Introduction
Welcome to the world of computer hardware, where every component plays a vital role in ensuring smooth and efficient operation. Among the essential components is RAM, or Random Access Memory, which plays a crucial role in the performance of a computer system. Understanding the RAM model of your computer is important for a variety of reasons, such as upgrading the memory or troubleshooting performance issues.
While the concept of RAM may seem complex to some, fear not! In this article, we will guide you through the process of identifying the RAM model on your computer. Whether you are a tech enthusiast wanting to expand your knowledge or someone looking to upgrade their RAM, this article will provide you with the necessary information and steps to achieve your goal.
Before we dive into the steps to identify the RAM model, let’s first understand what a RAM model is and why it’s important to know. The RAM model refers to the specific type and specifications of the RAM module installed on your computer. Each computer may have different RAM models, varying in terms of capacity, speed, and compatibility. Identifying the RAM model will allow you to determine the maximum capacity your computer supports, the type of RAM you can upgrade to, and ensure compatibility when purchasing new RAM modules.
Identifying the RAM model can also be beneficial when troubleshooting performance issues. By knowing the specific specifications of your RAM, you can determine if the installed memory meets the requirements of the software or applications you are using. This knowledge can help diagnose and solve potential performance bottlenecks caused by insufficient memory.
In the following sections, we will walk you through the steps to identify the RAM model on your computer. Whether you are using a desktop or a laptop, these steps will help you gain the insights you need. So, let’s get started!
Understanding RAM models
Before we begin the process of identifying the RAM model on your computer, let’s take a moment to understand the different RAM models and their significance. RAM, or Random Access Memory, is a type of computer memory that is used to store data that is actively being used by the computer’s processor. It allows for fast and efficient access to data, which is essential for smooth multitasking and overall system performance.
There are several factors that define a RAM model, including its capacity, speed, and form factor. Capacity refers to the amount of data that can be stored in the RAM module, typically measured in gigabytes (GB). The more RAM you have, the more data your computer can hold and access quickly. Speed, measured in megahertz (MHz) or gigahertz (GHz), determines how quickly the data can be transferred to and from the RAM. A higher speed means faster data access and improved overall system performance.
The form factor of a RAM module refers to its physical dimensions and how it is designed to fit into the computer’s motherboard. Common RAM form factors include DIMM (Dual In-line Memory Module) for desktop computers and SODIMM (Small Outline Dual In-line Memory Module) for laptops and smaller devices. It is important to identify the correct form factor to ensure compatibility when upgrading or replacing your RAM.
In addition to these specifications, RAM models also have specific compatibility requirements. For example, some motherboards only support specific types or generations of RAM. It is crucial to consult your computer’s documentation or manufacturer’s website to determine the supported RAM models before making any upgrades or replacements.
Understanding the different RAM models and their specifications is essential for making informed decisions when it comes to upgrading or troubleshooting your computer’s memory. It allows you to identify the maximum capacity your computer can support and the type of RAM that is compatible with your system. Moreover, knowing the RAM model helps in optimizing your computer’s performance, ensuring that the installed memory meets the requirements of your software and applications.
Now that we have a better understanding of RAM models, let’s move on to the steps involved in identifying the RAM model on your computer.
Steps to See the RAM Model
Now that you have a basic understanding of RAM models, let’s explore the step-by-step process to identify the RAM model on your computer. Follow these steps to gain valuable insights into your computer’s memory:
- Gather information: Before proceeding, gather information about your computer, such as the make and model. This information will be useful when accessing your computer’s documentation or manufacturer’s website for specific details about the RAM model.
- Check the computer’s specifications: Access your computer’s system information to check the installed RAM capacity. On Windows, you can do this by right-clicking on the “My Computer” or “This PC” icon, selecting “Properties,” and finding the RAM information. On macOS, click on the Apple menu, select “About This Mac,” and navigate to the “Memory” tab.
- Open the computer: In most cases, identifying the RAM model requires you to open your computer’s case. Before doing so, ensure that you have unplugged the power cord and grounded yourself to prevent any electrostatic discharge that could damage the components.
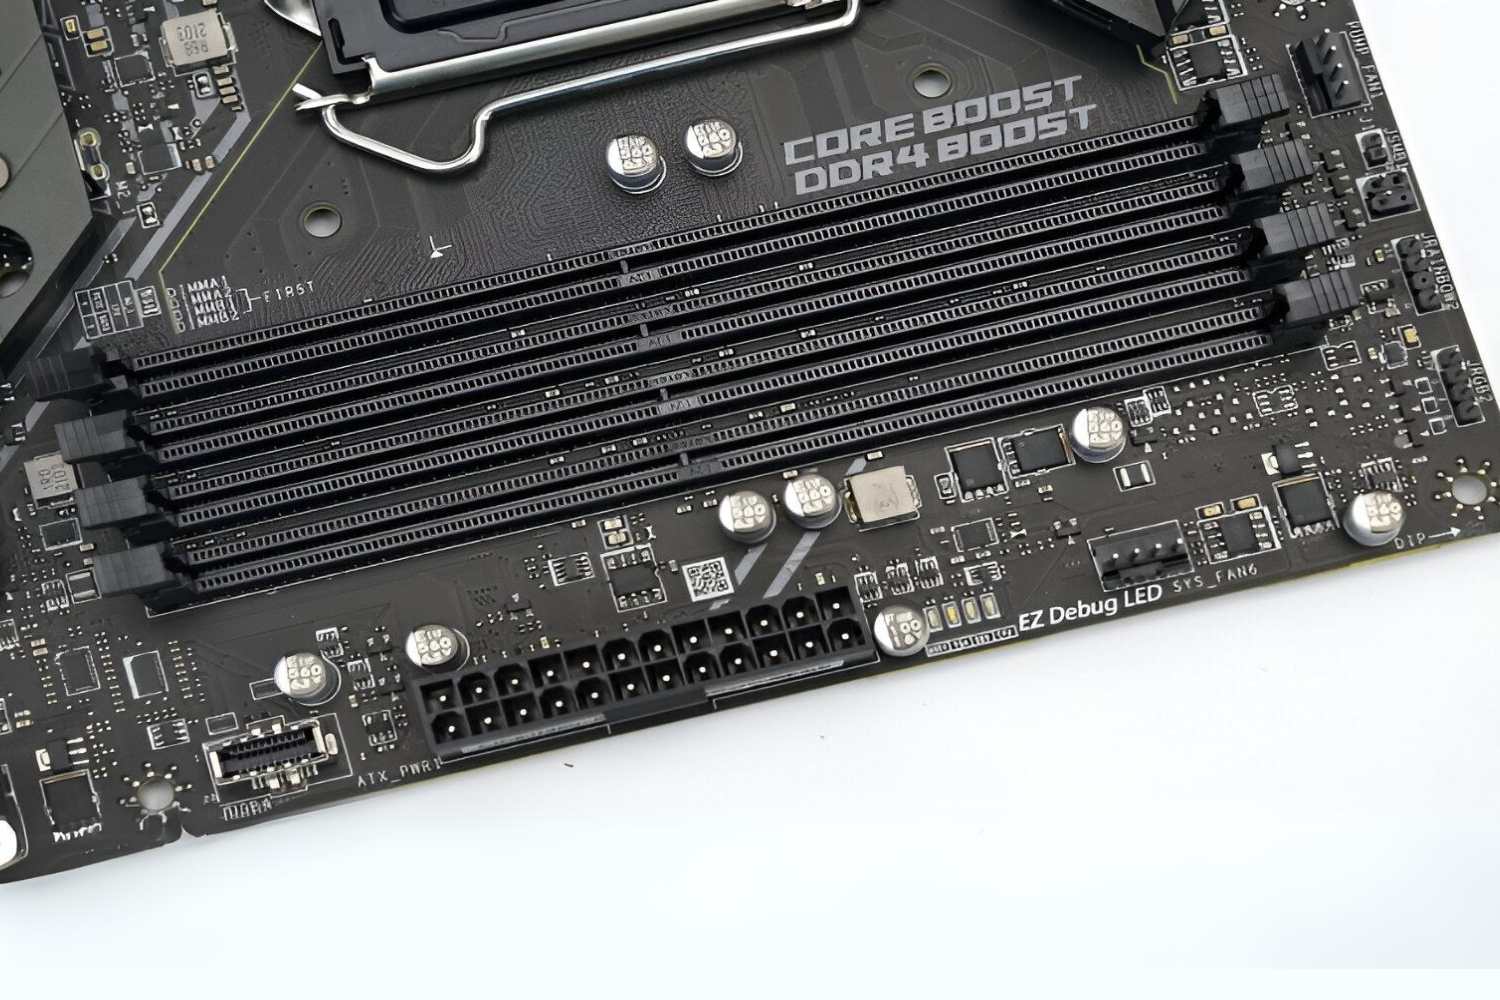
- Locate the RAM slots: Once the computer is open, locate the RAM slots on the motherboard. These slots are usually long and have locking mechanisms on each end to secure the RAM module.
- Remove the RAM module: Carefully unlatch the locking mechanisms on either side of the RAM module and gently pull it out of the slot. If there are multiple RAM modules installed, remove one at a time for inspection.
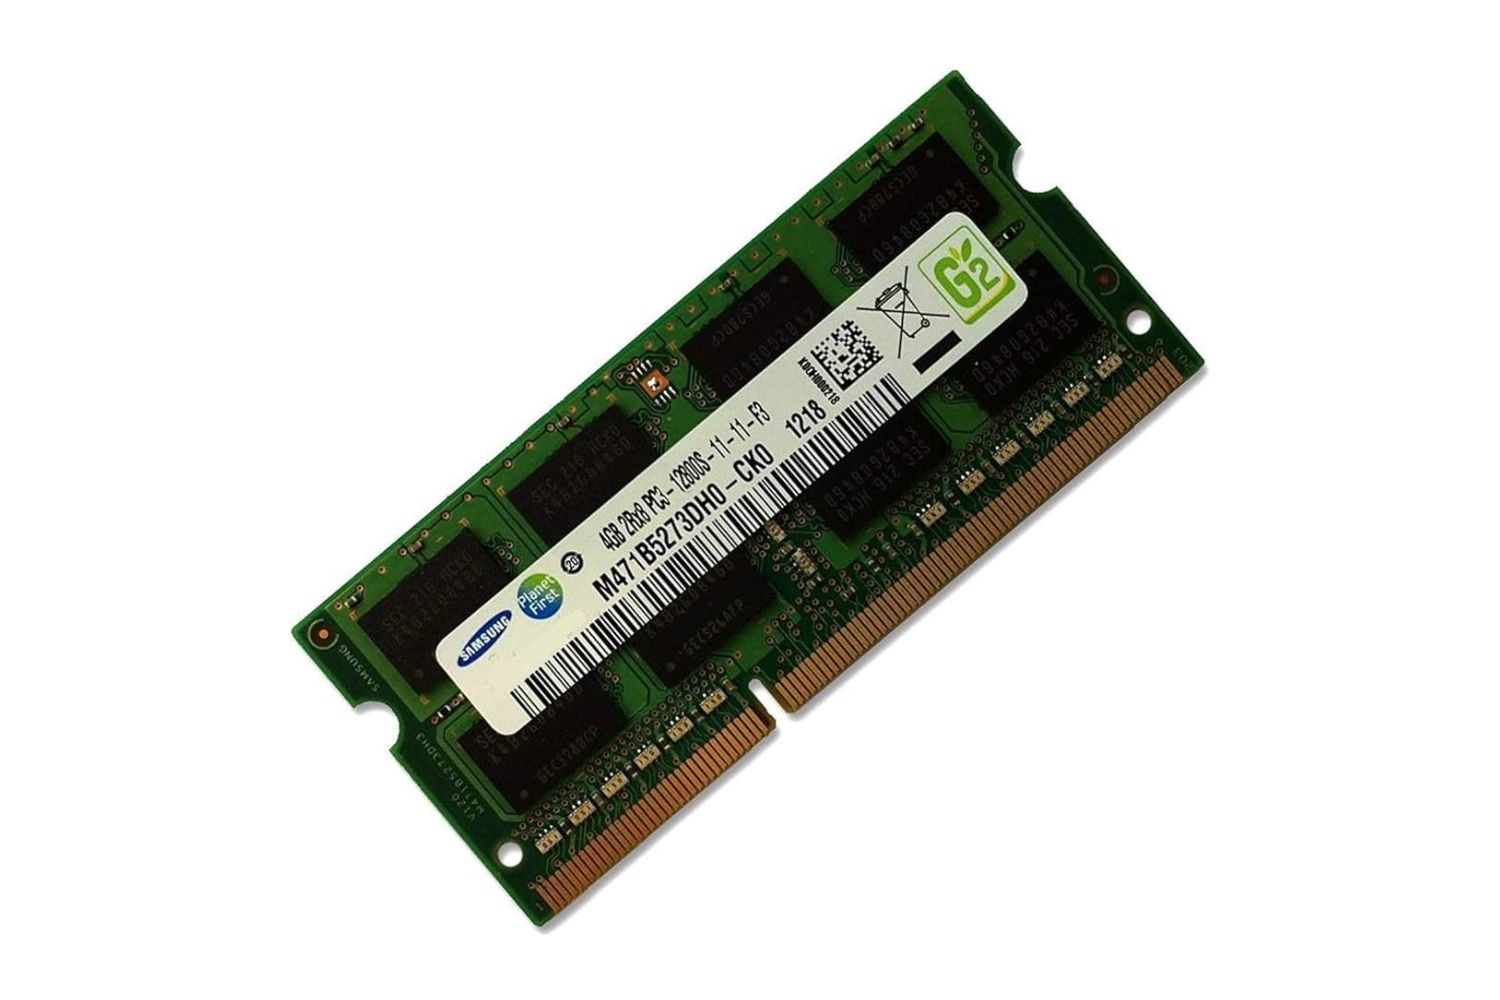
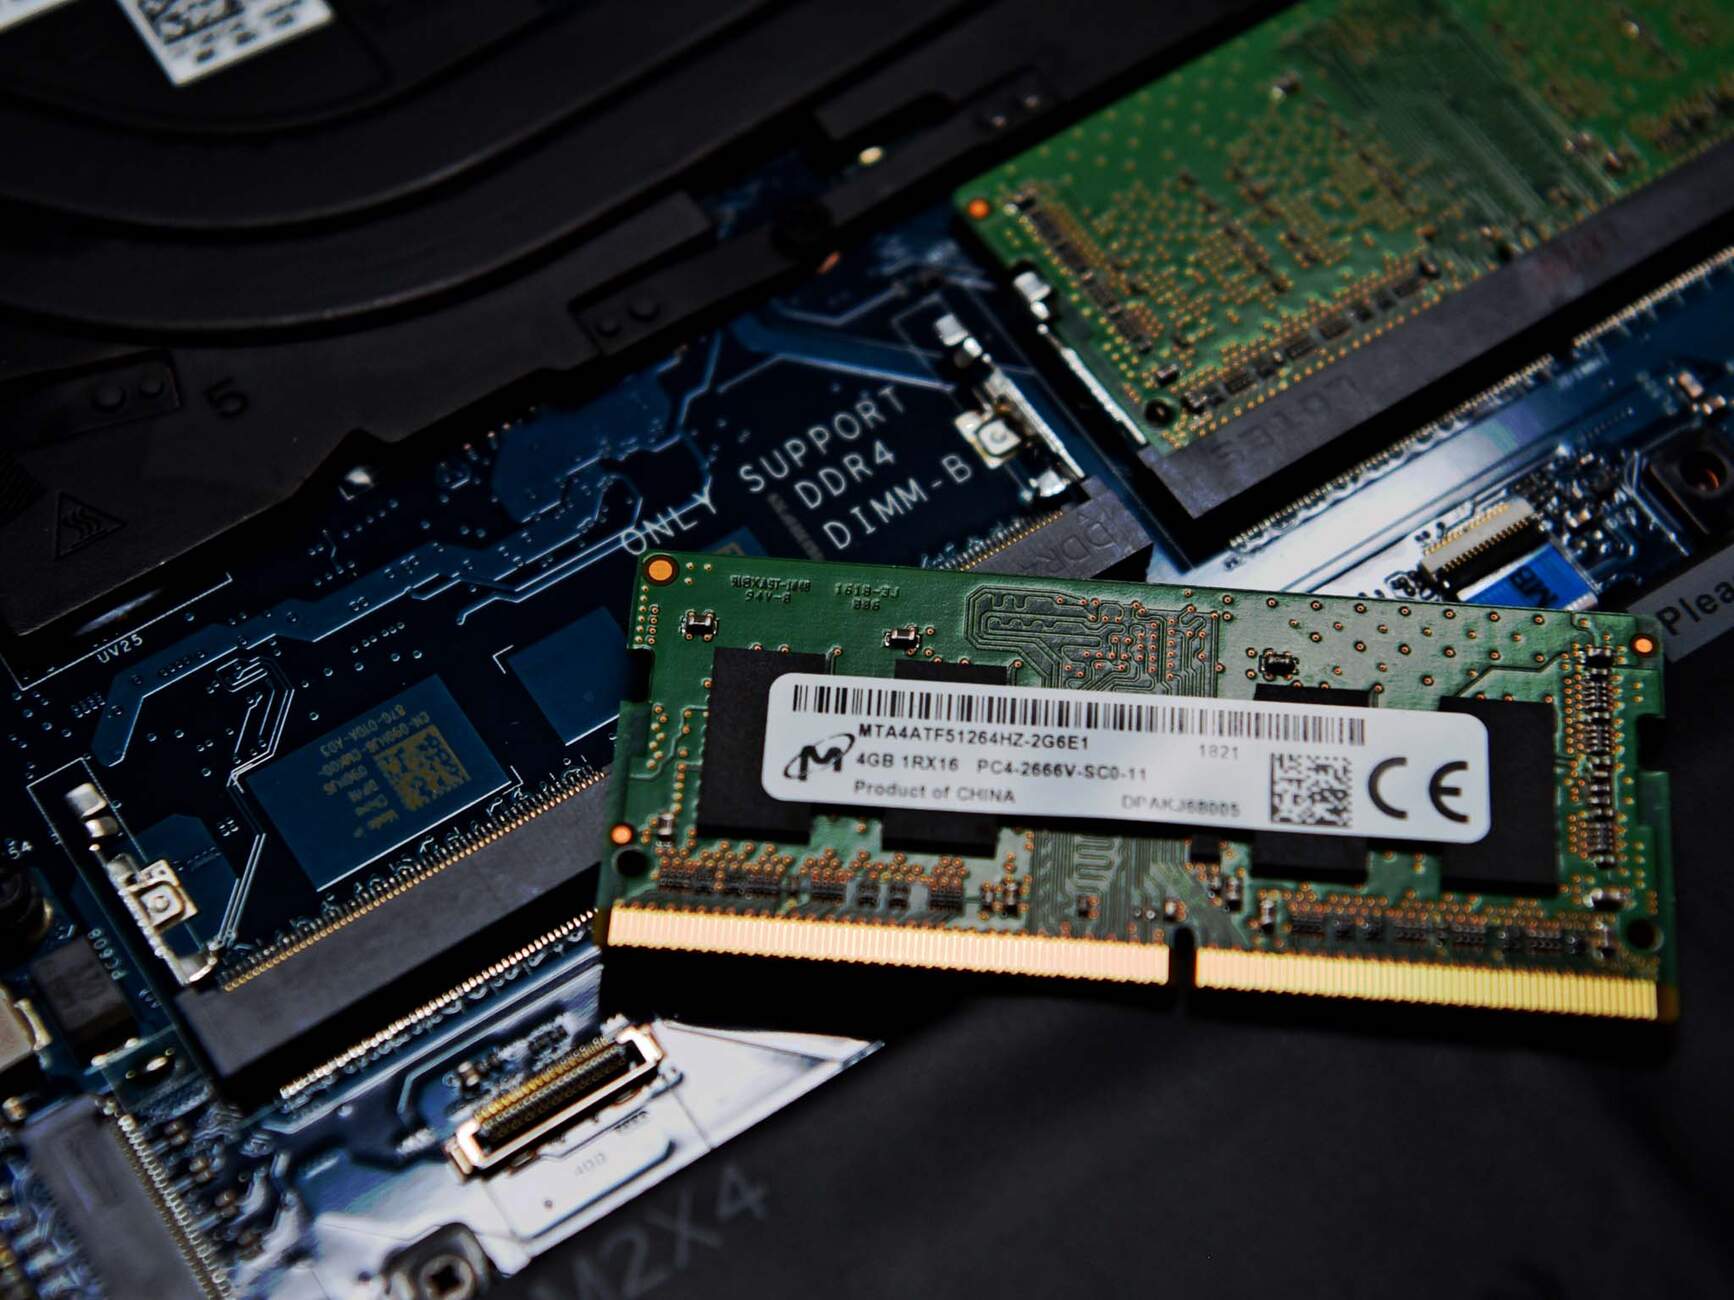
- Inspect the RAM module: Take a close look at the RAM module. Look for any identifying labels, stickers, or engravings on the module itself. These labels often display information regarding the RAM model, including the manufacturer, capacity, and speed.
- Identify the RAM model: Using the information obtained from the inspection, search the manufacturer’s website or consult the computer’s documentation to identify the RAM model. Cross-reference the details you found on the module to ensure accuracy.
Following these steps will enable you to identify the RAM model installed in your computer. It is important to note that some computer models may have more complex mechanisms or variations in the steps listed above. In such cases, referring to the computer’s documentation or contacting the manufacturer’s support can provide additional guidance.
Now that you have successfully identified the RAM model on your computer, you can move forward with confidence, whether it’s upgrading your RAM or troubleshooting performance issues related to memory capacity or compatibility.
Step 1: Gathering Information
Before you begin the process of identifying the RAM model on your computer, it’s essential to start by gathering some necessary information. This preparation will help guide you through the next steps more effectively and ensure accurate identification of the RAM model. Here’s what you need to do:
Research your computer: Take a moment to gather some information about your computer, such as the make and model. This information is typically found on a label or sticker on the computer case or the bottom of a laptop. It can also be obtained from the computer’s documentation or through the manufacturer’s website. The make and model details are important because different computer models may have varying RAM configurations and compatibility requirements.
Access the computer’s system information: Depending on your computer’s operating system, you can easily access the system information to gather details about the installed RAM. On Windows, right-click on the “My Computer” or “This PC” icon, select “Properties,” and you will find the RAM information under the “Installed memory” section. On a macOS, click on the Apple menu, select “About This Mac,” and navigate to the “Memory” tab to view details about your computer’s memory.
Note the current RAM capacity: While accessing the system information, make a note of the current RAM capacity. This information will give you an idea of the existing RAM module’s size and help you determine whether you need to upgrade or replace it in the future.
Take note of the operating system requirements: Different operating systems have specific RAM requirements for optimal performance. For example, the latest versions of Windows or macOS may recommend a minimum RAM size or suggest certain speed specifications. Knowing the operating system’s requirements will guide you in determining if any upgrades are needed to meet these recommendations and improve your computer’s performance.
Consult the computer’s documentation: If available, refer to the computer’s documentation, including the user manual or specifications guide. These documents often contain details about the computer’s hardware, including the RAM model and specifications. Check the manual’s table of contents or index to locate the section related to memory or RAM.
Gathering this information ensures that you have a comprehensive understanding of your computer’s make and model, current RAM capacity, operating system requirements, and any relevant details in the documentation. This information will be invaluable as you proceed with the steps to identify the RAM model on your computer.
Step 2: Checking the Computer’s Specifications
Once you have gathered the necessary information about your computer, the next step in identifying the RAM model is to check the computer’s specifications. This step helps you understand the current configuration and provides a starting point for identifying the RAM model. Here’s what you need to do:
Access the computer’s system information: Depending on your computer’s operating system, you can access the system information to view the installed RAM. On Windows, right-click on the “My Computer” or “This PC” icon and select “Properties.” In the System window that appears, you will find the RAM information under the “Installed memory (RAM)” section. On macOS, click on the Apple menu, select “About This Mac,” and navigate to the “Memory” tab to view the details about the installed RAM.
Note the RAM capacity: Take note of the current RAM capacity displayed in the system information. This information tells you the amount of memory currently installed in your computer. The RAM capacity is usually measured in gigabytes (GB). For example, if the system information shows “8.00 GB,” it means your computer currently has 8 gigabytes of RAM.
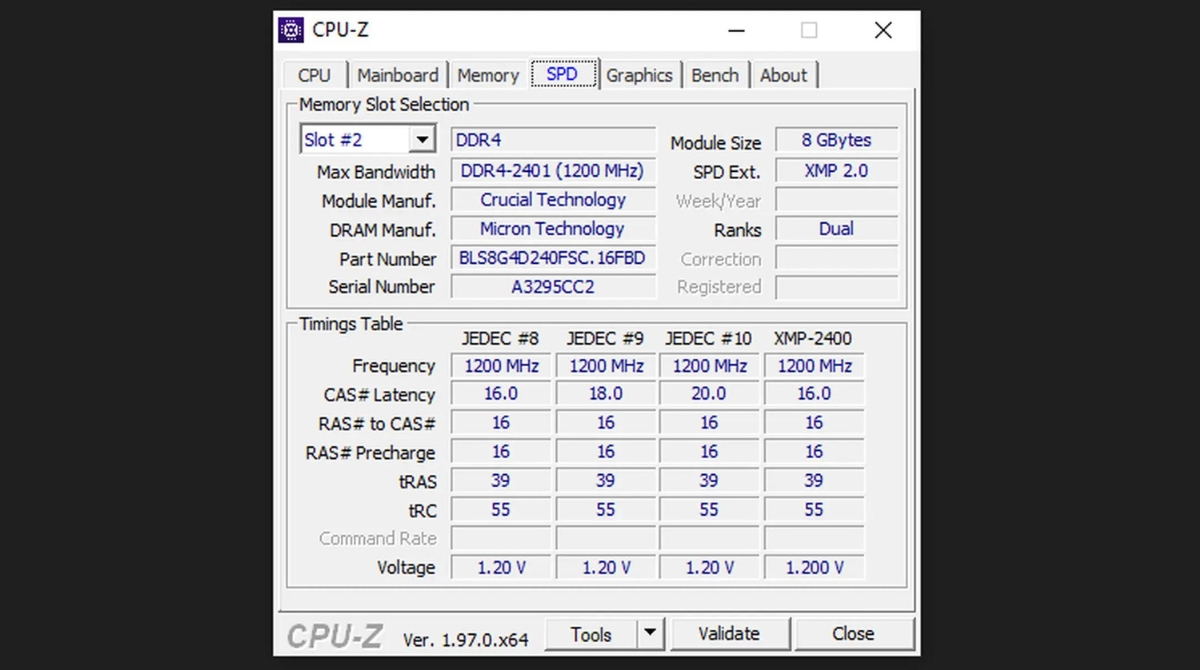
Check the memory type and speed: The system information may also provide details regarding the memory type and speed. Look for information such as “DDR3,” “DDR4,” or similar terms, which represent the type of memory installed in your computer. Additionally, the system information may display the memory speed, measured in megahertz (MHz) or gigahertz (GHz), indicating the rate at which data transfers to and from the RAM.
Make a note of the form factor: If possible, also make a note of the RAM’s form factor. Form factor refers to the physical dimensions and design of the RAM module. Common form factors include DIMM (Dual In-line Memory Module) for desktop computers and SODIMM (Small Outline Dual In-line Memory Module) for laptops and smaller devices. Knowing the form factor is important when selecting compatible RAM modules for upgrades or replacements.
By checking the computer’s specifications, you gain valuable insights into the currently installed RAM capacity, memory type and speed, and even the form factor. This information serves as a foundation for further exploring and identifying the specific RAM model of your computer as you proceed with the following steps.
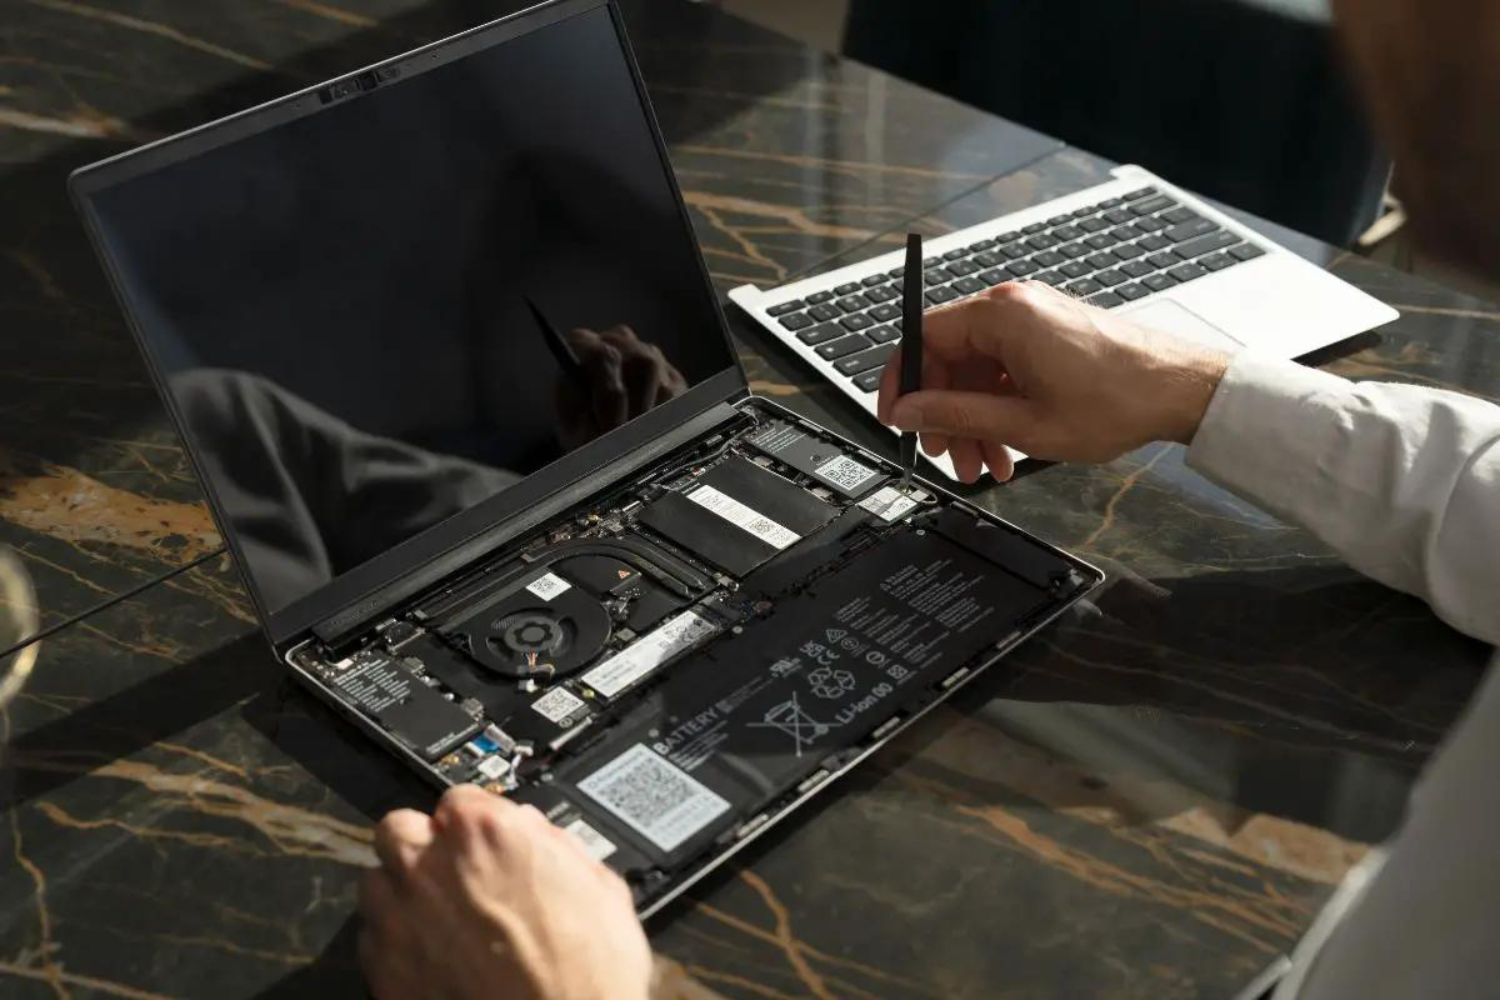
Step 3: Opening the Computer
Now that you have gathered the necessary information about your computer’s specifications, it’s time to move on to the next step: opening the computer. Opening the computer’s case or accessing the memory compartment allows you to physically inspect the RAM modules and gather more details about their model. Here are the steps to follow:
Precautions: Before opening the computer, ensure that you have taken necessary precautions to protect both yourself and the computer. First, shut down the computer and unplug it from the power source. This will prevent any potential electrical hazards. It is also recommended to wear an anti-static wrist strap to prevent static discharge that may damage sensitive components.
Desktop computers: Most desktop computers have a removable side panel that provides access to the internal components. Locate the screws or fasteners securing the side panel and use a screwdriver or your hands to remove them. Carefully slide or lift off the side panel to expose the internal components.
Laptops: Opening a laptop can be a bit more complex, as the components are tightly packed and require specific techniques. Refer to your laptop’s documentation or the manufacturer’s website for instructions on accessing the memory compartment. In some cases, you may need to remove a specific panel or keyboard to reach the RAM slots. Follow the outlined steps carefully to avoid damaging any components.
Note: It’s important to keep in mind that opening the computer may void the warranty or may not be recommended for certain users. If you are hesitant or unsure about opening the computer yourself, it is best to seek assistance from a professional technician.
By successfully opening the computer, you have gained physical access to the internal components, including the RAM modules. This allows you to proceed to the next step of locating the RAM slots and examining the modules to further identify the RAM model.
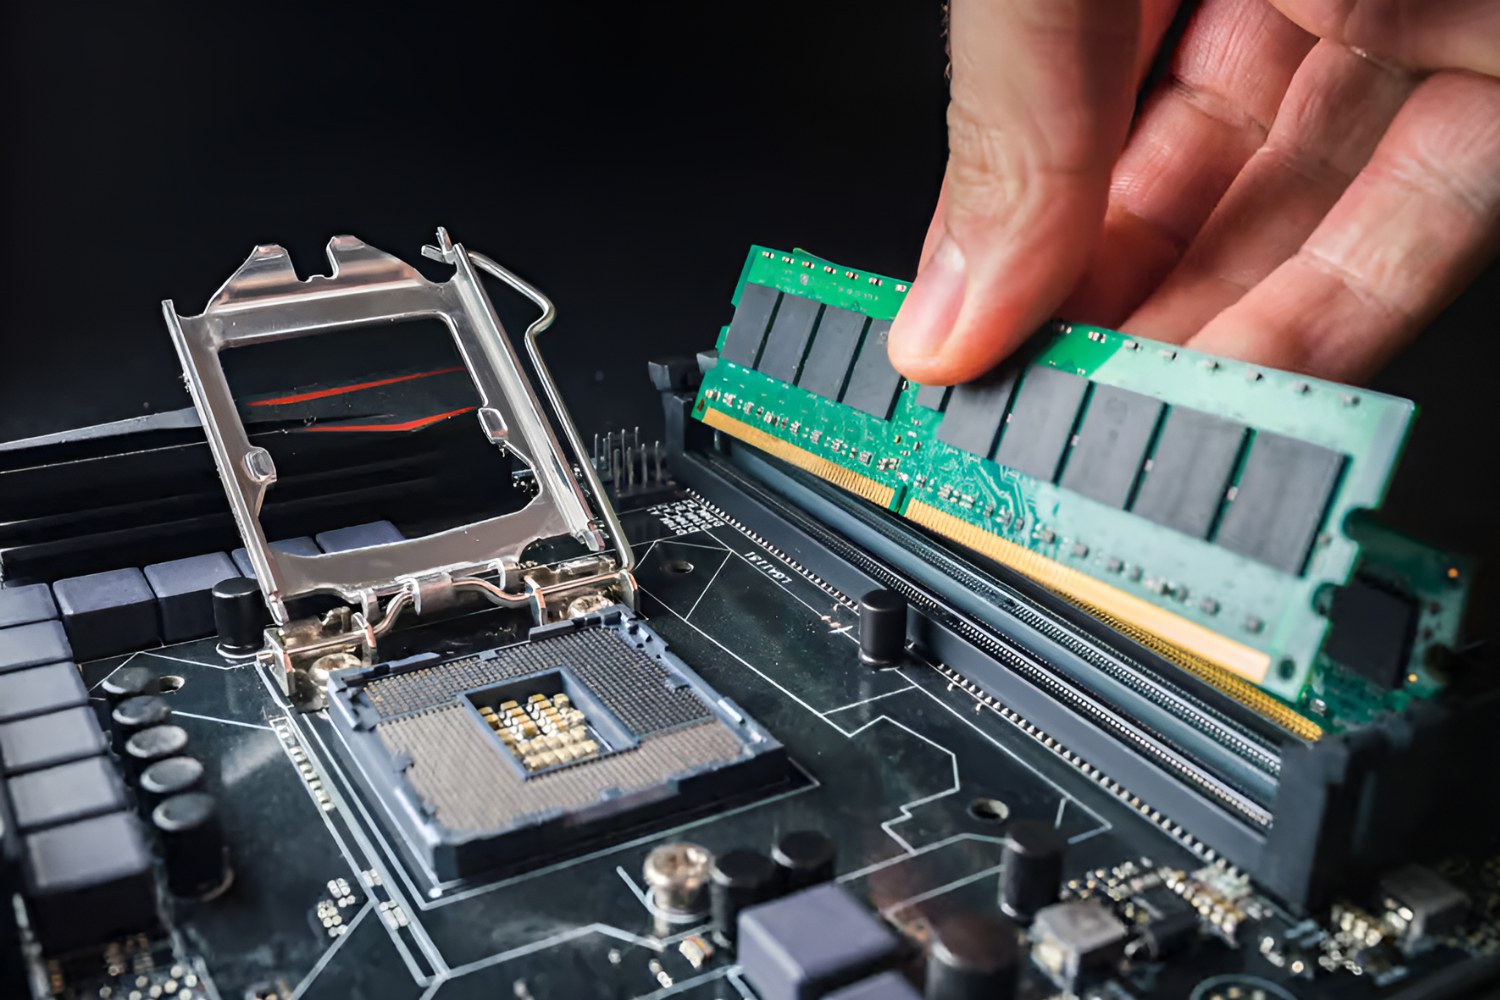
Step 4: Locating the RAM Slots
With the computer case open, it’s time to locate the RAM slots. The RAM slots are where the RAM modules are inserted into the computer’s motherboard. Identifying the RAM slots is crucial for accessing and inspecting the RAM modules. Here’s how to find the RAM slots:
Desktop computers: In a desktop computer, the RAM slots are typically located near the center or towards the side of the motherboard. Look for long, rectangular slots with plastic clips or levers on each end. These clips or levers are used to secure the RAM modules in place. The number of RAM slots can vary depending on the motherboard, but they are usually easily identifiable.
Laptops: In laptops, the RAM slots are generally located underneath a specific panel on the bottom of the laptop. This panel is designed to provide easy access to the RAM and other upgradeable components. Refer to your laptop’s documentation or the manufacturer’s website for specific instructions on locating the RAM slots.
Note: In some cases, the RAM slots may be hidden beneath other components or covered by additional shields or heat sinks. If you are having trouble locating the RAM slots, consult your computer’s documentation or seek assistance from the manufacturer’s support team.
Locating the RAM slots is an important step as it allows you to proceed to the next step of removing the RAM modules for further inspection. Once you have identified the RAM slots, you can continue to the next step with confidence.
Step 5: Removing the RAM Module
Now that you have located the RAM slots on your computer, it’s time to proceed with removing the RAM module for inspection. Removing the RAM module will allow you to get a closer look at it and gather specific details about its model. Here’s how to remove the RAM module:
Desktop computers: In a desktop computer, removing the RAM module is relatively straightforward. Start by identifying the clips or levers on each end of the RAM slot. Gently push these clips away from the RAM module to release it. The module will pop up slightly, allowing you to grab the edges and pull it out of the slot. Avoid applying excessive force or pulling at an angle to prevent any damage to the module or the slot.
Laptops: Removing the RAM module in a laptop may vary depending on the specific model. In most cases, you will need to locate and release the clips or levers that hold the module in place. Carefully push these clips away from the RAM module, allowing it to pop up. Then, you can pull the module out of its slot at a slight angle. Again, exercise caution to prevent any unintentional damage.
Note: It’s important to handle the RAM module with care. Avoid touching the gold contacts on the bottom of the module, as contact with oils or contaminants on your fingers can affect its performance. Hold the module by the edges instead.
By removing the RAM module, you have gained physical access to it, allowing for closer inspection and identification of its model. Make sure to handle the module carefully and avoid any unnecessary force or damage.
Step 6: Inspecting the RAM Module
With the RAM module safely removed from its slot, you can now proceed with inspecting it closely. This step involves examining the module for any identifying labels, stickers, or engravings that provide details about its model. Here’s how to inspect the RAM module:
Visual inspection: Take a close look at the RAM module for any visible labels or engravings. Manufacturers often place stickers on the module that display crucial information such as the brand, model number, capacity, and speed. These stickers are typically located on one side of the module but may vary depending on the manufacturer.
Note the details: Once you have located the labels or engravings, make a note of the important details. These details may include the manufacturer’s brand name, model number, capacity (such as in gigabytes), speed (in megahertz or gigahertz), and any additional specifications specific to the module.
Take photographs (optional): If you want to ensure accuracy or retain a record of the RAM module details, consider taking photographs of the module. This can be particularly helpful if you need to consult with experts or refer back to the information at a later time. Just be sure to capture clear images that clearly show the labels or engravings.
Searching for information: Once you have gathered the details from the RAM module, you can search for additional information. Use the manufacturer’s brand name, model number, and other specifications to search online or consult the manufacturer’s website for further details about the RAM module. This will help ensure accuracy and provide a comprehensive understanding of the module’s specifications.
Inspecting the RAM module is a crucial step in identifying its specific model. By examining the labels, engravings, and stickers on the module, you can gather valuable information about its brand, model number, capacity, and speed. This information will aid in ensuring compatibility when upgrading or replacing the RAM and assist in troubleshooting any performance issues related to memory.
Step 7: Identifying the RAM Model
After inspecting the RAM module and gathering all the necessary information, it’s time to move on to the final step: identifying the RAM model. This step involves using the details obtained from the module to determine its specific model. Here’s how to identify the RAM model:
Reference the manufacturer’s website: Start by visiting the manufacturer’s website of the RAM module. Most manufacturers provide comprehensive information about their products, including specifications and model details. Look for a search or support section on their website where you can input the brand name, model number, or other identifying details obtained from the RAM module. This will help you find detailed information about the specific RAM model.
Consult online databases: There are various online databases and forums dedicated to computer hardware, including RAM modules. These resources can be helpful in identifying the RAM model based on the information gathered from the module. You can search for the brand name, model number, or other details to find relevant discussions or entries that provide further insights into the RAM module.
Seek professional assistance: If you are still having trouble identifying the RAM model, it may be beneficial to seek professional assistance. Contacting the manufacturer’s support team or consulting with computer technicians who specialize in hardware can provide valuable guidance in identifying the specific model of the RAM module.
By using the information obtained from inspecting the RAM module, such as the brand name, model number, and other specifications, you can navigate the manufacturer’s website, online databases, or seek professional assistance to successfully identify the RAM model.
Identifying the RAM model is essential for various purposes, such as upgrading the RAM or troubleshooting performance issues. With the RAM model identified, you can confidently proceed with upgrading or replacing the RAM module, ensuring compatibility and maximizing your computer’s performance.
Closing Thoughts
Identifying the RAM model on your computer is an important task that can help you make informed decisions regarding memory upgrades, troubleshooting performance issues, and ensuring compatibility with your system. By following the steps outlined in this guide, you can successfully find the specific details about your RAM model.
Remember, gathering information about your computer, checking its specifications, opening the computer (if necessary), locating the RAM slots, removing the RAM module, inspecting it closely, and identifying the model are the key steps in this process. Each step plays a crucial role in providing you with the necessary information to make informed decisions about your computer’s memory.
As you progress through the steps, it is essential to exercise caution, especially when opening the computer or handling the RAM module. Take necessary precautions to avoid potential damage or static discharge that may harm the components.
Once you have successfully identified the RAM model, you can take advantage of this knowledge in various ways. If you are looking to upgrade your RAM, knowing the maximum capacity and compatible RAM models will ensure a smooth and successful upgrade. Troubleshooting performance issues related to memory will also become more efficient as you can determine if your current RAM meets the requirements of the software or applications you use.
Keep in mind that every computer and RAM configuration may vary, so it is important to consult your computer’s documentation or manufacturer’s website for specific details and compatibility information. Additionally, seeking professional assistance is always an option if you encounter any difficulties or are unsure about performing the steps independently.
By understanding and identifying the RAM model on your computer, you are empowered to make informed choices that optimize your computer’s performance and enhance your overall computing experience.