Introduction
In today’s digital era, we rely heavily on our Android devices for various tasks, such as browsing the internet, streaming videos, playing games, and staying connected with our friends and family. Over time, as we install more apps and accumulate data, our device’s performance may start to slow down. One of the common causes of sluggishness is the accumulation of temporary files and processes in the device’s random access memory (RAM).
RAM is a vital component of our Android devices as it allows for smooth and efficient multitasking. However, when RAM gets filled up with unnecessary processes and data, it can lead to a decrease in performance, causing apps to load slowly, and even result in lag or freezing.
Clearing RAM on your Android device is a simple yet effective way to optimize its performance and regain fast and smooth operation. By freeing up RAM, you can experience improved app loading times, smoother multitasking, and better overall device responsiveness.
In this article, we will explore different methods to clear RAM on your Android device. Whether you’re using a recent flagship smartphone or an older model, these techniques are applicable across various Android versions and devices. So, let’s dive in and learn how to reclaim your device’s RAM and optimize its performance!
Why do you need to clear RAM on your Android device?
Your Android device’s RAM plays a crucial role in its performance. RAM is a type of volatile memory that stores temporary data for running processes and apps. As you use your device, RAM gradually fills up with these temporary files, background processes, and cached data. Inevitably, this can lead to a decline in performance over time. Here are a few key reasons why clearing RAM on your Android device is essential:
- Improved multitasking: When RAM is full, it becomes challenging for your device to handle multiple tasks simultaneously. Clearing RAM reduces the load on the memory and enables your device to handle multitasking more efficiently. This means you can switch between apps seamlessly, without experiencing lag or delays.
- Faster app loading times: When you open an app, it needs to be loaded into RAM for smooth operation. If the RAM is cluttered with unnecessary processes, it takes longer for apps to load and run. By clearing RAM, you free up space for the app to load quickly, resulting in faster app launch times.
- Reduced lag and freezing: Insufficient RAM can cause your device to lag, freeze, or become unresponsive. This is especially noticeable when using resource-intensive apps or playing graphics-intensive games. Clearing RAM helps streamline the memory usage, reducing the likelihood of lag or freezing issues.
- Better overall device performance: When your Android device’s RAM is cleared, it operates more efficiently, providing a smoother user experience. It also prevents unnecessary battery drain, as the device doesn’t have to work as hard to manage overloaded memory. This can result in improved battery life and overall device performance.
By periodically clearing RAM on your Android device, you can optimize its performance, enhance multitasking capabilities, and enjoy faster app loading times. It’s an effective way to ensure that your device operates at its best, helping you make the most out of your Android experience.
How to clear RAM on Android
Clearing RAM on your Android device is a straightforward process that can be done using various methods. You don’t need any technical expertise, and it only takes a few simple steps. Here are three common methods to clear RAM on Android:
- Method 1: Using the Recent Apps button
- Tap the square or Recent Apps button at the bottom of your screen (varies depending on the device).
- Swipe left or right to navigate through the recent apps until you find the “Clear All” button.
- Tap on “Clear All” to close all the background apps and free up RAM.
- Method 2: Using the Settings menu
- Open the Settings app on your Android device.
- Scroll down and tap on “Apps” or “Applications” (the name may vary depending on your Android version).
- Select “Running” or “Running services” to see a list of currently running apps and processes.
- Tap on the app you want to close or tap “Stop” or “Force Stop” to end the unnecessary processes and free up RAM.
- Method 3: Using a third-party app
On most Android devices, you can quickly clear RAM by using the Recent Apps button. Here’s how:
If your device doesn’t have the Clear All button in the Recent Apps menu, you can still clear RAM through the Settings menu. Follow these steps:
If you prefer a more automated approach, you can use a third-party app to clear RAM on your Android device. Numerous apps are available on the Google Play Store that can help you optimize your device’s performance and clear RAM with just a few taps. Some popular options include Clean Master, CCleaner, and SD Maid.
Remember to use only reputable apps from trusted developers and read user reviews before installing any third-party app on your device.
Using any of these methods allows you to clear RAM on your Android device, freeing up memory and enhancing its performance. Experiment with different methods to find the one that works best for you, and consider making it a regular habit to keep your device running smoothly.
Method 1: Using the Recent Apps button
One of the easiest and quickest ways to clear RAM on your Android device is by utilizing the Recent Apps button. This method is commonly available on most Android devices and can be done with just a few simple steps:
- Tap the square or Recent Apps button at the bottom of your screen (the exact appearance may vary depending on your device).
- Swipe left or right to navigate through the recent apps until you find the “Clear All” button.
- Tap on “Clear All” to close all the background apps and free up RAM.
By following these steps, you are effectively clearing the RAM on your device, as all the recent apps and their associated processes will be closed. This helps remove any unnecessary memory usage and enables your device to utilize its resources more efficiently.
It’s important to note that by clearing the RAM using the Recent Apps button, you are force closing the background apps. This means that any unsaved data or progress in those apps will be lost. However, most apps are designed to save your progress, so you usually won’t lose any significant data or information.
Using the Recent Apps button to clear RAM is a convenient method, as it allows you to directly close all the running background apps in one go. It’s especially useful when you have numerous apps open and want to quickly free up RAM without individually closing each app.
Make it a habit to periodically clear RAM using the Recent Apps button, especially if you notice any lag or sluggishness in your device’s performance. It’s a simple yet effective way to optimize your Android device and ensure it runs smoothly and efficiently.
Method 2: Using the Settings menu
If your Android device doesn’t have a dedicated “Clear All” button in the Recent Apps menu, you can still clear RAM by utilizing the Settings menu. This method allows you to individually close specific apps or processes that are running in the background, helping to free up valuable RAM resources. Follow these simple steps to clear RAM using the Settings menu:
- Open the Settings app on your Android device. You can usually find it in your app drawer or by swiping down from the top of the screen and tapping on the gear icon.
- Scroll down and tap on “Apps” or “Applications” (the name may vary depending on your Android version).
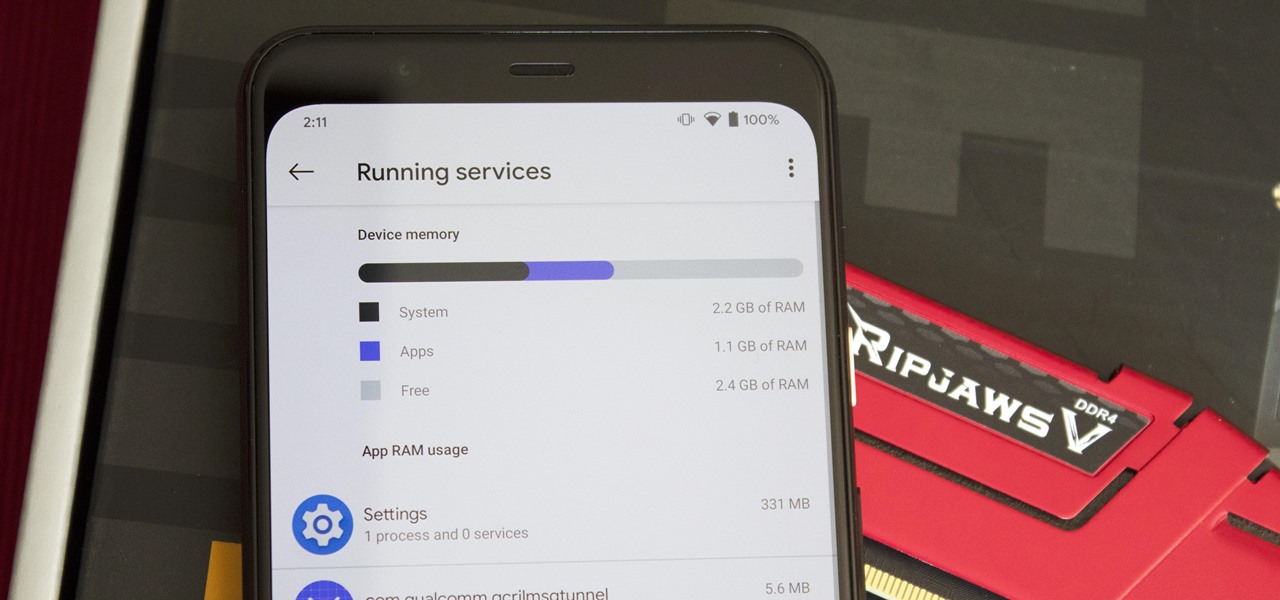
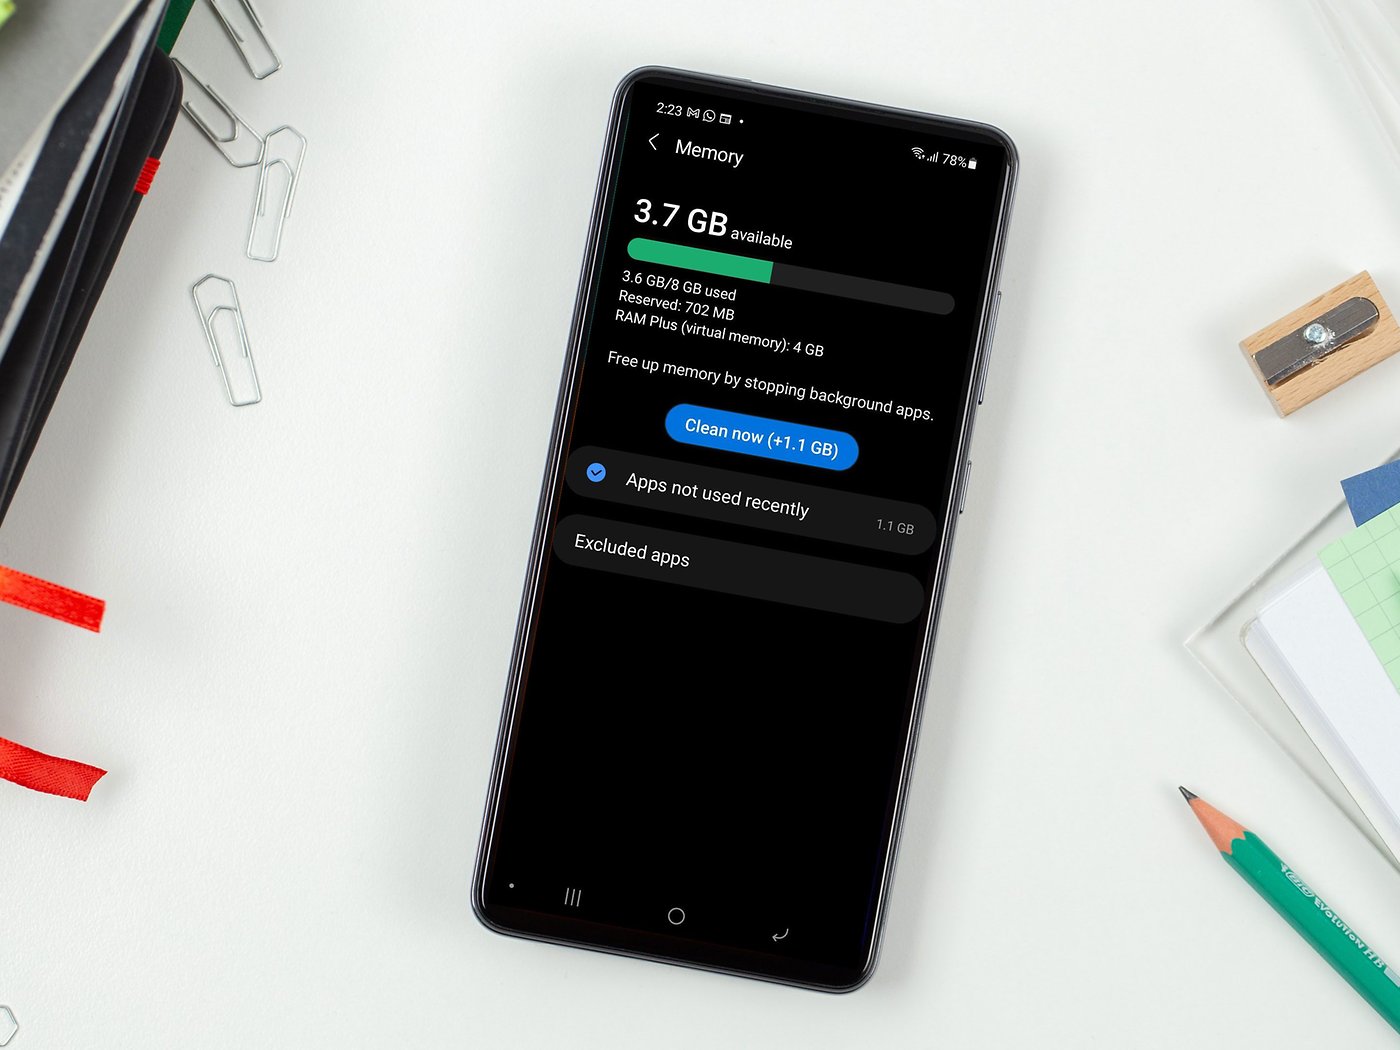
- Select “Running” or “Running services” from the list of options. This will display a list of all the currently running apps and processes on your device.
- Tap on the app you want to close or select “Stop” or “Force Stop” to end the unnecessary processes and free up RAM. You can also view the RAM usage of each app to identify the ones consuming a significant amount of memory.
- Repeat this process for any other apps or processes that you want to close or force stop.
By manually closing selected apps or processes through the Settings menu, you have more control over which specific components are using up your device’s RAM. This method is particularly useful when you want to target specific apps or troubleshoot any performance issues related to them.
It’s worth noting that force stopping certain system apps or critical processes can have unintended consequences, such as affecting the functionality or stability of your device. As a precaution, exercise caution when force stopping apps and only target non-essential processes.
Clearing RAM using the Settings menu gives you more flexibility and allows for a more customized approach in managing your device’s memory usage. By taking a proactive role in closing unnecessary apps and processes, you can optimize your Android device’s performance and ensure efficient use of its RAM resources.
Method 3: Using a third-party app
If you prefer a more automated and comprehensive approach to clearing RAM on your Android device, you can utilize various third-party apps available on the Google Play Store. These apps are specifically designed to optimize device performance by managing RAM usage and freeing up memory. Here’s how you can clear RAM using a third-party app:
- Open the Google Play Store on your Android device and search for a RAM cleaning or optimization app. Popular options include Clean Master, CCleaner, and SD Maid.
- Select an app that has positive reviews and a high rating. Consider reading user feedback to get a better understanding of its effectiveness and reliability.
- Install the chosen app and launch it on your device.
- Within the app, locate the RAM cleaning or optimization feature. It is often prominently displayed on the main screen or accessible through a dedicated tab or menu.
- Tap on the “Clean” or “Optimize” button to initiate the RAM cleaning process.
Third-party RAM cleaning apps are designed to automate the process of clearing RAM on your Android device. They typically perform a deep scan of the device, identifying and closing any unnecessary background apps or processes that consume RAM. Some apps also offer additional features like junk file cleaning, battery optimization, and device boosting, providing an all-in-one solution to enhance overall device performance.
While third-party apps can be convenient and effective for clearing RAM, it’s important to choose a reputable app from a trusted developer. Stick with well-known apps that have a large user base and positive reviews. Be cautious of apps that make unrealistic claims or request excessive permissions, as they may not provide the desired results or compromise your device’s security.
Using a third-party app to clear RAM offers a user-friendly and automated solution for optimizing your Android device’s performance. It can be particularly beneficial for users who prefer a streamlined and hassle-free approach in managing their device’s memory usage.
Additional tips to optimize your device’s performance
Clearing RAM is just one aspect of optimizing your Android device’s performance. Here are some additional tips to further enhance its speed and efficiency:
- Remove unused apps: Uninstalling apps that you no longer use not only frees up storage space but also reduces the load on your device’s RAM. Go through your app list and remove any apps that you haven’t used in a while.
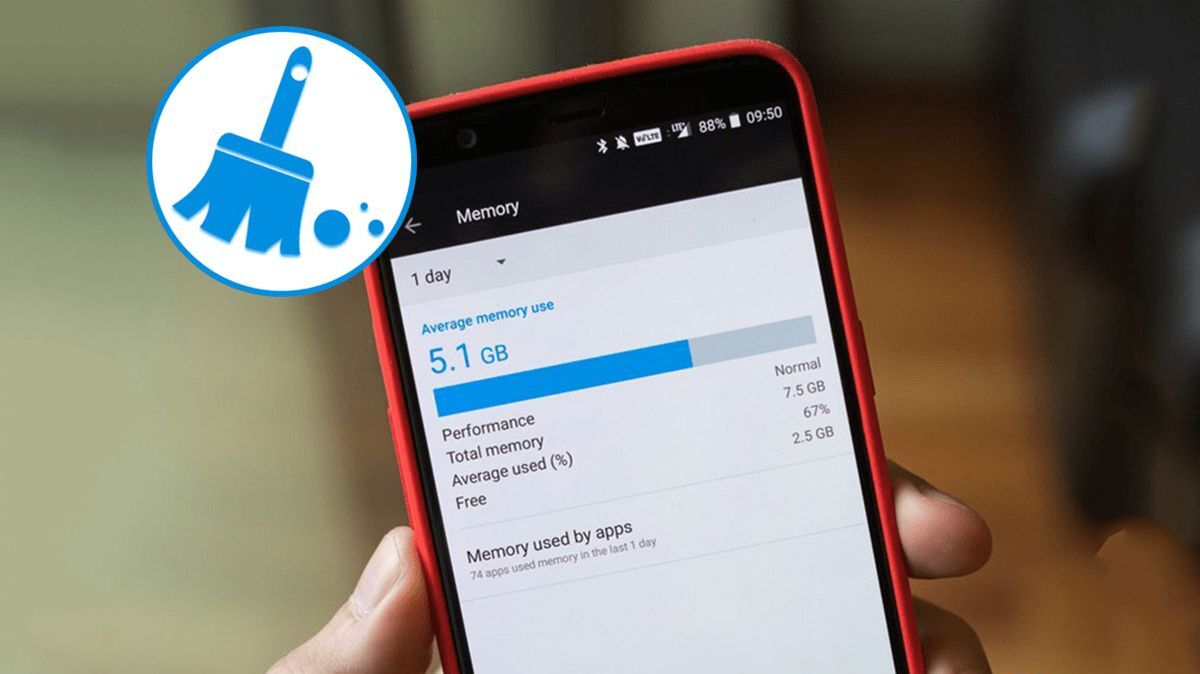
- Clear app cache: App cache files can accumulate over time and take up valuable space in your device’s storage. Clearing app caches can help improve performance and free up storage space. You can do this by going to the Settings menu, selecting “Apps” or “Applications,” and choosing the app you want to clear the cache for.
- Limit background app refresh: Some apps continuously refresh and update in the background, consuming both battery and RAM resources. Go to the Settings menu, find “Battery” or “Battery usage,” and customize the app settings to limit background refresh for non-essential apps.
- Disable or uninstall bloatware: Bloatware refers to pre-installed apps that come with your device but are not essential. These apps can consume RAM and storage space unnecessarily. Disable or uninstall bloatware apps through the Settings menu or by using a third-party app manager.
- Restart your device regularly: Restarting your device helps clear the RAM and close any lingering background processes. It can help refresh your device’s performance and resolve any temporary performance issues.
- Keep your device up to date: Regularly updating your device’s operating system and apps ensures you have the latest bug fixes and performance improvements. These updates often optimize resource usage, resulting in better overall device performance.
- Avoid using live wallpapers and widgets: Live wallpapers and widgets may enhance the visual appeal of your device but can also consume additional system resources like RAM and CPU cycles. Consider using static wallpapers and limit the number of active widgets to improve performance.
- Manage your storage: Keep your device’s storage organized by regularly deleting unnecessary files, such as old photos, videos, or documents. You can use built-in file managers or third-party storage cleaning apps to help you identify and remove clutter.
- Limit animations and transitions: Reducing or disabling animations and transitions in the device settings can make the user interface feel more responsive. This can help speed up your device’s performance and reduce RAM usage.
By following these additional tips, you can further optimize your Android device’s performance, improve its speed, and ensure a smooth user experience. Experiment with different techniques and find the combination that works best for your needs and preferences.
Conclusion
Optimizing the performance of your Android device is essential for ensuring smooth multitasking, fast app loading times, and an overall enjoyable user experience. Clearing RAM is a simple yet effective way to free up memory, reduce lag, and enhance your device’s speed and responsiveness.
In this article, we explored three methods to clear RAM on your Android device. You can use the Recent Apps button to quickly close all background apps, navigate to the Settings menu to individually stop unnecessary processes, or rely on third-party apps for automated RAM cleaning and optimization.
Additionally, we provided some extra tips to further optimize your device’s performance, such as uninstalling unused apps, clearing app caches, limiting background app refresh, and managing your storage effectively. These recommendations, when combined with regular device updates, restarts, and careful management of system resources, can ensure that your Android device runs at its best.
Remember to exercise caution when force closing apps or using third-party optimization apps. It’s always a good idea to research and choose reputable apps from trusted developers to maintain the security and stability of your device.
By implementing these strategies and making them a part of your device maintenance routine, you can enjoy the full potential of your Android device. Enjoy smoother performance, faster app response times, and a more efficient user experience!