Introduction
Welcome to the ever-evolving world of technology, where smartphones have become an integral part of our daily lives. With the vast array of applications and features available on our Android phones, it’s no wonder that we often find ourselves in need of more RAM (Random Access Memory). RAM plays a crucial role in ensuring smooth multitasking and optimal performance on our devices. However, as we install numerous apps and run resource-intensive tasks, our smartphone’s RAM can become overwhelmed, resulting in sluggishness and reduced responsiveness.
So, what can one do when faced with the need for more RAM on an Android phone? This article aims to explore various methods and techniques that can help increase the RAM on your Android device. Whether you’re experiencing lag while gaming, struggling with multiple app crashes, or just want to optimize your phone’s performance, we’ve got you covered.
Before we dive into the different approaches to increasing RAM, it’s important to note that while these methods can help optimize RAM usage, they may not actually expand the physical RAM capacity of your device. Instead, they focus on freeing up existing RAM and improving its efficiency. With that in mind, let’s explore the possibilities!
Why would you want to increase RAM on your Android phone?
As technology continues to advance, the applications and tasks we perform on our smartphones are becoming increasingly resource-intensive. This puts a strain on the available RAM, leading to slower performance, app crashes, and overall frustration. Here are a few reasons why you might want to consider increasing the RAM on your Android phone:
1. Improved multitasking:
With more RAM, your phone can handle multiple tasks simultaneously without compromising performance. Whether you’re switching between apps, running a heavy productivity suite, or multitasking during gaming sessions, increased RAM ensures smoother transitions and reduces the chances of lag or app freezing.
2. Enhanced gaming experience:
Mobile gaming has surged in popularity, and many games now demand substantial RAM to run smoothly. By increasing your Android phone’s RAM, you can enjoy a seamless and immersive gaming experience without the annoyance of frame drops, lag, or app crashes.
3. Faster app loading times:
Have you ever experienced the frustration of waiting for apps to load? Insufficient RAM can significantly impact app loading times, resulting in delays and lost productivity. With more RAM, you’ll enjoy faster and more efficient loading times, allowing you to access your favorite apps with ease.
4. Optimal performance for resource-intensive applications:
Applications like video editing tools, graphic design software, and augmented reality apps require substantial resources to run smoothly. Insufficient RAM can lead to sluggish performance and hinder your productivity. By increasing RAM, you can ensure that these resource-intensive applications run seamlessly, allowing you to unleash your creativity without any limitations.
5. Future-proofing your device:
As technology advances, the system requirements for new apps and updates continue to rise. By increasing your Android phone’s RAM, you can future-proof your device and ensure it remains capable of handling the latest features and demanding applications. This can extend the lifespan of your device, saving you from the need to upgrade to a new phone prematurely.
These are just a few of the reasons why you might want to consider increasing the RAM on your Android phone. By doing so, you can optimize your device’s performance, enhance your user experience, and stay ahead of the ever-increasing demands of modern smartphone technology.
Is it possible to increase RAM on an Android phone?
When it comes to increasing the RAM on an Android phone, there is a common misconception that you can physically add more memory to your device. However, the truth is that upgrading the physical RAM on an Android phone is not possible for the average user. The amount of RAM in a smartphone is determined by the manufacturer and is fixed at the time of production.
RAM is a hardware component that is integrated into the phone’s motherboard and is tightly associated with the device’s processor. Therefore, increasing the RAM would require replacing or modifying the internal hardware, which is not a feasible option for most users. It typically requires specialized knowledge, equipment, and is often exclusive to certain phone models or brands.
While physically increasing RAM may not be possible, there are still ways to optimize and manage your Android phone’s existing RAM to improve performance. These methods focus on maximizing the usage and efficiency of the available RAM, allowing you to get the most out of your device without actually expanding the physical memory capacity.
It’s worth noting that some high-end flagship Android phones offer variants with different RAM capacities. If you’re in the market for a new phone and require more RAM, you can consider purchasing a model with higher RAM specifications. However, once you’ve purchased a device, it is not possible to upgrade the RAM beyond what is specified by the manufacturer.
Now that we’ve established that physical RAM upgrades are not possible, let’s explore the various methods and techniques you can use to optimize and manage your Android phone’s existing RAM. By implementing these approaches, you can ensure that your device runs smoothly, even with resource-intensive tasks and demanding applications.
Ways to increase RAM on your Android phone
While physically increasing the RAM on your Android phone may not be possible, there are several effective methods and techniques you can employ to optimize and manage the existing RAM. Let’s explore these different approaches:
1. Clearing out background apps:
One of the simplest ways to free up RAM is by closing background apps that are running unnecessarily. These apps consume valuable memory resources even when they’re not actively being used. You can either manually close them through the app switcher or use the “Clear All” option to close all background apps at once. This will help free up RAM and improve overall performance.
2. Uninstalling unnecessary apps:
Take a moment to evaluate the apps installed on your phone and uninstall any that you no longer use or need. Unnecessary apps take up valuable storage space and can contribute to RAM usage. By removing these apps, you can free up both storage and RAM, resulting in improved performance and faster operation.
3. Using a task manager app:
Task manager apps can help you identify and close resource-hungry apps that are consuming excessive RAM. These apps provide an overview of running processes and allow you to manually stop them, freeing up RAM in the process. Popular task manager apps include Greenify, KillApps, and Advanced Task Manager.
4. Using a memory management app:
Memory management apps work by automatically optimizing RAM usage on your Android phone. These apps analyze the system’s RAM and intelligently allocate resources to running apps. Some memory management apps also offer features like automatic RAM cleaning and boosting. Examples of memory management apps include CCleaner, RAM Booster, and Auto Memory Manager.
5. Boosting RAM with a third-party app:
There are several dedicated RAM booster apps available on the Play Store that claim to improve your device’s RAM performance. These apps often work by clearing out background processes, temporary files, and cached data to free up RAM. However, it’s important to note that the effectiveness of these apps can vary, and some may even have adverse effects on your device’s performance.
6. Installing a custom ROM:
If you’re familiar with the process of flashing custom ROMs, you may consider installing a lightweight custom ROM optimized for better RAM management. Custom ROMs typically offer a more streamlined and efficient operating system, allowing your device to make the most of its available RAM. However, note that installing a custom ROM requires technical knowledge and may void your device’s warranty.
7. Upgrading your phone’s hardware:
While it is not possible to upgrade the RAM module on your Android phone, there are certain hardware upgrades that can indirectly enhance its performance. For instance, upgrading to a higher capacity and faster storage (e.g., replacing a traditional hard drive with an SSD) can help improve overall system responsiveness and reduce reliance on RAM.
By implementing these methods, you can effectively optimize and manage the RAM on your Android phone, resulting in improved performance, smoother multitasking, and a better overall user experience.
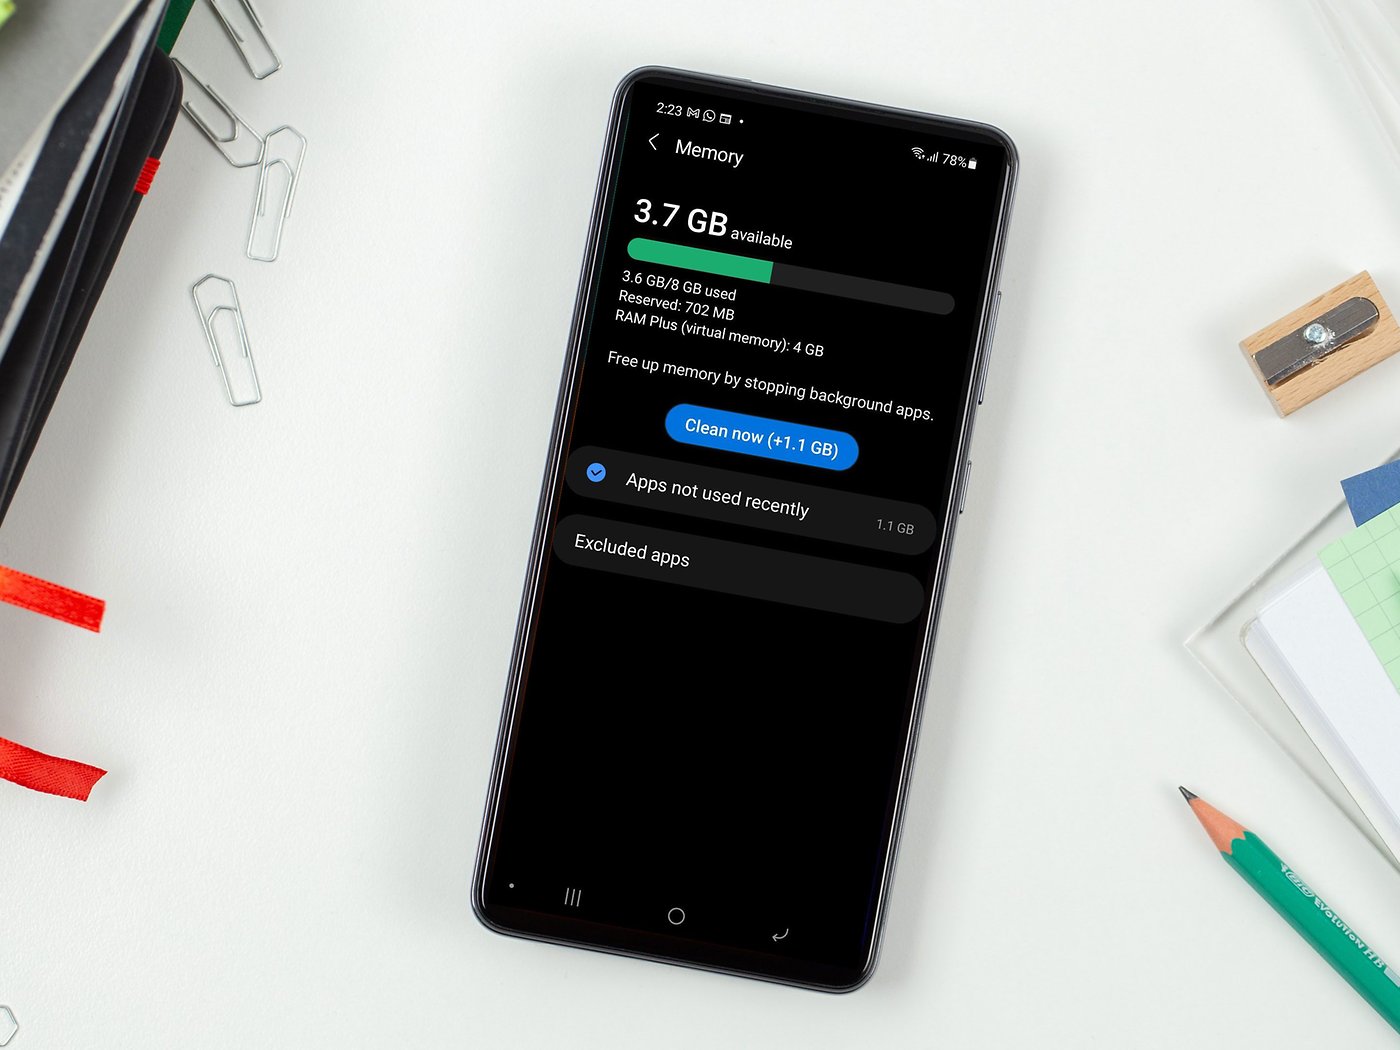
Clearing out background apps
One of the simplest yet effective ways to increase available RAM on your Android phone is by clearing out background apps. Many apps continue to run in the background even when you’re not actively using them, consuming valuable memory resources. By closing these unnecessary background apps, you can free up RAM and improve the overall performance of your device.
How to clear out background apps:
1. Access the app switcher: On most Android phones, you can access the app switcher by tapping the square or recent apps button, usually located at the bottom of your screen. This will bring up a list of recently used apps.
2. Close individual apps: Swipe left or right to navigate through the list of apps and find the ones you want to close. You can then swipe them off the screen or tap the close button to shut them down. This will free up the RAM previously used by those apps.
3. Use the “Clear All” option: Some Android devices offer a “Clear All” button, usually located either at the bottom or top of the app switcher screen. Tapping this button will close all running background apps at once, instantly freeing up a significant amount of RAM.
Keep in mind that closing background apps does not mean you have to uninstall them. When you open the app again, it will automatically launch from scratch, using system resources as needed. It’s important to note that certain system apps and services should not be closed as they are necessary for the proper functioning of your device.
Clearing out background apps regularly can be especially helpful if your phone starts to feel sluggish or unresponsive. It allows your device to allocate more RAM to the apps you are actively using, improving their performance and reducing the chances of lag or freezing.
In addition to manually closing background apps, you can also enable developer options on your Android phone to limit background processes. By accessing the developer options in your device’s settings and adjusting the “Background process limit” setting, you can prevent certain apps from running in the background or restrict the number of processes they can have active simultaneously. This can help save RAM and optimize system performance.
By regularly clearing out and managing background apps, you can make the most of the available RAM on your Android phone, ensuring a smoother and more responsive user experience.
Uninstalling unnecessary apps
Another effective method to increase the available RAM on your Android phone is by uninstalling unnecessary apps. Over time, we tend to accumulate a multitude of apps that we no longer use or need. These apps not only take up valuable storage space but also consume precious RAM resources, which can result in sluggishness and reduced device performance. By identifying and removing these unnecessary apps, you can free up both storage and RAM, leading to improved overall performance.
How to uninstall unnecessary apps:
1. Access the app drawer: Open the app drawer on your Android phone by tapping on the app drawer icon, typically located at the bottom-center or bottom-right of the home screen. This will display a list of all the apps installed on your device.
2. Identify unnecessary apps: Scroll through the list of apps and identify the ones that you no longer use or need. These can include apps that you haven’t used in a while, duplicate apps with similar functionality, or pre-installed bloatware that came with your device.
3. Uninstall the apps: Tap and hold the app you want to uninstall until a menu appears. Select the “Uninstall” or “Remove” option from the menu, which will start the app removal process. Follow any prompts or confirmations that appear to complete the uninstallation.
4. Repeat for other unnecessary apps: Repeat the process for other unnecessary apps you identified in step 2. Take your time to review and uninstall apps that you don’t use regularly or that are taking up significant storage and RAM space.
By uninstalling unnecessary apps, you not only free up valuable storage space but also reduce the number of processes running in the background, which in turn frees up RAM resources. This can result in increased system responsiveness, faster app launches, and smoother multitasking.
If you’re unsure whether you should uninstall an app, you can also utilize the “Disable” option instead. Disabling an app can prevent it from running in the background and from being accessed, but it doesn’t remove the app completely. This can be useful for system apps that cannot be uninstalled but are not essential to your device’s operation.
Remember to review your app list periodically to keep it lean and organized. By removing unnecessary apps, you can optimize your device’s performance, decrease RAM usage, and create a clutter-free experience, ensuring that your Android phone runs smoothly and efficiently.
Using a task manager app
Using a task manager app is an effective way to increase the available RAM on your Android phone and optimize its performance. These apps allow you to identify and close resource-intensive apps that are running in the background, consuming valuable memory resources. By manually stopping these apps, you can free up RAM and ensure a smoother and more efficient user experience.
How to use a task manager app:
1. Install a task manager app: Head to the Google Play Store and search for a task manager app that suits your needs. Popular options include Greenify, KillApps, and Advanced Task Manager. Download and install the app of your choice.
2. Launch the task manager app: Open the task manager app on your Android phone. You’ll typically see a list of running apps and processes, along with information about their RAM usage and impact on system performance.
3. Identify resource-intensive apps: Go through the list and identify apps that are consuming a significant amount of RAM or causing performance issues. These can be apps that are running unnecessarily in the background, consuming excessive system resources.
4. Stop or close the apps: Tap on the app you want to stop or close, and you’ll typically be presented with options such as “Stop,” “Close,” or “End Task.” Select the appropriate option to stop the app from running in the background. Some task manager apps also offer bulk closing or automated closing of selected apps.
5. Customize app settings: Many task manager apps allow you to customize how they manage background apps and processes. You can adjust settings such as automatic task killing, ignore list for apps you want to exclude, and notifications for high RAM usage.
Task manager apps provide you with the flexibility to manually control which apps are running in the background and consuming RAM resources. By closing or stopping resource-intensive apps, you free up RAM for the apps that you actively use, resulting in smoother performance, faster app launches, and a more responsive device.
It’s important to note that while task manager apps can be useful, they should be used judiciously. Android’s native memory management system is already designed to intelligently handle background processes and allocate resources efficiently. In some cases, task manager apps can have minimal impact or even degrade system performance. Therefore, it’s crucial to choose a reliable task manager app and understand its limitations.
By using a task manager app wisely and regularly monitoring app behavior, you can optimize your Android phone’s RAM usage, ensure efficient multitasking, and enjoy a seamless user experience.
Using a memory management app
If you want a more automated approach to optimize your Android phone’s RAM usage, using a memory management app can be a convenient option. These apps analyze your device’s RAM usage and employ various techniques to optimize memory allocation, resulting in improved performance and smoother multitasking.
How to use a memory management app:
1. Install a memory management app: Head to the Google Play Store and search for a memory management app that suits your needs. Popular options include CCleaner, RAM Booster, and Auto Memory Manager. Download and install the app of your choice.
2. Launch the memory management app: Open the app on your Android phone. You’ll typically see options and features related to optimizing your device’s RAM usage and managing memory resources.
3. Analyze RAM usage: Many memory management apps provide real-time information about your device’s RAM usage. This can include the amount of RAM currently being used, the amount of free RAM, and a breakdown of which apps are consuming the most memory.
4. Optimize RAM usage: Use the available options and features in the memory management app to optimize your device’s RAM usage. This can include options like automatic RAM cleaning, boosting, or task killing. Some apps also allow you to set specific rules and thresholds for when certain actions should be taken to optimize RAM usage.
5. Customize app settings: Explore the settings and preferences in the memory management app. You may find additional options to fine-tune how the app manages RAM, such as adjusting the frequency of RAM optimization, creating whitelists or blacklists for certain apps, or configuring notifications related to RAM utilization.
Memory management apps aim to intelligently allocate resources and optimize RAM usage on your Android device. They can help identify apps that are consuming excessive memory and take actions to free up RAM for other tasks and processes. By automatically managing memory usage, these apps can enhance multitasking capabilities and improve overall device performance.
While memory management apps can be effective, it’s important to choose a reputable app and avoid ones that make unrealistic promises or overuse system resources themselves. Android’s native memory management system is already designed to handle memory allocation effectively, and excessive use of memory management apps may not provide significant benefits or can even have adverse effects on performance.
Using a memory management app can be a helpful tool to streamline your device’s RAM usage and ensure optimal performance. By leveraging these apps’ features and settings, you can enhance multitasking capabilities, reduce lag, and enjoy a smoother user experience on your Android phone.
Boosting RAM with a third-party app
If you’re looking for a quick and easy way to boost the RAM on your Android phone, using a third-party RAM booster app can be an option. These apps claim to optimize memory usage, clear out unnecessary processes, and free up RAM to enhance the performance of your device. However, it’s important to approach these apps with caution and understand their limitations.
Using a third-party RAM booster app:
1. Install a RAM booster app: Search for a reputable RAM booster app on the Google Play Store. Popular options include Clean Master, DU Speed Booster, and AVG Cleaner. Download and install the app of your choice.
2. Launch the RAM booster app: Open the app on your Android phone. You’ll typically see options and features related to optimizing your device’s RAM usage and boosting performance.
3. Analyze RAM usage: RAM booster apps often display real-time information about your device’s RAM usage. They may highlight apps or processes that are using excessive memory and potentially impacting performance.
4. Initiate a RAM boost: Most RAM booster apps offer a “Boost” or “Clean” button that you can tap to initiate a boost. When pressed, the app will perform tasks such as clearing out background processes, freeing up RAM, and optimizing the device’s memory usage.
5. Customize app settings: Explore the settings and preferences in the RAM booster app. You may find options to customize how the app performs its optimization tasks, such as scheduling automatic boosts or configuring notifications.
It’s essential to understand that while RAM booster apps can provide temporary relief by freeing up RAM, they may not provide a significant or long-term improvement in device performance. Android’s built-in memory management is already designed to dynamically allocate resources and optimize RAM usage. Additionally, constantly clearing out processes and tasks may cause apps to restart more frequently, leading to potential delays in their functionality.
Furthermore, some RAM booster apps might employ aggressive tactics or utilize excessive system resources themselves, potentially impacting the overall performance of your device instead of improving it. Therefore, it’s crucial to research and choose a reputable RAM booster app from a trusted developer to ensure a reliable and safe experience.
While RAM booster apps can be convenient for freeing up RAM and optimizing the device’s memory usage, it’s important to approach them with caution and use them sparingly. Android’s native memory management system is generally efficient at managing RAM resources, and manually clearing processes should be done judiciously to avoid any unintended consequences.
Ultimately, the long-term solution to optimizing RAM and improving device performance lies in regular maintenance, such as clearing out unnecessary apps, managing background processes, and ensuring a clutter-free device. Combining these practices with sensible RAM booster app usage can help create a smoother and more responsive experience on your Android phone.
Installing a custom ROM
If you’re looking to take control of your Android phone’s RAM management and overall performance, installing a custom ROM can be a viable option. Custom ROMs are modified versions of the Android operating system that offer different features, optimizations, and often a more streamlined performance. By installing a custom ROM, you can potentially optimize RAM usage and improve the overall responsiveness of your device.
Installing a custom ROM:
1. Check device compatibility: Before installing a custom ROM, ensure that it is compatible with your specific Android phone model. Custom ROMs are typically developed for specific devices, and installing an incompatible ROM can result in instability or even bricking of your device.
2. Backup your data: Installing a custom ROM involves erasing the current operating system and data on your device. It’s crucial to back up all your important data, including contacts, photos, videos, and apps. This allows you to restore your data if needed after installing the custom ROM.
3. Unlock bootloader and install custom recovery: Most custom ROMs require an unlocked bootloader and a custom recovery like TWRP or ClockworkMod. Unlocking the bootloader and installing a custom recovery is a necessary step in the process, as it allows you to flash the custom ROM onto your device.
4. Download and flash the custom ROM: Visit a reputable custom ROM community or developer website and download the custom ROM that you want to install. Once downloaded, transfer the ROM file to your device’s internal storage or SD card. Boot your device into custom recovery mode and use the “Install” option to flash the ROM file. Follow the on-screen prompts and wait for the installation process to complete.
5. Customize and optimize: After successfully installing the custom ROM, boot into the new operating system. Explore the ROM’s settings and features to customize your device as per your preferences. Often, custom ROMs offer additional performance tweaks and options to optimize RAM usage, giving you more control over how your device manages memory resources.
It’s important to note that installing a custom ROM is an advanced process that carries risks, and it may void your device’s warranty. Additionally, not all custom ROMs are stable or actively maintained, so it’s crucial to do thorough research and choose a reliable ROM from reputable developers or communities.
Installing a custom ROM can provide benefits such as improved RAM management, enhanced performance, and access to additional customization options. However, it requires technical knowledge and may not be suitable for novice users. If you are unfamiliar with the process or uncomfortable with performing advanced modifications on your device, it’s best to seek assistance from experienced users or refrain from installing a custom ROM.
By installing a well-supported and optimized custom ROM, you can potentially enhance your Android phone’s RAM management and overall performance, enjoying a more personalized and efficient user experience.
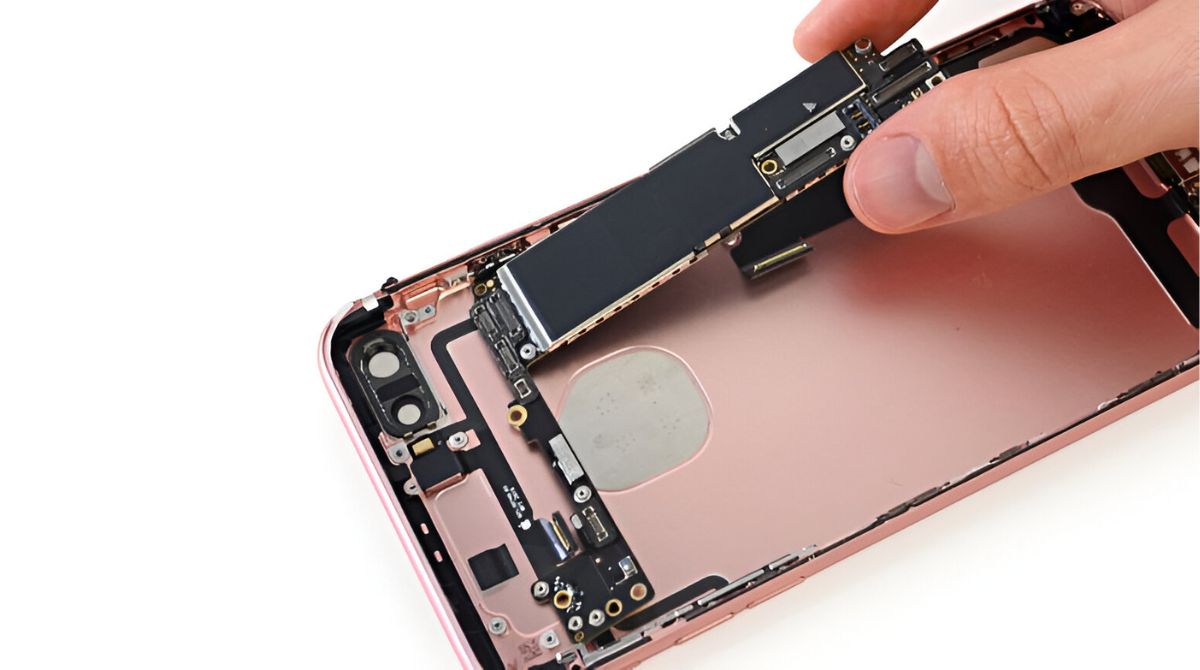
Upgrading your phone’s hardware
If you’re looking to significantly increase the RAM on your Android phone, upgrading your device’s hardware can be a solution. Upgrading the hardware of your phone allows for a physical increase in RAM capacity, which can greatly improve multitasking capabilities and overall performance. However, it’s important to note that hardware upgrades may not be feasible or practical for all users, as they often require technical expertise and can be limited by the specific device model.
How to upgrade your phone’s hardware:
1. Check hardware compatibility: Before considering a RAM upgrade, determine if your phone’s hardware supports it. Not all Android devices have upgradeable RAM modules, and some may have their RAM soldered onto the motherboard or non-expandable memory configurations. Research your specific phone model to find out if it supports RAM upgrades.
2. Find compatible RAM modules: If your phone’s RAM is upgradeable, identify compatible RAM modules. Different phone models have specific RAM module compatibility, so ensure you choose the correct type, speed, and capacity of RAM for your device. Consult your phone’s user manual or research compatible RAM options for your specific model.
3. Disassemble your phone: Upgrading the RAM on your Android phone typically requires disassembling the device. You’ll need to remove the phone’s back cover, battery, and any other necessary components to access the RAM module. Be cautious and follow disassembly instructions specific to your phone model to avoid damaging the device.
4. Install the new RAM module: Insert the new RAM module into the corresponding slot on your phone’s motherboard. Ensure it is properly aligned and firmly seated. Be gentle during the installation process, taking care not to apply excessive force or damage any connectors or components.
5. Reassemble your phone: Once the RAM module is installed, carefully reassemble your Android phone, ensuring that all components are securely in place. Replace the back cover, battery, and any other removed parts. Double-check that everything is properly aligned before powering on your device.
It’s important to consider the potential risks and limitations when upgrading your phone’s hardware. Upgrading the RAM on an Android phone requires technical expertise and may void your device’s warranty. Additionally, incompatible RAM modules or improper installation can lead to system instability, data corruption, or even permanent damage to your device.
As upgrading RAM on Android phones can be challenging, it’s often recommended for advanced users or individuals with experience in phone hardware modifications. In many cases, it may be more practical and cost-effective to consider purchasing a new Android phone with the desired RAM capacity rather than attempting a RAM upgrade.
Before proceeding with a hardware upgrade, carefully evaluate the technical requirements, potential risks, and costs involved. It’s advisable to consult experts or seek professional assistance to ensure a successful and safe hardware upgrade process.
Upgrading your phone’s hardware, including RAM, can significantly improve its multitasking capabilities and overall performance. However, due to the complexities involved and potential risks, it’s essential to carefully consider whether upgrading your phone’s hardware is the best option for your specific needs and circumstances.
Conclusion
Increasing the RAM on your Android phone can greatly enhance its performance, allowing for smoother multitasking, faster app loading times, and improved overall responsiveness. While physically upgrading the RAM is not possible for most users, there are various methods and techniques that can optimize and manage the existing RAM on your device.
Clearing out background apps and uninstalling unnecessary apps are simple yet effective ways to free up RAM. By closing unused apps and removing unnecessary ones, you can maximize available RAM and improve device performance.
Task manager apps and memory management apps provide more automated approaches to optimize RAM usage. These apps allow you to identify resource-intensive apps and manage them to free up RAM and enhance multitasking capabilities.
Third-party RAM booster apps claim to optimize RAM usage and boost performance. However, it’s important to choose reputable apps and use them sparingly, as excessive use of RAM boosters may not provide significant long-term benefits and can even impact performance.
For advanced users, installing a custom ROM can provide more control over RAM management and overall device performance. Custom ROMs offer different features, optimizations, and customization options, potentially enhancing RAM usage efficiency.
Hardware upgrades, such as increasing RAM capacity, can significantly improve multitasking capabilities and performance. However, it requires technical expertise and may not be feasible or practical for all users.
When considering methods to increase RAM on your Android phone, it’s crucial to research and understand the limitations and risks associated with each approach. Each method has its own advantages and considerations, and what works best for one user may not be suitable for another.
Optimizing and managing your Android phone’s RAM can help ensure a smoother and more responsive user experience. By implementing the appropriate methods and strategies, you can maximize the performance of your device and make the most out of the available RAM.