Introduction
Are you experiencing sluggish performance on your Android mobile due to low RAM? Do your apps take forever to load or frequently crash? Don’t worry, there are ways to increase your device’s RAM and boost its overall performance without having to root your Android device.
RAM (Random Access Memory) is a crucial component of any mobile device, as it directly affects its multitasking capabilities and overall speed. Unfortunately, many budget or older Android devices come with limited RAM, which can lead to performance issues when running resource-intensive applications.
In this article, we will explore various methods to increase the available RAM on your Android mobile without the need for root access. These methods are safe, easy to implement, and can significantly enhance your device’s performance, allowing you to enjoy seamless multitasking and improved app responsiveness.
Whether you’re a heavy gamer, a power user, or simply want to optimize your device’s performance, the following methods will help you maximize the available RAM on your Android mobile, without requiring any complex technical knowledge.
Method 1: Clearing Cache
One of the simplest and most effective ways to free up RAM on your Android mobile is by clearing the cache. Over time, apps accumulate temporary files and data that can consume a significant amount of memory.
To clear the cache, follow these steps:
- Go to Settings on your Android device.
- Select Storage or Storage & Memory.
- Tap on Cached data.
- A confirmation prompt will appear. Click OK to clear the cache.
This process will remove all cached data from your device, including app caches, system caches, and temporary files. It’s important to note that clearing the cache will not delete any personal data or app settings.
Once the cache is cleared, you’ll notice a significant improvement in your device’s performance. Apps will launch faster, and you’ll have more available RAM for multitasking.
It’s advisable to periodically clear the cache to maintain optimal performance. You can also use third-party cache cleaning apps available on the Google Play Store to automate this process and ensure that your device’s cache is regularly cleared.
Method 2: Uninstalling Unnecessary Apps
An effective way to free up RAM on your Android mobile is by uninstalling unnecessary apps. Many times, we download and install apps that we no longer use or have become obsolete. These apps continue to consume valuable RAM, resulting in slower performance and decreased available memory.
To uninstall unnecessary apps, follow these steps:
- Go to Settings on your Android device.
- Select Apps or Application Manager.
- Scroll through the list of apps and tap on the one you want to uninstall.
- Click on Uninstall or Disable.
- Confirm the uninstallation or disablement when prompted.
It’s important to identify apps that you rarely use or ones that serve no purpose. Games, social media apps, or utility apps that you rarely use are good candidates for removal.
By uninstalling unnecessary apps, you’ll free up valuable space and reduce the load on your device’s RAM. This will result in improved performance, faster app launches, and smoother multitasking capabilities.
In addition to uninstalling individual apps, you can also take advantage of the “App Manager” feature in your device’s settings, which provides a comprehensive list of all installed apps along with their memory usage. This allows you to identify memory-hogging apps and remove them in bulk.
To access the App Manager:
- Go to Settings on your Android device.
- Select Apps or Application Manager.
- Look for the option that says “App Manager,” “App List,” or similar.
- Sort the apps by size or memory usage to identify the ones consuming the most space.
- Select the apps you want to uninstall and follow the prompts to remove them.
Regularly reviewing and uninstalling unnecessary apps will not only increase your available RAM but also declutter your device and enhance its overall performance.
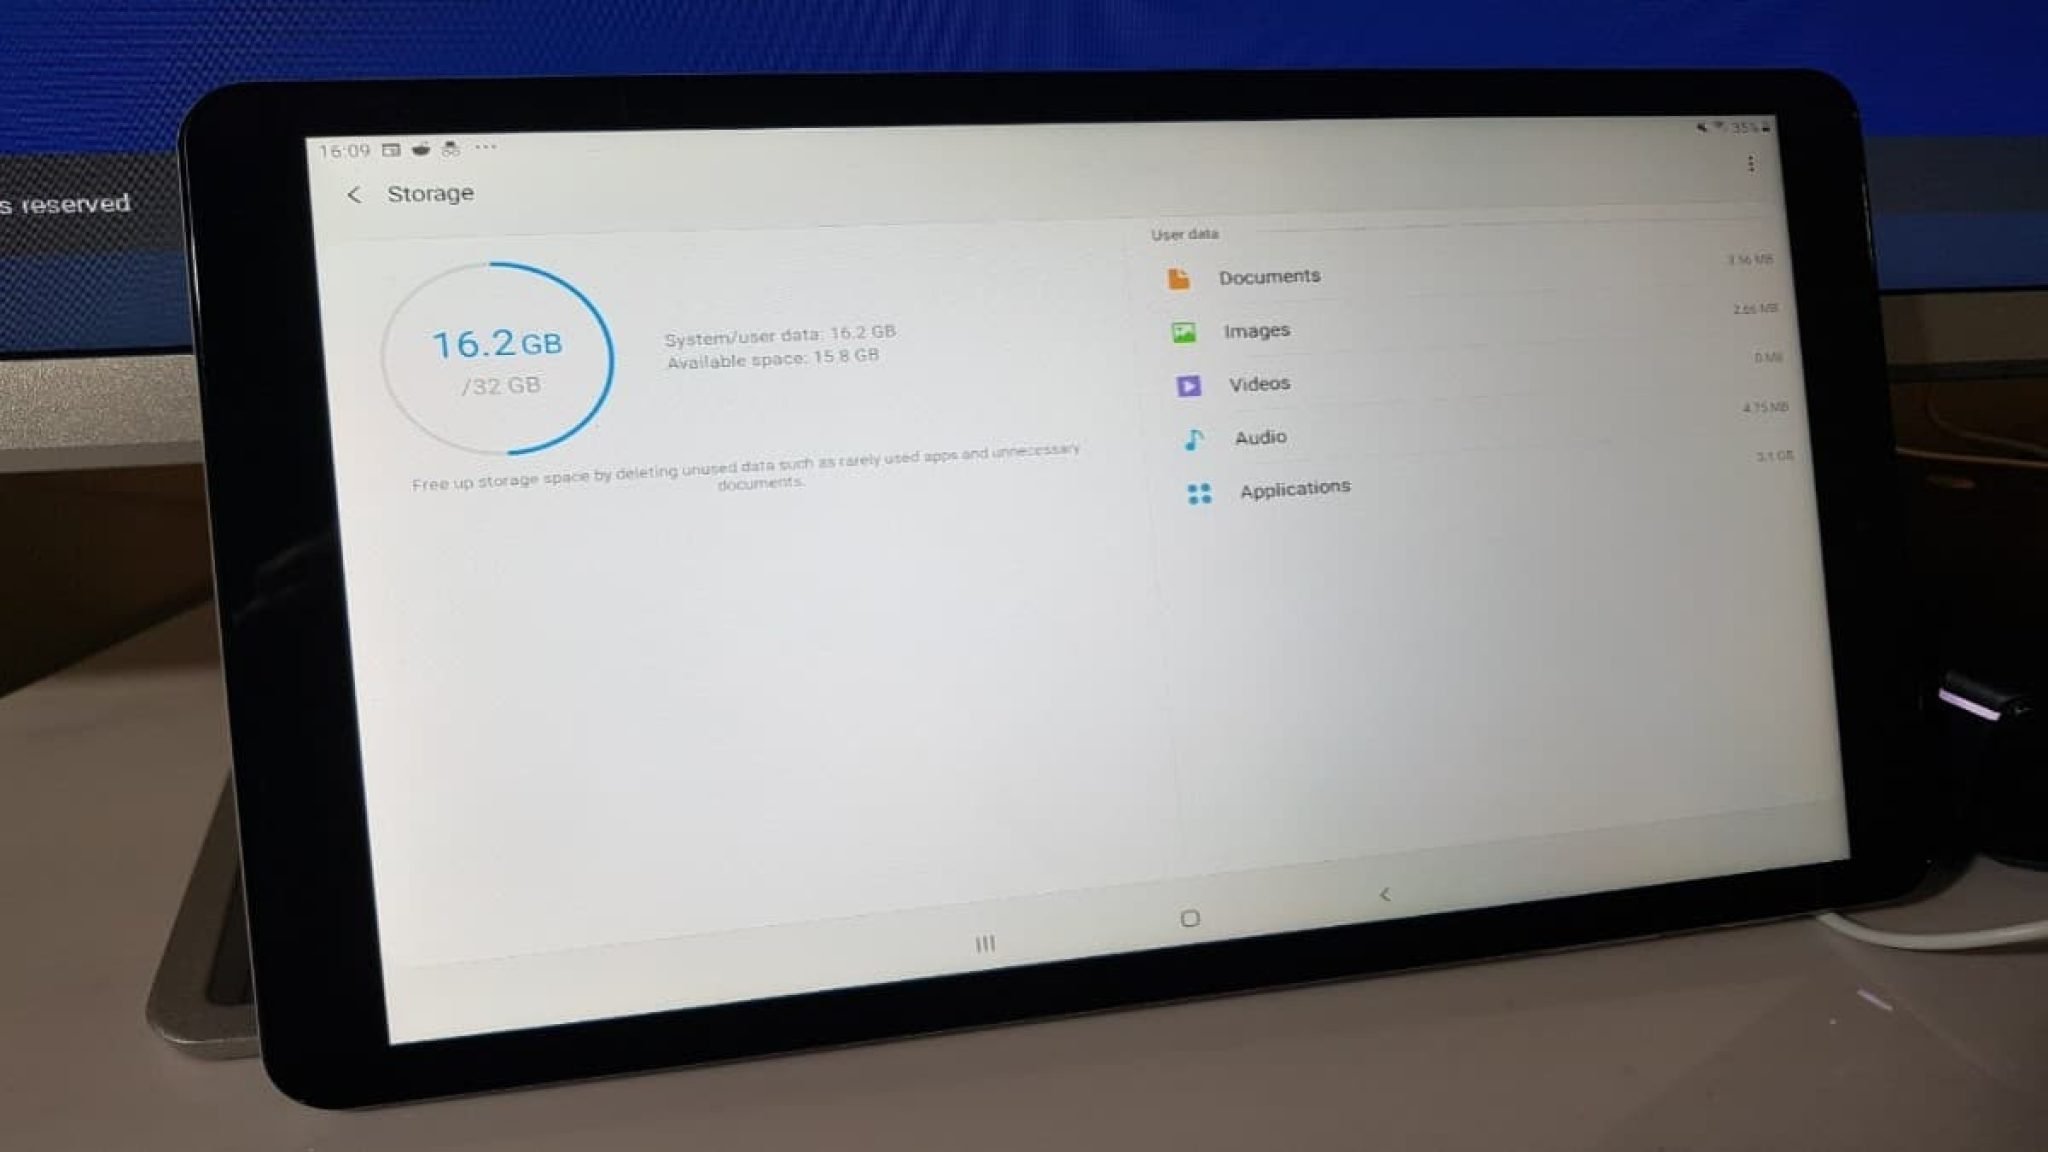
Method 3: Using a Memory Card as RAM
If your Android device supports expandable storage, you can utilize a memory card to increase your device’s available RAM. This method is a great option for devices with limited internal storage or lower RAM capacities.
Here’s how you can use a memory card as RAM:
- Ensure that your Android device supports the “Adoptable Storage” feature. This feature allows you to use the memory card as internal storage, including utilizing it as additional RAM.
- Insert a compatible memory card into your device.
- Go to Settings and select Storage or Storage & Memory.
- Choose the option “Format SD Card” or similar. This will format the memory card and set it up as internal storage.
- Once the formatting process is complete, go back to the Storage settings and select the memory card.
- Tap on the three-dot menu icon and select “Storage Settings” or “Format as Internal” storage.
- Follow the on-screen prompts to complete the process.
By utilizing a memory card as RAM, you effectively increase your device’s available memory. This allows for smoother multitasking, faster app launches, and an overall improved user experience.
It’s important to note that using a memory card as RAM may slightly impact device performance, as memory access speeds on a memory card are usually slower compared to internal RAM. However, the benefits of increased memory outweigh this drawback for most users.
Additionally, it’s crucial to use a reliable and high-speed memory card to ensure optimal performance. Class 10 or UHS-I cards are recommended for this purpose.
To further optimize the usage of the memory card, you can move certain apps to the memory card, reducing the load on your device’s internal storage. This can be done by going to Settings > Apps > [App Name] > Storage > Change Storage Location and selecting the memory card as the default storage for the app.
Using a memory card as RAM is an effective way to increase the available memory on your Android mobile, especially if you have limited internal storage or RAM capacity.
Method 4: Limit Background Processes
Background processes running on your Android device can consume a significant amount of RAM, leading to decreased performance and limited multitasking capabilities. By limiting these background processes, you can free up RAM and ensure that more memory is available for running important apps and tasks.
Follow these steps to limit background processes on your Android device:
- Go to Settings on your Android device.
- Select Developer options. If you don’t see this option, go to About phone and tap on Build number 7 times to enable Developer options.
- Scroll down and find the option called “Limit background processes” or “Background process limit.”
- Select the desired limit for background processes. The available options usually range from Standard or No background processes to a specific number of processes, such as 2 or 3.
- Choose the limit that suits your needs and tap OK.
By setting a limit on background processes, you effectively restrict the number of apps and services running in the background, optimizing your device’s RAM usage. This, in turn, ensures smoother app performance, faster response times, and improved multitasking capabilities.
It’s important to note that limiting background processes may have implications for certain apps that rely on background services to function properly. If you experience any issues with specific apps after limiting background processes, you can adjust the limit or exclude those apps from the limit individually.
Furthermore, periodically reviewing and closing unused apps in the background can also help free up additional RAM. You can do this by accessing the Recent Apps menu (usually done by tapping the square or recent apps button) and manually swiping away unnecessary apps.
By limiting background processes and managing background apps, you can optimize your Android device’s RAM usage, resulting in improved performance, smoother multitasking, and a more responsive user experience.
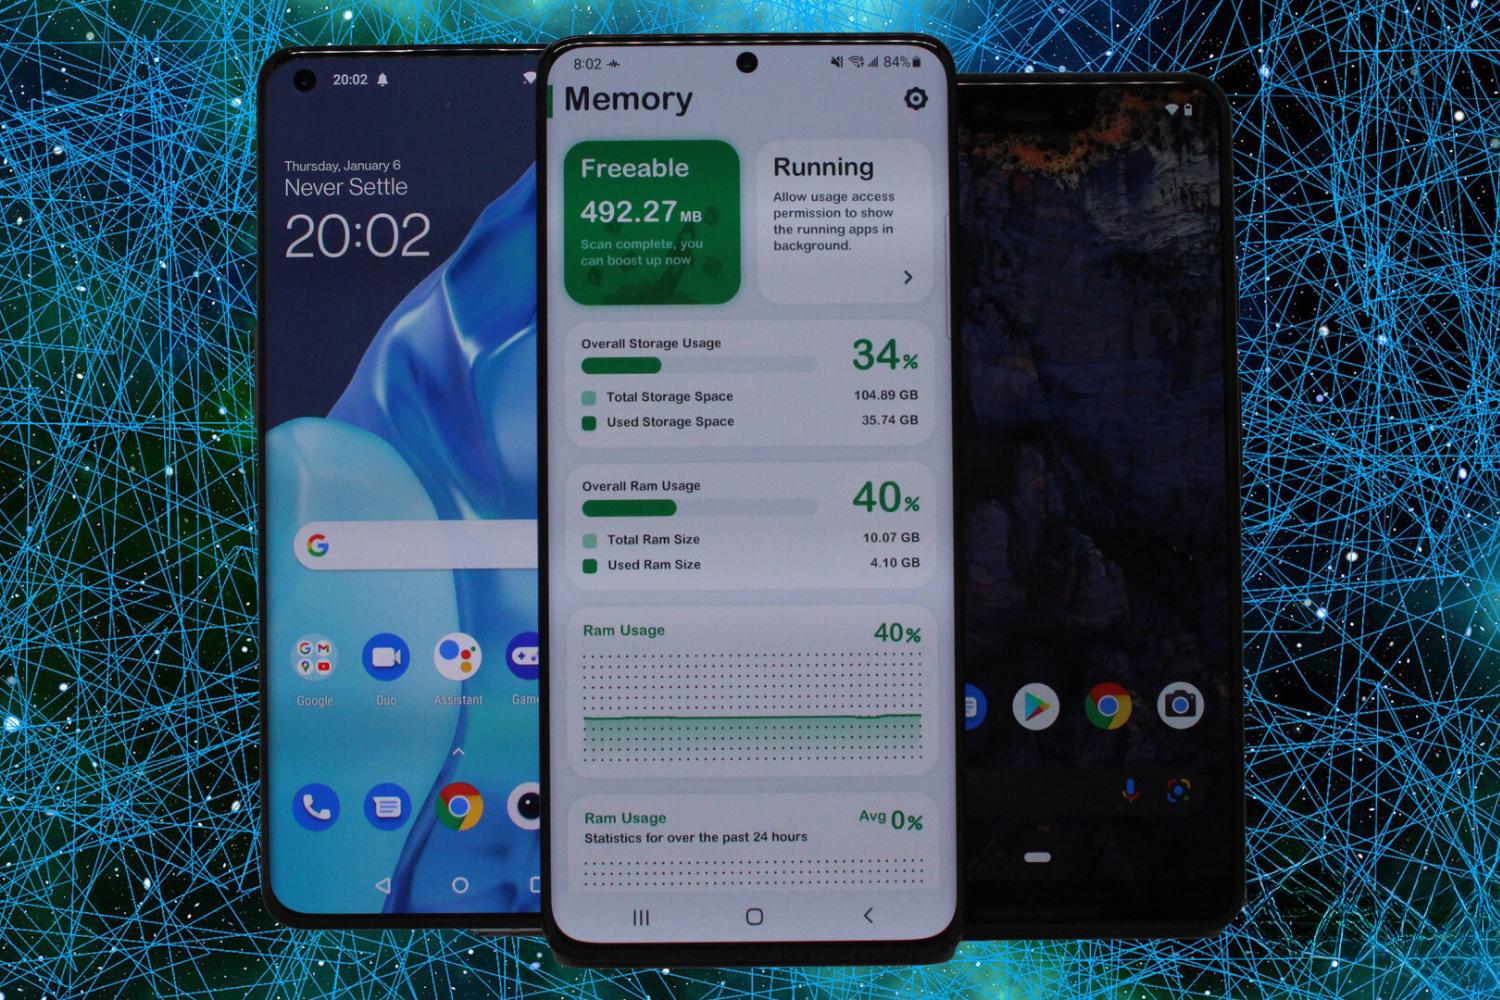
Method 5: Using a RAM-boosting App
If you’re looking for a more automated and convenient way to optimize your Android device’s RAM usage, using a RAM-boosting app can be an effective solution. These apps are designed to analyze your device’s memory usage, identify RAM-hogging apps, and free up memory for better performance.
Here’s how you can use a RAM-boosting app to enhance your Android device’s performance:
- Go to the Google Play Store and search for “RAM booster” or “RAM cleaner.”
- Choose a reputable app with positive reviews and high ratings.
- Install the selected RAM-boosting app on your device.
- Once installed, launch the app and follow the on-screen instructions to analyze your device’s memory usage.
- The app will display a list of apps and processes that are consuming excessive memory.
- Select the option to free up RAM or optimize memory. The app will close unnecessary background processes and clear cached data to free up memory.
Using a RAM-boosting app can help streamline your device’s RAM usage, resulting in improved performance, faster app launches, and smoother multitasking. These apps often provide additional features such as boosting device speed, battery optimization, and CPU management to further enhance your Android experience.
It’s important to choose a reputable app from a trusted developer to ensure the effectiveness and safety of the RAM-boosting process. Additionally, be cautious of apps that make exaggerated performance claims or require unnecessary permissions.
While RAM-boosting apps can be helpful in freeing up memory and optimizing performance, they should be used in conjunction with other RAM-enhancing methods mentioned in this article. It’s recommended to use such apps regularly but not solely rely on them for improving device performance.
By incorporating a RAM-boosting app into your device maintenance routine, you can ensure that your Android mobile operates at its optimum level and maintains optimal performance even when running resource-intensive applications.
Conclusion
Increasing the available RAM on your Android mobile is essential for improving performance, multitasking capabilities, and overall user experience. While rooting your device may provide more customization options, it’s not always necessary to enhance RAM. The methods outlined in this article offer safe and effective ways to increase RAM on your Android device without the need for root access.
Clearing cache, uninstalling unnecessary apps, using a memory card as RAM, limiting background processes, and utilizing a RAM-boosting app are all viable options for increasing the available RAM on your Android mobile. By implementing these methods, you’ll notice a significant improvement in your device’s performance, faster app launches, smoother multitasking, and reduced occurrence of app crashes.
It’s important to note that while these methods can significantly enhance your device’s performance, they should be used in conjunction with regular device maintenance practices such as keeping your device updated, closing unused apps, and managing storage effectively.
Remember, each Android device may have slight variations in terms of settings and options, but the general concepts discussed in this article should apply to most devices.
By following these methods and taking control of your device’s RAM usage, you can enjoy a seamless and efficient Android experience without the need for complex technical knowledge or rooting your device.
So, go ahead and give these methods a try. Unlock the full potential of your Android mobile by increasing the available RAM and enjoy a faster, smoother, and more enjoyable user experience!