Why Increase RAM on Android?
RAM (Random Access Memory) plays a crucial role in the performance of an Android device. It acts as temporary storage for app data and allows for smooth multitasking, efficient app switching, and fast app loading. However, many Android devices come with limited RAM, which can lead to sluggishness, app crashes, and overall poor user experience.
Increasing RAM on your Android device can significantly improve its performance and address these issues. By providing more available memory, you can enjoy smoother multitasking, faster app load times, and improved overall responsiveness. Whether you’re a gamer who wants to run resource-intensive games smoothly, a power user who frequently switches between multiple apps, or simply someone tired of lag and slow performance, increasing your device’s RAM can provide that much-needed boost for a better Android experience.
Additionally, increasing RAM enhances your device’s ability to handle demanding tasks, such as photo and video editing, running productivity apps, and multitasking with heavy applications. It allows you to run more apps simultaneously without sacrificing performance, ensuring that you can accomplish tasks more efficiently and effectively.
It’s worth noting that increasing RAM does not directly affect the storage capacity of your device. RAM is solely responsible for temporarily storing data while the device is powered on, whereas storage refers to the permanent storage of files, apps, and data on your device. So, increasing RAM does not mean you’ll have more storage space; it simply provides a larger pool of memory for your device to work with, resulting in improved performance and smoother operation.
In the following sections, we will explore various methods to increase RAM on your Android device. From optimizing app usage to utilizing RAM management apps, we’ll cover different strategies that can help you optimize your device’s performance without the need for a costly hardware upgrade.
Understanding RAM on Android
RAM (Random Access Memory) is a vital component of your Android device’s hardware. It serves as temporary storage for data and instructions that your device needs to process in real-time. Think of it as your device’s working memory, where active apps and processes reside while you’re using your device.
When you launch an app or perform any task on your Android device, the required data and instructions are loaded into RAM for quick access. This allows your device to retrieve the necessary information and execute tasks swiftly. RAM is responsible for multitasking capabilities, enabling you to switch between apps seamlessly without delay or loss of data.
Typically, Android devices come with a certain amount of RAM, which can range from 1GB to 12GB or more, depending on the device model and specifications. However, as you install more apps and perform resource-intensive tasks, the available RAM may decrease, leading to slowdowns and performance issues. This is especially true if you have multiple apps running simultaneously or have apps with high memory requirements.
When the available RAM is low, the device relies on a mechanism called “swapping.” It moves less-used data from RAM to the device’s storage to free up memory space for more critical tasks. However, swapping data between RAM and storage takes time and can result in a noticeable performance decrease.
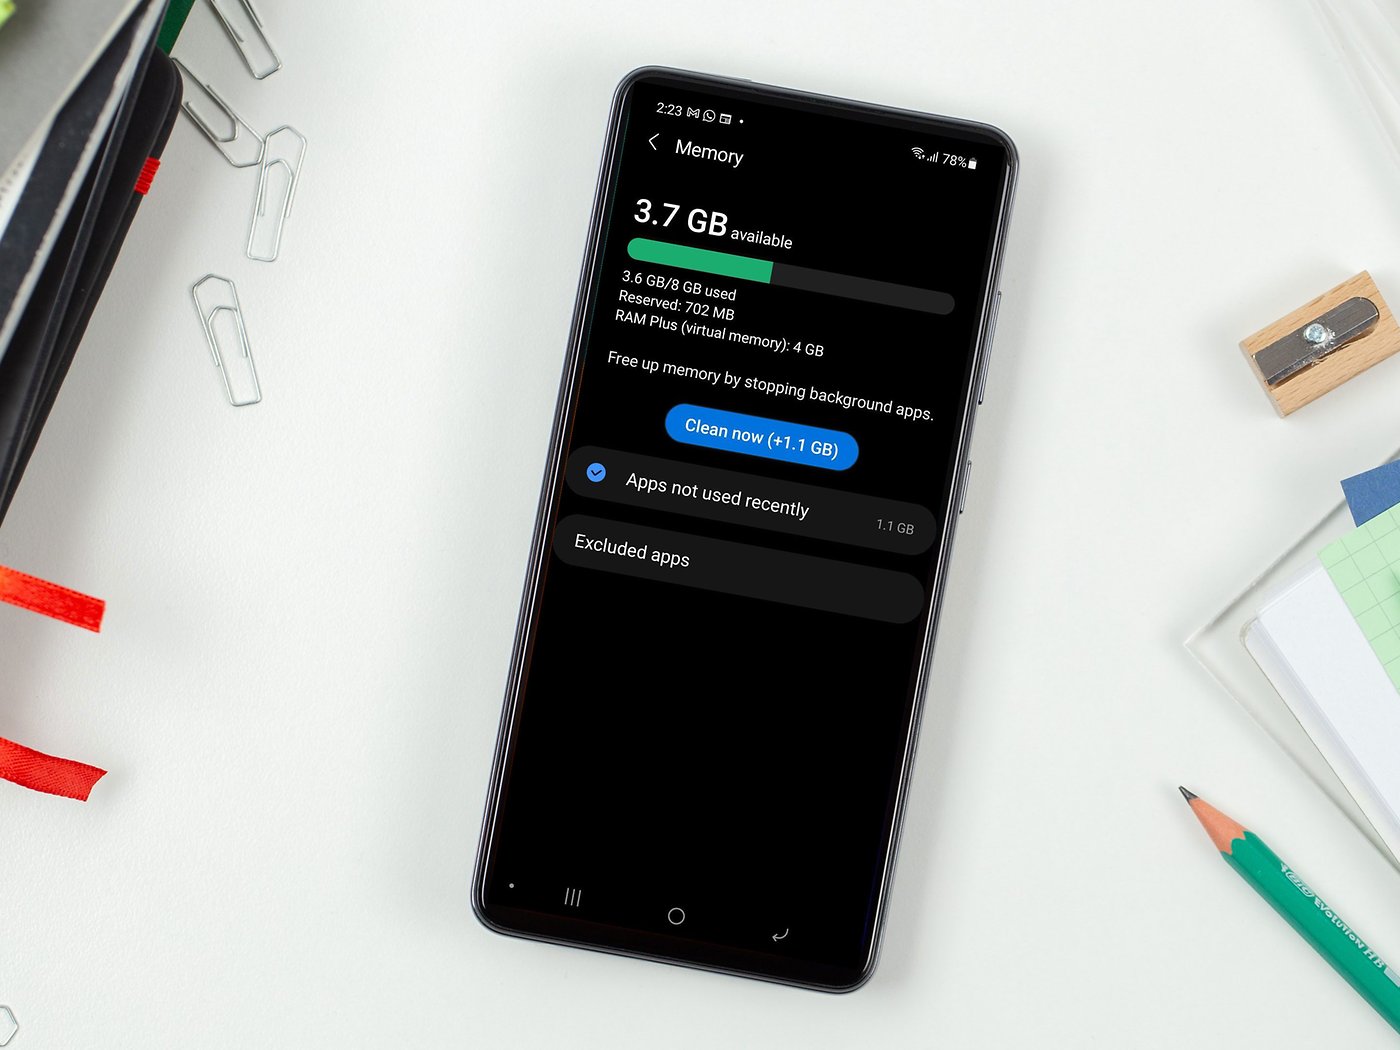
Understanding your device’s RAM usage is crucial for optimizing its performance. Android provides built-in tools that allow you to monitor RAM usage and identify resource-hungry apps. You can access this information by navigating to the “Settings” menu, selecting “About Phone,” and finding the “Memory” or “RAM” section. Here, you can view the total RAM capacity, how much is currently in use, and the amount used by each individual app.
By gaining insight into your device’s RAM consumption, you can make informed decisions about optimizing your device’s performance. Clearing unnecessary apps from the recent apps list, disabling or uninstalling resource-intensive apps, and regularly clearing app cache are some effective ways to free up RAM and improve performance.
In the next sections, we will explore various methods to increase RAM on your Android device, helping you optimize its performance and enjoy a smoother user experience.
Ways to Increase RAM on Android
If you’re experiencing performance issues on your Android device due to low RAM, there are several methods you can try to increase the available memory. These methods range from simple optimizations to more advanced techniques. Let’s explore some of the effective ways to boost your device’s RAM:
1. Clear Unnecessary Apps and Cache: Begin by removing any unnecessary apps from your device. These apps consume valuable memory even when not in use. Additionally, clearing app cache regularly can free up space and improve RAM performance.
2. Use a RAM Booster App: RAM booster apps, such as Clean Master, can help optimize RAM usage by clearing unnecessary background processes and freeing up memory. These apps often come with additional features like junk file cleaning and CPU boosting.
3. Use a Task Manager App: Task manager apps, such as Advanced Task Manager, allow you to manually close running apps and services, freeing up RAM and improving performance. These apps give you more control over the processes running in the background.
4. Disable Animations and Background Processes: Android devices come with animations and background processes that consume RAM. Disable or reduce the animation scale in the device settings and limit background processes to conserve memory.
5. Install a Custom ROM: Custom ROMs are modified versions of the Android operating system that offer improved performance and features. Some custom ROMs are designed to be lightweight, allowing for better RAM optimization and enhanced device performance.
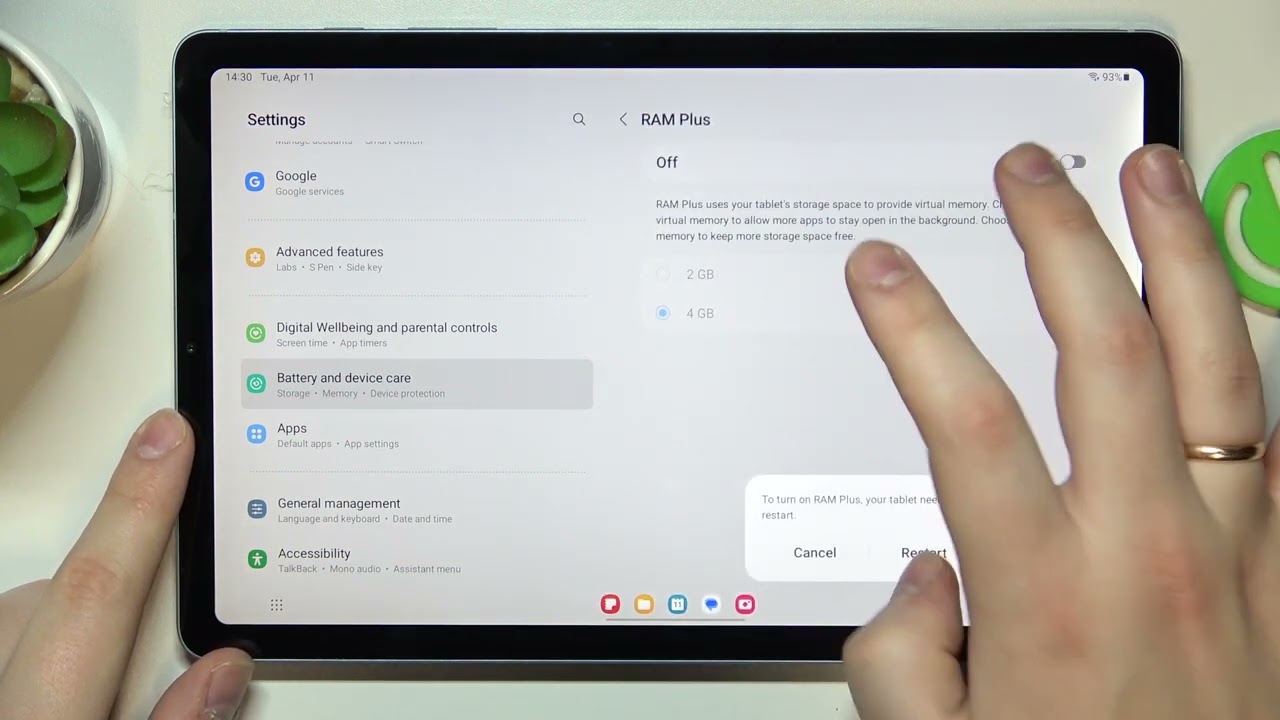
6. Use a RAM Management App: RAM management apps, such as ROEHSOFT RAM Expander, allow you to use your external SD card as virtual RAM, effectively increasing the available memory. However, this method requires rooting your device.
7. Expand RAM with an SD Card: If your device supports it, you can insert a compatible SD card and configure it as internal storage. This allows the device to utilize the SD card’s memory as an extension of the internal RAM, increasing the available memory for apps and processes.
8. Upgrade to a Device with More RAM: If all else fails and you require more RAM for your usage needs, consider upgrading to a device with higher RAM capacity. This ensures that you have enough memory to handle resource-intensive apps and multitasking without compromising performance.
Remember, different methods may work better for certain devices, so it’s essential to experiment and find the one that suits your specific requirements. Increasing your Android device’s RAM can significantly improve its performance, allowing you to enjoy smooth multitasking and faster app loading times.
Option 1: Clear Unnecessary Apps and Cache
One of the simplest and most effective ways to increase the available RAM on your Android device is by clearing unnecessary apps and cache. Over time, your device may accumulate a large number of apps that consume valuable memory even when they’re not actively being used. By removing these apps, you can free up space and improve RAM performance.
To begin, go to the Settings menu on your Android device and select the “Apps” or “Applications” option. Here, you’ll see a list of all the installed apps on your device. Review the list and identify any apps that you no longer need or rarely use. Tap on the app and then select the “Uninstall” or “Disable” option to remove it from your device. This will not only free up storage space but also reduce the strain on your device’s RAM.
In addition to uninstalling unnecessary apps, it’s also important to clear app cache regularly. Cache files are temporary data that apps store to help them load faster in the future. However, over time, these cache files can become outdated or excessive, taking up valuable RAM space. To clear the app cache, go to the Settings menu, select “Storage,” and then tap on “Cached Data.” Confirm the deletion to clear the cache and free up memory.
Another quick way to clear cache for multiple apps simultaneously is to use the built-in Storage Settings on your Android device. Simply go to the Settings menu, select “Storage,” and then tap on “Cached Data” or “Cached Apps.” From here, you can select multiple apps and clear their caches in one go, saving time and optimizing your device’s RAM usage.
Regularly clearing unnecessary apps and cache can significantly improve your Android device’s performance. You’ll have more available RAM to allocate to the apps and processes that you need, resulting in smoother multitasking, faster app load times, and an overall better user experience.
It’s important to note that clearing cache and uninstalling apps can lead to the loss of certain settings or stored data within those apps. Therefore, before removing an app, ensure that you have backed up any important data associated with it. Additionally, be cautious when removing system apps, as doing so may impact the stability or functionality of your device.
In the next section, we will explore another option to increase RAM on your Android device by using a dedicated RAM booster app.
Option 2: Use a RAM Booster App
If you’re looking for a convenient and automated way to optimize your device’s RAM usage, using a RAM booster app can be an effective solution. RAM booster apps are designed to help you free up memory, improve performance, and enhance the overall responsiveness of your Android device.
These apps work by identifying and closing resource-intensive background processes and clearing unnecessary data from your device’s memory. By doing so, they free up RAM space and ensure that critical apps and processes have enough memory to function smoothly.
One popular RAM booster app is Clean Master. It offers a comprehensive set of features to optimize your device’s performance, including a RAM booster. With just a single tap, Clean Master can analyze your device’s RAM usage and clear unnecessary background processes and system cache, freeing up valuable memory.
To use a RAM booster app like Clean Master, simply download and install the app from the Google Play Store. Open the app and navigate to the “Memory Boost” or “RAM Boost” section. Here, you’ll find options to analyze and optimize your device’s RAM usage.
When using a RAM booster app, it’s important to note that these apps work by closing background processes, which may impact the functionality of certain apps or services. Therefore, it’s advisable to review the list of processes that the app intends to close before proceeding with the optimization.
Additionally, it’s worth mentioning that while RAM booster apps can be beneficial in certain situations, they are not a permanent solution. Android’s built-in memory management system is already designed to optimize RAM usage and allocate resources efficiently. However, if you frequently experience low RAM issues or want to optimize your device for specific tasks, a RAM booster app can provide a quick and convenient solution.
It’s important to choose a reputable and trustworthy RAM booster app from a reliable developer. Read user reviews, check ratings, and research the app’s performance and security features before installing it on your device.
In the next section, we will explore another option to optimize your device’s RAM by using a task manager app.
Option 3: Use a Task Manager App
A task manager app can be a valuable tool for optimizing your device’s RAM usage and improving overall performance. Task manager apps allow you to manually control and close running apps, freeing up RAM and ensuring that critical processes have enough memory to function smoothly.
One popular task manager app is Advanced Task Manager. It offers a range of features designed to help you manage running apps and processes efficiently. With Advanced Task Manager, you can view a list of active apps and services, select and close them individually or in bulk, and even set automatic tasks to close apps at specific intervals.
To use a task manager app like Advanced Task Manager, start by downloading and installing the app from the Google Play Store. Once installed, open the app and navigate to the “Running Apps” or “Tasks” section. Here, you’ll see a list of all the running apps and services on your device.
To close an app or service, simply tap on it and select the “End” or “Stop” option. You can also select multiple apps at once and close them in bulk. Advanced Task Manager also provides options to whitelist certain apps, ensuring that they remain running even when you choose to close all other apps.
Using a task manager app allows you to have more control over the apps and services running in the background. By closing unnecessary processes, you can free up memory resources and improve your device’s performance.
However, it’s important to note that manually closing apps using a task manager should be done with caution. Android’s built-in memory management is already designed to optimize RAM usage, and closing certain essential system processes or apps may have unintended consequences or impact the stability of your device.
Task manager apps are particularly useful if you want more control over app management or if you regularly switch between resource-intensive apps. They provide a convenient way to close specific apps that may be consuming excessive memory or causing performance issues.
When choosing a task manager app, opt for a reputable and well-reviewed option from a trusted developer. Take into consideration the app’s user interface, features, and compatibility with your Android device’s version.
In the next section, we will explore another option to increase RAM on your Android device by disabling animations and background processes.
Option 4: Disable Animations and Background Processes
Disabling animations and background processes can be an effective way to optimize your device’s RAM usage and improve overall performance. By reducing unnecessary visual effects and limiting background processes, you can free up memory resources and ensure that critical apps have enough RAM to function smoothly.
To disable animations on your Android device, go to the Settings menu and select “About Phone” or “About Device.” Look for the “Build Number” and tap on it seven times to enable Developer Mode. Once Developer Mode is enabled, go back to the main Settings menu and select “Developer Options.” Here, you’ll find options to disable or reduce the scale of animations, including “Window Animation Scale,” “Transition Animation Scale,” and “Animator Duration Scale.” Set these options to “Off” or decrease their scale to reduce the visual effects and improve system responsiveness.
Reducing background processes is another way to free up RAM and improve device performance. Android allows you to limit the number of background processes running simultaneously. To do this, go to the Developer Options menu (refer to the previous steps to enable Developer Mode) and look for the “Limit background processes” option. By default, this option is set to “Standard limit.” You can change it to a lower value, such as “At most 4 processes” or “At most 2 processes,” depending on your device’s capabilities and your desired level of background multitasking.
Disabling animations and limiting background processes can help improve the speed and responsiveness of your device, especially if you have a device with limited RAM. By reducing the strain on your device’s memory, you can ensure that critical apps and processes have enough RAM to operate smoothly.
However, it’s important to note that disabling animations may result in a less visually appealing user interface, and limiting background processes may affect your device’s multitasking capabilities. Therefore, it’s essential to find a balance that suits your preferences and usage requirements.
In the next section, we will explore another option to increase RAM on your Android device by installing a custom ROM.
Option 5: Install a Custom ROM
Installing a custom ROM can be a more advanced option to increase RAM on your Android device and optimize its performance. A custom ROM is a modified version of the Android operating system that offers additional features, customization options, and often better performance and RAM optimization compared to the stock ROM provided by the device manufacturer.
Custom ROMs are created by independent developers or communities and can be installed on compatible devices. They provide a way to customize and enhance your device’s software experience, including RAM management.
One of the advantages of custom ROMs is that they are often designed to be lightweight, prioritizing RAM optimization and efficient resource usage. This can result in improved device performance, faster app loading times, and smoother multitasking.
To install a custom ROM, you’ll typically need to follow specific instructions provided by the ROM developer or community. This may involve unlocking the bootloader of your device, installing a custom recovery, and flashing the custom ROM using the recovery mode.
It’s crucial to research and choose a reputable custom ROM from trusted sources. Look for ROMs that are well-maintained, regularly updated, and compatible with your device. Be aware that installing a custom ROM will void the warranty of your device, so it’s important to understand the risks and benefits before proceeding.
Custom ROMs not only offer RAM optimization but also provide the flexibility to customize various aspects of your device’s user interface and functionality. This can include options to tweak performance settings, customize the status bar, modify the notification system, and more. Custom ROMs often come with additional features and optimizations that can enhance your Android experience.
It’s important to note that installing a custom ROM requires technical knowledge and carries some risks. Improper installation or choosing an incompatible ROM can lead to a bricked device or other issues. Therefore, it’s recommended to research thoroughly, follow instructions carefully, and back up your data before attempting to install a custom ROM.
In the next section, we will explore another option to increase RAM on your Android device by using a RAM management app.
Option 6: Use a RAM Management App
Using a dedicated RAM management app can be an effective way to optimize your Android device’s RAM usage and improve overall performance. These apps are specifically designed to help you monitor and manage your device’s memory, ensuring that it is allocated efficiently for optimal performance.
One popular app in this category is ROEHSOFT RAM Expander. It allows you to use your external SD card as virtual RAM, effectively increasing the available memory for your device. This can be particularly useful if your device has limited RAM capacity and you need more memory to run resource-intensive apps or multitask efficiently.
To use a RAM management app like ROEHSOFT RAM Expander, you’ll need to have root access on your device. Rooting your device gives you administrative access and allows you to make changes to system files and settings that are otherwise inaccessible.
After installing the RAM management app, you can configure it to use your external SD card as virtual RAM. The app will create a swap file on the SD card, which essentially functions as additional RAM for your device. This allows you to allocate more memory to run memory-intensive apps and processes without experiencing performance slowdowns or lags.
It’s essential to note that rooting your device and using a RAM management app carries certain risks, including potential security vulnerabilities and voiding your device’s warranty. Additionally, using a swap file on an external SD card may not provide the same performance benefits as physical RAM. However, it can still be a viable option to increase RAM capacity and improve device performance, especially if you have an older device with limited RAM.
Before deciding to use a RAM management app, it’s important to research the compatibility and reputation of the app and carefully follow the installation and usage instructions provided by the app developer. Additionally, make sure to backup your important data before making any system changes or altering system files.
In the next section, we will explore another option to increase RAM on your Android device by expanding it with an SD card.
Option 7: Expand RAM with an SD Card
Expanding your device’s RAM with an SD card can be a viable option to increase memory capacity and improve performance on your Android device. While it doesn’t technically add physical RAM to your device, it allows you to utilize the external SD card’s memory as an extension of your device’s RAM.
To expand RAM with an SD card, you’ll need an Android device that supports this feature. Not all devices have the capability to use an SD card as virtual RAM, so it’s essential to ensure compatibility before proceeding.
To get started, insert a compatible SD card into your device. Then, go to the Settings menu and navigate to the “Storage” or “Memory” section. Here, you should find an option to set up the SD card as internal or portable storage. Select the option to set up the SD card as internal storage, which will allow your device to use the SD card’s memory as if it were internal RAM.
Once the SD card is set up as internal storage, your device will automatically allocate memory to it, effectively expanding your available RAM. This allows for smoother multitasking, faster app loading times, and improved overall performance.
It’s important to note that expanding RAM with an SD card has its limitations. While it can provide additional memory for your device, the speed of an SD card is usually slower compared to physical RAM. This means that accessing data from the SD card may not be as fast as accessing data from dedicated RAM. As a result, you may experience slight performance variations compared to devices with larger built-in RAM capacities.
Another consideration is the size and class of the SD card. To ensure optimal performance, choose an SD card with a higher class rating, such as Class 10 or higher. It’s also recommended to choose an SD card with a larger storage capacity to accommodate your needs effectively.
Expanding RAM with an SD card can be a cost-effective solution to increase memory capacity on your Android device, especially if you have an older device with limited built-in RAM. It provides additional memory resources for running apps and processes, allowing for improved multitasking and a smoother user experience.
In the next section, we will explore another option to increase RAM on your Android device by upgrading to a device with more RAM.
Option 8: Upgrade to a Device with More RAM
If you’ve exhausted all other options and still find that your Android device’s RAM is insufficient for your needs, upgrading to a device with more RAM may be the best solution. Upgrading to a device with a higher RAM capacity can provide a significant boost in performance, ensuring smoother multitasking, faster app loading times, and improved overall responsiveness.
When considering an upgrade, it’s important to research and compare the RAM capacities of different devices. Android devices typically range from 1GB to 12GB or more of RAM, depending on the device model and specifications. Assess your usage requirements and choose a device with a RAM capacity that can accommodate your needs effectively.
Upgrading to a device with more RAM not only provides more memory for running apps and processes but also future-proofs your device and allows it to handle increasingly resource-intensive applications. This can be particularly important if you are a power user, gamer, or frequently engage in tasks that require a large amount of memory, such as video editing or running virtual machines.
Before making a purchase, consider other factors such as processor speed, storage capacity, display quality, and overall device performance. These factors can also contribute to the overall user experience and should be taken into account alongside RAM capacity.
It’s worth mentioning that upgrading to a device with more RAM will likely come at a cost. Higher RAM capacities often correspond with higher device prices. Therefore, evaluate your budget and needs to ensure that an upgrade is a justifiable investment for you.
When upgrading to a new device, ensure that it is from a reputable manufacturer and that it meets your specific requirements and preferences. Read user reviews, compare specifications, and make an informed decision based on your usage and budget.
Remember, upgrading to a device with more RAM is a long-term solution that provides the most significant boost in performance. However, it may not be necessary for everyone, and alternative options, such as clearing cache or using a RAM management app, may suffice depending on your usage patterns and needs.
In the next section, we will conclude our exploration of various ways to increase RAM on your Android device and provide a summary of the options discussed.
Conclusion
In conclusion, optimizing and increasing the RAM on your Android device can significantly improve its performance and enhance your overall user experience. Whether you’re facing sluggishness, app crashes, or slow multitasking, there are several options available to boost your device’s RAM capacity and optimize its memory usage.
By implementing the methods discussed in this article, such as clearing unnecessary apps and cache, using RAM booster apps, managing tasks, disabling animations and background processes, installing custom ROMs, utilizing RAM management apps, expanding RAM with an SD card, or upgrading to a device with more RAM, you can make noticeable improvements in your device’s performance.
It’s important to note that each option has its advantages and considerations, and the effectiveness may vary depending on your specific device and usage patterns. Some options may require technical knowledge or come with certain risks, such as rooting your device or voiding your warranty. Therefore, it’s crucial to research and choose the right approach based on your requirements and comfort level.
Moreover, it’s worth mentioning that managing your device’s RAM is just one aspect of overall device optimization. Regularly optimizing your device’s storage, clearing cache, updating apps, and maintaining a clutter-free device can also contribute to improved performance and longevity.
Remember that while increasing RAM can provide a noticeable boost to your device’s performance, it may not be the only factor affecting its speed and responsiveness. Other hardware components, such as the processor and storage speed, also play a significant role in overall device performance.
Overall, the goal of increasing RAM on your Android device is to ensure smoother multitasking, faster app loading times, and a more enjoyable user experience. Experiment with different options and find the methods that work best for your device and usage requirements.
Lastly, it’s important to regularly monitor your device’s performance and make adjustments as necessary. With the right optimizations and enhancements, you can unlock the full potential of your Android device and enjoy a faster, more efficient, and seamless user experience.