Introduction
Welcome to our guide on how to install Zoom on your laptop. Zoom is a popular video conferencing application that allows you to connect with others remotely, making it perfect for online meetings, virtual classrooms, and keeping in touch with loved ones. Whether you have a Windows or Mac laptop, we have you covered with step-by-step instructions to get Zoom up and running on your device.
In today’s digital age, staying connected through video calls has become a necessity, and Zoom has emerged as one of the leading platforms for online communication. Its user-friendly interface and robust features have made it a go-to choice for individuals, businesses, and educational institutions worldwide.
In this guide, we will walk you through the process of downloading and installing Zoom on both Windows and Mac laptops. We will also cover how to create a Zoom account, log in, configure your settings, and join or schedule Zoom meetings. Additionally, we will provide some troubleshooting tips to help you overcome any installation issues you may encounter.
Whether you are a first-time Zoom user or looking to refresh your knowledge, this guide will equip you with the necessary steps to get started with Zoom on your laptop. So, let’s dive in and explore how to install Zoom and make the most of its powerful features.
Step 1: Downloading Zoom
The first step in installing Zoom on your laptop is to download the Zoom application. Follow these instructions based on the operating system of your laptop:
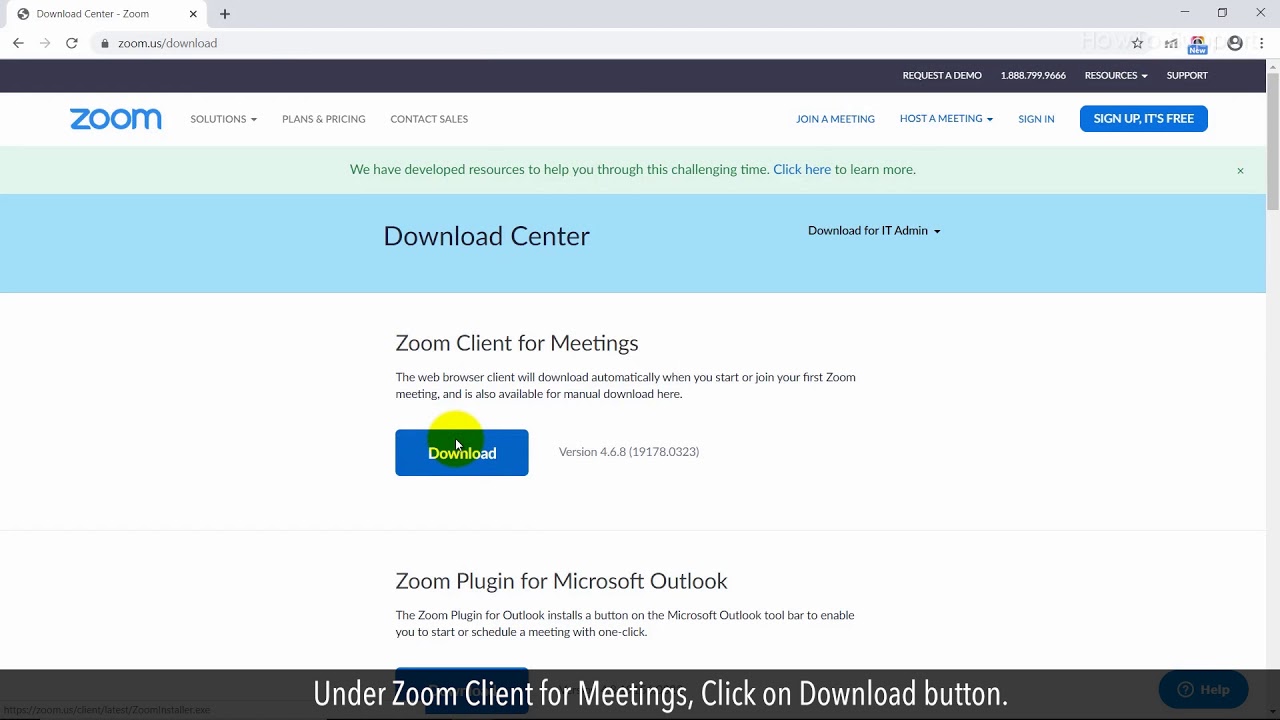
- For Windows: Open your preferred web browser and go to the official Zoom website at https://zoom.us/. Once you’re on the homepage, click on the “Resources” tab in the top navigation menu, and select “Download Zoom Client.” On the download page, click on the “Download” button under the “Zoom Client for Meetings” section. The installation file will start downloading. Once the download is complete, locate the file and double-click on it to begin the installation process.
- For Mac: Open your preferred web browser and visit the official Zoom website at https://zoom.us/. On the homepage, click on the “Resources” tab in the top navigation menu, and select “Download Zoom Client.” On the download page, click on the “Download” button under the “Zoom Client for Meetings” section. The installation file will start downloading. Once the download is complete, open the file and double-click on the “Zoom.pkg” file to begin the installation process.
Downloading the Zoom application is the first and crucial step towards utilizing its features. By choosing the appropriate installation file for your laptop’s operating system, you will be on your way to experiencing seamless video conferencing, virtual meetings, and much more.
Make sure to check the system requirements for Zoom before downloading to ensure compatibility with your laptop’s operating system. With Zoom’s versatile platform, you can connect with people around the globe with just a few clicks.
Step 2: Installing Zoom on Windows Laptop
Once you have downloaded the Zoom installation file for Windows, you are ready to proceed with the installation process. Follow these simple steps to install Zoom on your Windows laptop:
- Locate the Zoom installation file that you downloaded in Step 1. The file is typically saved in the “Downloads” folder unless you specified a different location.
- Double-click on the installation file to begin the installation process. If prompted by the User Account Control (UAC) window, click “Yes” to grant permission to install the application.
- The Zoom installation wizard will appear. Click on the “Install” button to start the installation process.
- Wait for the installation to complete. The progress bar will indicate the status of the installation process.
- Once the installation is finished, you will see a confirmation message. Click on the “Close” button to exit the installation wizard.
Congratulations! You have successfully installed Zoom on your Windows laptop. The application is now ready to use. To launch Zoom, you can either double-click on the Zoom icon on your desktop or search for “Zoom” in the Start menu and click on the appropriate search result.
Before you start using Zoom, it is recommended to create a Zoom account, which will allow you to access all the features and settings available. In the next step, we will guide you through the process of creating a Zoom account.
Note: If you encounter any issues during the installation process, double-check that your laptop meets the system requirements for Zoom. Additionally, ensure that you have a stable internet connection to avoid any disruptions during the installation.
Step 3: Installing Zoom on Mac Laptop
If you are using a Mac laptop, follow the steps below to install Zoom:
- Locate the Zoom installation file that you downloaded in Step 1.
- Double-click on the installation file. This will open the Zoom installer.
- A pop-up window will appear asking you to confirm that you want to install Zoom. Click on the “Continue” button.
- Next, you will be prompted to agree to the Zoom Software License Agreement. Take a moment to review the agreement, then click on the “Agree” button to proceed.
- Select the destination where you want to install the Zoom application. By default, it will be your “Applications” folder. If you wish to specify a different location, click on the “Change Install Location” button and navigate to the desired folder.
- Click on the “Install” button to start the installation process. If prompted, enter your Mac’s administrator password.
- The installation progress will be displayed. Wait for the installation to complete.
- After the installation is finished, you will see a confirmation message. Click on the “Close” button to exit the installer.
Great job! You have successfully installed Zoom on your Mac laptop. To launch the application, go to your “Applications” folder and locate the Zoom icon. Double-click on the icon to open Zoom.
To use Zoom to its full potential, it is recommended to create a Zoom account. The next step will guide you through the process of creating an account, which will give you access to all the features and settings available in Zoom.
If you encounter any issues during the installation process, make sure that you have a stable internet connection and that your Mac meets the system requirements for Zoom. Additionally, ensure that you have the necessary permissions to install applications on your Mac.
Step 4: Creating a Zoom Account
To fully utilize all the features and settings that Zoom has to offer, it is recommended to create a Zoom account. Follow the steps below to create your Zoom account:
- Open the Zoom application on your laptop.
- Click on the “Sign Up” or “Sign In” button, located at the top-right corner of the Zoom window.
- If you already have a Zoom account, click on the “Sign In” tab and enter your login credentials. Otherwise, continue with the next step.
- To create a new Zoom account, click on the “Sign Up” tab.
- Enter your email address in the designated field. This will be the email associated with your Zoom account.
- Fill in your first name and last name in the respective fields.
- Choose a strong password for your Zoom account, and enter it in the “Password” field.
- Click on the “Sign Up” button to proceed.
- Zoom will send a verification email to the email address you provided. Open your email inbox and locate the email from Zoom.
- Click on the verification link in the email to confirm your Zoom account.
Congratulations! You have successfully created your Zoom account. You can now use your Zoom credentials to sign in to the application and access all its features.
Creating a Zoom account allows you to schedule and host meetings, save meeting recordings, customize settings, and much more. It also facilitates seamless communication with other Zoom users.
If you encounter any issues during the account creation process, double-check your email address and password for accuracy. Also, ensure that you have a stable internet connection to receive the verification email.
Now that you have a Zoom account, you are ready to proceed to the next step and learn how to log in to Zoom.
Step 5: Logging into Zoom
Once you have created a Zoom account, logging in to the Zoom application is a straightforward process. Follow the steps below to log in to Zoom:
- Open the Zoom application on your laptop.
- Click on the “Sign In” button, located at the top-right corner of the Zoom window.
- Enter your registered email address and password in the respective fields.
- Click on the “Sign In” button to proceed.
Upon successful login, you will be taken to the Zoom home screen, where you can access various features and settings.
If you have logged in using the correct email address and password, but are still unable to access your Zoom account, ensure that your internet connection is stable. You may also want to check if there are any browser or firewall settings that might be blocking Zoom.
Remember to keep your Zoom login credentials secure and not share them with anyone. This will help protect your account and ensure the privacy and integrity of your meetings and data.
If you experience any issues logging in to your Zoom account, you can use the “Forgot Password?” option on the login page to reset your password. Follow the instructions provided to regain access to your account.
Now that you are successfully logged in to Zoom, it’s time to explore and configure Zoom settings to customize your Zoom experience. The next step will guide you through the process of configuring your Zoom settings.
Step 6: Configuring Zoom Settings
Configuring the settings in Zoom allows you to personalize your video conferencing experience and optimize it according to your preferences. To configure your Zoom settings, follow the steps below:
- Open the Zoom application on your laptop.
- Click on the profile icon or your profile picture in the top-right corner of the main Zoom window.
- From the dropdown menu, select “Settings.” This will open the Zoom settings window.
- In the settings window, you will find multiple tabs on the left-hand side, each representing different categories of settings.
- Click on a tab to access the respective settings. Some of the key settings you may want to configure include:
- General: Here you can customize your profile picture, display name, and set your default meeting settings.
- Audio: Configure your microphone and speaker settings, as well as audio advanced options.
- Video: Adjust video settings such as camera selection, video resolution, and video advanced options.
- Meetings: Set preferences for meeting invitations, screen sharing, and other meeting-related options.
- Recording: Configure settings related to local and cloud recording, recording formats, and permissions.
- Virtual Background: Customize your background using virtual images or videos during meetings.
- Advanced: Access more advanced settings such as network connectivity, keyboard shortcuts, and accessibility options.
- Make the desired changes in each tab according to your preferences. You can click on the “Save” or “Apply” button to save your settings.
By configuring your Zoom settings, you can tailor your video conferencing experience to suit your specific needs. It allows you to optimize the audio and video quality, select the appropriate meeting options, and customize other features based on your requirements.
Take some time to explore the various settings available in Zoom and adjust them according to your preferences. Review the settings periodically to ensure they are up to date and aligned with your needs.
Now that you have configured your Zoom settings, you are ready to join meetings or even schedule your own. In the next step, we will guide you through the process of joining a Zoom meeting.
Step 7: Joining a Zoom Meeting
Joining a Zoom meeting is a simple process that allows you to connect with others virtually. Follow the steps below to join a Zoom meeting:
- Open the Zoom application on your laptop.
- Click on the “Join” button or “Join a Meeting” option on the Zoom home screen.
- In the meeting ID or personal link name field, enter the meeting ID provided to you by the meeting host.
- If the meeting has a password, enter the password in the “Password” field. Note that meeting passwords are case-sensitive.
- Optional: Enable or disable video by selecting the respective checkbox based on your preference.
- Choose your preferred audio options, such as joining with computer audio or using a phone for audio.
- Click on the “Join” button to join the meeting.
- Once you join the meeting, you can adjust your audio and video settings, control your microphone and camera, and interact with other participants using the meeting controls.
Joining a Zoom meeting allows you to collaborate, communicate, and engage with others no matter where they are located. Whether it’s a business meeting, a virtual classroom, or a social gathering, Zoom provides a seamless platform for connection.
Remember to be mindful of meeting etiquette and follow any guidelines or instructions provided by the meeting host. Mute your microphone when you’re not speaking to minimize background noise and be attentive and respectful during the meeting.
If you encounter any issues while joining a Zoom meeting, ensure that you have entered the correct meeting ID and password. Double-check your internet connection to ensure a stable and reliable connection.
Now that you know how to join a Zoom meeting, let’s explore how to schedule your own Zoom meetings in the next step.
Step 8: Scheduling a Zoom Meeting
Scheduling a Zoom meeting allows you to plan and organize virtual gatherings in advance. Follow the steps below to schedule your own Zoom meeting:
- Open the Zoom application on your laptop.
- Click on the “Schedule” button or “Schedule a Meeting” option on the Zoom home screen.
- A scheduling window will appear, where you can enter the details for your meeting.
- Fill in the meeting topic or title in the designated field. This should reflect the purpose or subject of your meeting.
- Select the date and start time for your meeting. You can also set the duration of the meeting.
- Choose the appropriate meeting settings, such as enabling or disabling video for participants and setting audio options.
- Specify if you want to require meeting passwords or enable waiting rooms for added security.
- Add any additional meeting options, such as screen sharing, recording, and participant privileges.
- Click on the “Schedule” button to finalize the scheduling of your Zoom meeting.
- After scheduling the meeting, you will be provided with meeting details, including the meeting ID, password, and the invitation text.
- You can then share the meeting invitation with participants via email, instant messaging, or any other preferred communication channel.
Scheduling a Zoom meeting allows you to plan and communicate the details of your meeting in advance. It helps ensure that everyone involved is aware of the meeting time, date, and other important information.
Remember to share the meeting invitation with participants well in advance to give them ample time to prepare and join the meeting on time.
As the meeting host, you have control over the meeting settings and can manage the participants and their privileges during the meeting. Familiarize yourself with the various meeting controls available to you to ensure a smooth and productive meeting experience.
Now that you know how to schedule a Zoom meeting, you are ready to plan and host successful virtual gatherings.
Step 9: Troubleshooting Zoom Installation Issues
While the installation process for Zoom is usually smooth, there can be instances where you encounter issues. Here are some common troubleshooting steps to resolve any Zoom installation issues:
- Ensure that your laptop meets the system requirements for running Zoom. Check the minimum operating system version, processor, and memory requirements on the Zoom website.
- If you encounter an error during the installation process, try running the installation file as an administrator. Right-click on the file and select “Run as administrator” from the context menu.
- If the installation gets stuck or freezes, close the installation wizard and try running it again. You can also restart your laptop and attempt the installation from the beginning.
- Temporarily disable any antivirus software or firewall that may be blocking the Zoom installation. Consult your antivirus documentation or contact your IT department for guidance on disabling these security measures.
- Make sure your internet connection is stable during the installation. Unstable or slow internet can cause interruptions or incomplete installations. Connect to a reliable network and try the installation again.
- Check if there are any other programs or applications running in the background that could be conflicting with the Zoom installation. Close unnecessary programs and try the installation again.
- If you are still unable to install Zoom, try downloading the installation file from the official website again. There may have been a temporary issue with the previous download.
- If all else fails, reach out to Zoom support for assistance. Visit the Zoom website and navigate to the support section for contact options such as live chat, email support, or community forums.
By following these troubleshooting steps, you can resolve common installation issues and ensure a successful installation of Zoom on your laptop.
Remember to always keep your Zoom application updated to the latest version. Updates often include bug fixes and improvements that can enhance the performance and stability of the application.
If you continue to experience difficulties with the Zoom installation, it may be helpful to consult with an IT professional or seek support from the Zoom community.
With the installation successfully completed, you can now enjoy the benefits of Zoom and connect with others through virtual meetings, video conferences, and more.
Conclusion
Congratulations! You have reached the end of our guide on how to install Zoom on your laptop. By following the step-by-step instructions, you have successfully downloaded, installed, and configured Zoom on your Windows or Mac laptop. Additionally, you have learned how to create a Zoom account, log in, and troubleshoot installation issues.
Zoom is a powerful and versatile video conferencing platform that empowers individuals, businesses, and educational institutions to connect and collaborate remotely. With its user-friendly interface and extensive features, Zoom has become a go-to solution for virtual meetings, online classrooms, and staying connected with loved ones.
By having Zoom installed on your laptop, you can conveniently join meetings, schedule your own meetings, and customize your video and audio settings to suit your preferences. The ability to connect with others from anywhere and conduct virtual discussions opens up endless possibilities for collaboration and productivity.
Remember to regularly check for Zoom updates to ensure that you are using the latest version of the application, as new updates often include performance improvements and security enhancements.
Whether you are a seasoned Zoom user or new to the platform, continue exploring and experimenting with the features and settings available. Zoom offers a wide range of advanced options and integrations that can enhance your virtual meeting experience.
Thank you for choosing our guide as a resource to install Zoom on your laptop. We hope this tutorial has been helpful in getting you started with Zoom and that it enables you to connect, collaborate, and communicate effectively in the digital world.
Now, go ahead and dive into the exciting world of Zoom, and enjoy seamless and engaging virtual interactions!


