Introduction
Installing RAM, or Random Access Memory, is a relatively simple and cost-effective way to boost the performance of your computer. Whether you’re a gamer looking to enhance your gaming experience or a professional needing to run resource-intensive software, upgrading your RAM can significantly improve your computer’s speed and multitasking capabilities.
This article will guide you through the process of installing RAM in your computer, providing step-by-step instructions to ensure a successful installation. You don’t need to be a tech expert to tackle this task; with a bit of patience and the right tools, you’ll be able to upgrade your RAM in no time.
We’ll cover everything from preparing your computer and opening the case to locating the RAM slots and properly installing the new RAM modules. By the end of this guide, you’ll have the knowledge and confidence to upgrade your computer’s RAM and enjoy the benefits of improved performance and efficiency.
Before we begin, it’s important to note that every computer is different, so the specific steps may vary slightly depending on the make and model of your computer. Make sure to consult your computer’s user manual for any additional instructions or precautions specific to your device.
Tools Needed
Before you begin the RAM installation process, it’s important to gather the necessary tools to ensure a smooth and successful upgrade. Here are the tools you’ll need:
- Screwdriver: Most computers require a Phillips-head screwdriver to open the case. Check the screws on your computer case to determine the appropriate size.
- Anti-static wrist strap: This strap helps prevent electrostatic discharge (ESD), which can damage sensitive computer components. It’s crucial to wear an anti-static wrist strap throughout the installation process.
- Compatible RAM modules: Consult your computer’s user manual or manufacturer’s website to determine the type and specifications of RAM modules compatible with your computer.
- Clean cloth or compressed air: Dust can accumulate inside the computer case, affecting its performance. Use a clean cloth or compressed air to remove any dust or debris from the RAM slots and surrounding areas.
Once you’ve gathered these tools, you’re ready to proceed with the RAM installation process. It’s important to work in a clean and static-free environment to avoid any potential damage to your computer components.
Note: If you’re unsure about the compatibility of the RAM modules or need assistance with the installation, don’t hesitate to consult a professional or seek guidance from the manufacturer or a reputable computer technician.
Step 1: Preparing the Computer
Before diving into the RAM installation process, it’s crucial to prepare your computer properly. This step ensures that you can safely work on your computer without risking any damage to the components. Follow these steps to prepare your computer:
- Power off the computer: Make sure to shut down your computer completely before beginning the installation process. This step is essential to avoid any potential damage to the hardware components.
- Unplug the power cord: Once your computer is powered off, unplug the power cord from the electrical socket. This step eliminates the risk of electric shock and provides added safety during the installation process.
- Disconnect peripherals: Remove any peripheral devices, such as external hard drives, USB devices, and monitors, that are connected to your computer. These devices can obstruct the access to the RAM slots and make the installation process more difficult.
- Lay the computer on a flat surface: Find a stable and flat surface to place your computer. This ensures stability during the installation process and minimizes the risk of accidental falls or damage to the computer.
- Touch a metal surface: To discharge any static electricity from your body, touch a metal surface that is grounded. This step helps prevent electrostatic discharge (ESD), which can be harmful to the computer’s components.
By following these steps, you have successfully prepared your computer for the RAM installation process. Now you are ready to move on to the next step: shutting down the computer.
Step 2: Shutting Down the Computer
Now that you’ve prepared your computer, it’s time to shut it down completely before moving forward with the RAM installation. Follow these steps to properly shut down your computer:
- Save your work: Make sure to save any open files or documents you’re working on. Closing any running applications will also help in ensuring that your work is not lost during the shutdown process.
- Close all applications: Close all open applications and programs running on your computer. This will prevent any data loss or potential conflicts during the shutdown process.
- Click on the “Start” button: In the bottom left corner of your screen, click on the “Start” button to access the shutdown options.
- Select “Shut Down”: From the dropdown menu, select the “Shut Down” option. This will initiate the shutdown process for your computer.
- Wait for the computer to power off: Give your computer a few moments to complete the shutdown process. You may see a “Shutting Down” screen or your computer’s logo disappearing, indicating that the shutdown is in progress.
- Verify that the computer is powered off: Ensure that the computer is completely powered off. You can do this by checking for any lights or sounds coming from your computer. If everything is silent and the power indicators are off, your computer is successfully shut down.
By following these steps, you have properly shut down your computer, ensuring that no components are active or at risk of damage during the RAM installation process. Now you can proceed to the next step: opening the computer case.
Step 3: Opening the Computer Case
In order to access the RAM slots, you’ll need to open your computer case. Follow these steps to safely open the case:
- Refer to the user manual: Before proceeding, consult your computer’s user manual for instructions specific to your make and model. It will provide guidance on the proper way to open the case and any precautions to take.
- Locate the screws: Identify the screws that secure the case. Most cases have screws on the back or side panel. Use the appropriate screwdriver to remove them, ensuring that they are safely set aside for later reassembly.
- Remove the side panel: Carefully slide or lift the side panel to remove it from the case. Some cases may have latch mechanisms or release buttons that need to be pressed or shifted to remove the panel.
- Ground yourself: Before continuing, it’s important to ground yourself to prevent electrostatic discharge. You can do this by touching a metal surface or wearing an anti-static wrist strap.
Once you have successfully opened the computer case, you’ll have clear access to the internal components, including the RAM slots. Take a moment to familiarize yourself with the layout and design of the interior, as this will make the RAM installation process easier and smoother.
Note: If you’re unsure about any step or encounter difficulties while opening the case, it’s recommended to seek assistance from a professional or refer to the manufacturer’s guidelines for your specific computer model.
Step 4: Grounding Yourself
Grounding yourself is an important step to prevent electrostatic discharge (ESD) when working with computer components. ESD can damage sensitive electronic components, including RAM modules, so it’s crucial to take precautions to avoid it. Follow these steps to ground yourself:
- Remove any static sources: Remove any clothing or accessories that are likely to cause static electricity, such as woolen clothing or synthetic fabrics. It’s best to wear cotton or similarly non-static generating clothing.
- Find a grounding point: Identify a grounded metal object, such as a metal table leg or a metal part of the computer chassis. This will provide a safe path for static electricity to dissipate.
- Touch the grounding point: Touch the identified grounding point with your hands, making sure to establish a direct contact. This helps discharge any static electricity that may have accumulated on your body.
- Alternatively, use an anti-static wrist strap: If you have an anti-static wrist strap, wrap it securely around your wrist. Connect the other end of the strap to a grounded metal object or the metal part of the computer chassis.
By grounding yourself, you minimize the chances of static electricity causing damage to your computer components. Remember to maintain contact with the grounding point or keep the anti-static wrist strap securely connected throughout the RAM installation process.
Note: It’s important to reestablish your ground contact if you move away from your work area or take a break during the installation process. This ensures continuous protection against ESD.
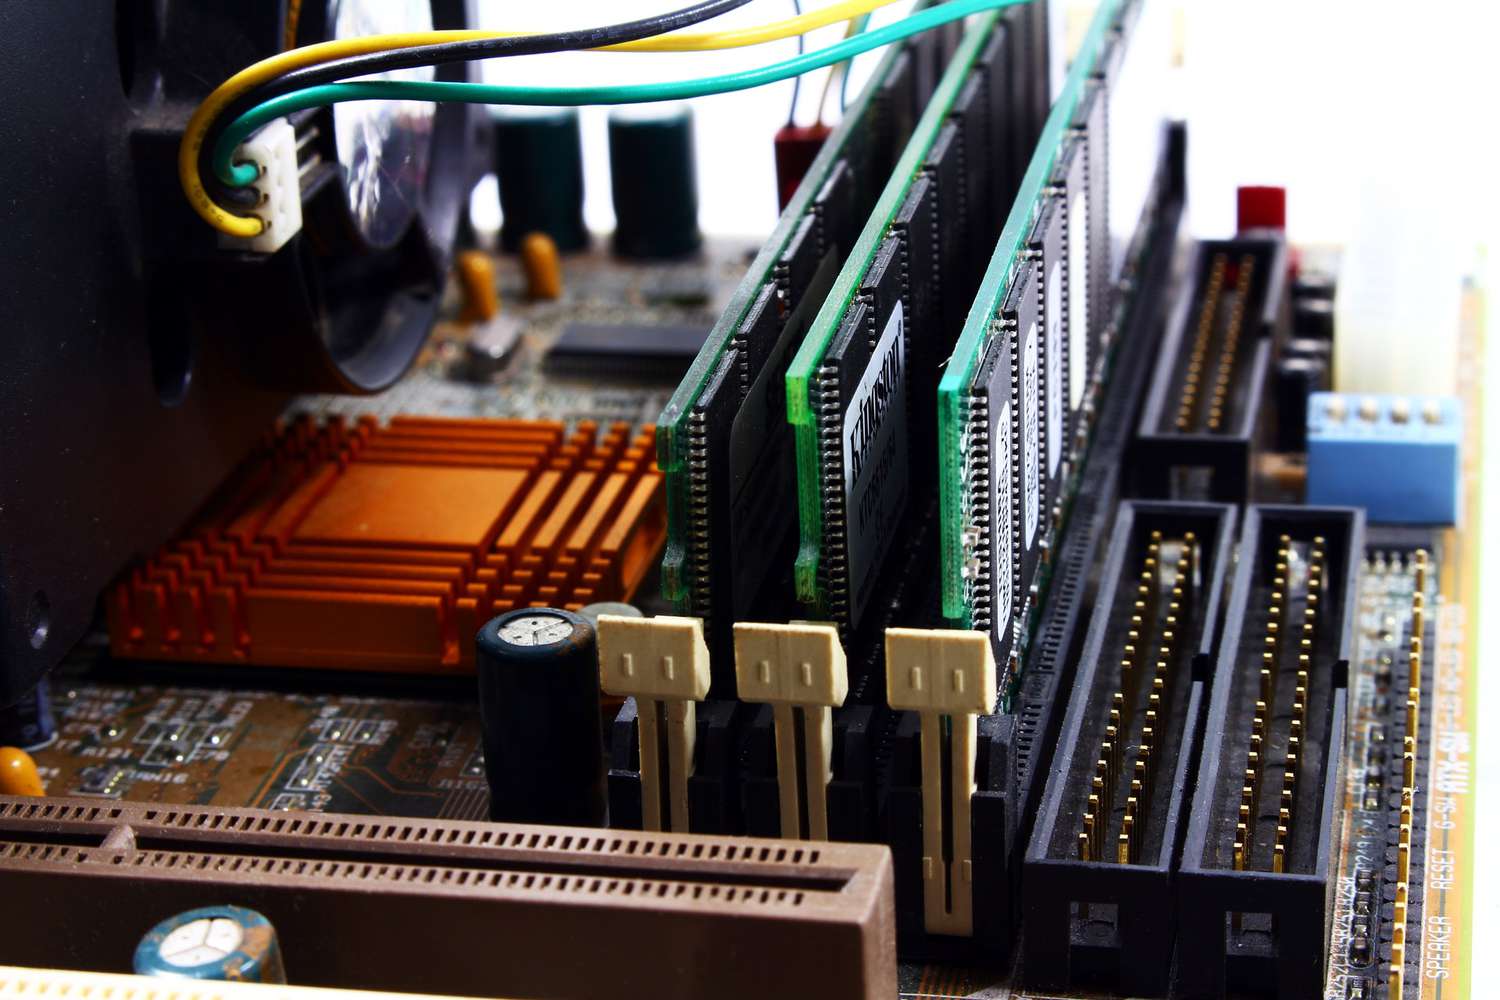
Step 5: Locating the RAM Slots
Before you can install new RAM modules, it’s important to locate the RAM slots inside your computer. Follow these steps to identify the RAM slots:
- Observe the motherboard: Take a look at the motherboard inside your computer case. The motherboard is the large circuit board that houses various components, including the RAM slots.
- Look for the DIMM slots: DIMM stands for Dual Inline Memory Module, which is the type of RAM used in most modern computers. Locate the DIMM slots on the motherboard; these slots are where the RAM modules will be inserted.
- Count the number of RAM slots: Take note of how many RAM slots are available on the motherboard. This will help you determine the maximum amount of RAM your computer can support.
- Refer to the user manual: If you’re having trouble identifying the RAM slots, refer to your computer’s user manual or the manufacturer’s website for more detailed information. They will usually provide diagrams or specific instructions on locating the RAM slots.
- Take precautions: While locating the RAM slots, ensure that you don’t touch any other components on the motherboard. Handle the motherboard with care and avoid applying excessive force or pressure.
Once you have located the RAM slots, you are ready to proceed to the next step: removing any existing RAM (if applicable) before installing the new modules.
Note: Remember that every computer has a different layout, so the location and number of RAM slots may vary. It’s essential to refer to your specific computer model’s documentation for accurate instructions.
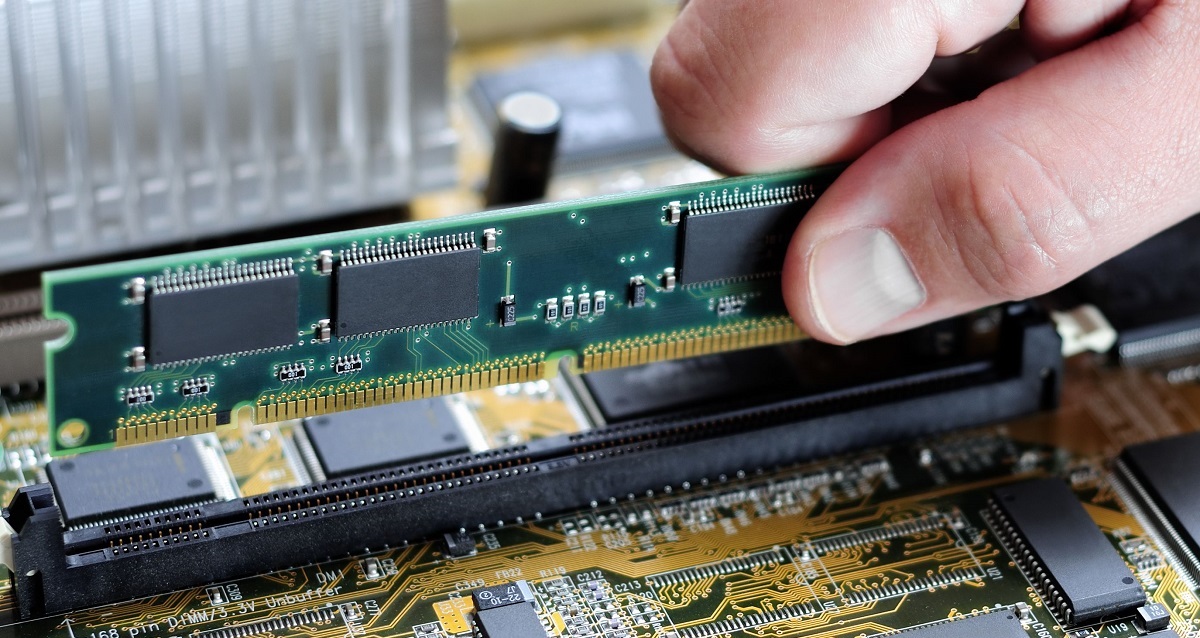
Step 6: Removing Existing RAM (if applicable)
If your computer already has RAM installed, you’ll need to remove it before installing the new modules. Follow these steps to remove the existing RAM:
- Identify the existing RAM modules: Locate the installed RAM modules in the RAM slots on the motherboard. Take note of how many modules are installed and their configuration.
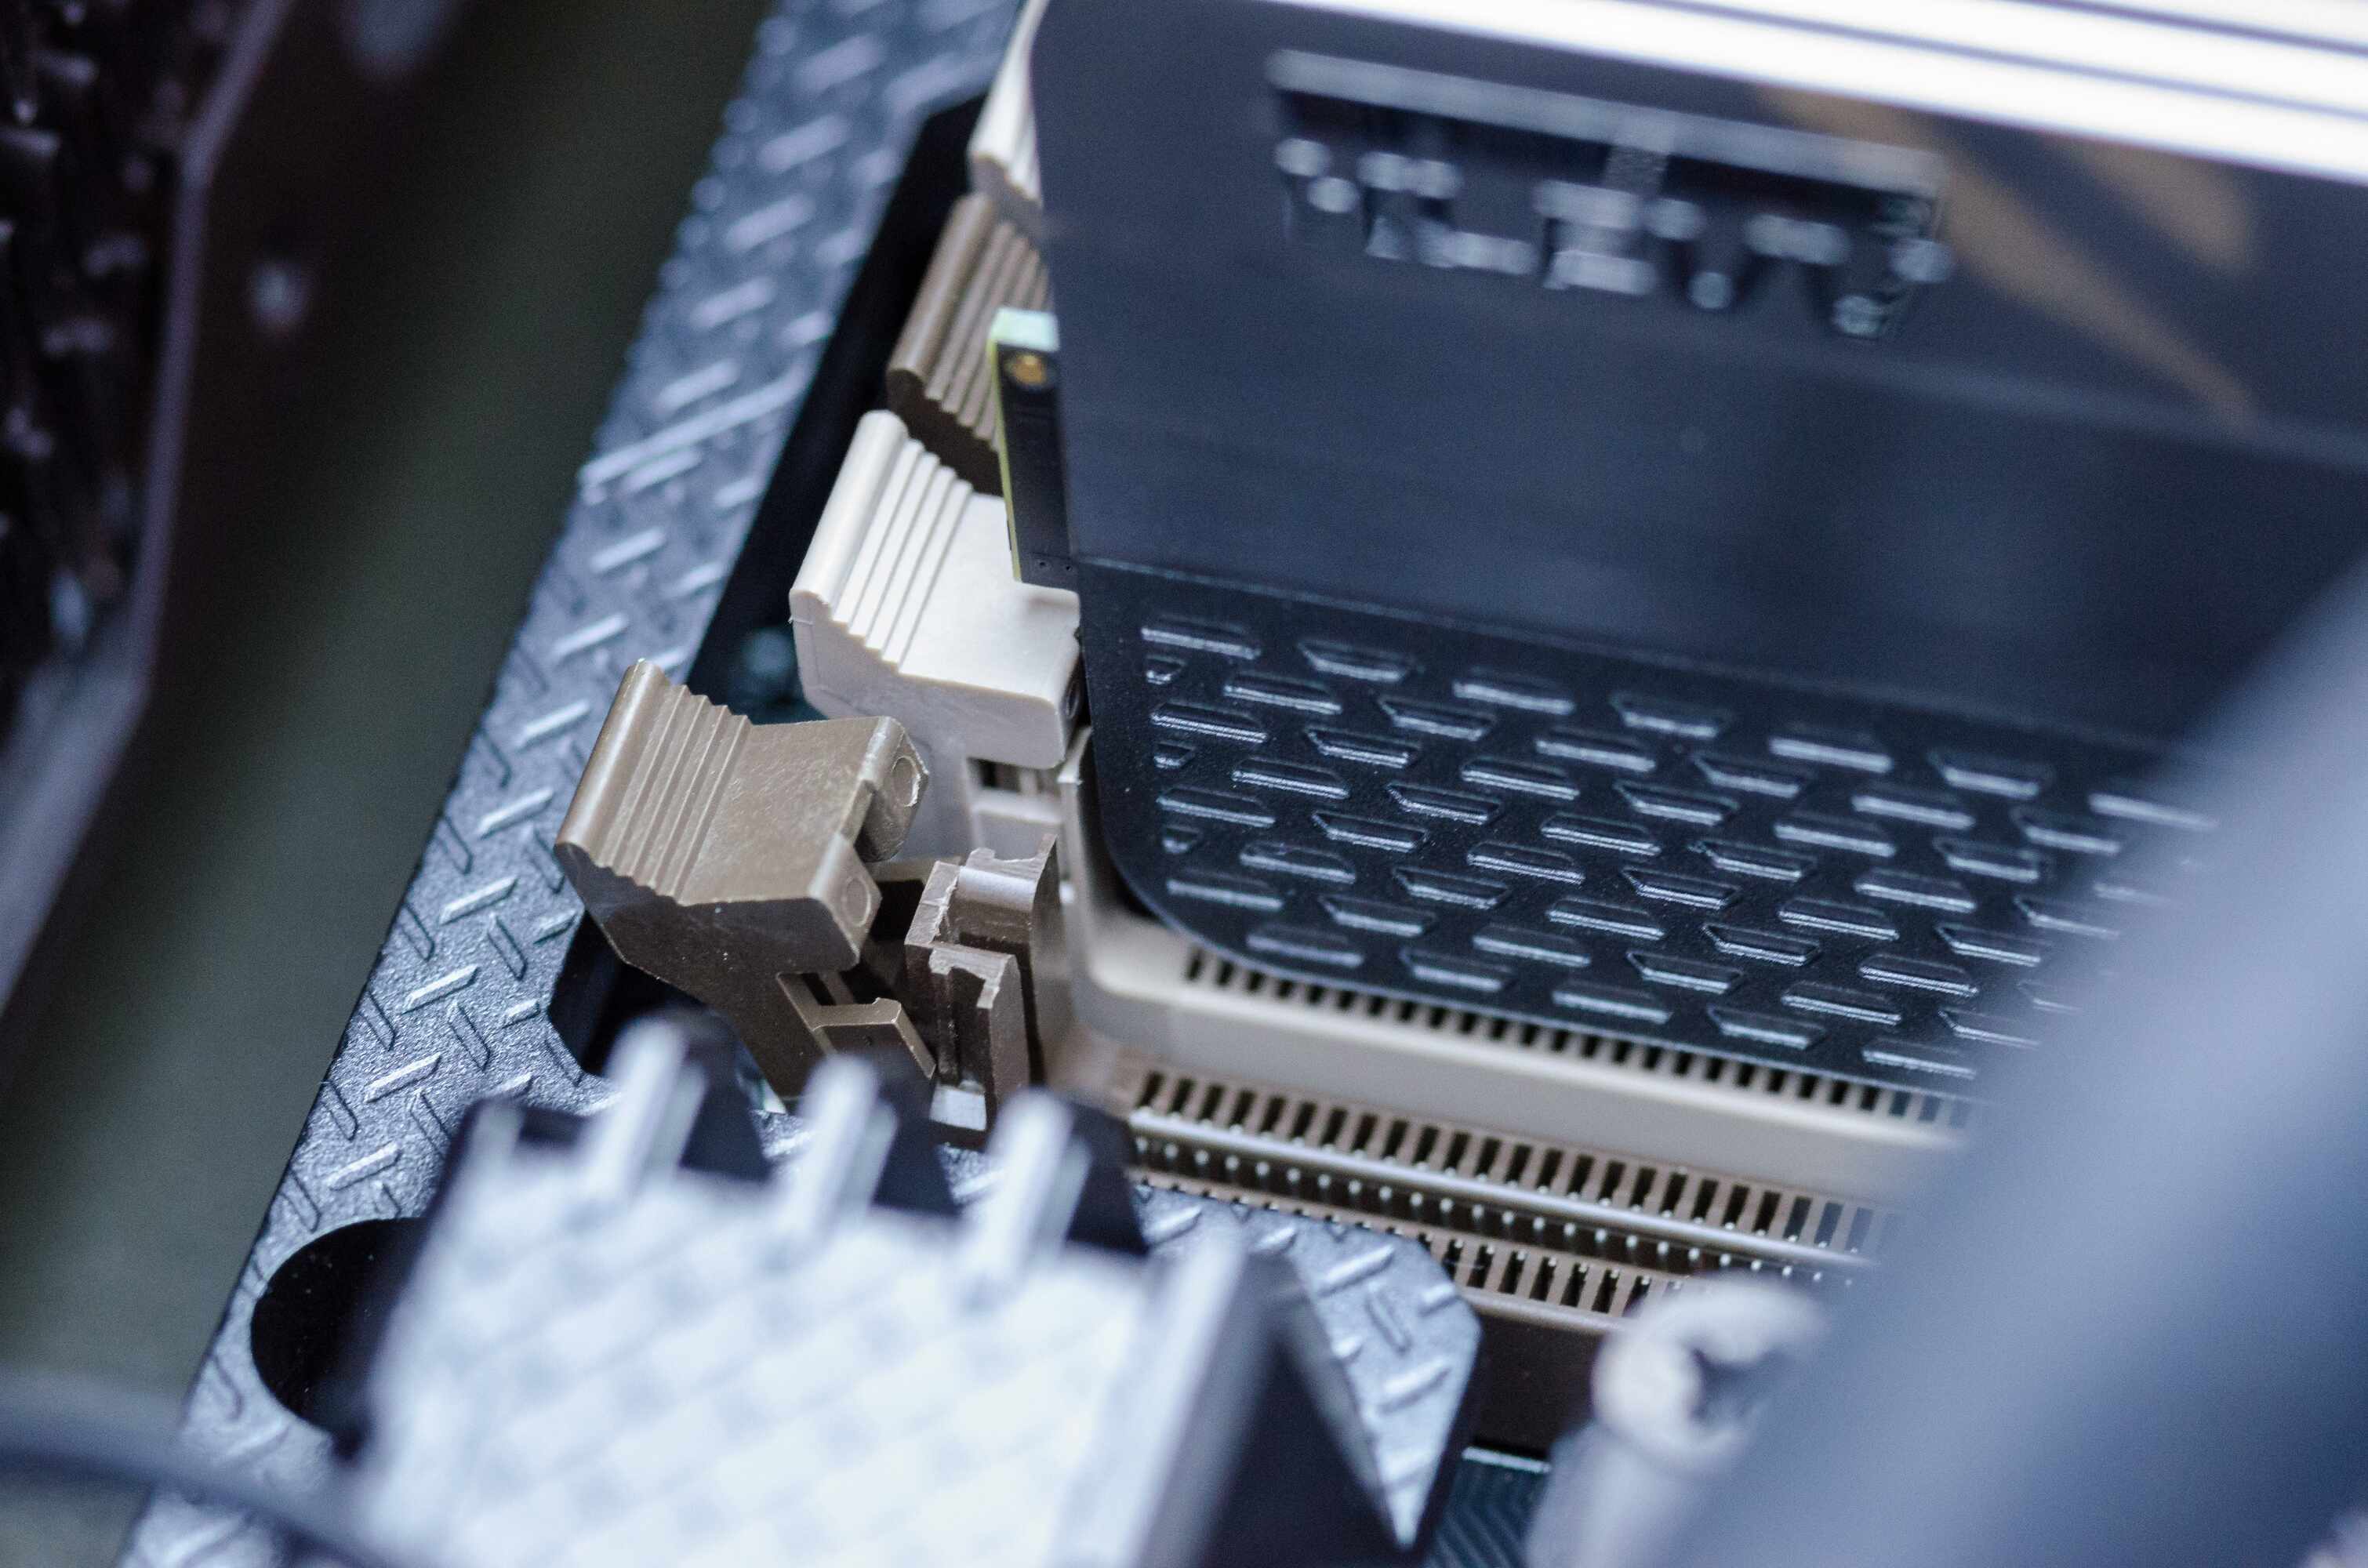
- Release the retaining clips: On each side of the RAM module, there are small retaining clips. Gently push these clips outward to release the RAM module from the slot. The module will pop up slightly when released.
- Remove the RAM module: Once the retaining clips are released, carefully grasp the sides of the RAM module and lift it straight up out of the slot. Avoid touching the gold pins on the bottom of the module, as this can cause static electricity damage.
- Repeat for additional modules: If your computer has multiple RAM modules, repeat the process for each module, one at a time.
- Set aside the removed RAM modules: Place the removed RAM modules in a safe and static-free location. It’s a good idea to keep them in an anti-static bag or wrap them in an anti-static cloth to prevent any damage.
By following these steps, you have successfully removed the existing RAM modules from your computer. Make sure to handle the modules with care, avoiding static electricity and physical damage. Now you are ready to move on to the next step: installing the new RAM modules.
Note: If your computer does not have any existing RAM installed, you can skip this step and proceed directly to installing the new RAM modules.
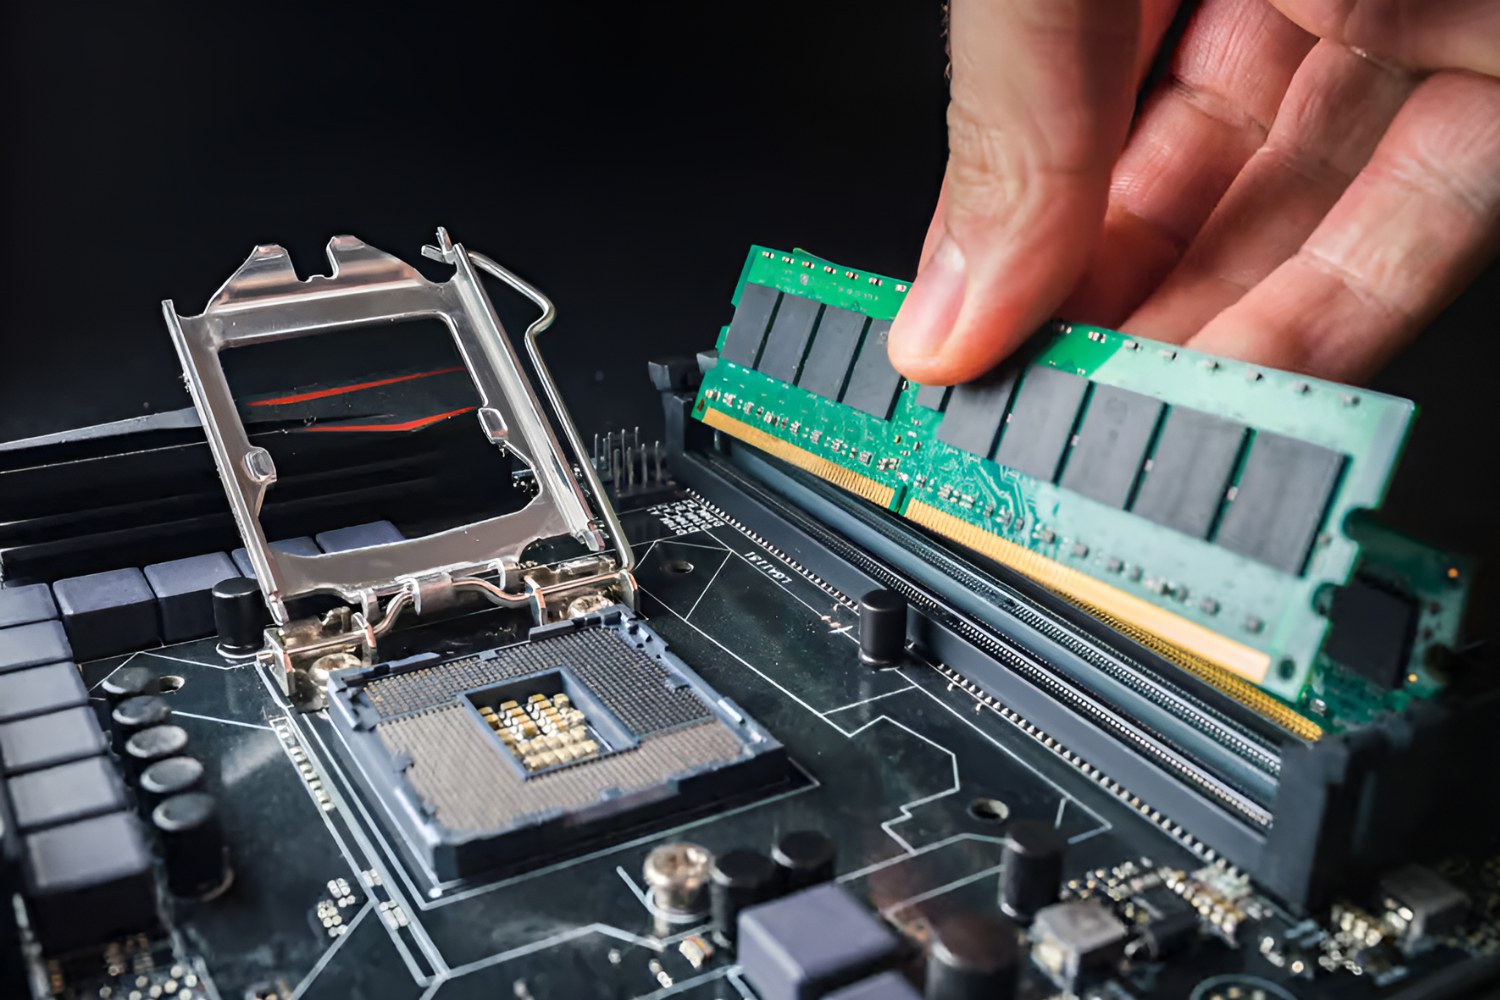
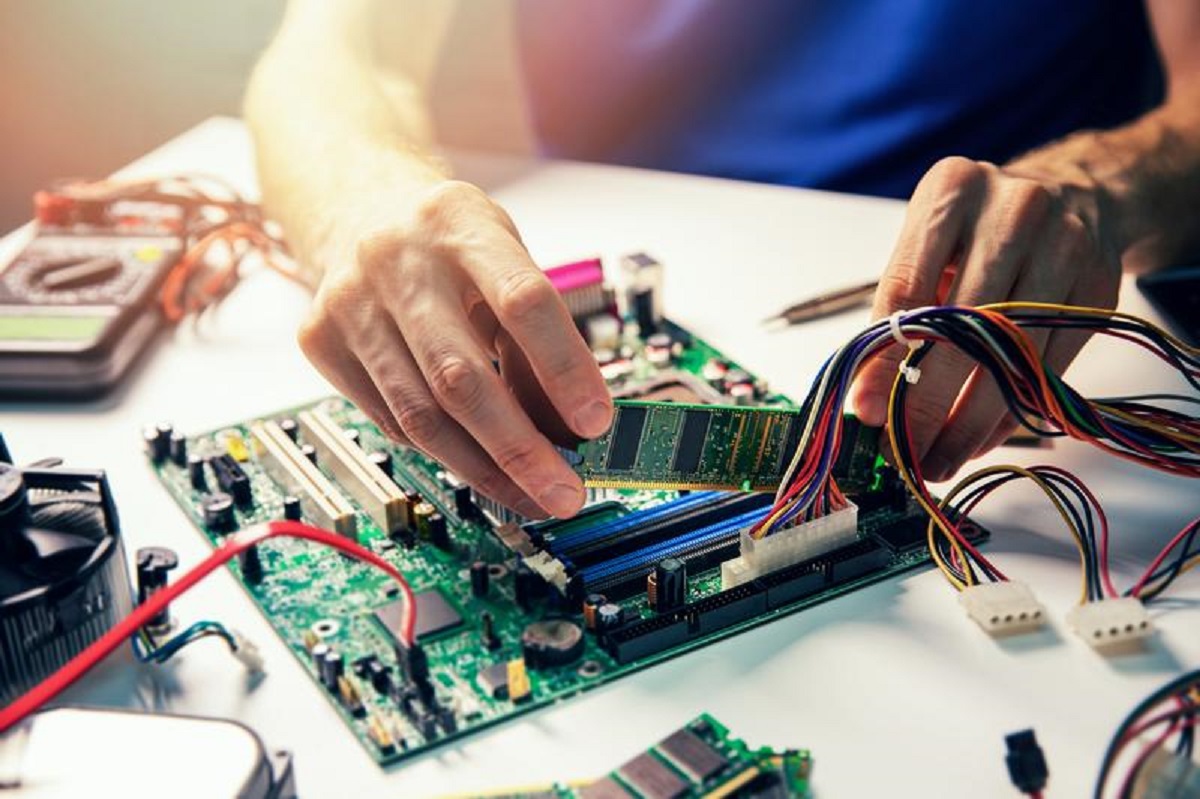
Step 7: Installing New RAM
Now that you have removed the existing RAM modules (if applicable), it’s time to install the new RAM modules. Follow these steps to properly install the new RAM:
- Handle the RAM modules: Carefully unpack the new RAM modules from their packaging. Hold them by their edges, avoiding touching the gold pins or any other sensitive components.
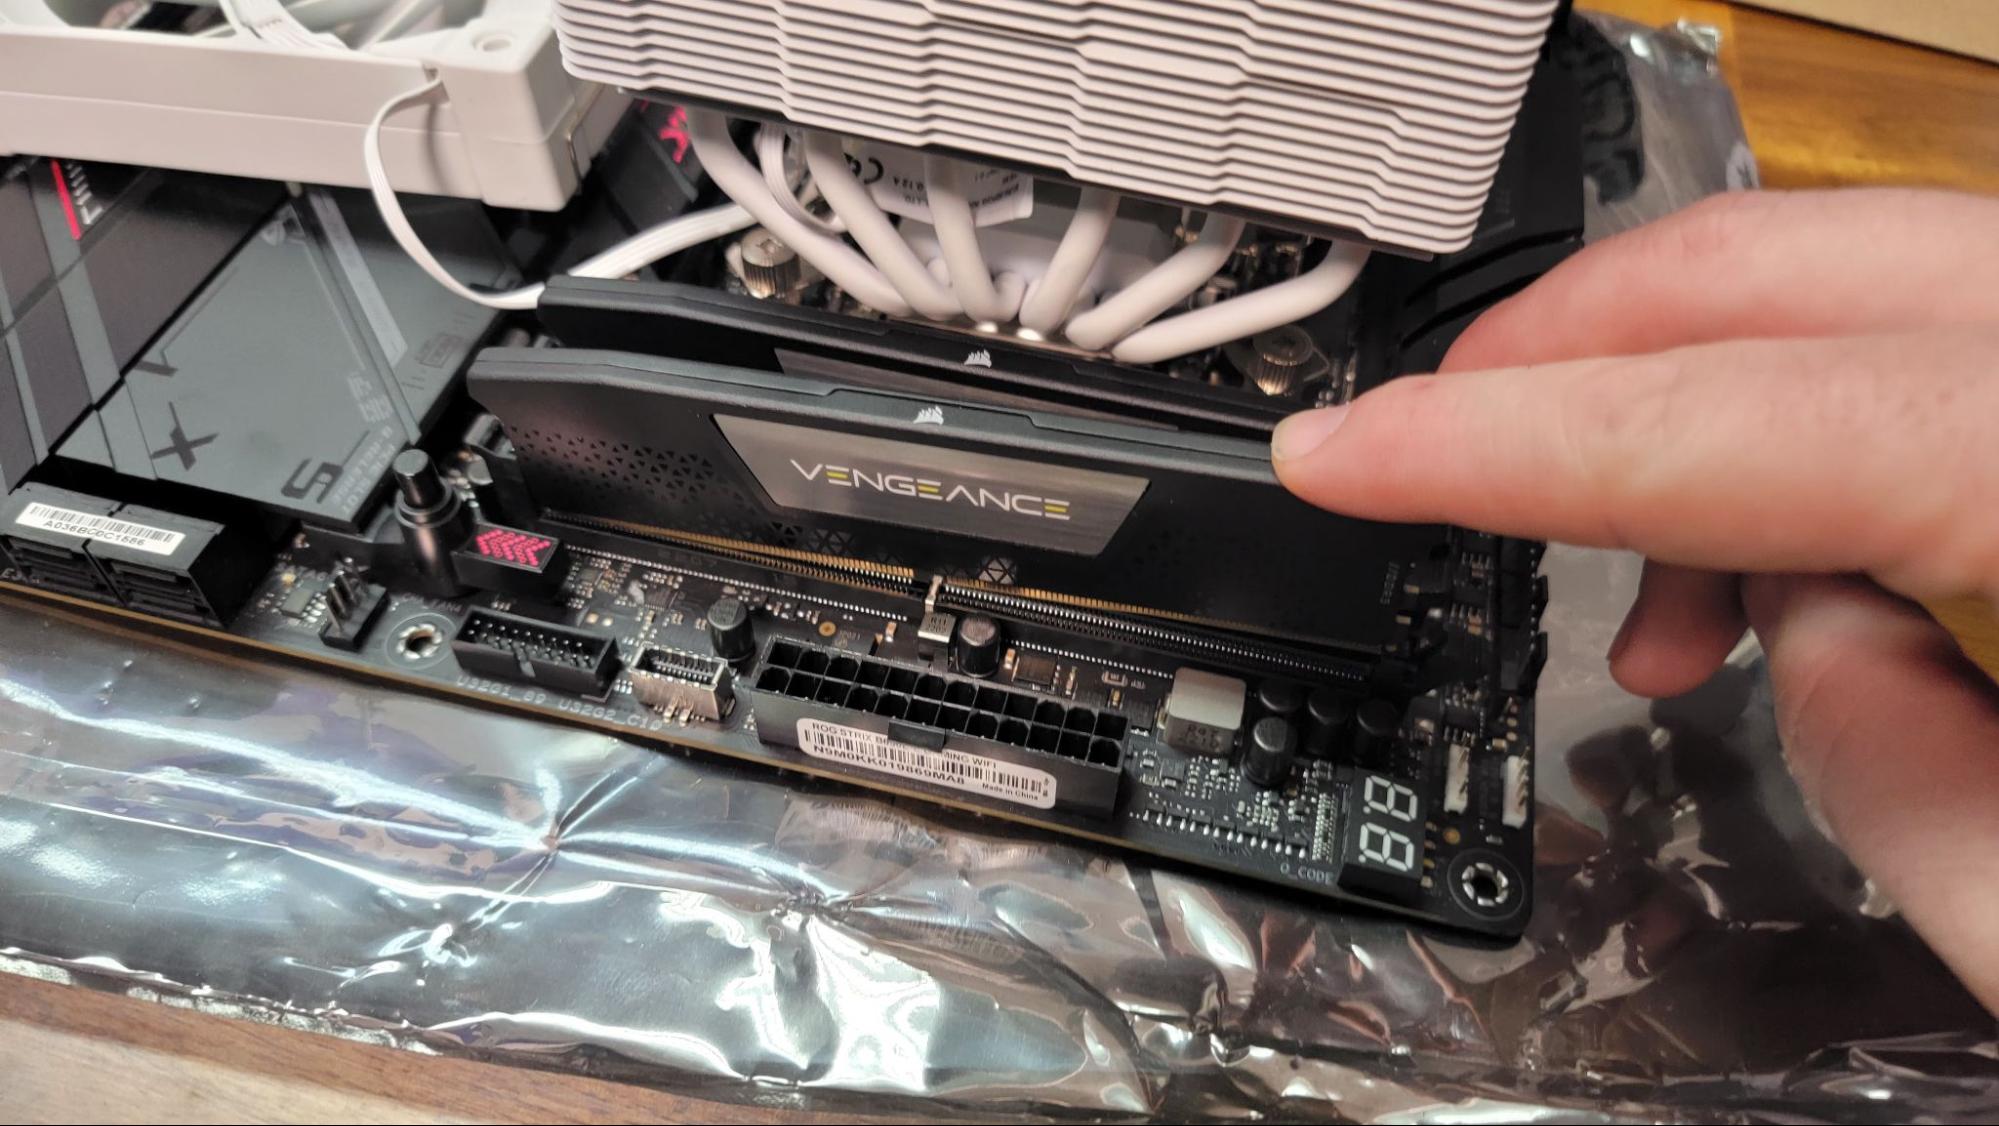
- Orient the RAM module correctly: Ensure that the notch on the bottom edge of the RAM module aligns with the notch in the RAM slot on the motherboard. This ensures that the RAM is inserted in the correct orientation.
- Insert the RAM module: Align the RAM module with the slot and begin inserting it at a slight angle. Push down gently but firmly until the module is fully seated in the slot. You will hear a click when the retaining clips lock the module in place.
- Repeat for additional modules: If you have multiple RAM modules to install, repeat the process for each module, one at a time, in the appropriate slots.
- Make sure they are secure: After installing the RAM modules, give them a gentle wiggle to ensure they are securely in place. The modules should not move or be loose within the slots.
- Double-check the configuration: Verify that the RAM modules are installed in the correct slots and in the recommended configuration as specified in your computer’s user manual or manufacturer’s guidelines.
By following these steps, you have successfully installed the new RAM modules into your computer. It’s important to ensure that they are properly seated and securely in place before proceeding to the next step.
Note: If you encounter any difficulties during the installation process or if the RAM modules do not fit properly, double-check the compatibility of the modules with your computer and consult the user manual or seek professional assistance.
Step 8: Closing the Computer Case
Now that you have successfully installed the new RAM modules, it’s time to close the computer case. Follow these steps to securely close the case:
- Align the side panel: Position the side panel back onto the computer case, ensuring that it aligns with the case properly. The edges should fit snugly together.
- Slide or secure the side panel: Depending on your computer case design, slide the side panel back into place or use the screws you removed earlier to secure it tightly. Make sure all screws are tightened evenly.
- Double-check for loose objects: Before fully closing the case, check for any loose cables or objects inside the case. Ensure that everything is properly connected and secured so that nothing interferes with the functioning of the computer.
- Tighten any remaining screws: If there are any additional screws or fasteners for the case, tighten them appropriately to ensure a secure fit.
- Remove any static sources: Before powering on the computer, remove any static sources near the computer, such as static-generating fabrics or objects. This reduces the risk of static electricity affecting the components.
By following these steps, you have successfully closed the computer case, securing the new RAM modules inside. Ensure that the case is tightly closed and all screws are securely fastened before proceeding to the next step.
Note: It’s important to take your time during this step to ensure that the case is closed properly. An improperly closed case can lead to issues with cooling, stability, and potential damage to the components.
Step 9: Powering on the Computer
With the new RAM modules installed and the computer case securely closed, it’s time to power on your computer and make sure everything is working properly. Follow these steps to safely power on your computer:
- Connect the power cord: Plug the power cord back into the electrical socket, ensuring a secure connection.
- Double-check connections: Before turning on the computer, make sure all peripheral devices, such as monitors and keyboards, are properly connected to the appropriate ports.
- Press the power button: Locate the power button on your computer and press it to turn on the computer. You should hear the fans start to spin and see the computer’s startup sequence on your monitor.
- Listen for any abnormal sounds: While the computer is powering on, listen for any unusual or irregular sounds, such as beeps or grinding noises. These may indicate a problem with the RAM installation or other hardware issues.
- Check the BIOS settings: During the startup process, you may need to access the computer’s BIOS settings. Consult your computer’s user manual for instructions on how to access the BIOS and verify that the new RAM is recognized and configured correctly.
- Monitor system performance: Once the computer has fully booted up, monitor its performance. Open up multiple applications and tasks to test the enhanced multitasking capabilities provided by the new RAM.
By following these steps, you have successfully powered on your computer with the new RAM modules installed. Take a moment to ensure that everything is functioning properly and that the computer is detecting the new RAM modules as expected.
Note: If you encounter any issues, such as system instability or the computer not detecting the new RAM modules, double-check the installation process and consult the user manual for troubleshooting steps. It’s also recommended to seek professional assistance if needed.
Conclusion
Congratulations! You have successfully completed the process of installing new RAM in your computer. By following the step-by-step instructions outlined in this guide, you have upgraded your computer’s memory, potentially improving its performance and multitasking capabilities.
Remember, installing RAM is a cost-effective and relatively simple way to enhance your computer’s speed and efficiency. Upgrading the RAM allows you to run more applications simultaneously, handle resource-intensive tasks, and experience smoother overall performance.
Throughout the installation process, it’s crucial to handle the RAM modules with care, ensure compatibility with your computer’s specifications, and take precautions to avoid static electricity discharge. These measures will help protect the longevity and functionality of the RAM modules.
If you encounter any difficulties or are unsure about any step, it’s always advisable to consult the user manual for your specific computer model or seek professional assistance. Additionally, periodically check for BIOS updates or driver updates to optimize the performance of your upgraded RAM.
Now that you have successfully installed your new RAM, enjoy the improved performance and productivity that it brings. Whether you’re a gamer, a creative professional, or simply a computer enthusiast, the increased RAM capacity will undoubtedly enhance your computing experience.
Thank you for following this guide, and happy computing with your upgraded RAM!