Introduction
Welcome to our guide on how to add RAM to your Asus laptop! If you’re experiencing sluggish performance or running out of memory while multitasking, upgrading the RAM can significantly improve your laptop’s speed and overall performance. Adding RAM is a simple and cost-effective way to enhance your laptop’s capabilities without having to purchase a new device.
Before we dive into the step-by-step process of adding RAM to your Asus laptop, it’s important to understand what RAM is and how it impacts your system. RAM, or Random Access Memory, is a type of computer memory that temporarily stores data that your laptop’s processor needs to access quickly. The more RAM your laptop has, the more data it can store, resulting in faster performance and smoother multitasking.
Upgrading the RAM on an Asus laptop involves opening the RAM compartment, removing the existing RAM sticks (if applicable), and inserting new RAM sticks that are compatible with your laptop model. However, before you begin the installation process, it’s crucial to determine the correct type and capacity of RAM that your laptop supports.
In this guide, we will walk you through each step of the process, providing clear instructions and tips to ensure a successful RAM upgrade. So, let’s get started on boosting your Asus laptop’s performance by adding some extra RAM!
Step 1: Determine the correct RAM type
Before you start the process of adding RAM to your Asus laptop, it’s essential to determine the correct type and capacity of RAM that your laptop supports. Using incompatible RAM can cause system instability or lead to it not being recognized by your laptop. Here’s how you can determine the correct RAM type:
- Check your laptop’s specifications: Start by consulting the user manual or visiting the Asus support website to find detailed information about your laptop’s RAM specifications. Look for details such as the maximum capacity, speed, and type of RAM supported.
- Use a system information tool: If you don’t have the user manual or can’t access the Asus support website, you can use a system information tool to determine your laptop’s RAM type. Windows users can use the built-in tool called “System Information” by typing “msinfo32” in the Run dialog (Windows key + R). On macOS, you can go to “About This Mac” from the Apple menu and click on “System Report.”
- Look for the RAM slots: Physically inspect your laptop to locate the RAM slot(s). The number of slots and their accessibility vary across Asus laptop models. Some laptops have the RAM slots easily accessible under a separate compartment, while others may require removing the keyboard or bottom cover.
- Check existing RAM: If you currently have RAM installed in your laptop, take note of the type, speed, and capacity. This information can be useful when purchasing compatible RAM modules.
Once you have determined the correct RAM type for your Asus laptop, you can proceed to the next step of preparing your laptop for the RAM installation. It’s important to handle the RAM modules carefully and avoid touching the gold contacts to prevent any damage during the installation process.
Step 2: Prepare the laptop for the RAM installation
Before you begin the installation process, it’s crucial to properly prepare your Asus laptop. Here are the necessary steps to ensure a smooth RAM upgrade:
- Power off your laptop: Make sure your laptop is turned off and disconnected from any power sources before starting the installation process. This will prevent any electrical damage and ensure your safety.
- Disconnect external devices: Remove any external devices, such as USB drives or peripherals, connected to your laptop. This will create a clutter-free workspace and prevent any accidental damage to the devices.
- Ground yourself: Before touching any internal components of your laptop, it’s essential to ground yourself to eliminate any static electricity. You can do this by touching a grounded metal object or by wearing an anti-static wrist strap.
- Gather the necessary tools: Depending on your Asus laptop model, you may require specific tools to access the RAM compartment. Ensure that you have the necessary tools, such as a screwdriver or pry tools, readily available.
- Work in a well-lit area: Find a well-lit and clean workspace to carry out the RAM installation process. This will help you see the components clearly and minimize the risk of misplacing or damaging any parts.
By following these preparation steps, you are ready to move on to the next phase of the RAM installation process. Remember to take your time and exercise caution when handling your laptop’s internal components to avoid any unnecessary damage or accidents.
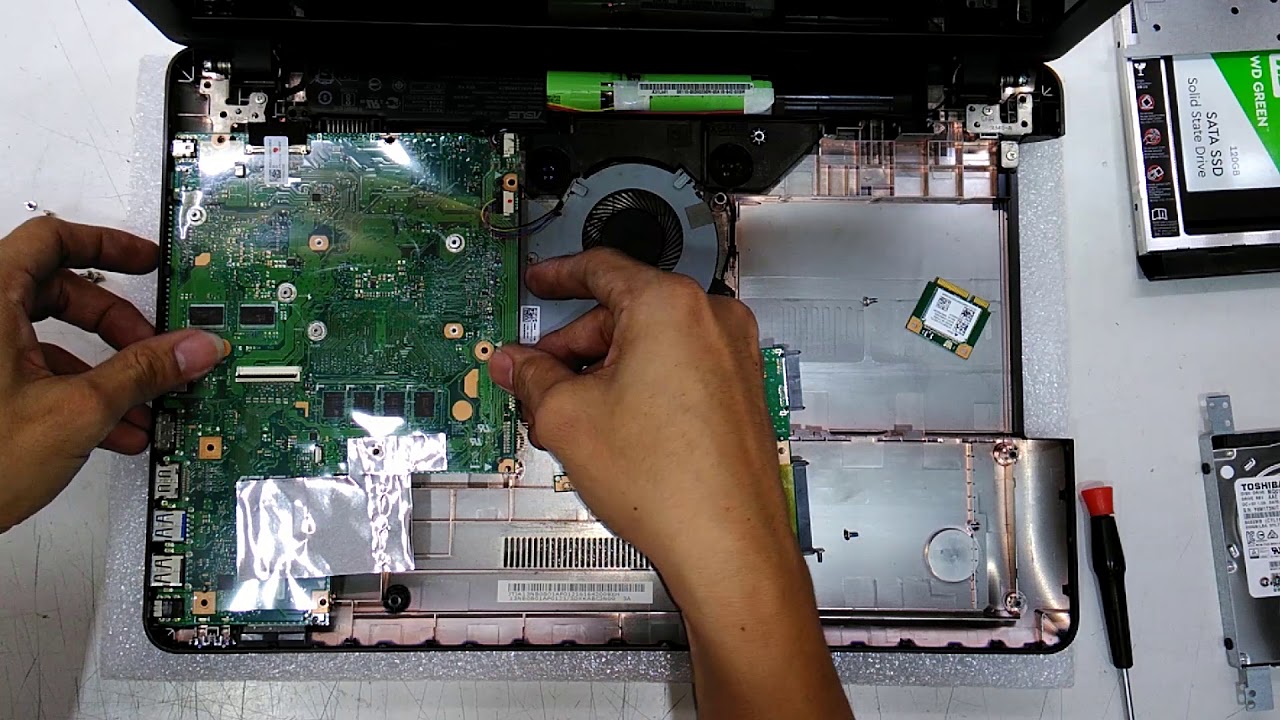
Step 3: Locate the RAM compartment
Once you have prepared your Asus laptop for the RAM installation, the next step is to locate the RAM compartment. The exact location and accessibility of the RAM compartment may vary depending on your laptop model. Here’s how you can locate it:
- Refer to the user manual: Consult the user manual or the Asus support website for specific instructions on locating the RAM compartment. The manual should provide detailed diagrams or descriptions to help you find the compartment.
- Inspect the bottom cover: In many Asus laptop models, the RAM compartment is located on the bottom of the laptop. Look for removable panels or hatches that grant access to the internal components. These panels are usually secured with screws.
- Remove the keyboard: In some laptop models, the RAM compartment may be located under the keyboard. If this is the case for your laptop, you will need to carefully remove the keyboard to access the RAM slots. Refer to the user manual or search online for specific instructions on removing the keyboard for your particular model.
- Check the side or rear: In certain Asus laptop models, the RAM compartment may be located on the side or rear of the laptop. Look for any removable panels or covers in these areas that provide access to the RAM slots.
- Take note of the location: Once you have located the RAM compartment, take note of its position and orientation for the next steps. This will help you reassemble the laptop correctly after installing the new RAM sticks.
Locating the RAM compartment is an important step in the process as it allows you to access the existing RAM sticks and insert the new ones. Take your time to find the compartment, and if you encounter any difficulties, refer to the user manual or seek assistance from the Asus support team.
Step 4: Remove the old RAM sticks (if applicable)
If your Asus laptop already has RAM installed, you will need to remove the existing RAM sticks before adding the new ones. Follow these steps to safely remove the old RAM sticks:
- Identify the existing RAM sticks: Take a look inside the RAM compartment and locate the existing RAM sticks. They are small rectangular modules connected to the motherboard. Take note of their position and orientation.
- Release the retaining clips: On either side of the RAM module, you will find small retaining clips that hold it in place. Carefully push these clips outward until they release the RAM stick. Gently lift the RAM stick at a slight angle to remove it from the slot.
- Handle with care: When handling the RAM sticks, avoid touching the gold contacts as oils from your fingers can affect its performance. Hold the RAM module by its edges or use an anti-static wrist strap to prevent any static discharge.
- Repeat the process if necessary: If your laptop has multiple RAM slots and you intend to replace all the existing RAM sticks, repeat the process for each one. Make sure to remove them one at a time and keep them separate to avoid confusion.
- Set aside the old RAM sticks: Once you have removed the old RAM sticks, set them aside in a safe and static-free location. You may want to keep them as a backup or sell them if they are still in good condition.
It’s important to note that not all Asus laptop models come with pre-installed RAM. If your laptop doesn’t have any existing RAM sticks, you can skip this step and proceed directly to inserting the new RAM sticks in the next step.
By carefully removing the old RAM sticks, you have completed an important part of the RAM upgrade process. Now you’re ready to insert the new RAM sticks and give your Asus laptop a boost in its memory capacity and performance!
Step 5: Insert the new RAM sticks
With the old RAM sticks removed, it’s time to insert the new RAM sticks into your Asus laptop. Follow these steps to ensure a successful installation:
- Ensure compatibility: Double-check that the new RAM sticks you purchased are compatible with your Asus laptop model. They should match the specified type, speed, and capacity outlined in the laptop’s user manual or on the manufacturer’s website.
- Align the RAM stick: Take one of the new RAM sticks and align it properly with the empty RAM slot. Match the notch on the RAM stick with the notch inside the slot to ensure the correct orientation.
- Insert the RAM stick: Holding the RAM stick at a slight angle, carefully insert it into the slot. Apply gentle and even pressure until the RAM stick is fully inserted and the retaining clips on both sides click into place.
- Repeat for additional RAM sticks: If you have multiple RAM sticks to install, repeat the process for each one. Make sure you’re inserting them into the appropriate slots as specified by your laptop’s user manual.
- Ensure proper seating: After inserting the new RAM sticks, gently press on them to ensure they are seated correctly. They should be secure and not wobble or move within the slots.
It is worth noting that some laptops may require you to push the RAM sticks with greater force to achieve the proper seating. However, be cautious not to apply excessive force to avoid damaging the components.
Once you have successfully inserted the new RAM sticks, you’re one step closer to enjoying an upgraded memory capacity on your Asus laptop. In the following steps, we’ll cover how to close the RAM compartment and reassemble the laptop, so keep reading!
Step 6: Close the RAM compartment and reassemble the laptop
After inserting the new RAM sticks, the next step is to close the RAM compartment and reassemble your Asus laptop. Follow these steps to ensure a proper reassembly:
- Secure the RAM compartment: If you removed any panels or covers to access the RAM compartment, make sure to securely tighten any screws or clips that hold them in place. This will ensure that the components inside are protected and secure.
- Replace the keyboard (if applicable): If you had to remove the keyboard to access the RAM compartment, carefully place the keyboard back into its slot. Follow the instructions from the user manual or online resources to make sure it is properly aligned and secured.
- Reattach the bottom cover: If you removed the bottom cover, align it with the laptop’s chassis and gently press down until it clicks into place. Secure it with the screws you removed earlier, making sure not to overtighten.
- Connect any external devices: Reconnect any external devices, such as USB drives or peripherals, that you removed earlier. Make sure all connections are secure.
- Power on the laptop: With the RAM installed and the laptop reassembled, connect the power adapter and press the power button to turn on your Asus laptop.
After powering on, your laptop should recognize the newly installed RAM. To confirm this, you can check the system information or use a third-party software to verify the capacity and speed of the RAM.
By properly closing the RAM compartment and reassembling your laptop, you have completed the installation process. It’s time to enjoy the enhanced performance and increased memory capacity of your Asus laptop with its new RAM!
Step 7: Turn on the laptop and check if the RAM has been successfully added
After completing the RAM installation and reassembling your Asus laptop, it’s essential to verify that the new RAM has been successfully added and recognized by your system. Follow these steps to ensure the RAM is functioning correctly:
- Power on your laptop: Connect the power adapter and press the power button to turn on your Asus laptop. Allow the operating system to boot up.
- Check system information: Once your laptop has fully booted up, you can check the system information to confirm the upgraded RAM capacity. On a Windows laptop, you can press the Windows key + Pause/Break or right-click on the “Computer” or “This PC” icon and select “Properties” to view the system information. On a macOS laptop, click on the Apple menu and then select “About This Mac.”
- Verify the RAM details: In the system information window, look for the RAM or memory section. It should display the total amount of RAM installed, along with other details like speed and type. Ensure that the information matches the specifications of the new RAM sticks you installed.
- Perform a RAM test (optional): If you want to further validate the functionality of your new RAM, you can run a RAM test. There are various third-party software available that can help you perform a thorough test to verify the RAM’s stability and performance.
- Monitor system performance: After confirming that the new RAM has been successfully added, you can monitor your laptop’s performance and notice improvements in multitasking, speed, and overall responsiveness. Enjoy the enhanced capabilities of your Asus laptop!
If you encounter any issues or if the system information does not display the correct information about the installed RAM, double-check the RAM installation to ensure it is properly seated in the slots. If problems persist, consult the Asus support team for assistance.
By following these steps and verifying the successful installation of the new RAM, you can be confident that your Asus laptop is now equipped with the upgraded memory capacity to handle your computing needs more efficiently.
Conclusion
Congratulations! You have successfully added RAM to your Asus laptop, enhancing its performance and increasing its memory capacity. By following the step-by-step guide provided in this article, you have unlocked the potential for smoother multitasking, faster application load times, and improved overall responsiveness.
Remember, upgrading the RAM is a cost-effective way to enhance your laptop’s capabilities without the need to purchase a new device. It is an excellent option if you find your laptop struggling with demanding tasks or running out of memory.
Throughout the process, you learned how to determine the correct RAM type for your Asus laptop, prepare the laptop for the installation, locate the RAM compartment, remove old RAM sticks (if applicable), insert the new RAM sticks, close the RAM compartment, and reassemble the laptop. Finally, you checked if the new RAM has been successfully added and verified its functionality.
By taking the time to properly install and verify the new RAM sticks, you can enjoy the benefits of increased memory capacity and improved performance. Whether you’re a student, professional, or casual laptop user, the upgraded RAM will make a noticeable difference in your day-to-day computing experience.
If you have any questions or encounter any issues during the RAM installation process, don’t hesitate to consult the Asus support team for assistance. They can provide guidance specific to your laptop model and help troubleshoot any problems you may encounter.
Now that you have successfully upgraded your Asus laptop’s RAM, you can fully enjoy the enhanced capabilities and improved speed. Happy computing!