Introduction
Welcome to this step-by-step guide on how to add RAM to your Dell laptop. As technology advances and our computing needs grow, it’s not uncommon to find your laptop struggling to keep up with demanding tasks. Adding more RAM (Random Access Memory) can significantly improve your laptop’s performance, allowing you to run multiple programs smoothly and have a more efficient multitasking experience.
Before we dive into the process, it’s important to note that not all laptops are upgradable in terms of RAM. Some models have soldered RAM modules, meaning they are not replaceable. However, most Dell laptops provide the option for RAM expansion, so be sure to check your laptop’s specifications or consult the Dell support website to ensure your specific model is compatible.
Adding RAM to your Dell laptop is a relatively straightforward process that can be done by anyone with basic technical skills. In this guide, we will walk you through the necessary steps to ensure a successful RAM upgrade. Make sure to follow each step carefully and take the necessary precautions to avoid any damage to your laptop.
Before we get started, be sure to gather the necessary tools for the process. You will need a small Phillips screwdriver, an anti-static wrist strap (optional but recommended), and of course, the new RAM modules that are compatible with your laptop. Once you have all the tools ready, we can proceed to shut down and disassemble your laptop in preparation for the RAM upgrade.
Checking Compatibility
Before purchasing new RAM modules for your Dell laptop, it’s crucial to ensure that they are compatible with your specific model. Using incompatible RAM can lead to system instability or even damage to your laptop’s motherboard. Here’s how you can check compatibility:
- Refer to Dell’s documentation: Visit the Dell support website and navigate to the page for your laptop model. Look for the specifications section and check for the maximum supported RAM capacity and the type of RAM supported (e.g., DDR3 or DDR4).
- Check your laptop’s current RAM configuration: To do this, go to “System Information” on your laptop. On Windows, you can press the Windows key + R, then type “msinfo32” and press Enter. Look for the “Installed Physical Memory (RAM)” field and note the current capacity and type of RAM installed.
- Consider the operating system requirements: Some versions of Windows or other operating systems have limitations on how much RAM they can utilize. Make sure that the additional RAM will be recognized and utilized by your operating system.
- Consult with a computer technician: If you’re unsure about the compatibility or need expert advice, consider reaching out to a computer technician who can assist you in determining the right RAM modules for your Dell laptop.
Once you have confirmed the compatibility, you can proceed with purchasing the appropriate RAM modules. It’s recommended to purchase RAM from reputable manufacturers to ensure reliability and compatibility.
Now that we have checked the compatibility of your laptop, and you have the necessary information, we can move on to gathering the tools required for the RAM installation process.
Gathering Necessary Tools
Before you begin the RAM installation process, it’s important to gather all the necessary tools to ensure a smooth and hassle-free experience. Here are the tools you’ll need:
- Small Phillips screwdriver: Most laptop screws are small and require a Phillips-head screwdriver. Make sure you have one that fits well and is in good condition to avoid stripping the screws.
- Anti-static wrist strap (optional but recommended): When working with sensitive computer components like RAM, it’s important to discharge any static electricity from your body to prevent damage. An anti-static wrist strap can help in grounding yourself, ensuring a safe environment for the sensitive parts.
- Replacement RAM modules: Carefully research the type and specifications of the RAM modules compatible with your Dell laptop. Ensure that the new RAM is of the same type (DDR3, DDR4, etc.) and matches the frequency and capacity requirements of your laptop.
Note: It is essential to use RAM modules that are compatible with your laptop model; using incompatible RAM may cause system instability or even damage your laptop’s motherboard.
Once you have gathered all the necessary tools, ensure that you have a comfortable and well-lit workspace. It’s also a good idea to keep a soft cloth or an anti-static mat handy to protect your laptop’s screen and prevent any accidental scratches or damage.
Now that you have all the tools ready, we can proceed to the next step of shutting down and disassembling your Dell laptop for the RAM installation.
Shutting Down and Disassembling the Laptop
Now that you have gathered the necessary tools, it’s time to prepare your Dell laptop for the RAM installation. Follow these steps carefully:
- Save your work and close all open programs: Make sure to save any important files and close all software applications before shutting down your laptop. This prevents data loss and ensures a smooth shutdown process.
- Power off your laptop: Click on the Windows Start menu, select the Power icon, and choose Shut Down. Wait for the laptop to completely power down.
- Disconnect all external devices: Unplug any connected devices such as USB drives, external hard drives, and charging cables from the laptop.
- Flip the laptop over: Carefully turn your Dell laptop upside down, resting it on a soft cloth or an anti-static mat to protect its casing from scratches.
- Locate the battery release latch: Depending on your Dell laptop model, you may have a battery release latch or screws holding the battery in place. Refer to your laptop’s user manual or the Dell support website to locate the battery release mechanism.
- Remove the laptop battery: If your laptop has a battery release latch, slide it to the unlocked position and gently lift the battery out. If there are screws securing the battery, use the appropriate size screwdriver to remove them and then lift out the battery.
- Ground yourself: To protect sensitive electronic components from static electricity, wear an anti-static wrist strap connected to a grounded surface or frequently touch a grounded metal object to discharge any static charge.
With the laptop powered off, the battery removed, and yourself properly grounded, you are now ready to proceed with locating the RAM slots in your Dell laptop.
Locating the RAM Slots
Now that you have shut down your Dell laptop and removed the battery, it’s time to locate the RAM slots. The RAM slots are where the memory modules will be installed. Follow these steps to find the RAM slots in your Dell laptop:
- Refer to your laptop’s user manual: The user manual provided with your laptop usually contains a detailed diagram or description of the internal components, including the location of the RAM slots. If you have the manual handy, it’s a reliable source of information.
- Search the Dell support website: Visit the Dell support website and search for your laptop model. Look for the documentation or manual section specific to your laptop model. Often, you can find a downloadable PDF version of the user manual that contains the necessary information.
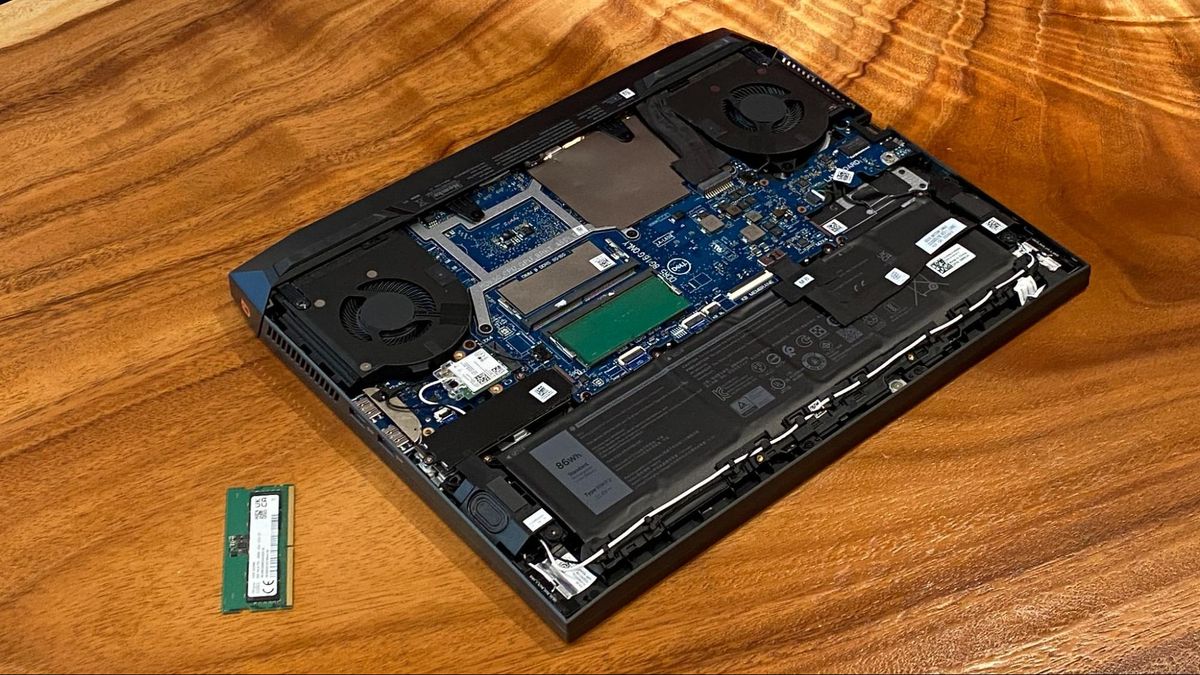
- Inspect the laptop’s bottom panel: In most Dell laptops, the RAM slots are located under the bottom panel. Look for a section of the panel that is secured with screws and has an icon or label indicating the RAM. This panel allows easy access to upgrade or replace the memory modules.
- Check under the keyboard: In some Dell laptop models, especially older ones, the RAM slots may be located under the keyboard. If you cannot find the RAM slots under the bottom panel, you may need to remove the keyboard to access them. Refer to the user manual or Dell support website for instructions on removing the keyboard.
Remember to handle your laptop with care and follow proper safety precautions when locating the RAM slots. If you are unsure or uncomfortable performing these steps, it’s recommended to seek assistance from a professional technician to avoid any accidental damage to your laptop.
Once you have successfully located the RAM slots, you are ready to move on to the next step of installing the new RAM modules in your Dell laptop.
Installing the New RAM
Now that you have located the RAM slots in your Dell laptop, it’s time to install the new RAM modules. Follow these steps carefully:
- Prepare the RAM modules: Remove the new RAM modules from their packaging. Handle them carefully by the edges to avoid touching the gold contacts, as this can transfer oils and affect the performance. Ensure that the notch on the RAM module aligns with the notch in the RAM slot.
- Install the RAM modules: Depending on your laptop model, you may have one or multiple RAM slots. Carefully insert the RAM module into the slot at a slight angle, with the gold contacts facing down. Gently push down until the module clicks into place. Ensure that the retention clips on the sides of the slot securely hold the RAM module in place.
- Repeat for additional RAM modules: If you are installing multiple RAM modules, repeat the above step for each module. Make sure to install them in the correct slots and align them properly with the notches.
- Replace the bottom panel or reattach the keyboard: Once all the RAM modules are installed, reattach the bottom panel or replace the keyboard if you had to remove it. Secure the screws tightly but avoid over-tightening.
Congratulations! You have successfully installed the new RAM modules in your Dell laptop. The additional memory should now be recognized by your system, improving its performance and multitasking capabilities.
It’s important to note that before moving on to the next step, you should ensure that all connections are secure and no loose screws or cables remain. Additionally, double-check that the RAM modules are inserted properly and the retention clips are securely holding them in place.
Next, let’s move on to reassembling the laptop and preparing it for testing with the new RAM.
Reassembling the Laptop
Now that you have successfully installed the new RAM modules in your Dell laptop, it’s time to reassemble the laptop and prepare it for testing. Follow these steps to complete the reassembly process:
- Replace the laptop battery: If you had removed the laptop battery earlier, align it with the battery compartment and gently slide it back into place. If there were screws securing the battery, insert and tighten them using the appropriate screwdriver.
- Reattach the bottom panel or secure the keyboard: If you had removed the bottom panel, position it over the laptop’s body and align the screw holes. Carefully tighten the screws without applying excessive force. If you had removed the keyboard, follow the instructions provided in the user manual or Dell support website to reattach it securely.
- Ensure all connections are secure: Check that any cables or connectors inside the laptop are properly connected and haven’t come loose during the disassembly process. Pay attention to any ribbon cables or connectors that need to be reconnected.
- Verify the integrity of the RAM modules: Gently press down on each RAM module to ensure they are properly seated in the RAM slots. This step is important to confirm that the modules are securely installed and won’t cause any issues when the laptop is operational.
Take your time during the reassembly process and be careful not to apply excessive force or torque when tightening the screws. It’s essential to handle the delicate components of your laptop with care to prevent any damage.
Once you have successfully reassembled your Dell laptop, it’s time to move on to the next step: testing the new RAM to ensure it is functioning correctly.
Testing the New RAM
After reassembling your Dell laptop with the new RAM modules installed, it’s important to test whether the RAM is functioning correctly. Follow these steps to ensure that the new RAM is recognized and working as expected:
- Power on your laptop: Press the Power button to turn on your Dell laptop. Wait for the operating system to load and the desktop to appear.
- Check the system information: Open the System Information window by pressing the Windows key + R, then typing “msinfo32” and pressing Enter. In the System Information window, locate the “Installed Physical Memory (RAM)” field and verify that it matches the total capacity of the newly installed RAM modules.
- Monitor system performance: As you use your laptop, observe its performance and multitasking capabilities. Launch multiple applications and perform tasks that would typically put a strain on the system’s memory. If your laptop is running smoothly without slowdowns or frequent freezes, it indicates that the new RAM is functioning properly.
- Run memory diagnostics: To further ensure the stability and reliability of the new RAM, you can run memory diagnostics. Windows has a built-in Memory Diagnostic tool that can test your RAM for errors. To access it, open the Windows Start menu, search for “Windows Memory Diagnostic,” and choose the option to run a “Restart now and check for problems.” Follow the on-screen instructions to complete the memory test.
It’s important to note that if you encounter any stability issues, system crashes, or error messages related to memory after installing the new RAM, you should double-check the installation process. Ensure that the RAM modules are properly seated in the slots and that they are compatible with your Dell laptop model. If the issues persist, you may need to seek assistance from a professional technician.
Congratulations! If your Dell laptop is running smoothly and the new RAM is recognized and functioning properly, you have successfully completed the RAM installation process. Enjoy the improved performance and enhanced multitasking capabilities provided by the upgraded memory.
Conclusion
Congratulations on successfully adding more RAM to your Dell laptop! By following the steps outlined in this guide, you have improved your laptop’s performance and enhanced its multitasking capabilities. The additional memory will allow you to run more demanding applications, switch between tasks seamlessly, and experience a smoother computing experience overall.
Throughout this process, you have learned how to check compatibility, gather the necessary tools, shut down and disassemble the laptop, locate the RAM slots, install the new RAM modules, reassemble the laptop, and test the new RAM for proper functionality. These steps, when followed carefully, ensure a successful RAM upgrade without causing any damage to your Dell laptop.
Remember, it’s essential to ensure compatibility between your laptop model and the RAM modules you purchase. Checking the laptop’s user manual or consulting the Dell support website can help you determine the maximum supported RAM capacity and the compatible type of RAM.
If you encounter any issues during the RAM installation process, always refer to the user manual or seek assistance from a professional technician to prevent any accidental damage to your laptop’s components.
Enjoy your upgraded Dell laptop and make the most out of the increased system performance and improved productivity. With the additional RAM, you can tackle more intensive tasks, such as graphic design, video editing, gaming, or running virtual machines, with ease.
Thank you for following this step-by-step guide. We hope that it has been informative and helpful in your RAM upgrade journey. Happy computing!