Introduction
Welcome to this guide on how to insert page breaks in Google Sheets. If you’re working with large datasets or complex spreadsheets, you may find it necessary to insert page breaks to control the print layout or to view different sections of your sheet more easily. Page breaks help you determine where one page ends and the next one begins, making it simple to adjust the formatting and layout as needed.
Google Sheets is a powerful online spreadsheet tool that allows you to create, edit, and share your data with ease. It offers a range of formatting options to organize your content, and the ability to insert page breaks is particularly handy when you want to control how your spreadsheet is divided on printed pages or when viewing it on screen.
In this article, we will explore different methods for inserting page breaks in Google Sheets. Whether you prefer using keyboard shortcuts, menu options, or right-clicking, we have you covered. You’ll become familiar with various techniques to insert page breaks efficiently and save time managing your spreadsheet’s layout.
Before we delve into the different methods, let’s take a moment to understand why page breaks are useful and how they can benefit you in your Google Sheets workflow.
What is a Page Break and Why is it Useful
A page break is a feature that allows you to control how your content is divided and displayed on printed pages or when viewing a document on screen. It specifies the point at which one page ends and the next one begins, ensuring a clear and organized layout.
Page breaks are particularly useful when working with large datasets or complex spreadsheets in Google Sheets. Here are a few key reasons why they are beneficial:
- Print Layout: One of the main advantages of page breaks is the ability to control how your spreadsheet is formatted and divided when printing. By inserting page breaks, you can ensure that each page contains the desired amount of information, avoiding awkward cutoffs or partial data.
- Data Analysis: Page breaks can be handy when analyzing and reviewing data, especially when dealing with a large number of rows and columns. By dividing your spreadsheet into logical sections using page breaks, you can focus on specific data ranges or isolate subsets of information, making it easier to analyze and draw insights.
- Visual Control: Page breaks allow you to have visual control over your document’s layout. You can ensure that important headings or sections start and end on a new page, making it easier to navigate and read through your spreadsheet.
- Improved Readability: By inserting page breaks, you can enhance the readability of your spreadsheet. Instead of having a long continuous scroll, page breaks create natural breaks between sections, making it easier for viewers to follow the data and understand its organization.
Now that we have discussed the importance and benefits of page breaks, let’s move on to exploring the various methods you can use to insert page breaks in Google Sheets.
Different Methods to Insert Page Break in Google Sheets
Google Sheets provides several convenient methods for inserting page breaks. Whether you prefer using menu options, keyboard shortcuts, or right-clicking, there is a method that suits your workflow. Here are the five different methods you can use:
1. Using the Menu Option: This method involves accessing the “Insert” menu in Google Sheets and selecting the “Page Break” option. Once selected, a horizontal line will appear in the spreadsheet, indicating the page break.
2. Using Keyboard Shortcut: If you are a fan of keyboard shortcuts, you can use the combination of Ctrl + Enter (Windows) or Command + Enter (Mac) to insert a page break in Google Sheets. Simply move your cursor to the desired cell, press the shortcut, and the page break will be added.
3. Using the Right-click Menu: Another quick way to insert a page break is by right-clicking on a cell or group of cells, selecting “Insert Page Break” from the context menu. This method is particularly useful when you want to add page breaks to specific sections of your spreadsheet.
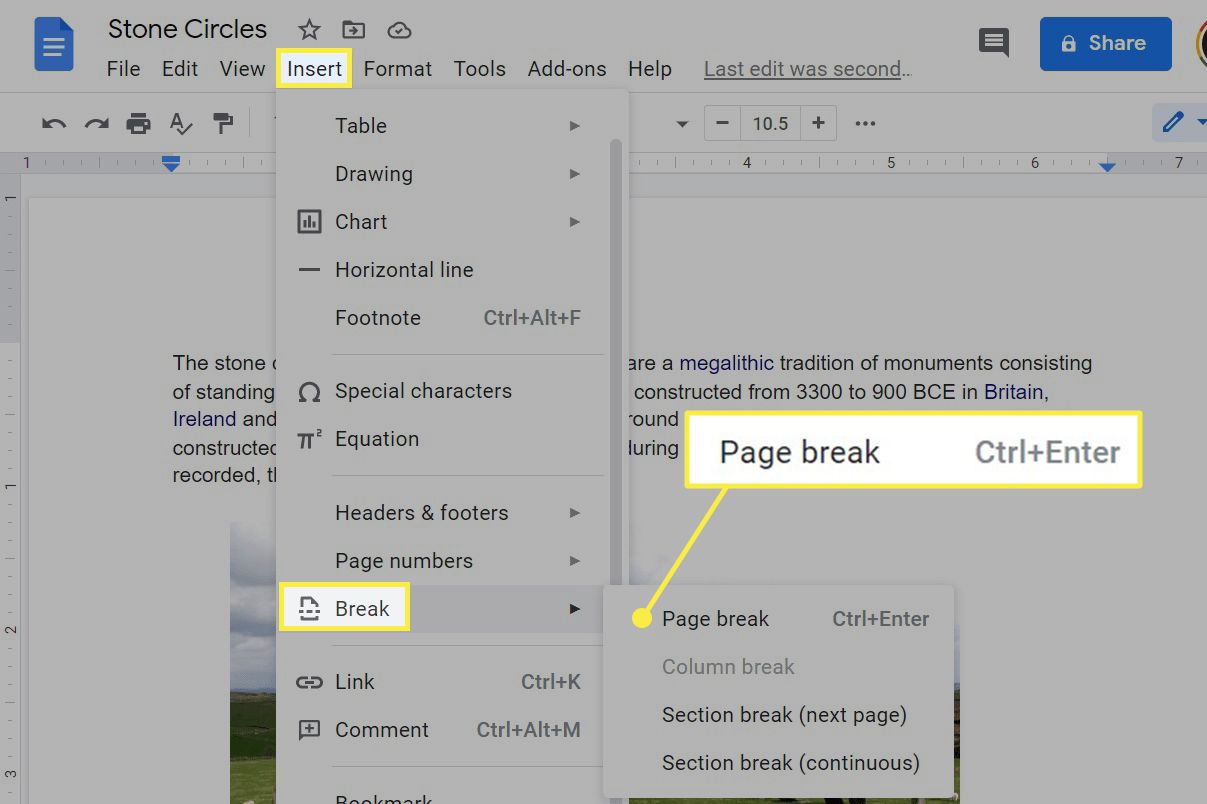
4. Using the Insert > Breaks Menu: Alternatively, you can navigate to the “Insert” menu and select “Breaks” to access the “Page Break” option. This method provides a convenient way to insert page breaks, as well as other types of breaks like column breaks or manually selecting where the break should occur.
5. Using the Move to Window Option: If you prefer viewing your spreadsheet in separate windows, you can use the “Move to Window” option to insert a page break. Simply open a new window, move your cursor to the desired position, and select “Move to Window” from the “View” menu.
Each of these methods provides a seamless way to insert page breaks in Google Sheets, allowing you to customize the layout of your spreadsheet for printing or viewing purposes. Experiment with these methods to determine which one works best for you in different scenarios.
Method 1: Using the Menu Option
One simple way to insert a page break in Google Sheets is by using the menu option. This method involves accessing the “Insert” menu and selecting the “Page Break” option. Here’s how you can do it:
- Open your Google Sheets document and navigate to the sheet where you want to insert the page break.
- Click on the “Insert” tab in the top menu.
- From the drop-down menu, select “Page Break”.
- A horizontal line will appear in your spreadsheet, indicating the page break. You can drag the page break line to adjust its position if needed.
This method allows you to easily insert page breaks at the desired locations in your Google Sheets. It is particularly useful when you want to have control over the print layout or visually organize your spreadsheet for better readability.
By inserting page breaks using the menu option, you can divide your spreadsheet into different sections, making it easier to navigate and understand the data. This is especially beneficial when dealing with sizable datasets or complex layouts.
Remember that page breaks will affect printing and the way your document is displayed on the screen. It’s a helpful tool to ensure your content is presented in a visually appealing and organized manner.
Now that you know how to insert page breaks using the menu option, feel free to explore other methods as well. Let’s dive into the next method for inserting page breaks in Google Sheets.
Method 2: Using Keyboard Shortcut
Another quick and efficient way to insert a page break in Google Sheets is by using a keyboard shortcut. This method allows you to rapidly add a page break without the need to navigate through menus. Here’s how you can do it:
- Open your Google Sheets document and navigate to the sheet where you want to insert the page break.
- Move your cursor to the desired cell where you want the page break to begin.
- Press the keyboard shortcut
Ctrl + Enter(Windows) orCommand + Enter(Mac). - A horizontal line will appear, indicating the page break. You can adjust its position by dragging the page break line if needed.
Using this keyboard shortcut, you can quickly insert page breaks at precise locations within your Google Sheets. It is a convenient method for those who prefer to navigate and perform actions using keyboard commands. By using this shortcut, you can save time and improve your workflow when working with page breaks.
Page breaks added using this method will provide visual cues for organizing your spreadsheet’s layout, making it easier to manage and understand the data. Whether you’re preparing your document for printing or enhancing its on-screen readability, the keyboard shortcut option is a time-saving solution.
Remember, you can use this shortcut repeatedly to insert multiple page breaks in different sections of your spreadsheet as needed. Experiment with different cell selections to control where the page breaks are inserted.
Now that you know how to insert page breaks using a keyboard shortcut, let’s explore another method to add page breaks in Google Sheets.
Method 3: Using the Right-click Menu
If you prefer a more intuitive and contextual approach, you can easily insert a page break in Google Sheets using the right-click menu. This method allows you to insert page breaks directly from the cell or range of cells you want to designate. Here’s how you can do it:
- Open your Google Sheets document and navigate to the sheet where you want to insert the page break.
- Right-click on the cell or group of cells where you want the page break to begin.
- From the context menu that appears, select “Insert Page Break”.
- A horizontal line will appear in your spreadsheet, indicating the page break. You can adjust its position by dragging the page break line if needed.
The right-click menu provides a convenient and efficient way to insert a page break exactly where you want it. This method allows for precise control over the placement of page breaks within your Google Sheets document.
By using the right-click menu to insert page breaks, you can easily segment your spreadsheet into logical sections, improving the readability and organization of your data. This is especially beneficial when you want to focus on specific portions of your spreadsheet or make clear visual distinctions between different sections.
Feel free to use this method to insert multiple page breaks at various locations throughout your spreadsheet. Right-click on different cells or groups of cells to add page breaks wherever necessary.
Now that you’re familiar with using the right-click menu to insert page breaks, let’s move on to exploring another method to insert page breaks in Google Sheets.
Method 4: Using the Insert > Breaks Menu
Google Sheets provides an alternative method for inserting page breaks through the “Insert” menu. This method allows for more flexibility in inserting different types of breaks, including page breaks, column breaks, or manually selecting where the break should occur. Here’s how you can do it:
- Open your Google Sheets document and navigate to the sheet where you want to insert the page break.
- Click on the “Insert” tab in the top menu.
- From the drop-down menu, select “Breaks”.
- In the sub-menu that appears, choose “Page Break”.
- A horizontal line will appear in your spreadsheet, indicating the page break. You can adjust its position by dragging the page break line if needed.
Using the “Insert > Breaks > Page Break” menu option, you have the ability to add page breaks to your Google Sheets document. This method allows you to insert other types of breaks as well, such as column breaks, giving you more control over the formatting of your spreadsheet.
By utilizing the “Insert > Breaks” menu, you can easily manage the layout of your spreadsheet by separating it into distinct sections. This can be particularly helpful when dealing with long datasets or complex spreadsheet structures. Adding page breaks ensures that each section is displayed clearly, with proper page breaks in the printed version.
Remember that by selecting this method, Google Sheets will automatically add a page break at the top of the selected cell range. If you want to manually specify the position of the page break, you can drag the inserted line to the desired location.
Now that you know how to insert page breaks using the “Insert > Breaks” menu, let’s move on to the next method for adding page breaks in Google Sheets.
Method 5: Using the Move to Window Option
If you prefer working with multiple windows or want to view your spreadsheet in separate windows, you can utilize the “Move to Window” option to insert a page break in Google Sheets. This method allows you to have more control over the placement of your page break. Here’s how you can do it:
- Open your Google Sheets document and navigate to the sheet where you want to insert the page break.
- Click on the “View” tab in the top menu.
- From the drop-down menu, select “Move to Window”.
- A new window will open up with the same Google Sheets document.
- In the new window, position your cursor where you want the page break to appear.
- Click on the “Insert” tab in the top menu.
- From the drop-down menu, select “Page Break”.
- A horizontal line will appear in the spreadsheet in the new window, indicating the page break. You can adjust its position by dragging the page break line if needed.
Using the “Move to Window” option in Google Sheets allows you to insert a page break in a specific window of your choice. This method is particularly helpful when you want to separate different sections of your spreadsheet visually.
By inserting page breaks in separate windows, you can easily determine where one page ends and the next one begins. This becomes especially useful when you want to focus on specific portions of your spreadsheet or have a clear visual distinction between different sections.
Remember, using this option creates a new window, allowing you to work with different views of your Google Sheets document. You can insert page breaks in one window while keeping the other window with a different perspective of your data.
Now that you know how to insert page breaks using the “Move to Window” option, let’s move on to the next section and conclude our exploration of different methods to insert page breaks in Google Sheets.
Conclusion
Inserting page breaks in Google Sheets allows you to control the print layout, navigate through your spreadsheet, and improve the readability of your data. We have explored five different methods to insert page breaks:
- Using the menu option
- Using keyboard shortcuts
- Using the right-click menu
- Using the Insert > Breaks menu
- Using the Move to Window option
Each method offers its own advantages and can be selected based on your personal preferences or specific needs. Whether you want to add page breaks using intuitive right-clicking, utilize keyboard shortcuts for speed, or explore different options within the menu, Google Sheets provides a range of tools to suit your workflow.
By inserting page breaks in Google Sheets, you can format your spreadsheet for printing, improve data analysis, and enhance the visual control and readability of your document. Whether you’re working with large datasets or complex layouts, utilizing page breaks helps you divide and organize your spreadsheet’s content effectively.
We hope this guide has provided you with a comprehensive understanding of how to insert page breaks in Google Sheets. Experiment with these methods to find the one that best fits your needs and preferences. With these skills, you can optimize your workflow and make your Google Sheets experience more efficient and organized.
Now go ahead and start adding page breaks to your spreadsheets in Google Sheets to take control of your print layout and enhance data analysis!


