Introduction
Welcome to the world of Windows 10, where multitasking and resource management are key to a smooth computing experience. One essential component that plays a crucial role in your computer’s performance is Random Access Memory (RAM). RAM is responsible for storing data that is actively being used by your system, allowing for faster access and smoother operations.
However, in some cases, you may find that your computer is running out of RAM, leading to slower performance, lag, and even system crashes. The good news is that there are several methods you can employ to increase your RAM and optimize your system’s utilization of this valuable resource.
In this article, we will explore nine effective techniques that can help you boost your RAM in Windows 10. Whether you’re a casual user looking to improve your computer’s performance or a power user engaging in resource-intensive tasks, these methods will come in handy. From hardware upgrades to software tweaks, we’ve got you covered.
So, let’s dive in and explore these methods in detail, ensuring that you can maximize your computer’s RAM and enjoy a seamless computing experience.
Method 1: Upgrade Your RAM
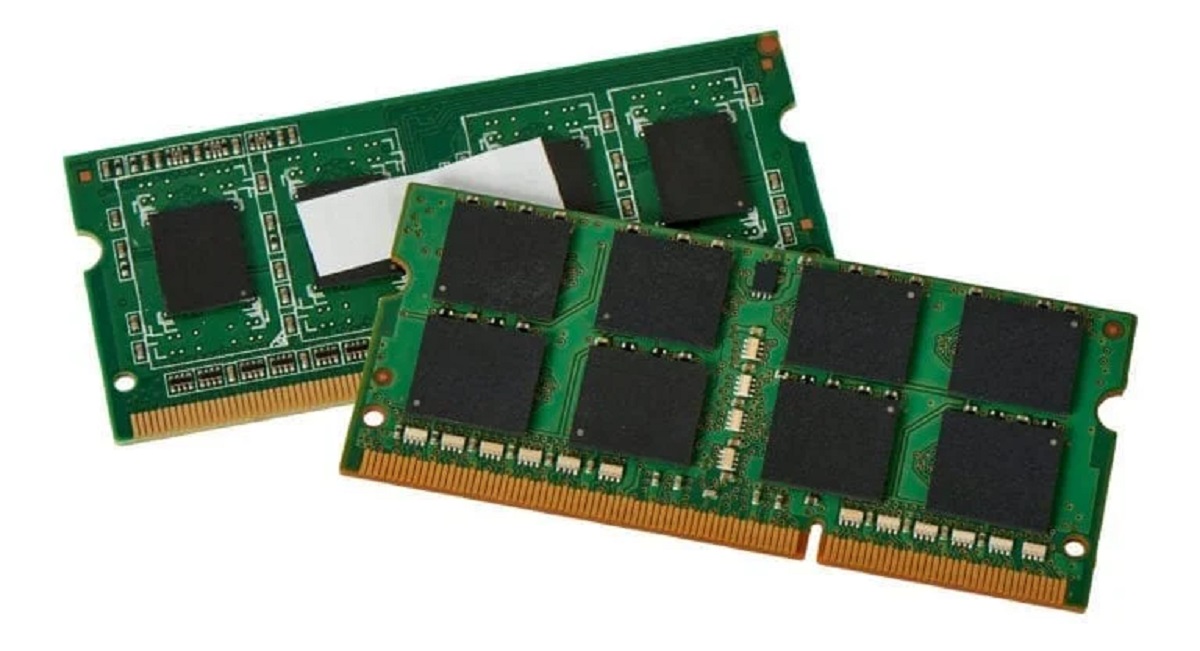
One of the most straightforward and effective ways to increase your RAM is to upgrade it. This method involves physically replacing your existing RAM modules with higher-capacity ones. By doing so, you can provide your computer with more memory to work with, enabling it to handle more tasks simultaneously.
The first step in upgrading your RAM is to determine the maximum amount of RAM supported by your system. You can usually find this information in your computer’s specifications or by visiting the manufacturer’s website. Once you know the maximum capacity, you can decide on the amount of RAM you want to upgrade to.
Purchasing compatible RAM modules is crucial to ensure a successful upgrade. It’s important to match the type, speed, and capacity of your existing RAM modules when buying new ones. If you’re unsure about these specifications, you can take your computer to a local computer store or consult with a knowledgeable technician to guide you through the process.
Once you have the new RAM modules, you need to power off your computer, unplug it, and open the computer case. Locate the existing RAM modules on the motherboard and gently remove them by pushing the retaining clips or levers. Insert the new RAM modules firmly into the vacant slots, ensuring they are properly aligned with the slots and securely seated.
After installing the new RAM, close the computer case, reconnect all cables, and power on your computer. The system should automatically detect the increased amount of RAM. However, if it doesn’t, you may need to adjust the RAM settings in your computer’s BIOS.
Upgrading your RAM provides a significant boost in your computer’s performance, allowing it to handle more demanding tasks and run multiple applications simultaneously without slowing down. This method is particularly beneficial for users who frequently engage in resource-intensive activities, such as gaming, video editing, or running virtual machines.
Method 2: Use ReadyBoost
If you’re looking for a way to increase your RAM without physically upgrading the hardware, ReadyBoost is a handy feature built into Windows 10 that can help optimize your system’s performance. ReadyBoost allows you to utilize external storage devices, such as USB flash drives or SD cards, as a cache for your frequently accessed data, effectively acting as additional virtual RAM.
To use ReadyBoost, start by inserting your compatible external storage device into your computer’s USB port or card reader. Windows will detect the device and prompt you with an option to use it for ReadyBoost. Click on “Speed up my system” to proceed.
In the ReadyBoost tab that appears, you can choose to dedicate the entire storage device or a portion of it for ReadyBoost. Windows recommends using at least 1.5 times the amount of available RAM for the cache size. However, you can adjust this value according to your preferences or available storage space.
Once you’ve selected the cache size, click on “Apply” and Windows will start using the external storage device as a virtual RAM cache. It will store frequently accessed data in the device, allowing for faster access times and improved performance.
It’s worth noting that not all external storage devices are compatible with ReadyBoost. Your device needs to meet certain criteria, such as having a minimum capacity of 4GB and being formatted with the NTFS file system. Additionally, the device should have a fast read and write speed to ensure optimal performance.
While ReadyBoost may not provide a significant increase in RAM like a physical upgrade, it can still offer noticeable improvements in system responsiveness, especially on computers with limited RAM. This method is particularly useful for laptops or older computers that are unable to accommodate additional RAM modules.
By utilizing ReadyBoost, you can make the most out of your external storage devices and give your system a performance boost without spending on hardware upgrades.
Method 3: Adjust Virtual Memory
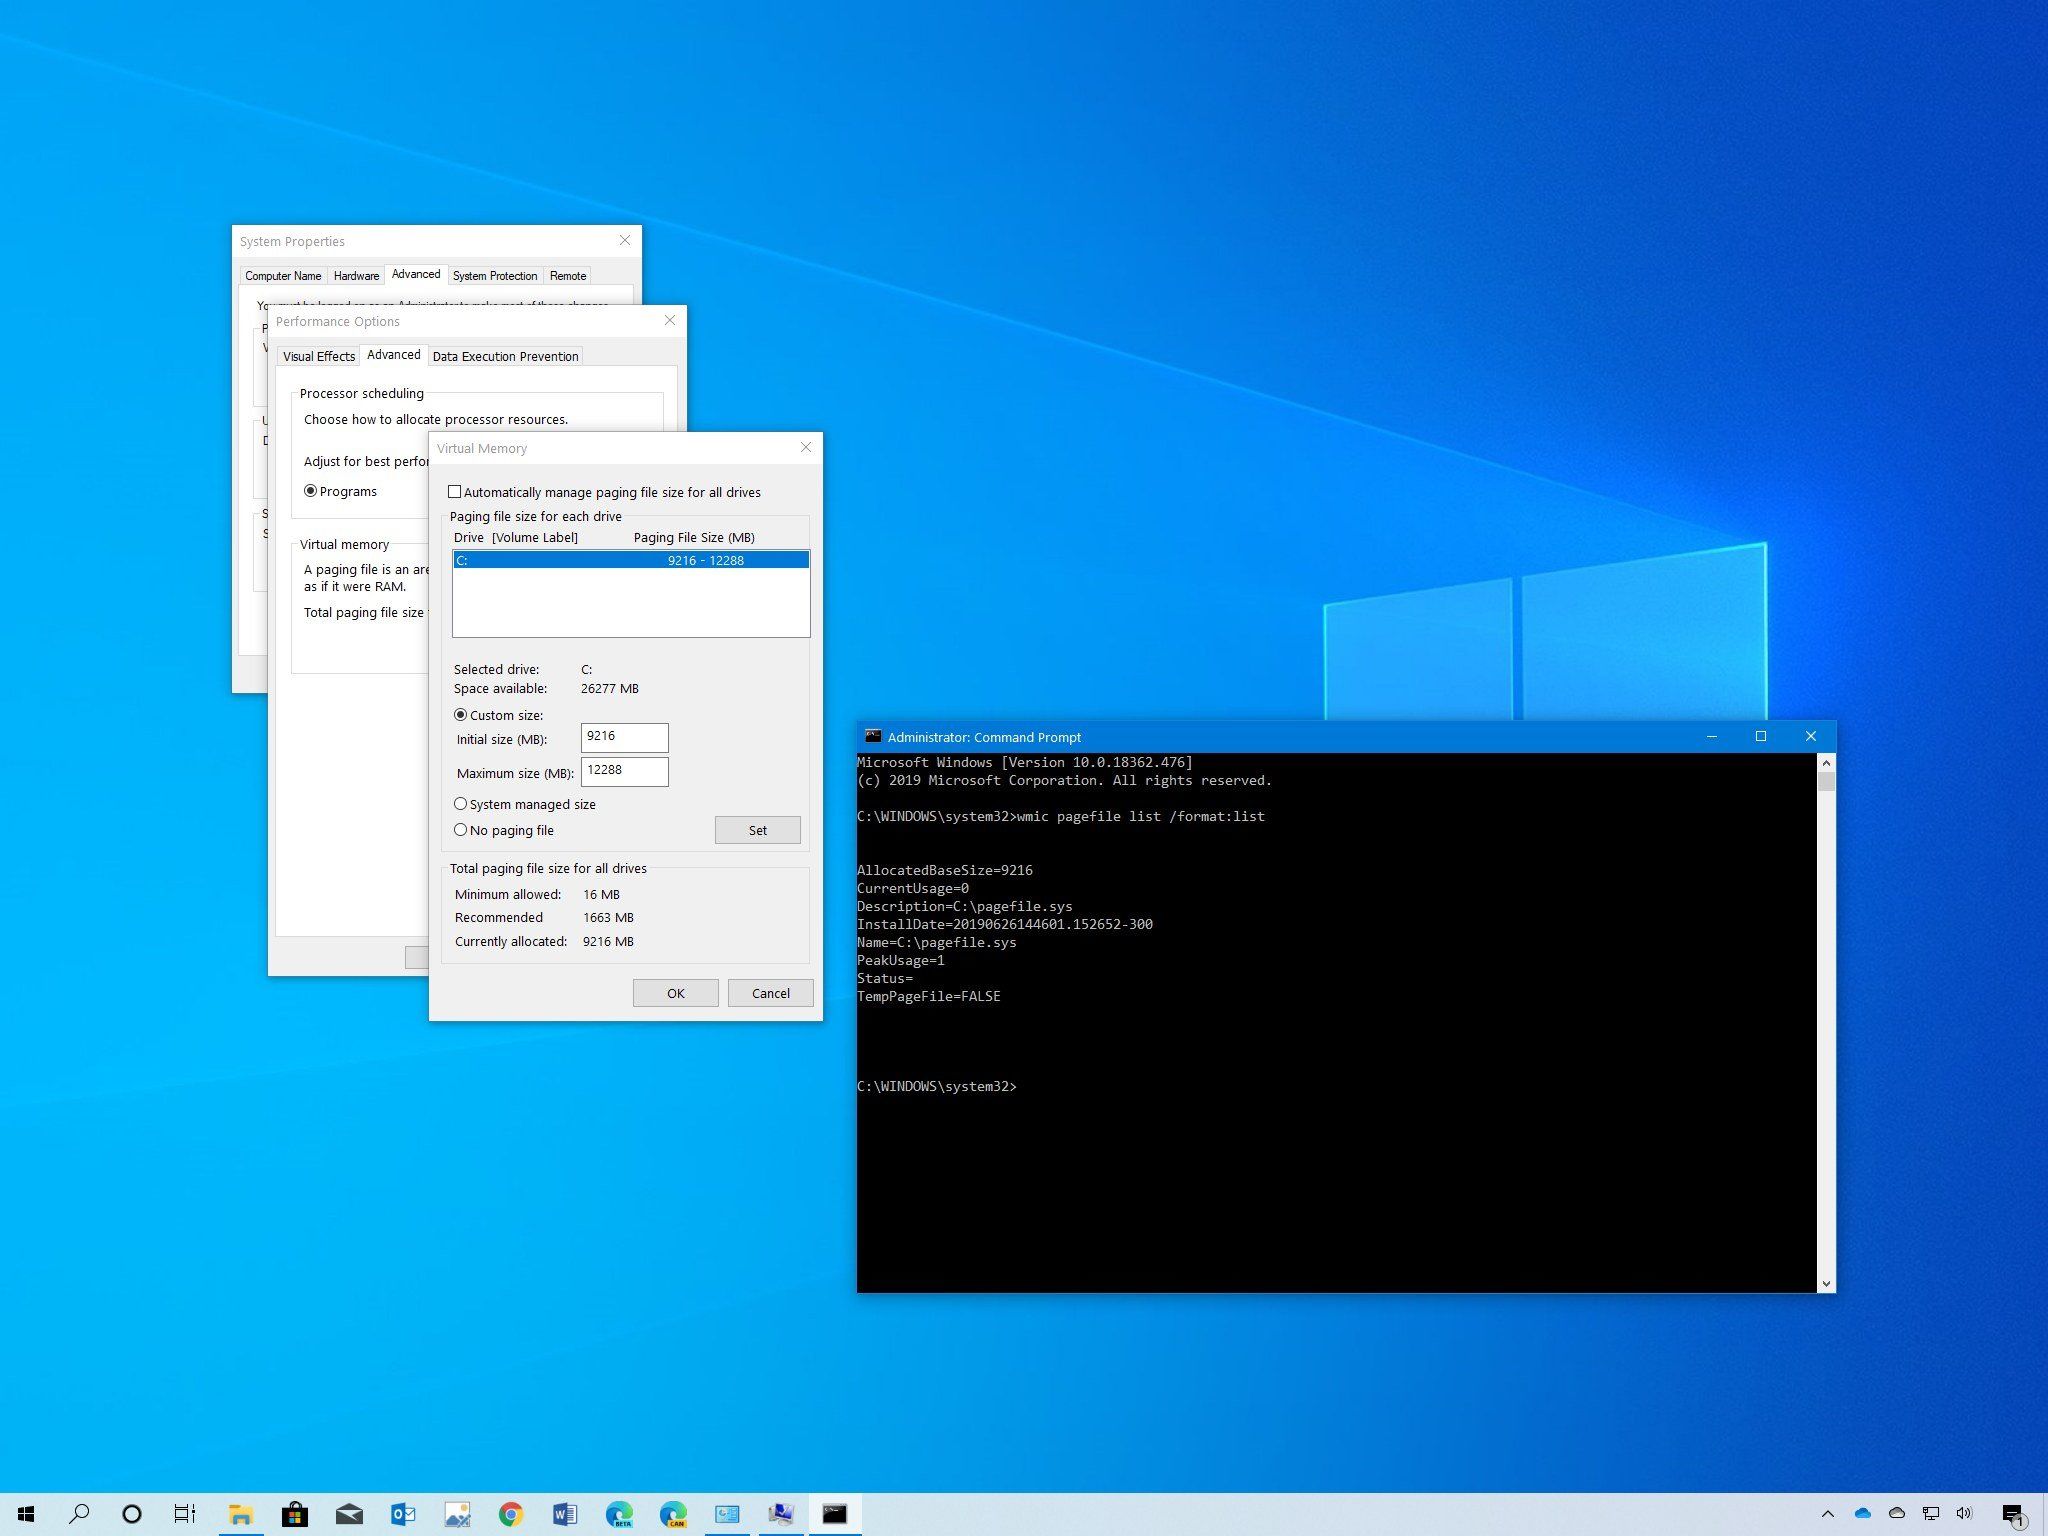
In addition to physical RAM, Windows 10 utilizes a feature called Virtual Memory to compensate for any shortfall in available RAM. Virtual Memory uses a portion of your computer’s hard drive space as temporary storage for data that would normally reside in RAM. By adjusting the Virtual Memory settings, you can optimize its usage and potentially increase your system’s performance.
To adjust the Virtual Memory settings, follow these steps:
- Right-click on the Start button and select “System”.
- In the System window, click on “Advanced system settings” from the left-hand side.
- Under the Advanced tab, in the Performance section, click on the “Settings” button.
- In the Performance Options window, go to the Advanced tab.
- Under the Virtual Memory section, click on the “Change” button.
- Uncheck the “Automatically manage paging file size for all drives” option if it is selected.
- Select the drive where your operating system is installed.
- Select the “Custom size” option and adjust the Initial size and Maximum size values.
- Click on the “Set” button and then “OK” to save the changes.
- Restart your computer for the changes to take effect.
When adjusting the Virtual Memory settings, it’s generally recommended to set both the Initial size and Maximum size to the same value. The recommended Virtual Memory size varies depending on your system’s specifications, but a good starting point is setting it to 1.5 times your physical RAM size. However, you can experiment with different values to find the optimal balance for your specific needs.
By adjusting the Virtual Memory settings, you give Windows more flexibility to manage memory resources effectively. This can lead to improved overall system performance and help prevent memory-related issues, such as frequent crashing or freezing.
Keep in mind that adjusting Virtual Memory is not a substitute for physical RAM. It acts as a supplementary solution to maximize your system’s resources and ensure smooth functioning, especially when dealing with memory-intensive tasks.
Method 4: Disable Startup Programs
When you start your computer, certain programs may automatically launch and run in the background. While some of these programs are essential for the smooth functioning of your system, others may consume valuable system resources, including RAM. Disabling unnecessary startup programs can help free up memory and improve your computer’s performance.
To disable startup programs in Windows 10, follow these steps:
- Right-click on the taskbar and select “Task Manager” from the context menu.
- In the Task Manager window, click on the “Startup” tab.
- You will see a list of all the programs that start with your computer. Sort the programs by the “Startup impact” column to identify the ones using the most resources.
- Select the program you want to disable and click on the “Disable” button at the bottom right.
- Repeat the process for other programs that you want to disable.
It’s important to exercise caution when disabling startup programs. Some programs may be necessary for the proper functioning of your computer or specific applications. If you’re unsure about a program’s importance, you can search online or consult with an expert to determine whether it’s safe to disable.
Disabling unnecessary startup programs can help improve boot times and reduce the strain on your system’s memory. By preventing these programs from automatically launching, you can allocate more resources to other applications and tasks, resulting in a more responsive and efficient computer.
Remember to periodically review your startup programs and disable any new additions that are not essential. This ensures that your system remains optimized and maximizes the available resources for the tasks you want to prioritize.
Method 5: Clear Temporary Files
Over time, your computer accumulates temporary files from various sources, such as web browsers, applications, and system processes. These files take up valuable storage space and can slow down your system, including your RAM. Clearing temporary files regularly can help free up resources, including RAM, and optimize your computer’s performance.
To clear temporary files in Windows 10, follow these steps:
- Press the Windows key + R on your keyboard to open the Run dialog box.
- Type “%temp%” (without quotes) in the dialog box and click “OK”.
- This will open the Temp folder. Select all the files and folders inside and press the Delete key on your keyboard. You may be prompted for administrator permission to delete certain files.
- Once you have cleared the Temp folder, open the Run dialog box again by pressing the Windows key + R.
- Type “temp” (without quotes) in the dialog box and click “OK”.
- This will open another Temp folder. Again, select all the files and folders inside and press the Delete key on your keyboard.
- Finally, empty your Recycle Bin to permanently delete the temporary files.
In addition to manually clearing temporary files, Windows 10 also provides a built-in tool called “Disk Cleanup” that automates the process. To access Disk Cleanup, follow these steps:
- Open File Explorer by pressing the Windows key + E on your keyboard.
- Right-click on the drive where your operating system is installed (usually “C:”) and select “Properties”.
- In the Properties window, under the General tab, click on the “Disk Cleanup” button.
- Windows will calculate the amount of space you can free up. Check the boxes next to the types of files you want to delete, such as Temporary files, Recycle Bin, and Thumbnails. You can also click on “Clean up system files” for more options.
- Click on the “OK” button and then “Delete Files” to confirm.
Regularly clearing temporary files not only frees up storage space but also helps optimize your computer’s performance by reducing the workload on your system’s resources, including RAM. By keeping your system clean and clutter-free, you can ensure smoother operation and faster response times for your applications and tasks.
Method 6: Uninstall Unnecessary Applications
Over time, we tend to accumulate a plethora of applications on our computers. While some of these applications may be essential for our work or entertainment, others may go unused or become unnecessary. Uninstalling unnecessary applications can help free up valuable storage space, reduce system clutter, and optimize your computer’s performance, including the usage of RAM.
To uninstall unnecessary applications in Windows 10, follow these steps:
- Click on the Start button and select “Settings” (the gear icon).
- In the Settings window, click on the “Apps” option.
- In the Apps & features tab, you will see a list of all installed applications on your computer. Scroll through the list and identify the applications that you no longer need or use.
- Select the application you want to uninstall and click on the “Uninstall” button.
- Follow the prompts and instructions to complete the uninstallation process.
It’s important to review the list of installed applications carefully before uninstalling them. Some applications may be system-critical, and removing them can cause issues. If you’re unsure about an application’s importance, it’s recommended to do a quick search online or consult with an expert before proceeding with the uninstallation.
By uninstalling unnecessary applications, you not only free up valuable storage space but also reduce the strain on your system’s resources, including RAM. This frees up more memory for the applications and tasks that you use frequently, resulting in improved performance and responsiveness.
Remember to periodically review your installed applications and remove any that are no longer needed. This practice not only helps optimize your computer’s performance but also ensures that your system remains clutter-free and organized.
Method 7: Use a RAM Cleaner
If you’re looking for a software-based solution to optimize your computer’s RAM usage, using a RAM cleaner can be an effective method. RAM cleaner applications are designed to free up memory by closing unnecessary processes, clearing out cached data, and optimizing system resources. By using a RAM cleaner, you can potentially increase the amount of available RAM and improve your computer’s performance.
When choosing a RAM cleaner, it’s essential to select a reputable and reliable application from a trusted source. Here are some key considerations to keep in mind:
- Research and read reviews: Look for reviews and feedback from other users to ensure that the RAM cleaner you choose is effective and safe to use.
- Compatibility: Check if the RAM cleaner is compatible with your operating system version and computer specifications.
- Features and customization: Look for features such as automatic optimization, real-time monitoring, and the ability to customize the cleaning process to suit your preferences.
- Backup and restore options: A reliable RAM cleaner should provide options to create backups and restore points in case any issues arise during the optimization process.
Once you have selected a RAM cleaner that meets your requirements, follow these general steps:
- Download and install the RAM cleaner on your computer.
- Launch the application and familiarize yourself with its user interface and available features.
- Adjust the settings, if necessary, to customize the cleaning process to your preferences.
- Run the RAM cleaner and allow it to scan your computer for unnecessary processes and memory usage.
- Review the scan results and select the options to clean and optimize your RAM.
- Follow the instructions provided by the RAM cleaner to complete the optimization process.
It’s important to note that while RAM cleaners can be helpful in freeing up memory and optimizing performance, they should be used with caution. Some RAM cleaners may be overly aggressive in terminating processes, which can lead to system instability or even cause data loss. It’s always a good practice to create backups and be mindful of the changes made by the RAM cleaner.
Using a RAM cleaner can provide a convenient solution to optimize your computer’s RAM usage, potentially improving multitasking capabilities and overall system performance. However, it’s important to weigh the benefits against any potential risks and select a reputable and trustworthy RAM cleaner for a safe and effective experience.
Method 8: Disable Visual Effects
Windows 10 comes with various visual effects and animations that enhance the user interface and provide a visually pleasing experience. However, these visual effects can consume a significant amount of system resources, including RAM. Disabling or adjusting these effects can help free up memory and improve your computer’s performance, especially on machines with limited resources.
To disable or adjust visual effects in Windows 10, follow these steps:
- Right-click on the Start button and select “System” from the context menu.
- In the System window, click on “Advanced system settings” from the left-hand side.
- Under the Advanced tab, click on the “Settings” button in the Performance section.
- In the Performance Options window, you have two options:
- Select “Adjust for best performance” to disable all visual effects and use the basic Windows appearance.
- Select “Custom” if you want to manually choose which visual effects to enable or disable. You can uncheck specific features or use the “Adjust for best performance” option as a starting point and enable only the effects you prefer.
- After making your selection, click on the “Apply” button and then “OK” to save the changes.
By disabling or reducing visual effects, you can reduce the strain on your system’s resources, including RAM. This allows your computer to allocate more memory to applications and tasks, resulting in improved responsiveness and smoother performance.
It’s worth noting that disabling visual effects will make your Windows interface appear less visually appealing, with fewer animations and enhanced visuals. However, the trade-off is a more efficient allocation of system resources, particularly on computers with lower-end hardware or older machines.
If you prefer a balance between performance and visual appeal, you can experiment with enabling certain effects that are less resource-intensive. This allows you to maintain a visually pleasing interface while still optimizing your system’s RAM usage.
It’s important to periodically reassess your visual effects settings, especially after making significant changes to your computer’s hardware or software. This ensures that your system is optimized for the best performance while still meeting your visual preferences.
Method 9: Update Drivers and Windows
Keeping your drivers and operating system up to date is crucial for optimal performance, stability, and compatibility of your computer. Outdated drivers or an older version of Windows can often result in performance issues, including high RAM usage. Updating your drivers and Windows can help resolve these issues and improve your computer’s overall performance.
To update your drivers and Windows in Windows 10, follow these steps:
- Press the Windows key + I on your keyboard to open the Settings app.
- In the Settings window, click on “Update & Security”.
- In the Windows Update tab, click on the “Check for updates” button.
- Windows will then search for available updates and prompt you to download and install them. Follow the on-screen instructions to complete the update process.
- To update your drivers, you can either visit the manufacturer’s website for each specific device on your computer or use a third-party driver update tool. These tools can scan your system, identify outdated drivers, and provide the necessary updates.
- If using a driver update tool, download and install it on your computer. Follow the instructions provided by the tool to scan and update your drivers.
Regularly updating your drivers and Windows ensures that you have the latest bug fixes, security patches, and performance enhancements for your system. This includes updates to drivers related to your hardware, such as graphics cards, network adapters, and audio devices.
Updating drivers can help resolve compatibility issues, improve hardware functionality, and optimize resource usage, including RAM. By using the latest drivers, you can ensure that your system is running efficiently and utilizing its resources effectively.
Furthermore, updating Windows keeps your operating system secure, as updates often include critical security patches that protect your computer from vulnerabilities. It also helps optimize system performance by addressing known issues and improving compatibility with software and hardware.
Make it a habit to regularly check for updates for both your drivers and Windows. This ensures that you are benefiting from the latest features, performance improvements, and security enhancements. By doing so, you can maximize your computer’s potential and ensure a smooth and efficient computing experience.
Conclusion
In conclusion, increasing your RAM and optimizing its usage is a crucial step in enhancing your computer’s performance and ensuring a smooth computing experience. Windows 10 offers several methods to achieve this goal and optimize your system’s RAM utilization.
From upgrading your RAM modules to utilizing ReadyBoost, adjusting virtual memory settings, and disabling startup programs, these methods can help you free up memory, reduce system clutter, and improve multitasking capabilities. Additionally, clearing temporary files, uninstalling unnecessary applications, using a RAM cleaner, disabling visual effects, and keeping your drivers and Windows up to date are all effective techniques to maximize your computer’s RAM and overall performance.
However, it’s important to remember that optimizing your RAM is just one aspect of maintaining a high-performing computer. Regular maintenance, such as disk cleanup, defragmentation, and malware protection, should also be a part of your routine to ensure optimal system performance.
By implementing these methods and following good computer maintenance practices, you can significantly enhance the speed, responsiveness, and efficiency of your Windows 10 computer. Whether you’re a casual user or a power user, optimizing your RAM will enable you to tackle resource-intensive tasks and multitask with ease.
Take the time to explore these methods and experiment with different settings to find the optimal configuration that works for your system. Remember to proceed with caution and make backups whenever necessary.
By making efficient use of your computer’s RAM, you can unlock its full potential and enjoy a seamless and enjoyable computing experience on Windows 10.