Introduction
Welcome to our guide on how to increase virtual memory in Windows 10. As computer systems continue to advance, the demand for memory also increases. Virtual memory plays a crucial role in ensuring that your computer functions smoothly, especially when multitasking or running memory-intensive applications.
Before we dive into the steps for increasing virtual memory, let’s take a moment to understand what virtual memory is. In simple terms, virtual memory is a combination of your computer’s physical RAM (Random Access Memory) and a portion of your hard drive space. This combination allows your computer to run more applications than it could with just the physical RAM.
You may be wondering why you would want to increase virtual memory in the first place. Well, the answer lies in optimizing your computer’s performance. By increasing virtual memory, you are essentially providing your computer with more memory to work with, which can result in faster response times and improved overall performance.
Now that you understand the importance of virtual memory and why you might want to increase it, let’s move on to checking your current settings and the steps involved in increasing virtual memory in Windows 10.
What is virtual memory?
Virtual memory is a memory management technique used by operating systems to provide additional memory to applications and processes. It is a combination of the computer’s physical RAM and a portion of the hard drive space, acting as an extension of the physical memory.
When a computer runs multiple applications simultaneously or when a single application requires more memory than what is available in the physical RAM, virtual memory comes into play. It temporarily stores data that is not actively being used by the system or applications.
To illustrate how virtual memory works, imagine a desk with limited working space. The physical RAM represents the desk surface, while the hard drive serves as additional storage space like a filing cabinet nearby. When the desk becomes cluttered with too many files, you move some to the filing cabinet to free up space. Similarly, when the RAM becomes filled with data, the operating system transfers less frequently used data to the hard drive, making room for new data in the RAM.
The process of swapping data between the RAM and the hard drive is managed by the operating system, ensuring that the most critical and actively used data remains in the fast-access physical RAM. This allows the computer to continue running smoothly, even when the physical memory is fully utilized.
It is important to note that virtual memory is not as fast as physical RAM since it resides on the hard drive, which has slower read and write speeds. However, it serves as a valuable resource when memory demands exceed the available physical RAM, allowing applications and processes to continue running without experiencing crashes or slowdowns.
By default, the operating system manages virtual memory settings automatically. However, in some cases, manually adjusting the virtual memory size can improve performance, particularly if you frequently run memory-intensive applications or experience performance issues due to insufficient memory.
Why would you want to increase virtual memory?
There are several reasons why you might want to increase virtual memory on your computer. Here are a few scenarios where increasing virtual memory can be beneficial:
- Running memory-intensive applications: If you frequently use applications that require a large amount of memory, such as video editing software or resource-heavy games, increasing virtual memory can help prevent performance issues. These applications often consume a significant portion of physical RAM, and by increasing virtual memory, you provide additional space for them to operate efficiently.
- Multitasking: If you find yourself frequently multitasking with multiple applications open simultaneously, increasing virtual memory can help improve your system’s responsiveness. Multitasking can put a strain on the available physical RAM, and having more virtual memory can prevent your system from running out of memory and slowing down.
- Reducing frequent crashes: If you experience frequent crashes or system freezes, it could be due to low memory. Increasing virtual memory can help alleviate this issue by providing more space for the operating system and applications to work with.
- Smoother performance with low RAM: If your computer has a relatively low amount of physical RAM, increasing virtual memory can compensate for the limited resources. This can result in smoother performance, especially when running multiple applications simultaneously.
- Optimizing system performance: Increasing virtual memory can be a proactive measure to optimize your system’s performance. By providing more memory resources, your computer can handle memory-hungry tasks more efficiently, leading to faster response times and overall improved performance.
It’s worth noting that increasing virtual memory is not a universal solution to all performance issues. It is important to consider other factors that may affect your computer’s performance, such as the processor speed and overall hardware capabilities. However, increasing virtual memory can be a helpful step in optimizing your system’s performance if memory-related issues are the primary concern.
Checking your current virtual memory settings
Before you proceed with increasing virtual memory in Windows 10, it’s important to first check your current virtual memory settings. This will give you an idea of the existing allocation and help you determine the appropriate adjustments to make. Here’s how you can check your current virtual memory settings:
- Open the Control Panel by typing “Control Panel” in the Windows search bar and selecting the corresponding result.
- In the Control Panel, click on the “System and Security” category.
- Under the System category, click on the “System” option.
- In the System window, click on the “Advanced system settings” link located on the left-hand side.
- A new window titled “System Properties” will open. In this window, navigate to the “Advanced” tab.
- In the Performance section, click on the “Settings” button.
- Another window titled “Performance Options” will open. Select the “Advanced” tab in this window as well.
- Under the Virtual Memory section, you will see information about the current virtual memory settings. The “Total paging file size for all drives” indicates the current allocation.
Take note of the current allocation size, as this will serve as a reference when you adjust the virtual memory settings later. It’s also advisable to understand the recommended virtual memory size for your system, which is often indicated below the current allocation information.
By checking your current virtual memory settings, you can effectively determine if an adjustment is necessary and if your computer is experiencing any memory-related issues. If you find that the current allocation is significantly lower than the recommended size or if your system often runs out of memory, increasing virtual memory can help alleviate these concerns and improve overall performance.
Increasing virtual memory in Windows 10
Now that you’ve checked your current virtual memory settings and identified the need to increase it, let’s dive into the steps to adjust the virtual memory in Windows 10. Follow these simple instructions:
- Step 1: Accessing the Advanced System Settings
To access the advanced system settings, press the Windows key + Pause/Break key on your keyboard. Alternatively, you can right-click on the “This PC” or “My Computer” icon on your desktop, select “Properties,” and then click on “Advanced system settings” on the left-hand side of the window that appears.
- Step 2: Adjusting the virtual memory settings
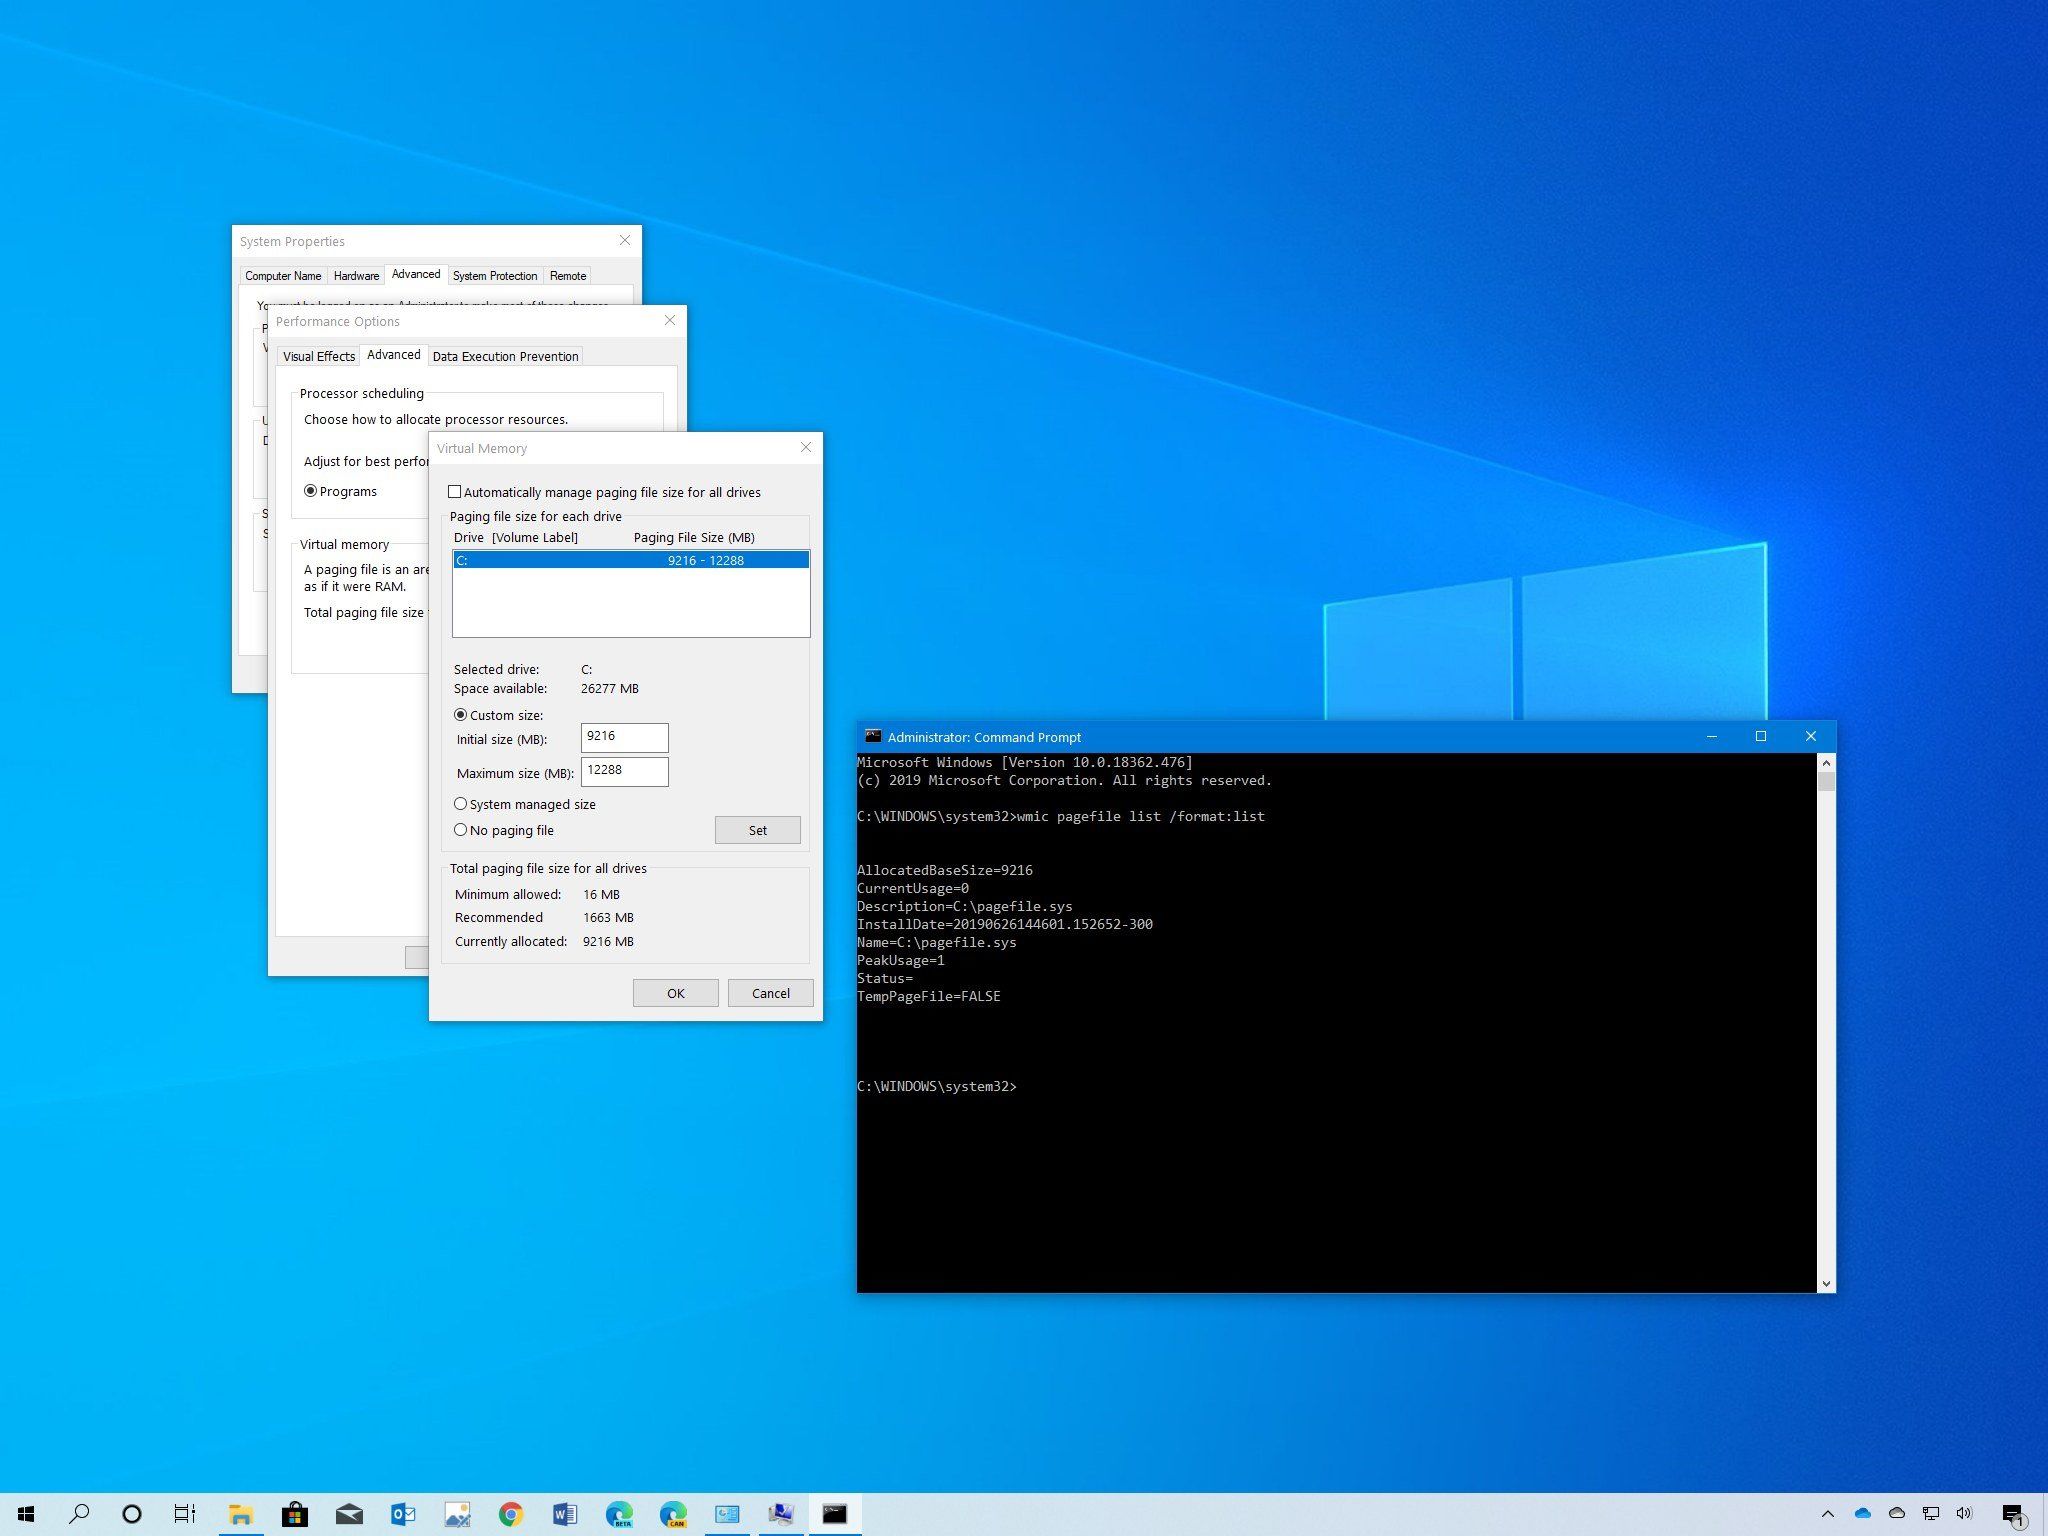
In the “System Properties” window, make sure you are on the “Advanced” tab. Under the “Performance” section, click on the “Settings” button. Another window titled “Performance Options” will open.
In the “Performance Options” window, select the “Advanced” tab. Under the “Virtual Memory” section, click on the “Change” button.
- Step 3: Selecting a suitable virtual memory size
In the “Virtual Memory” window, you will see a list of available drives. It’s recommended to adjust the virtual memory for your system drive (usually the C drive).
To set a custom size for the virtual memory, select the desired drive, click on the “Custom size” option, and enter the initial and maximum size values. Alternatively, you can choose the “System managed size” option to let Windows automatically determine the virtual memory size.
- Step 4: Applying the changes and restarting the computer
After selecting the desired virtual memory size, click on the “Set” button, then click on “OK” in the “Virtual Memory” window. Next, click on “Apply” and then “OK” in the “Performance Options” window.
Finally, restart your computer for the changes to take effect.
Congratulations! You have successfully increased the virtual memory in Windows 10. The additional memory allocation will provide your computer with more space to handle memory-intensive tasks and improve overall performance.
Please note that increasing the virtual memory size does require some available hard drive space. Ensure that you have sufficient free space on your system drive to accommodate the increased allocation.
Step 1: Accessing the Advanced System Settings
The first step in increasing virtual memory in Windows 10 is accessing the advanced system settings. This will allow you to make the necessary adjustments to the virtual memory allocation. Here’s how you can do it:
- Press the Windows key + Pause/Break key on your keyboard. Alternatively, you can right-click on the “This PC” or “My Computer” icon on your desktop and select “Properties” from the context menu.
- A window will open, displaying basic information about your computer. Look for the option that says “Advanced system settings” on the left-hand side and click on it.
By following these steps, you will open the “System Properties” window that contains various advanced settings for your computer.
An alternative method to access the advanced system settings is by right-clicking on the “Start” button and selecting “System” from the context menu. In the System window that opens, click on the “Advanced system settings” link on the left-hand side to proceed to the same “System Properties” window.
It’s worth mentioning that the keyboard shortcut mentioned above may vary depending on your computer’s manufacturer or the configuration settings you have. In such cases, refer to your computer’s documentation or search online for the specific keyboard shortcut to access the system properties.
Once you have successfully accessed the advanced system settings, you are now ready to move on to the next step: adjusting the virtual memory settings.
Step 2: Adjusting the virtual memory settings
After accessing the advanced system settings in Windows 10, you can proceed to adjust the virtual memory settings. This step involves navigating through the Performance Options menu to access the Virtual Memory settings. Here’s a detailed guide on how to do it:
- In the “System Properties” window, ensure that you are on the “Advanced” tab. Under the “Performance” section, click on the “Settings” button. This will open the “Performance Options” window.
- In the “Performance Options” window, select the “Advanced” tab. Here, you will find several performance-related settings for your computer.
- Scroll down until you reach the “Virtual Memory” section. Within this section, click on the “Change” button to adjust the virtual memory settings.
By following these steps, you will be able to access the Virtual Memory settings and make the necessary adjustments. This is where you can customize the virtual memory size according to your computer’s needs and available resources.
In the “Virtual Memory” window, you will see a list of available drives. It is advisable to adjust the virtual memory for your system drive, typically labeled as the C drive. Select the appropriate drive where you want to modify the virtual memory settings.
To set a custom size for the virtual memory, select the desired drive and click on the “Custom size” option. This will allow you to manually enter the initial and maximum size values for the virtual memory. Make sure to consider the total amount of memory your system can handle and the available free space on your drive when determining the appropriate sizes for the virtual memory.
Alternatively, you can choose the “System managed size” option to let Windows automatically determine the virtual memory size based on your computer’s configuration and available resources. This option is recommended for most users as it ensures optimal performance and hassle-free management of virtual memory.
Once you have selected the desired virtual memory size and customization options, click on the “Set” button to apply the changes. Then, click on “OK” in the “Virtual Memory” window and “Apply” followed by “OK” in the “Performance Options” window to save the new virtual memory settings.
Congratulations! You have successfully adjusted the virtual memory settings for your Windows 10 computer. Proceed to the next step to complete the process.
Step 3: Selecting a suitable virtual memory size
Once you have accessed the virtual memory settings in Windows 10, the next step is to select a suitable virtual memory size for your computer. A well-chosen virtual memory size can ensure optimal performance and prevent memory-related issues. Here’s a guide to help you in selecting the appropriate size:
- In the Virtual Memory window, you will see a list of available drives. It is recommended to adjust the virtual memory size for your system drive, typically labeled as the C drive.
- Select the desired drive by clicking on it to highlight it.
- Next, you will have two options for setting the virtual memory size:
- Custom size: Choosing this option allows you to manually enter the initial and maximum size values for the virtual memory. It is important to consider factors such as the total amount of memory your system can handle and the available free space on your drive when determining the sizes.
- System managed size: This option lets Windows automatically determine the virtual memory size based on your computer’s configuration and available resources. It is the recommended option for most users as it ensures optimal performance and simplifies the management of virtual memory.
To set a custom size for the virtual memory, select the drive and click on the “Custom size” option. Then, enter the initial size (in MB) and the maximum size (in MB) that you want to allocate for the virtual memory on that drive. Keep in mind that the initial size should be smaller than or equal to the maximum size.
If you prefer to have Windows manage the virtual memory size automatically, select the “System managed size” option. This allows Windows to dynamically adjust the virtual memory allocation based on your computer’s needs, ensuring efficient memory management without user intervention.
It’s important to note that the recommended virtual memory size is usually displayed below the allocation options in the Virtual Memory window. This recommendation is based on Microsoft’s guidelines and takes into account the specifications of your computer. You can use this recommendation as a reference when adjusting the virtual memory size, but ultimately, the decision is yours based on your specific requirements and available resources.
Once you have made your selection, click on the “Set” button to apply the changes. Remember to click on “OK” in the Virtual Memory window and then “Apply” followed by “OK” in the Performance Options window to save the new virtual memory settings for your Windows 10 computer.
With a suitable virtual memory size in place, your computer will be better equipped to handle memory-intensive tasks and offer improved performance.
Step 4: Applying the changes and restarting the computer
After adjusting the virtual memory settings in Windows 10, the final step is to apply the changes and restart your computer. This ensures that the new virtual memory allocation takes effect and allows your system to utilize the updated settings. Follow these instructions to complete the process:
- Once you have finished making the desired changes to the virtual memory settings, click on the “Set” button in the Virtual Memory window to apply the new configuration.
- Next, click on “OK” in the Virtual Memory window to close it.
- Back in the Performance Options window, click on the “Apply” button to save the changes you made to the virtual memory settings.
- Finally, click on “OK” in the Performance Options window to exit and close it.
With the changes applied, it is crucial to restart your computer for the modifications to take effect. Restarting allows the operating system to reconfigure and allocate the virtual memory according to the new settings you have specified.
To restart your computer, click on the “Start” button in the Windows taskbar and select “Restart” from the power options. Alternatively, you can press the Windows key and then click on the Power icon, followed by choosing the “Restart” option.
Upon restarting, your Windows 10 computer will now utilize the increased virtual memory size you have set. This additional memory allocation will provide your system with more space to handle memory-intensive tasks and improve overall performance.
Keep in mind that restarting your computer may temporarily interrupt any ongoing processes or applications. It’s a good practice to save your work and close any important applications before proceeding with the restart.
Once your computer has restarted successfully, you can start using it with the updated virtual memory settings. Enjoy the improved performance and the ability to handle memory-demanding tasks more efficiently.
Verifying the increased virtual memory size
After you have adjusted the virtual memory settings and restarted your computer, it’s important to verify that the changes have been applied successfully. Verifying the increased virtual memory size is essential to ensure that your computer is utilizing the updated settings. Follow these steps to verify the virtual memory size in Windows 10:
- Right-click on the “Start” button in the Windows taskbar and select “System” from the context menu. Alternatively, you can press the Windows key + Pause/Break key on your keyboard.
- In the System window that appears, you will find the relevant information about your computer’s specifications, including the installed memory (RAM).
- Click on the “Advanced system settings” link on the left-hand side of the window. This will open the System Properties window.
- In the System Properties window, navigate to the “Advanced” tab.
- In the Performance section, click on the “Settings” button.
- In the Performance Options window that appears, select the “Advanced” tab.
- Under the Virtual Memory section, you will see information about the current virtual memory settings.
In the Virtual Memory section, verify that the total paging file size for all drives matches the virtual memory size you had set earlier. This confirms that the changes you made to the virtual memory settings have been successfully applied.
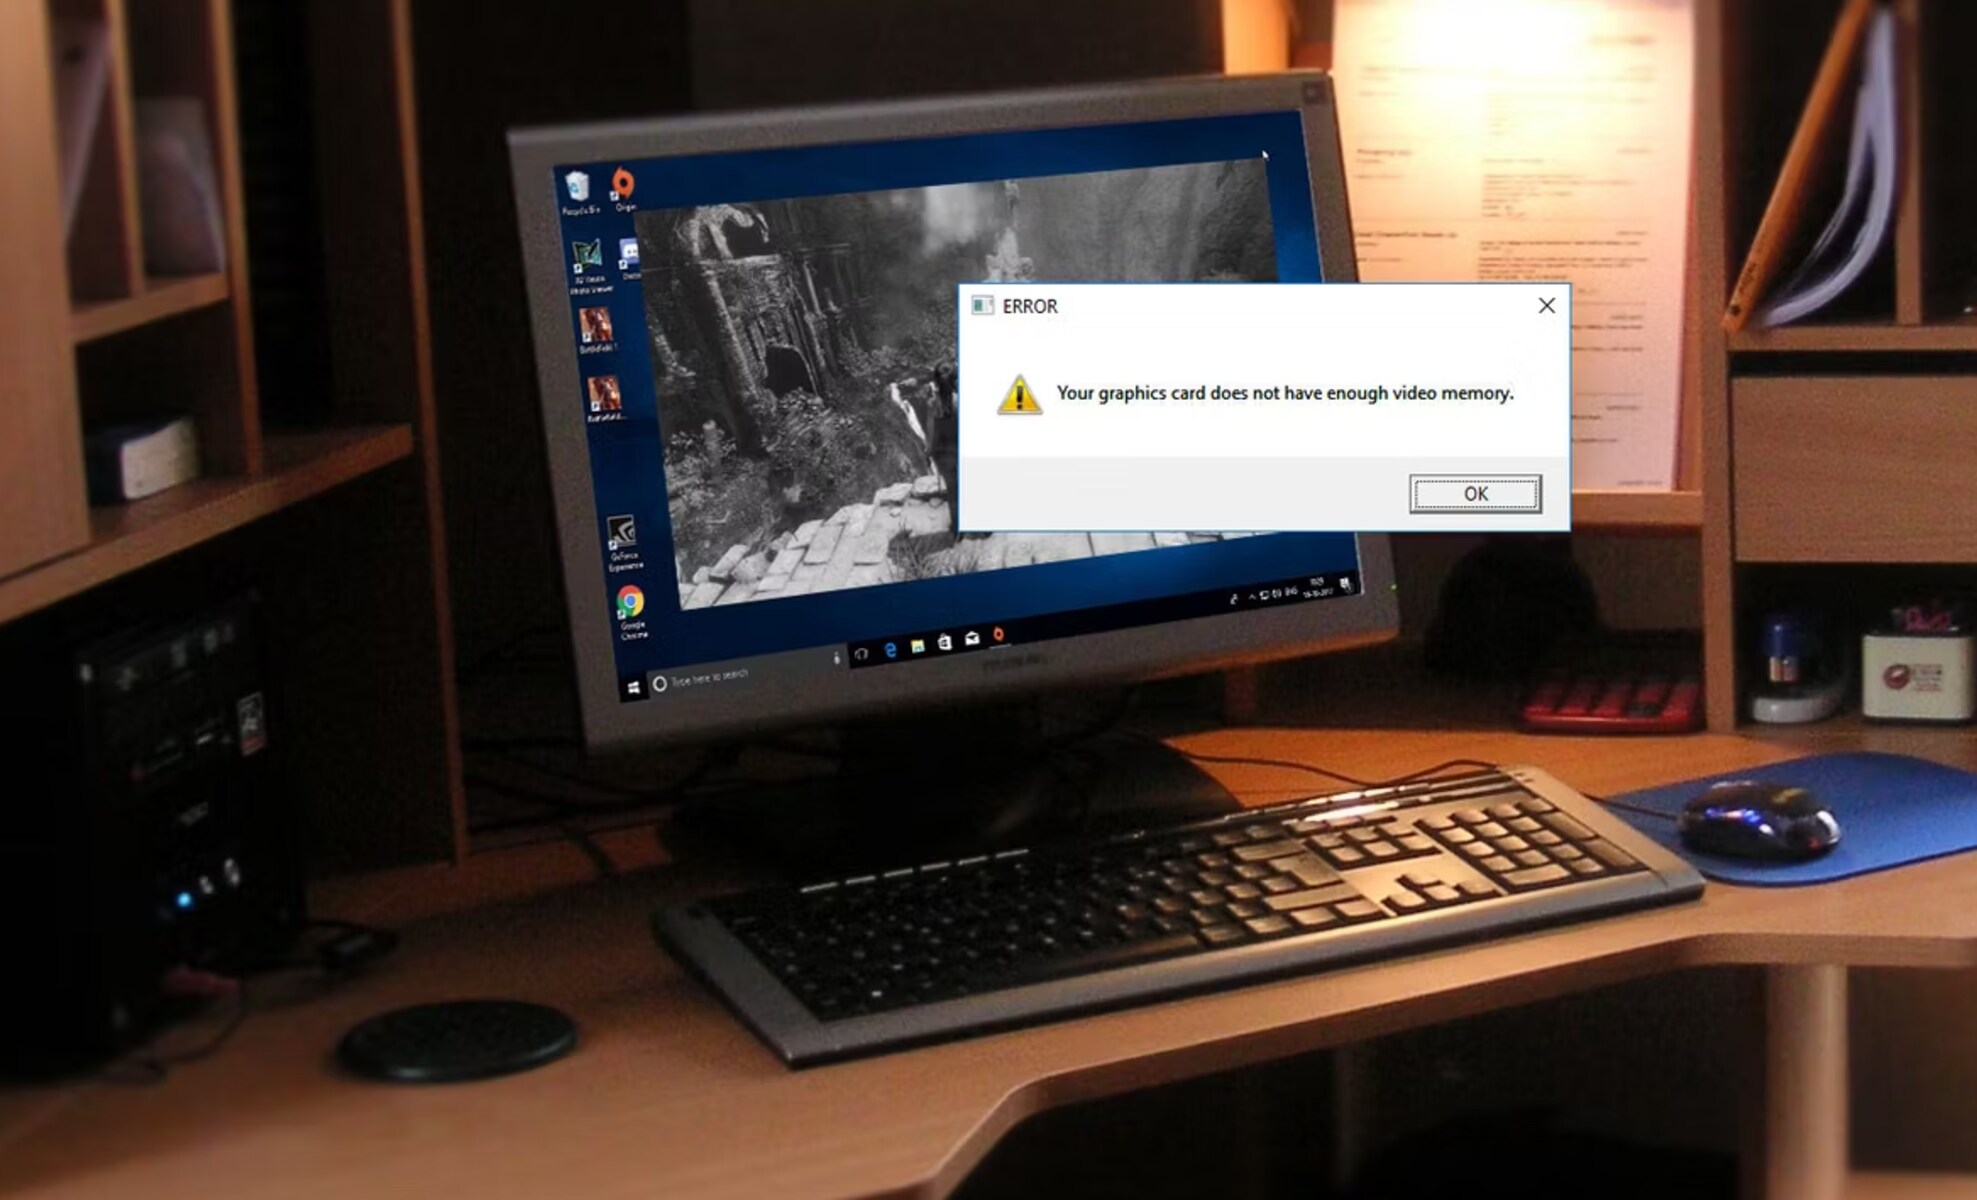
It’s important to note that Windows may display a warning message if the virtual memory size is set too low or if it is not sufficient to meet the demands of your computer. If you encounter any warnings or errors related to virtual memory, you may need to revisit the settings to adjust them accordingly.
By verifying the increased virtual memory size, you can ensure that your computer is equipped with the appropriate memory resources to handle memory-intensive tasks effectively. Having sufficient virtual memory helps prevent memory-related issues and ensures improved performance and responsiveness.
With the virtual memory settings verified and confirmed, you can now enjoy a well-optimized system that can handle various applications and tasks without running out of memory resources.
Tips and considerations for managing virtual memory
Managing virtual memory effectively is crucial for optimizing your computer’s performance. Here are some important tips and considerations to keep in mind when it comes to virtual memory management in Windows 10:
- Allow Windows to manage virtual memory: In most cases, it is recommended to let Windows handle the virtual memory settings automatically. The “System managed size” option in the virtual memory settings ensures that the allocation is optimized based on your system’s configuration and available resources.
- Leave enough free space on your drive: Ensure that you have sufficient free space on your system drive (usually the C drive) to accommodate the virtual memory allocation. Lack of free space can lead to performance issues and may prevent Windows from allocating the necessary virtual memory.
- Avoid setting the virtual memory size too low: Setting the virtual memory size too low can result in memory-related errors and system instability. It is advisable to follow the recommended virtual memory size or let Windows manage it automatically for optimal performance.
- Consider upgrading physical RAM: If you consistently find that you need to increase virtual memory to accommodate your usage patterns, it may be worthwhile to consider upgrading your physical RAM. Increasing the amount of RAM in your system can provide a more significant and immediate performance boost than relying solely on virtual memory.
- Monitor memory usage: Keep an eye on the memory usage of your system by using the built-in Windows Task Manager or third-party monitoring tools. Monitoring memory usage can help you identify if there are any applications or processes consuming excessive memory and taking steps to optimize them.
- Close unnecessary applications: Closing unused or unnecessary applications can free up memory resources and improve overall system performance. It’s a good practice to regularly close applications that you are not actively using.
- Restart your computer periodically: Restarting your computer can help refresh the system, clear temporary files, and free up memory. It is recommended to restart your computer regularly, especially if you have been running memory-intensive applications or experiencing decreased performance.
- Consider using an SSD: If possible, consider using a solid-state drive (SSD) as your system drive. SSDs offer faster read and write speeds compared to traditional hard drives, which can result in improved virtual memory performance.
- Seek professional assistance if needed: If you continue to experience memory-related issues or performance problems despite adjusting the virtual memory settings, it may be worth seeking professional assistance from a computer technician or IT specialist who can further diagnose the problem and provide appropriate solutions.
By following these tips and considerations, you can effectively manage and optimize the virtual memory on your Windows 10 computer, ensuring smooth performance and efficient memory allocation for your system and applications.
Conclusion
In this guide, we have explored the process of increasing virtual memory in Windows 10. Virtual memory plays a crucial role in handling memory-intensive tasks and optimizing system performance. By following the steps outlined in this guide, you can adjust the virtual memory settings to meet your specific needs and improve your computer’s overall responsiveness.
We started by understanding what virtual memory is and why you might want to increase it. Whether you are running memory-intensive applications, multitasking, or dealing with frequent crashes, increasing virtual memory can provide additional memory resources to ensure smoother performance.
We then walked through the process of checking your current virtual memory settings and adjusting them accordingly. Accessing the advanced system settings, selecting a suitable virtual memory size, and applying the changes were explained step by step.
We also discussed the importance of verifying the increased virtual memory size to ensure that the changes have been successfully applied. By checking the virtual memory size, you can confirm that your computer is utilizing the updated settings and benefiting from the increased memory resources.
Lastly, we provided some tips and considerations for managing virtual memory effectively. These tips, such as allowing Windows to manage virtual memory, leaving enough free space on your drive, and monitoring memory usage, can help you maintain optimal system performance and avoid common memory-related issues.
Remember, virtual memory should not be viewed as a solution to all performance problems. It is just one aspect of optimizing your system’s performance, and factors like available physical RAM, processor speed, and overall hardware capabilities should also be considered.
By understanding and managing virtual memory effectively, you can ensure that your Windows 10 computer operates smoothly, handles memory-intensive tasks efficiently, and delivers an overall enhanced user experience.