Introduction
Welcome to the world of Discord streaming! Discord has quickly become one of the most popular platforms for gamers, content creators, and communities to connect and communicate. With its seamless integration of voice, video, and chat features, Discord provides an excellent platform for streaming your gaming adventures or hosting live events.
While Discord offers a smooth streaming experience right out of the box, there are several steps you can take to further enhance the quality of your stream. Whether you’re striving for crystal-clear audio, high-definition video, or minimizing stream delay, this guide will walk you through some essential tips and settings to improve your Discord stream quality.
Before we dive into the specific optimizations, it’s important to note that the quality of your Discord stream heavily depends on your own internet connection and hardware setup. You can follow these tips to optimize your stream within the limits of your existing equipment.
So, without further ado, let’s explore the steps you can take to elevate your Discord stream to the next level!
Choose the Right Discord Server Region
When it comes to streaming on Discord, the first step to ensure optimal performance is choosing the right server region. Discord operates on a global network of servers, and selecting the server region closest to your physical location can significantly improve the quality of your stream.
Each server region has its own infrastructure and routing protocols, which can impact your connection stability and latency. If you connect to a server region that is physically far away from you, it may introduce delays and packet loss, resulting in a less smooth and reliable stream.
To choose the right server region, follow these steps:
- Open Discord and navigate to the settings menu by clicking on the gear icon in the bottom left corner.
- In the settings menu, select the “Voice & Video” tab on the left sidebar.
- Under the “Voice Region” section, you will see a dropdown menu with the current server region selected.
- Click on the dropdown menu and choose the server region that is closest to your physical location.
- Once you’ve selected the desired server region, Discord will automatically connect you to servers in that region for optimal performance.
By choosing the right server region, you can minimize latency and reduce the chances of experiencing lag or disconnections during your streaming sessions. This is especially crucial if you plan to stream high-intensity games or engage in real-time voice communication with your audience.
Keep in mind that if you are streaming with friends or co-streaming with other Discord users, it’s important to choose a server region that is close to the majority of the participants to ensure everyone has a smooth streaming experience. Collaboration and coordination are key to a successful stream, and optimizing your server region is the first step towards achieving that.
Now that you have selected the appropriate server region, let’s move on to optimizing your internet connection to provide a stable and fast streaming experience.
Optimize Your Internet Connection
A stable and fast internet connection is crucial for maintaining high-quality Discord streams. To optimize your internet connection and minimize issues such as lag and buffering, follow these steps:
- Check your internet speed: Use an online speed test tool to check your internet download and upload speeds. Ideally, you should have a minimum upload speed of 3 Mbps for a decent stream quality.
- Use a wired connection: If possible, connect your computer or gaming console directly to your router using an Ethernet cable. Wired connections tend to be more stable and reliable compared to Wi-Fi connections.
- Close bandwidth-consuming apps: Make sure to close any bandwidth-intensive applications or downloads running in the background. These can hog your internet resources and negatively impact your stream quality.
- Limit network interference: Position your router in a central location and away from other electronic devices that can interfere with the signal. Additionally, reduce the number of devices connected to your network while streaming to free up bandwidth.
- Upgrade your internet plan: If you consistently experience slow speeds or frequent disconnections during streams, consider upgrading your internet plan to a higher speed package or switching to a more reliable provider.
- Enable Quality of Service (QoS): Some routers have QoS settings that prioritize internet traffic for specific applications, like streaming. Enable this feature if available to ensure Discord gets the necessary bandwidth it requires for a smooth stream.
By optimizing your internet connection, you can ensure a stable and fast connection for streaming on Discord. This will result in better stream quality, reduced latency, and an overall improved streaming experience for both you and your audience.
Now that your internet connection is optimized, let’s dive into adjusting Discord stream settings to further enhance your stream quality.
Adjust Discord Stream Settings
Discord offers a range of settings that you can adjust to optimize your stream quality. These settings allow you to fine-tune various aspects of your stream, including video resolution, frame rate, and audio quality. Here are some key settings to consider:
- Video Resolution: In the “Voice & Video” settings menu, under the “Video Settings” section, select an appropriate video resolution for your stream. Higher resolutions may require a more powerful computer and bandwidth, so choose a resolution that balances quality and performance.
- Frame Rate: Also in the “Video Settings” section, you can adjust the frame rate of your stream. Higher frame rates provide smoother motion, but they also require more processing power and bandwidth. Consider your hardware capabilities and internet speed when deciding on the frame rate.
- Audio Quality: Under the “Voice Settings” section, you can select the audio input and output devices. Opt for a good quality microphone to ensure clear and crisp audio for your stream. You can also adjust the input sensitivity to eliminate background noise.
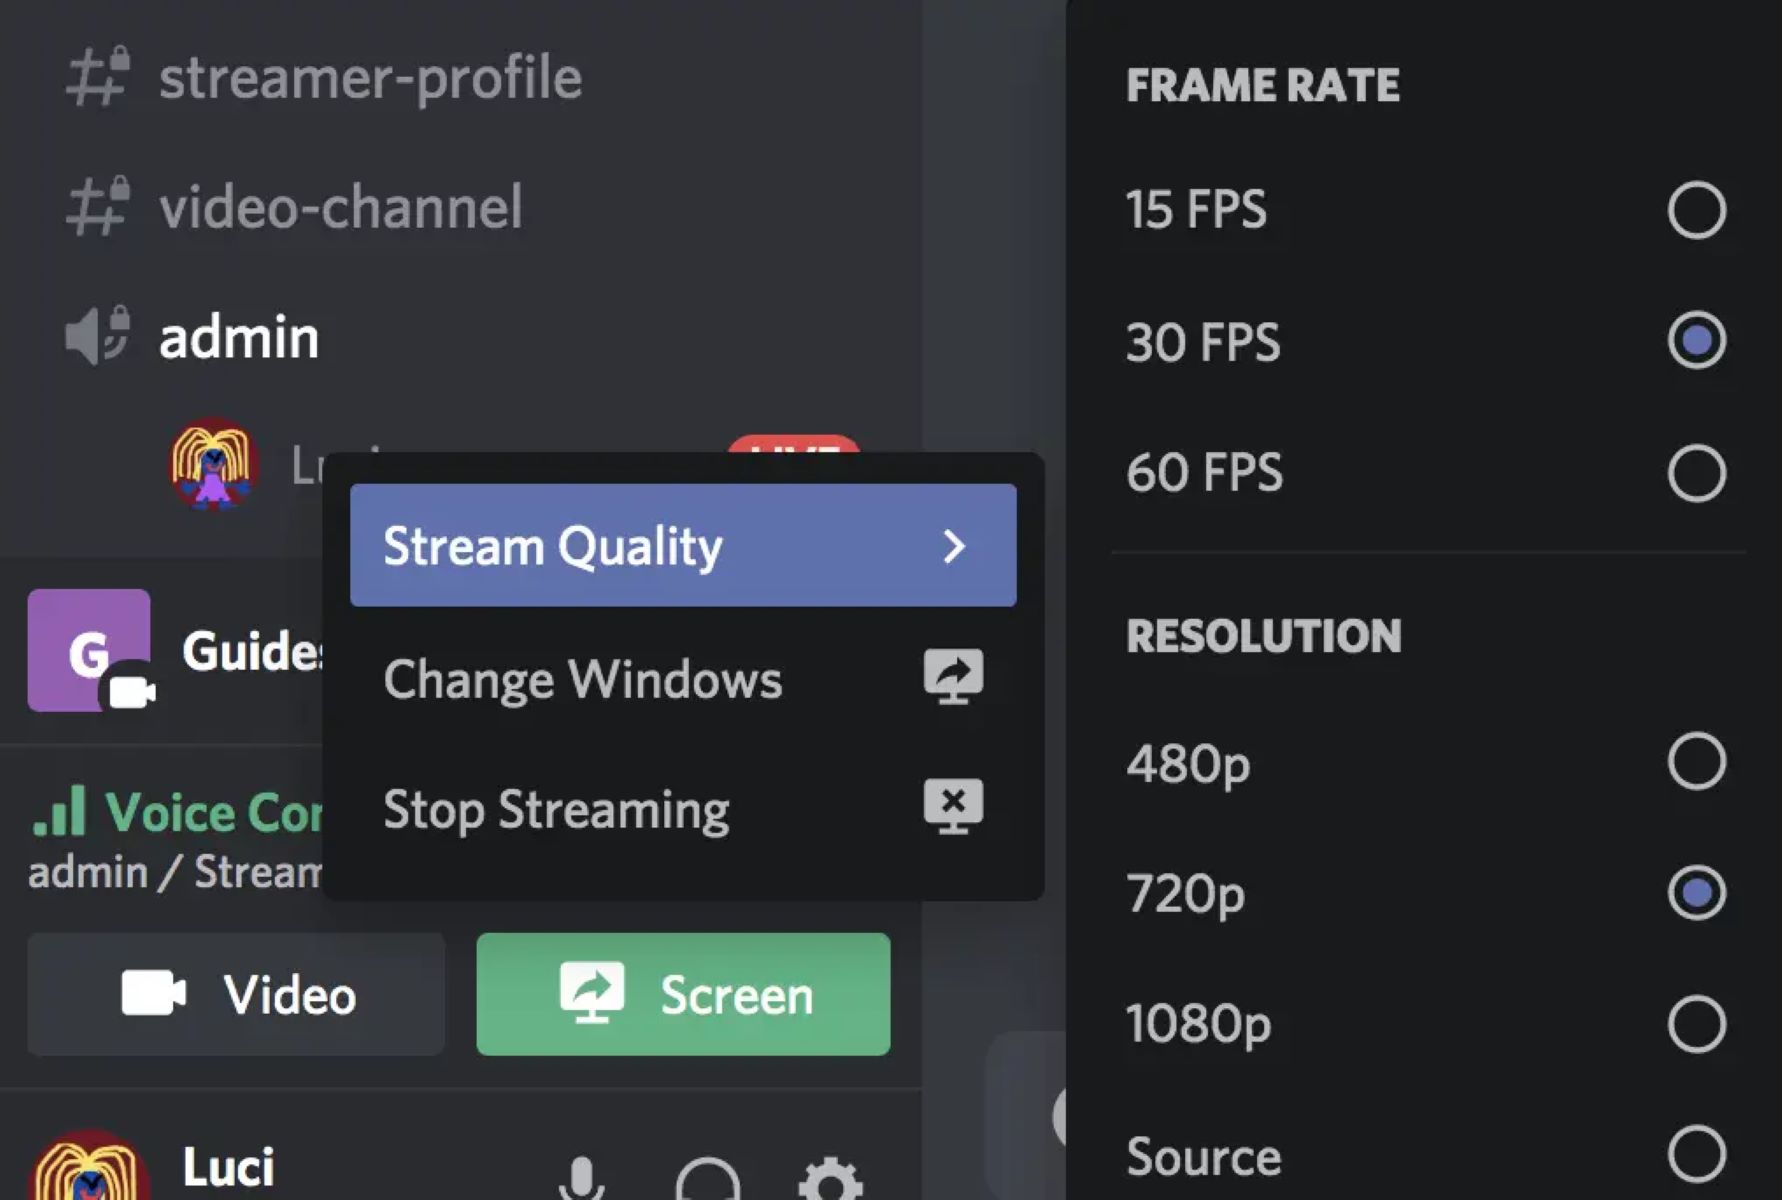
- Go Live Stream Quality: If you’re using the “Go Live” feature on Discord, you can adjust the stream quality in the streaming settings. Depending on your hardware capabilities and internet connection, you can choose between auto, 720p, or 1080p for the stream resolution.
- Bandwidth: Discord offers the option to limit the bandwidth used for voice and video calls. Consider setting a bandwidth limit to allocate more resources to your stream and minimize potential interruptions or degradation in stream quality.
Experiment with these settings to find the optimal configuration for your stream. Keep in mind that the ideal settings may vary depending on your hardware, internet connection, and the demands of the game or content you are streaming.
Additionally, it’s important to regularly update both Discord and any streaming software you may be using, such as OBS or Streamlabs OBS. These updates often come with performance improvements, bug fixes, and new features that can further enhance your streaming experience on Discord.
Now that you’ve adjusted the Discord stream settings, let’s explore some additional tips to ensure a smooth and uninterrupted streaming experience.
Use a Wired Connection
When it comes to streaming on Discord, a stable and reliable internet connection is essential. While Wi-Fi is convenient, it can be prone to interference and signal disruptions, which can negatively impact your stream quality. To ensure a consistent and robust connection, it’s recommended to use a wired Ethernet connection instead.
A wired connection provides several advantages over Wi-Fi:
- Stability: Wired connections are less susceptible to interference from other devices or neighboring Wi-Fi networks. This leads to a more stable and consistent internet connection, reducing the chances of sudden lag spikes or stream interruptions.
- Reliability: Unlike Wi-Fi, which can experience signal drop-offs or weak connections in certain areas of your home or office, a wired connection maintains a strong and reliable link between your computer and the router.
- Speed: Wired connections generally offer faster and more consistent speeds compared to Wi-Fi. This is especially beneficial for streaming content, as it ensures smooth and high-quality video and audio transmission.
To set up a wired connection, follow these steps:
- Locate your router: Identify the port on your router labeled “LAN” or “Ethernet.”
- Connect an Ethernet cable: Plug one end of the cable into the LAN port on your router and the other end into the Ethernet port on your computer or gaming device.
- Disable Wi-Fi: To prevent any conflicts or potential interruptions, disable Wi-Fi on your computer or device to ensure that it solely uses the wired connection.
- Configure network settings: Your computer or device should automatically detect and configure the wired connection. However, if you encounter any issues, consult the documentation provided by your operating system or contact your internet service provider for assistance.
By using a wired connection for streaming on Discord, you can greatly enhance the stability and reliability of your connection. This translates to improved stream quality and a seamless streaming experience for both you and your audience.
Now that you’ve established a wired connection, let’s explore some tips for optimizing your system performance by closing unnecessary applications and background processes.
Close Unnecessary Applications and Background Processes
When streaming on Discord, it’s important to optimize your system performance by closing unnecessary applications and background processes. Running too many applications or processes can consume valuable system resources, leading to a decrease in stream quality and potential lag or interruptions. By minimizing unnecessary tasks, you can allocate more resources to Discord and enhance your overall streaming experience. Here are some steps to follow:
- Identify resource-intensive applications: Open your Task Manager (Ctrl + Shift + Esc on Windows) and review the list of running processes. Look for any applications or processes that are utilizing a significant amount of your CPU, memory, or network resources.
- Close unused applications: Close any applications that you don’t need while streaming. This includes web browsers, chat clients, file-sharing programs, and other resource-heavy applications. Be sure to save any work in progress before closing these applications.
- Disable startup programs: Some applications automatically launch when you start your computer and continue running in the background. Disable or remove any unnecessary startup programs to free up system resources.
- Check for background services: In addition to applications, there may be background services running on your computer that are not needed while streaming. Use the Task Manager or system settings to identify and disable any unnecessary services.
- Optimize browser tabs/extensions: If you use a web browser during your stream, close any unnecessary tabs and disable any extensions that may be running in the background. This can help reduce memory usage and improve overall performance.
- Manage system updates: Operating system updates, antivirus scans, and software updates can sometimes interfere with your stream. Schedule these updates to occur outside of your streaming time or temporarily disable them while you’re live.
By closing unnecessary applications and background processes, you can free up system resources and create a more streamlined environment for streaming on Discord. This will help maintain a consistent stream quality with minimal interruptions or performance issues.
Now that your system is optimized, let’s discuss the importance of limiting the Discord stream resolution to ensure a smooth and stable stream.
Limit Discord Stream Resolution
When streaming on Discord, it’s crucial to consider the resolution of your stream to ensure a smooth and stable experience for both you and your viewers. Streaming at a high resolution requires more processing power and bandwidth, which can lead to buffering, lag, or dropped frames if your system or internet connection cannot handle the load. To avoid such issues, it’s recommended to limit the Discord stream resolution to a suitable level. Here’s how:
- Open Discord and go to the settings menu by clicking on the gear icon in the bottom left corner.
- In the settings menu, select the “Voice & Video” tab on the left sidebar.
- Under the “Video Settings” section, find the “Quality” dropdown menu.
- Choose a resolution that matches your system’s capabilities and internet bandwidth. It’s advisable to start with a lower resolution, such as 720p, and gradually increase it if your system can handle it without any performance issues.
- Keep in mind that the resolution you select may also depend on the preferences of your viewers and the type of content you are streaming. If you’re streaming gameplay, for example, a resolution of 720p is generally sufficient for most viewers to enjoy the stream without straining their internet connections.
Limiting the stream resolution helps ensure a smoother stream with fewer buffering issues and a more consistent experience for your audience. It also allows viewers with slower internet connections to watch your stream without encountering excessive lag or performance problems.
Remember to regularly test your stream at different resolutions to find the right balance between quality and performance. This will help you provide an enjoyable viewing experience and maintain a stable stream without overwhelming your system or internet connection.
Now that we’ve covered how to limit the stream resolution, let’s discuss the importance of keeping Discord and your streaming software updated to take advantage of the latest features and improvements.
Update Discord and Streaming Software
Keeping your Discord and streaming software up to date is crucial for maintaining optimal performance and taking advantage of the latest features and improvements. Regular updates often include bug fixes, stability enhancements, and performance optimizations that can enhance your streaming experience on Discord. Here’s how to ensure your software is always up to date:
Update Discord
Discord updates are typically rolled out automatically, but it’s important to check for updates manually to ensure you have the latest version. Here’s how:
- Open Discord and click on the gear icon in the bottom left corner to access the settings menu.
- In the settings menu, select the “Appearance” tab on the left sidebar.
- Under “Advanced,” toggle on the “Developer Mode.”
- Close the settings menu and right-click the Discord icon in your system tray or taskbar.
- Hover over the “Quit Discord” option and select “Check for Updates” from the extended menu.
- If an update is available, follow the prompts to download and install the latest version of Discord.
Update Streaming Software
If you use streaming software such as OBS or Streamlabs OBS, it’s essential to keep them updated as well. The process may vary slightly depending on the software you’re using, but here are the general steps:
- Open your streaming software and navigate to the settings or preferences menu.
- Look for an option related to updates or check for updates.
- Click on the update button or follow the prompts to update the software to the latest version.
Regularly updating your Discord and streaming software ensures that you have the most stable and optimized versions available. It can also help you benefit from new features and improvements that enhance your streaming capabilities, such as increased performance, additional customization options, and enhanced compatibility with other software and hardware.
By keeping your software up to date, you can ensure a smoother and more reliable streaming experience on Discord, providing your audience with the best possible viewing experience.
Now that you’re armed with the knowledge of updating your software, let’s move on to reducing stream delay for more interactive streaming sessions.
Reduce Stream Delay
Stream delay refers to the time it takes for your stream to reach your viewers’ screens after you transmit it. While a small delay can help prevent stream sniping and provide a buffer for any unforeseen issues, excessive delay can hinder interactivity and real-time engagement with your audience. Here are some strategies to reduce stream delay on Discord:
- Choose a lower latency setting: In your Discord settings, navigate to the “Voice & Video” tab and find the “Advanced” section. Lower the “Voice Processing” option to the “Low” or “Medium” setting to decrease stream delay.
- Opt for a lower quality stream: While it’s natural to want to provide the highest quality stream possible, reducing the stream resolution and bit rate can help decrease the delay. Experiment with different settings to find a balance between quality and latency that suits your needs.
- Use a streaming platform with low latency: Consider using platforms specifically designed for low-latency streaming, such as Twitch’s low latency mode or platforms that utilize WebRTC technology. These platforms prioritize real-time interaction and reduce stream delay to a minimum.
- Upgrade your hardware and internet connection: A more powerful computer and a faster internet connection can help reduce processing time and data transmission delays. Consider investing in hardware upgrades or upgrading to a higher-speed internet plan if feasible.
- Optimize your encoding settings: If you use software like OBS to encode and stream your content, ensure that your encoding settings are properly configured. Lower encoding presets and video bitrates can help decrease encoding lag and reduce stream delay.
By implementing these strategies, you can significantly reduce the stream delay on Discord, making your streams more interactive and engaging for your audience. Remember to test different settings and monitor the impact on your stream’s performance to find the optimal balance that suits your needs.
Now that we’ve explored various methods to reduce stream delay, let’s move on to another essential aspect of improving stream quality: using a good quality microphone.
Use a Good Quality Microphone
When it comes to streaming on Discord, having clear and high-quality audio is essential to engage and captivate your audience. To achieve this, it’s important to invest in a good quality microphone. A high-quality microphone can significantly improve the clarity and overall sound of your stream. Here are some considerations when choosing a microphone:
- Choose a dedicated microphone: While headsets with built-in microphones may be convenient for gaming, dedicated microphones tend to provide better audio quality. Look for microphones specifically designed for recording purposes or streaming, such as USB condenser microphones or XLR microphones with an audio interface.
- Consider microphone options: There are various types of microphones available, including dynamic microphones, condenser microphones, and lavalier microphones. Each has its own pros and cons, so it’s important to research and choose the type that best suits your needs and recording environment.
- Look for noise cancellation features: Look for microphones that have built-in noise cancellation or pop filters to reduce background noise, plosive sounds, and other unwanted audio artifacts. This helps ensure a cleaner and more professional sound for your stream.
- Position the microphone correctly: Proper microphone placement is crucial for capturing clear and balanced sound. Place the microphone at an appropriate distance from your mouth, typically around 6-12 inches, and position it to minimize interruptions from breathing sounds or physical movements.
- Test and adjust audio settings: Once you’ve chosen a microphone, test and adjust your audio settings in Discord or your streaming software. Set the microphone input level to an optimal level, ensuring that your voice is clear and easy to understand without distorting or clipping.
By using a good quality microphone, you can provide your audience with clear and professional audio, enhancing the overall quality of your streams. It allows your viewers to fully immerse themselves in your content and better connect with you as a streamer.
Remember to regularly test and monitor your microphone setup to ensure it’s functioning properly and delivering the desired audio quality. Making adjustments and fine-tuning your settings can further enhance the sound for an even more immersive streaming experience.
Now that we’ve covered the importance of using a good quality microphone, let’s summarize the key points discussed in this guide to improving Discord stream quality.
Conclusion
Streaming on Discord can be an exciting and rewarding experience, allowing you to connect with your audience and share your passions in real-time. By following the tips and strategies outlined in this guide, you can significantly improve the quality of your Discord stream and provide a more enjoyable experience for both you and your viewers.
We started by highlighting the importance of choosing the right Discord server region to minimize latency and ensure a stable connection. Then, we discussed optimizing your internet connection by using a wired connection, closing unnecessary applications and background processes, and checking your internet speed.
Adjusting Discord stream settings, such as video resolution, frame rate, and audio quality, can significantly enhance the overall stream quality. Additionally, keeping Discord and your streaming software up to date allows you to take advantage of the latest features and improvements.
We also explored reducing stream delay to boost interactivity and engagement, as well as using a good quality microphone to deliver clear and professional audio. The right microphone choice and proper placement can make a world of difference in the quality of your stream’s audio.
Remember, finding the perfect balance between quality and performance takes time and experimentation. Continuously monitor and adjust your settings based on your hardware capabilities, internet connection, and content requirements.
By implementing these strategies and continuously improving your setup, you can create an immersive and high-quality streaming experience on Discord that keeps your audience entertained and coming back for more.
So, go ahead and apply these tips, experiment, and have fun as you elevate your Discord stream quality to new heights!