Introduction
Streaming games has become a popular way for gamers to connect with their audience and share their gaming experiences. Discord, the widely used communication platform, provides a great opportunity for gamers to stream their gameplay to friends, communities, or even the public. With Discord’s built-in streaming feature, you can effortlessly showcase your gaming skills and interact with viewers in real-time.
In this guide, we will walk you through the step-by-step process of setting up and streaming games on Discord. Whether you want to share your intense multiplayer battles or show off your speedruns, this guide will help you get started.
Before we dive into the details, it’s important to ensure that you have a solid understanding of Discord and OBS Studio, a popular open-source software for video recording and live streaming. Additionally, make sure you have a reliable internet connection and a computer capable of handling both the game and streaming software simultaneously.
Now, let’s begin the journey to becoming a game streamer on Discord. By the end of this guide, you will have everything you need to start streaming your gameplay and engage with a wider audience of fellow gamers.
Step 1: Setting up Discord
Before you can start streaming games on Discord, you need to make sure you have Discord installed on your computer. If you haven’t done so already, follow these simple steps to set up Discord:
- Visit the official Discord website at discord.com and click on the download button.
- Once the download is complete, run the Discord installer and follow the on-screen instructions to install Discord on your computer.
- After the installation is complete, launch Discord and create an account if you don’t already have one. You will be prompted to provide a username, email address, and password.
- Once you’ve created your account, you can personalize your profile by adding a profile picture and setting a status message. This will allow others to recognize and engage with you while you’re streaming.
- Next, you’ll want to join gaming communities or create your own server. Discord has a variety of servers dedicated to different games and gaming interests. Joining these communities will allow you to connect with like-minded gamers and potentially expand your audience when you start streaming.
Now that you have successfully set up Discord, you are ready to move on to the next step: adjusting Discord settings to optimize your streaming experience.
Step 2: Adjusting Discord settings
Once you have Discord installed on your computer, it’s important to customize some settings to ensure the best streaming experience. Here’s how you can adjust your Discord settings:
- Open Discord and click on the gear icon located at the bottom left corner of the window. This will take you to the User Settings section.
- In the User Settings menu, navigate to the ‘Voice & Video’ tab. Here, you can configure your audio and video settings for streaming.
- Under the ‘Voice Settings’, you can choose your input and output devices. Make sure to select the microphone and headphones that you want to use for your stream. It’s important to use a high-quality microphone to ensure clear and crisp audio for your viewers.
- In the ‘Video Settings’, you can select the camera input if you want to stream your face along with your gameplay. You can also adjust the camera resolution and framerate according to your preferences.
- Below the ‘Voice Settings’, you’ll find the ‘App Settings’ section. Here, you can adjust various settings related to Discord’s appearance, notifications, and behavior. Take some time to explore these options and customize Discord to suit your needs.
- Now, head over to the ‘Keybinds’ tab, where you can set up hotkeys for various Discord functions. Having hotkeys can make it easier to toggle your stream on and off, switch between voice channels, or perform other actions while you’re in the middle of a game.
Take a moment to review and adjust these Discord settings according to your preferences. Ensuring proper audio and video configurations will greatly enhance the quality of your stream and the overall viewing experience for your audience.
Step 3: Checking your game’s compatibility
Before you start streaming a game on Discord, it’s important to ensure that the game you want to stream is compatible with Discord’s streaming feature. While Discord supports a wide range of games, it’s always a good idea to double-check. Here’s how you can check your game’s compatibility:
- Visit the Discord website and navigate to the ‘Streamkit’ section. You can find this by going to the Discord homepage and clicking on the ‘Developers’ tab at the top of the page.
- In the Streamkit section, you will find a list of games that are officially supported for streaming on Discord. Check if the game you want to stream is on this list. If it is, you can proceed to the next step. If not, you may need to find an alternative method to stream that particular game.
- If your game is on the supported list, it’s important to make sure that you have the latest version of the game installed on your computer. Discord might not be able to detect or stream older versions of the game effectively.
- Additionally, check if there are any known compatibility issues or limitations for streaming the game on Discord. Sometimes, certain features or aspects of the game may not work properly during the stream. It’s helpful to be aware of any potential issues in advance.
By thoroughly checking your game’s compatibility with Discord’s streaming feature, you can avoid any unexpected issues or complications while live streaming. Now that you have confirmed your game’s compatibility, it’s time to move on to the next step: configuring OBS Studio for streaming.
Step 4: Configuring OBS Studio
OBS Studio is a powerful software that allows you to capture gameplay and stream it to platforms like Discord. To use OBS Studio for streaming games on Discord, you need to configure it properly. Follow these steps to set up OBS Studio:
- Download OBS Studio from the official website and install it on your computer if you haven’t done so already.
- Launch OBS Studio and click on the ‘Settings’ button at the bottom right corner of the window. This will open the settings menu.
- In the ‘Settings’ menu, navigate to the ‘Output’ tab. Here, you can configure the streaming settings for Discord.
- Under ‘Output Mode,’ select the ‘Streaming’ option from the dropdown menu. This will allow OBS Studio to stream your gameplay to Discord.
- Next, select the streaming service as ‘Custom’ and enter the server URL and stream key provided by Discord. You can find these details in the Discord server settings under the ‘Streamkit’ section.
- Adjust the ‘Video Bitrate’ and ‘Audio Bitrate’ settings according to your internet connection speed and desired stream quality. Higher bitrates result in better quality streams but require a stable internet connection.
- Click ‘Apply’ to save the changes.
- Navigate to the ‘Video’ tab in the settings menu to configure the video settings for your stream. Select the desired base and output resolutions, FPS, and video format.
- Make sure to test your settings by clicking on the ‘Start Streaming’ button in OBS Studio. Verify that your gameplay is being captured correctly and that the audio and video quality is satisfactory.
With OBS Studio properly configured, you are now ready to connect it to Discord and start streaming your gameplay. In the next step, we will explain how to connect OBS Studio to Discord for a seamless streaming experience.
Step 5: Connecting OBS Studio to Discord
Now that OBS Studio is properly configured, you need to connect it to Discord in order to start streaming your gameplay. Follow these steps to connect OBS Studio to Discord:
- Open Discord and go to the server where you want to stream your gameplay.
- In the voice channel or text channel of that server, click on the ‘Settings’ cog icon next to your username. This will open the Server Settings menu.
- Navigate to the ‘Integrations’ tab in the Server Settings menu and click on the ‘Connect’ button next to the OBS Studio integration.
- Follow the prompts to authorize Discord to access OBS Studio. Make sure to grant the necessary permissions for Discord to control and communicate with OBS Studio.
- Once the integration is successfully connected, you will see a confirmation message in the Server Settings menu.
Now, Discord and OBS Studio are connected, and you can start streaming your gameplay directly from OBS Studio to Discord. With this connection in place, you’ll be able to seamlessly control your stream and interact with your audience through Discord.
It’s important to note that you should always launch OBS Studio before Discord, as it ensures that Discord can detect and connect to OBS Studio properly. Additionally, make sure that OBS Studio is running and your scene is set up correctly before starting your stream on Discord.
Now that you’ve established the connection between OBS Studio and Discord, let’s move on to the next step and learn how to go live on Discord.
Step 6: Going live on Discord
With everything set up and connected, it’s time to go live on Discord and start streaming your gameplay to your audience. Follow these steps to go live on Discord:
- Open OBS Studio and make sure your desired scene is selected, containing your game capture and any additional overlays or sources you want to include in your stream.
- Switch to Discord and navigate to the voice channel or text channel of the server where you want to stream.
- Look for the ‘Live’ button located at the bottom left of the voice or text channel. It should be next to your username.
- Click on the ‘Live’ button to open the ‘Go Live’ window.
- In the ‘Go Live’ window, select ‘Stream’ and then choose ‘OBS Studio’ from the dropdown menu. This will ensure that Discord streams the content from OBS Studio.
- Choose the OBS Studio scene you want to stream from the ‘Scene’ dropdown menu.
- Optionally, you can enable the ‘Enable Camera’ toggle if you want to include your webcam feed in the stream.
- Click ‘Go Live’ to start streaming your gameplay to Discord.
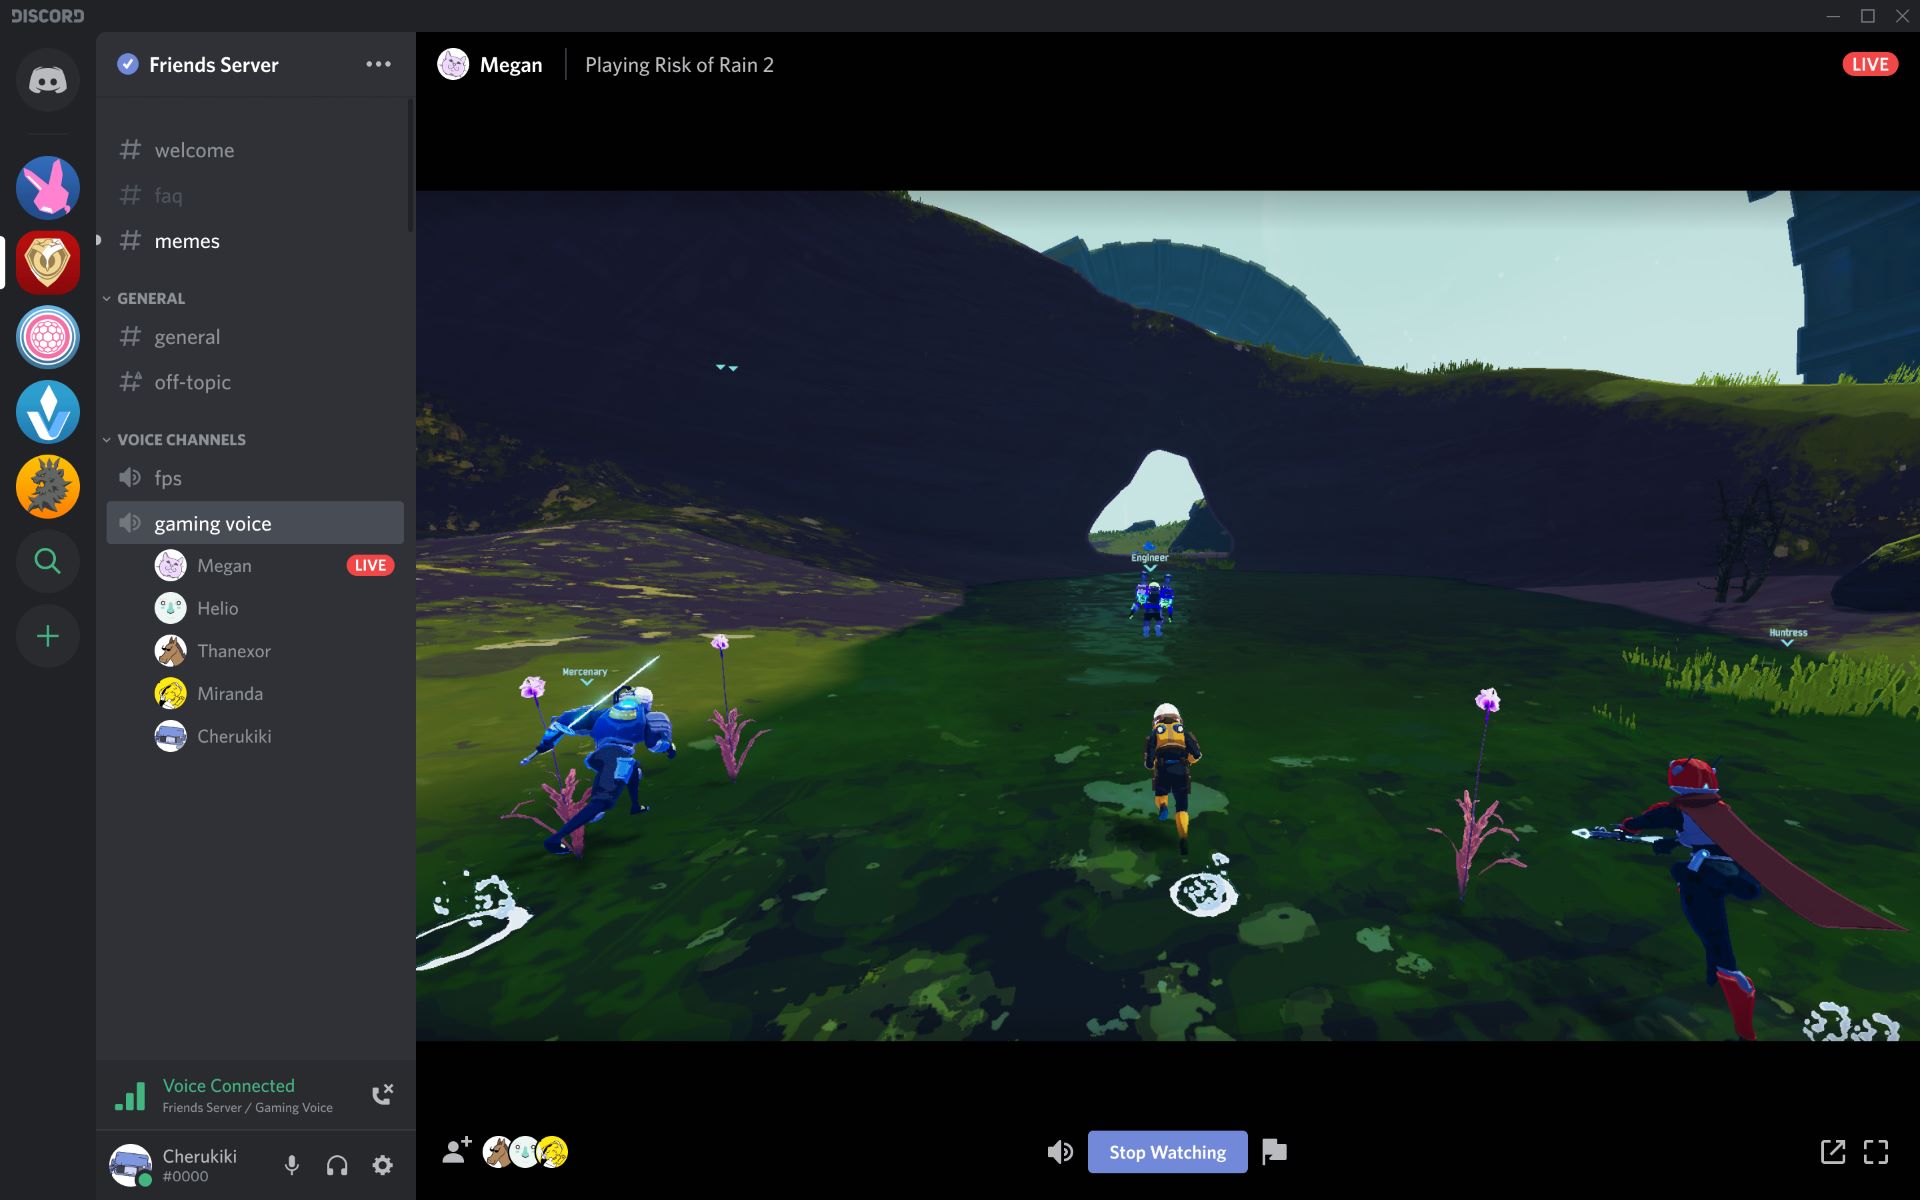
Once you are live on Discord, your audience will be able to join your stream and watch your gameplay in real-time. They can interact with you through text chat or voice chat, allowing for a truly immersive streaming experience.
Remember to monitor your stream and engage with your viewers during the stream. Interact with chat, respond to questions, and create an engaging and enjoyable atmosphere. Building a connection with your audience will help grow your community and make your streams more enjoyable for everyone involved.
Now that you have gone live on Discord, it’s time to explore some additional customization options for your stream. Let’s move on to the next step and learn how to customize your stream settings.
Step 7: Customizing your stream settings
Now that you’re streaming your gameplay on Discord, it’s time to customize your stream settings to enhance the viewing experience for your audience. Here are some essential customization options to consider:
- Overlay and Layout: Explore different overlays and layouts to add professional and aesthetic elements to your stream. You can use OBS Studio’s built-in features or explore third-party resources for an extensive range of overlays, alerts, and widgets.
- Streaming Quality: Strike a balance between stream quality and performance based on your internet connection and computer capabilities. Experiment with different video quality settings to ensure a smooth viewing experience for your audience.
- Audio Settings: Adjust the audio levels to ensure that your voice is clear and balanced with the game audio. OBS Studio allows you to control individual audio sources, such as game audio, microphone, and music, to create the desired mix.
- Interactivity: Enable chat overlay on your stream to make it easy for viewers to interact with you. Respond to comments and questions in real-time, fostering a sense of community and engagement.
- Scene Transitions: Add scene transitions to make your stream visually appealing. OBS Studio offers various transition effects like fade, cut, and slide to smoothly switch between scenes or display different elements during the stream.
- Stream Information: Customize your stream’s title, category, and tags to attract the right audience to your stream. Clear and engaging information can help viewers understand the content of your stream and improve discoverability.
- Stream Schedule: Establish a consistent streaming schedule to help your viewers anticipate when you’ll be live. Regular streaming sessions can attract a loyal audience who will make an effort to join you during your scheduled streams.
- Engagement Tools: Consider integrating chat bots or other moderation tools to manage your stream effectively. These tools can filter out spam, highlight important messages, and provide additional functionality to improve the viewer experience.
Remember, customization is an ongoing process. Continuously assess and adjust your stream settings based on viewer feedback and your own preferences. Experiment with different features and tools to find what works best for your gaming style and community.
Finally, enjoy the process of streaming and connecting with your audience. Building a community takes time, but with dedication, consistency, and a passion for gaming, your stream can become a hub for gamers and gaming enthusiasts.
With that, you have successfully customized your stream settings. Now go out there and create an unforgettable streaming experience on Discord!
Conclusion
Congratulations! You have now learned how to stream games on Discord and engage with your audience in real-time. By following these step-by-step instructions, you have set up Discord, adjusted the necessary settings, checked your game’s compatibility, configured OBS Studio, connected it to Discord, gone live, and customized your stream settings.
Streaming your gameplay on Discord opens up a world of possibilities to connect with fellow gamers, showcase your skills, and build a community. Whether you’re a seasoned gamer or just starting out, Discord provides an excellent platform to share your gaming experiences and connect with like-minded individuals.
Remember, streaming games on Discord is not just about the technical aspects. It’s also about creating an engaging and enjoyable experience for your viewers. Interact with your audience, respond to questions and comments, and make your streams a welcoming space for everyone.
As you continue your streaming journey, don’t forget to explore new games, participate in gaming communities, and constantly refine your stream settings based on feedback and personal preferences. Building a dedicated audience takes time and effort, but with consistency and passion, you can create a thriving community of fellow gamers.
So, what are you waiting for? Grab your controller, fire up your favorite game, and start streaming it on Discord. Your gaming adventure awaits, and an audience eager to watch and engage with you is just a click away!