Introduction
Welcome to this guide on how to get your PC to recognize a new SSD! If you’ve recently purchased a solid-state drive (SSD) and are excited to upgrade your computer’s storage, but are facing the challenge of getting your PC to recognize it, you’re in the right place. In this article, we will walk you through the steps to ensure that your new SSD is properly installed and recognized by your computer.
Upgrading to an SSD can greatly improve your computer’s performance by providing faster boot times, quicker file transfers, and improved overall responsiveness. However, the process of installing and setting up an SSD may appear daunting at first. But fear not! We’ve got you covered with clear and simple instructions to make the process as smooth as possible.
Before we dive into the step-by-step process, it’s important to note that SSD recognition issues can sometimes occur due to compatibility issues, hardware connections, BIOS settings, or even a need for firmware updates. By following the steps outlined in this guide, you’ll be able to troubleshoot and resolve these issues effectively.
In the following sections, we will cover each step in detail, including checking compatibility, physically installing the SSD, connecting it to the power supply and motherboard, accessing BIOS, enabling the SSD, partitioning and formatting, updating the SSD firmware (if necessary), and verifying recognition in Windows.
By the end of this guide, you’ll have the knowledge and confidence to successfully install and set up your new SSD, ensuring that your PC recognizes it as a primary storage device. So let’s get started with checking compatibility!
Check Compatibility
Before proceeding with the installation of your new SSD, it is essential to check its compatibility with your computer system. Not all PCs are compatible with every type of SSD, so it’s important to ensure that you have the right hardware setup.
The first thing to consider is the form factor of your SSD. There are different form factors available, such as 2.5-inch, M.2, and PCIe. Check your computer’s specifications or motherboard manual to determine which form factor slots are supported.
Next, determine the interface of your SSD. The most common interfaces are SATA (Serial ATA) and NVMe (Non-Volatile Memory Express). SATA is an older and slower interface, while NVMe offers faster speeds. Check your motherboard’s specifications to see if it supports the interface of your SSD.
You should also consider the capacity of your SSD. Ensure that your computer’s power supply can handle the additional power requirements of the new drive. SSDs typically require less power than traditional hard drives, but it’s still important to check compatibility.
Another factor to consider is the operating system. Ensure that your operating system supports the file system of the SSD. Most modern operating systems, such as Windows 10, macOS, and Linux, are compatible with SSDs, but it’s always a good idea to double-check.
Finally, check if there are any specific requirements or recommendations from the SSD manufacturer. They may provide compatibility information or firmware updates that are necessary for proper recognition and performance.
Once you have confirmed compatibility between your SSD and computer system, you can proceed to the next step: physically installing the SSD.
Physically Install the SSD
Now that you have checked the compatibility of your new SSD with your computer system, it’s time to physically install the SSD into your PC. Follow these steps to ensure a successful installation:
- Power off your computer and unplug the power cable for safety.
- Open your computer case by removing the side panel. Refer to your computer’s manual or manufacturer’s website for specific instructions, as the process may vary depending on your case model.
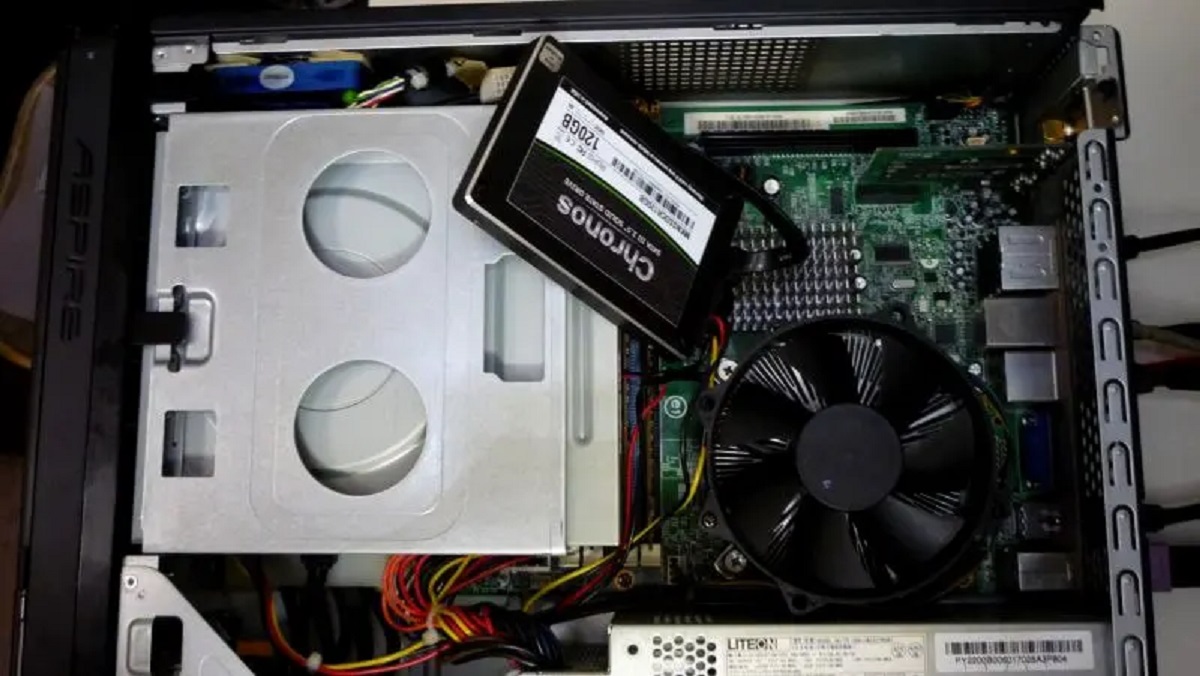
- Locate an available drive bay where you will install the SSD. If using a 2.5-inch SSD, you can often mount it in a 2.5-inch drive bay or use an adapter to fit it into a larger 3.5-inch drive bay.
- If necessary, remove any existing brackets or adapters from the drive bay to create space for the SSD.
- Take the SSD and gently insert it into the drive bay, making sure that the connectors are facing towards the back of the case.
- If using an adapter or bracket, secure the SSD in place using screws or mounting clips provided with the adapter.
- Once the SSD is securely installed, reconnect the side panel of your computer case.
- Plug in the power cable and turn on your computer.
With the physical installation complete, we can now move on to connecting the SSD to the power supply and motherboard.
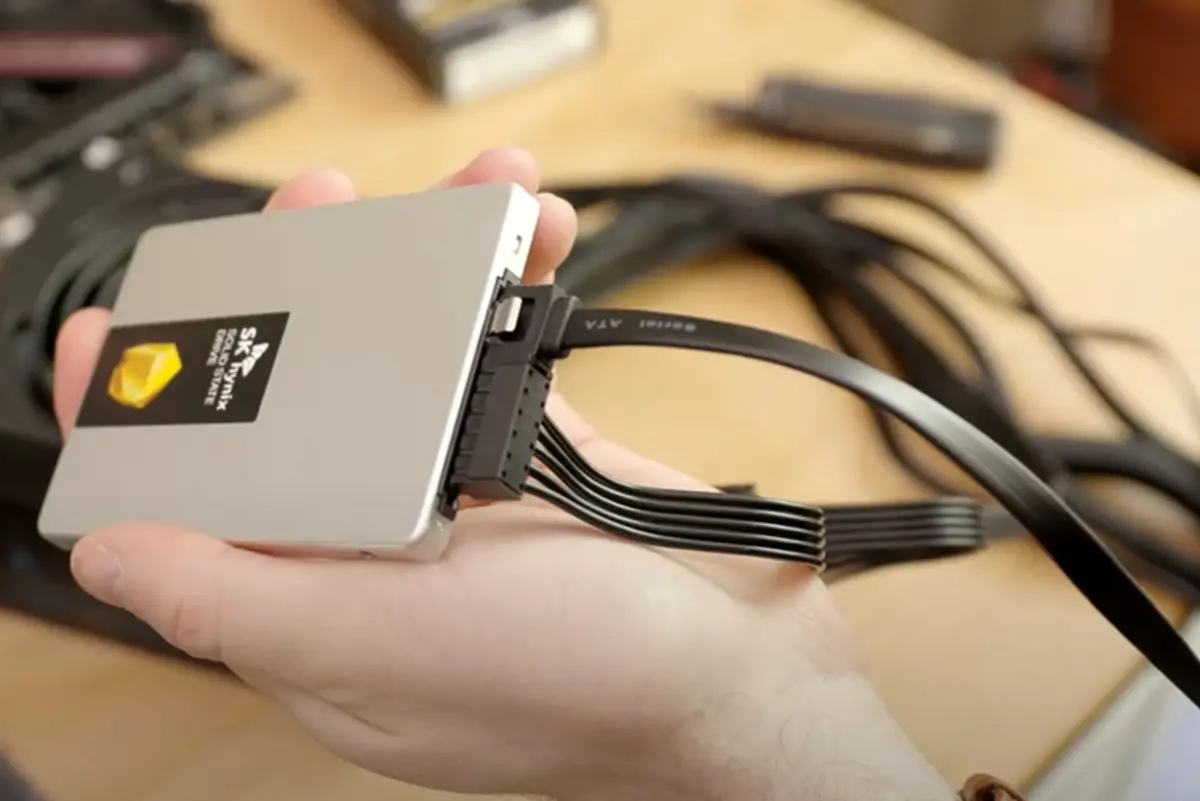
Connect the SSD to the Power Supply
After you have physically installed the SSD into your computer, the next step is to connect it to the power supply. Follow these steps to ensure a proper power connection:
- Ensure that your computer is powered off and unplugged from the wall outlet for safety.
- Locate the SATA power cable from your power supply. This cable has a rectangular connector with multiple pins.
- Take the SATA power cable and connect it to the power connector on the SSD. Make sure it is securely plugged in.
- If your SSD requires additional power, such as with PCIe SSDs, check the manufacturer’s instructions for any specific power requirements. Some SSDs may require an additional power cable or adapter.
- Double-check that all power connections are secure and properly plugged in.
- Once you have ensured a proper power connection, you can move on to connecting the SSD to the motherboard.
Now that the SSD is connected to the power supply, we can proceed to the next step of connecting it to the motherboard.
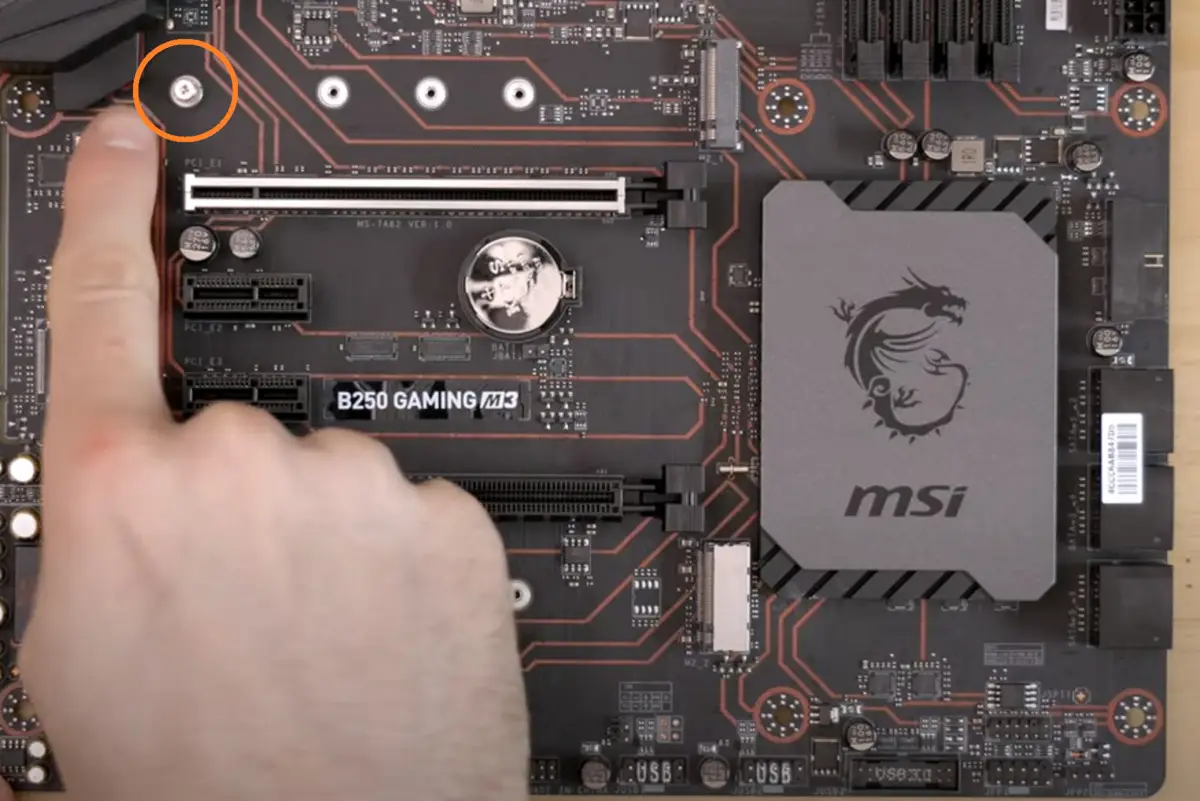
Connect the SSD to the Motherboard
Now that we have connected the SSD to the power supply, the next step is to connect it to the motherboard. Follow these steps to ensure a proper connection:
- Locate an available SATA port on the motherboard. These ports are usually labeled and can be found near the storage connectors.
- Take a SATA data cable and connect one end to the SATA port on the motherboard.
- Take the other end of the SATA data cable and connect it to the SATA data connector on the SSD. It will easily fit into the corresponding port.
- Ensure that both ends of the SATA data cable are securely connected to the motherboard and the SSD.
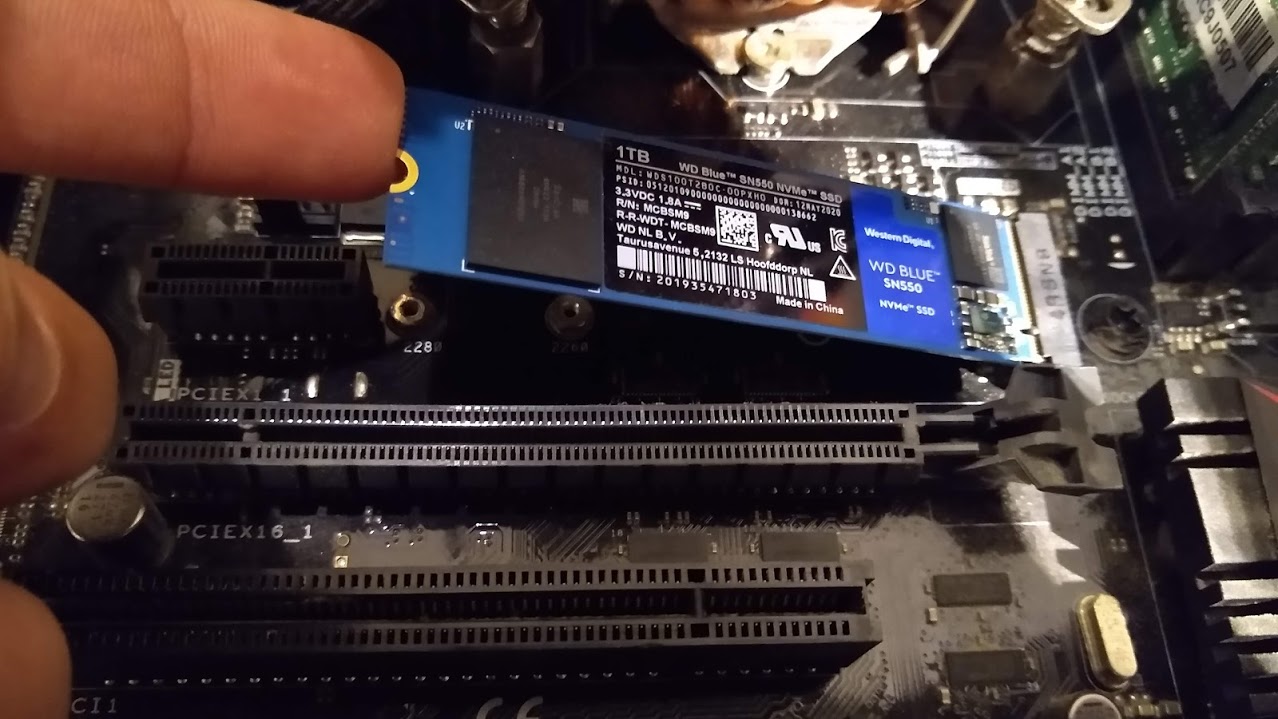
- If you are using an M.2 SSD, the installation process may differ. Consult your motherboard’s manual for specific instructions on how to install an M.2 SSD. Usually, it involves inserting the M.2 SSD into a slot on the motherboard and securing it with a screw.
- Once the SSD is properly connected to the motherboard, you can proceed to the next step of booting into BIOS.
With the SSD successfully connected to the motherboard, we are now ready to boot into BIOS and configure the necessary settings for the SSD recognition.
Boot into BIOS
Booting into the BIOS (Basic Input/Output System) allows you to access and modify various settings related to your computer’s hardware components. To configure the BIOS settings for recognizing the new SSD, follow these steps:
- Ensure that your computer is powered off.
- Power on your computer and immediately press the key or key combination required to access the BIOS. This key or combination varies depending on your computer manufacturer. Common keys are Del, F2, F10, or F12. Refer to your computer’s manual or manufacturer’s website for the specific key or combination for your system.
- Once you have successfully entered the BIOS, navigate through the different menus using the arrow keys on your keyboard.
- Look for the “Storage” or “Drives” menu in the BIOS. This menu contains options related to storage devices and their settings.
- Check if the SSD is detected in the BIOS. It should be listed along with other storage devices.
- If the SSD is not detected, try the following steps:
- Check the physical connections of the SSD to the power supply and motherboard. Ensure they are properly connected.
- Verify that the SATA port and data cable are in good condition. Try using a different SATA port or data cable if available.
- If the SSD is detected in the BIOS, proceed to the next step of enabling the SSD.
Boot into BIOS is a crucial step in ensuring that the newly installed SSD is recognized by your computer. By following these instructions, you will be ready to move on to enabling the SSD in the BIOS and configuring the necessary settings.
Enable the SSD in BIOS
Once you have successfully accessed the BIOS and verified that the SSD is detected, the next step is to enable the SSD to ensure that your computer recognizes it as a bootable device. Follow these steps to enable the SSD in BIOS:
- Navigate to the “Storage” or “Drives” menu in the BIOS using the arrow keys on your keyboard.
- Locate the SSD in the list of connected storage devices.
- Select the SSD and check if there is an option to enable it. Depending on your BIOS version and manufacturer, this option may be labeled as “Enabled”, “AHCI”, or “Bootable”.
- If an option to enable the SSD is available, select it and save the changes by pressing the designated key (often F10) to exit the BIOS. Confirm that you want to save the changes and restart your computer.
- If the SSD is already enabled, you can proceed to the next step of partitioning and formatting the SSD.
- Upon restarting your computer, it will now recognize the SSD as a bootable device, and you can proceed with the necessary software configurations.
Enabling the SSD in BIOS is crucial to ensure that your computer recognizes it as a primary storage device. By following these steps, you will successfully enable the SSD and prepare it for further configurations to fulfill its storage potential.
Partition and Format the SSD
After enabling the SSD in the BIOS, the next step is to partition and format the SSD so that it can be used to store data. Partitioning and formatting allow you to divide the SSD into logical sections and prepare it for file systems. Follow these steps to partition and format your SSD:
- Boot your computer into the operating system that you want to install or use with the SSD.
- Open the Disk Management utility. In Windows, you can access it by right-clicking on the Start button and selecting “Disk Management”.
- Once the Disk Management window is open, locate your SSD from the list of available disks.
- Right-click on the unallocated space of the SSD and select “New Simple Volume”. This will open the New Simple Volume Wizard.
- Follow the instructions in the wizard to configure the partition size, assign a drive letter, and choose a file system format. It is recommended to select the NTFS file system for better compatibility and performance.
- Complete the wizard, and the partitioning and formatting process will begin. This may take a few moments to complete.
- Once the process is finished, you will see the newly formatted SSD listed as a drive in the Disk Management utility.
- You can now start using the SSD to store data by copying files or installing applications onto it.
Partitioning and formatting your SSD is a necessary step to prepare it for data storage. By following these steps, you will successfully create partitions and format your SSD, making it ready for storing and accessing files.
Update SSD Firmware (If applicable)
Updating the firmware of your SSD is an important step to ensure optimal performance, stability, and compatibility with your computer system. Firmware updates can address any bugs, improve performance, and add new features. Follow these steps to update the SSD firmware:
- Visit the website of the SSD manufacturer and navigate to the support or downloads section.
- Search for the specific SSD model that you have installed in your computer.
- Look for any available firmware updates for your SSD model. It’s important to download the correct firmware update for your specific SSD model to avoid any compatibility issues.
- Once you have downloaded the firmware update file, carefully read the instructions provided by the manufacturer. They will guide you through the process of updating the SSD firmware.
- Follow the manufacturer’s instructions to install the firmware update. This may involve running an executable file or creating a bootable USB drive.
- During the firmware update process, it is crucial to not interrupt the power supply to your computer. Ensure that your computer’s battery is charged or that it remains plugged into a power source.
- Once the firmware update is complete, restart your computer to apply the changes.
- After your computer has restarted, verify in the BIOS or your operating system that the firmware update was successful and that the SSD is recognized with the updated firmware version.
Updating the SSD firmware, if applicable, ensures that your SSD is running with the latest improvements and optimizations. It is a recommended step to enhance performance and prolong the lifespan of your SSD.
Verify SSD Recognition in Windows
After completing the previous steps, it is important to verify that the SSD is properly recognized by your operating system, specifically Windows. This ensures that you can fully utilize the capabilities of your newly installed SSD. Follow these steps to verify SSD recognition in Windows:
- Make sure your computer is powered on and logged into the Windows operating system.
- Open the File Explorer or My Computer window by right-clicking on the Start button and selecting the respective option.
- In the File Explorer, locate the list of drives and devices. Your SSD should be listed as a separate drive.
- Click on the SSD drive to open it and verify that you can create new folders, copy files, or perform any other disk-related operations.
- Check the properties of the SSD drive to ensure that the correct capacity is displayed.
- Verify that the operating system recognizes the SSD as the primary boot drive. This can usually be done by checking the Boot Order settings in the BIOS.
- Perform speed tests or transfer large files to confirm that the SSD is operating at the expected speed and performance level.
- If the SSD is not recognized or experiencing any issues, double-check the connections and configurations following the previous steps.
- If you continue to experience any issues with SSD recognition, consult the manufacturer’s support resources or seek assistance from a professional.
Verifying SSD recognition in Windows is crucial to ensure that your newly installed SSD is functioning as expected. By following these steps, you can confirm that the SSD is properly recognized by the operating system and take advantage of its improved speed and performance.
Conclusion
Congratulations! You have successfully learned how to get your PC to recognize a new SSD. By following the steps provided in this guide, you have overcome the challenges of compatibility, physical installation, power supply connection, motherboard connection, BIOS configuration, partitioning and formatting, firmware updates, and verification in Windows.
Upgrading your computer with an SSD can significantly enhance its performance, providing faster boot times, quicker file transfers, and improved overall responsiveness. By properly installing and setting up your SSD, you have unlocked its full potential and can now enjoy the benefits of fast and reliable storage.
Remember to carefully check the compatibility of your SSD with your computer system before making a purchase. Ensure that you have the correct form factor, interface, and capacity that are supported by your hardware. Additionally, keep in mind the importance of enabling the SSD in the BIOS, partitioning and formatting it, and updating the firmware if applicable.
If you encounter any issues during the process, such as SSD recognition problems or difficulties with the firmware update, refer to the manufacturer’s instructions or seek assistance from their support resources. Don’t hesitate to consult a professional if necessary.
Thank you for following this guide on how to get your PC to recognize a new SSD. We hope that this information has been helpful to you and that your new SSD brings a significant improvement to your computer’s performance and storage capabilities.