Introduction
Welcome to our guide on how to get to files on Chromebook! Chromebooks are popular for their simplicity and ease of use.
However, if you’re new to this operating system, navigating and accessing files can sometimes feel a little different compared to a traditional computer. Whether you’re looking for files stored on your device or in the cloud, we’ll show you how to find them and work with them efficiently.
Chromebooks primarily use web-based applications and cloud storage instead of traditional desktop applications and local storage. This unique setup allows for seamless collaboration and access to your files from anywhere. To get the most out of your Chromebook, it’s important to understand how to find, open, and manage your files effectively.
In this comprehensive guide, we’ll cover various methods for accessing and managing files on your Chromebook. We’ll show you how to find files using the File app and access them in specific apps. We’ll also discuss how to download files from the internet, transfer files from external devices, and manage your files in Google Drive.
Furthermore, we’ll explore how to delete or restore files as well as introduce you to file manager apps from the Chrome Web Store that can further enhance your file management experience.
By the end of this guide, you’ll have all the necessary knowledge to navigate your way through your Chromebook’s file system and effortlessly access, transfer, and manage your files. Let’s get started!
Finding files on your Chromebook
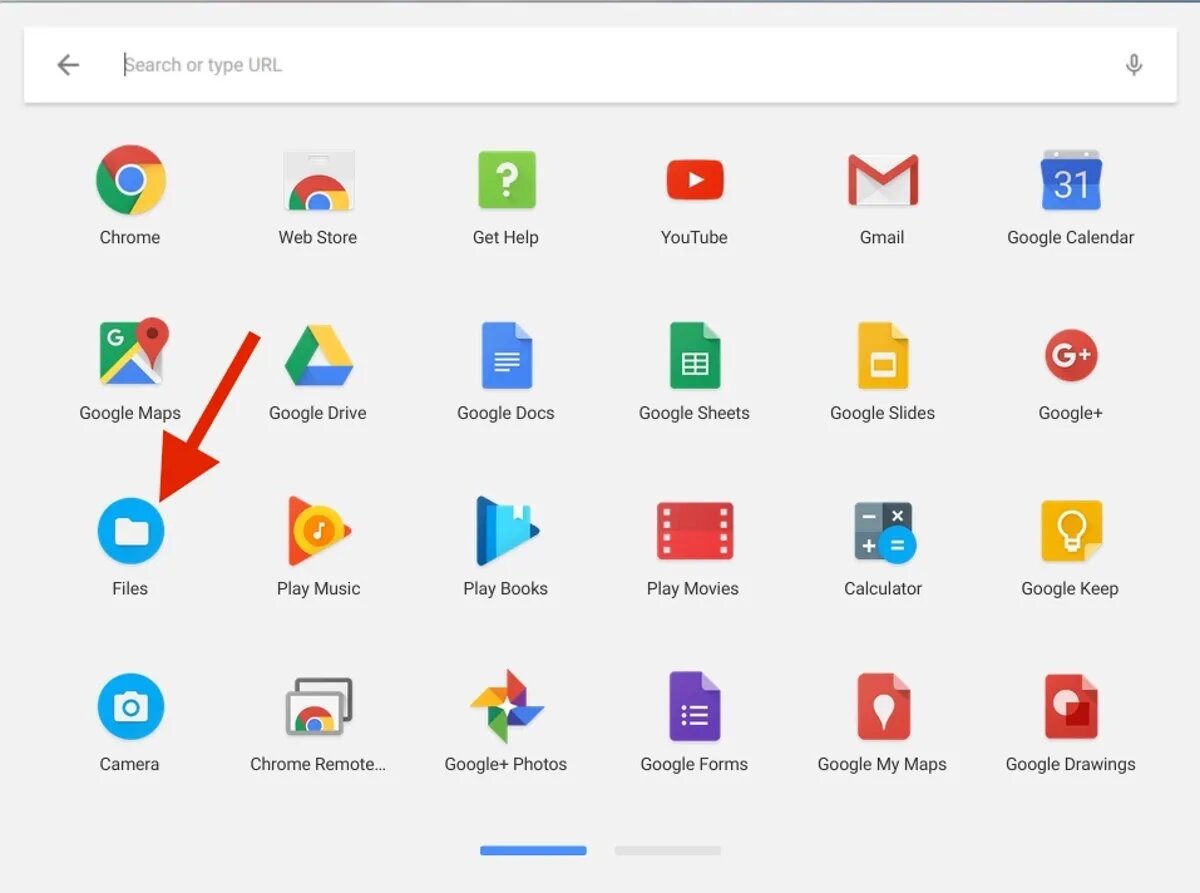
When it comes to finding files on your Chromebook, the File app is your go-to tool. To access it, simply click on the Launcher at the bottom left corner of your screen, then locate and click on the “Files” icon. Alternatively, you can use the keyboard shortcut “Alt + Shift + M” to open the File app directly.
Once you have the File app open, you’ll see a list of all your files and folders. By default, you’ll be in the “My Files” section, which displays files stored locally on your device. This includes downloads, documents, images, and more. If you have files stored in your Google Drive, you can switch to the “Google Drive” section to view and access them.
The File app provides various ways to locate specific files. You can use the search bar at the top of the app to search for files by name, extension, or keywords. Simply type in your search query and the app will display relevant results in real-time.
If you’re looking for recently accessed files, you can use the “Recent” section on the left sidebar. Here, you’ll find a list of files you’ve opened or modified recently, making it easy to quickly access your most important files.
In addition, you can use the “Downloads” section to locate any files you’ve downloaded from the internet. This is particularly useful if you’re trying to find a specific file that you’ve recently downloaded but can’t remember where you saved it.
Remember, your Chromebook is designed to seamlessly integrate with cloud storage services like Google Drive. This means that when you save files, they are automatically synced and backed up to the cloud. To access files stored in your Google Drive, simply navigate to the “Google Drive” section in the File app. Here, you’ll find all your files and folders organized just as they are in your Drive account.
With the File app on your Chromebook, finding files is quick and easy. Whether they’re stored locally or in the cloud, the File app provides a convenient and intuitive interface for locating and accessing your files in just a few clicks.
Accessing files from the File app
The File app on your Chromebook not only helps you find your files, but also provides a seamless way to open and work with them in specific apps. Once you’ve located the file you want to access, simply follow these steps:
- Select the file by clicking on it once. You’ll notice that the file is highlighted.
- Right-click on the file or click on the three-dot menu button at the top right corner of the File app.
- A dropdown menu will appear with various options. From here, you can choose to open the file, share it with others, move it to a different folder, make a copy, or delete it.
- To open the file, simply click on the “Open” option. Depending on the file type, the appropriate app will be launched to view or edit the file.
If you prefer using shortcuts, you can also use the keyboard to open a file directly. Once you’ve selected the file in the File app, press the “Enter” key on your keyboard. The file will instantly open in its associated app.
When accessing specific file types, such as documents or images, Chrome OS will automatically open them in the appropriate app. For example, if you open a PDF file, it will be displayed in the Chrome PDF Viewer. If you have installed additional apps or extensions that can handle specific file types, you may have the option to choose which app to open the file with.
If you want to open a file in a different app than the default option, follow these steps:
- Right-click on the file or click on the three-dot menu button in the File app.
- Select “Open with” from the dropdown menu.
- A list of compatible apps will appear. Choose the app you want to open the file with, or click on “Other” to explore additional options.
- The file will now open in the selected app.
Remember, the File app on your Chromebook provides a convenient way to access and open your files. With just a few clicks, you can find the file you need and open it in the appropriate app, making it easy to work on your documents, view your images, or play your media files.
Opening files with specific apps
On your Chromebook, you have the flexibility to choose which app you want to use to open specific file types. This allows you to work with files in the app that works best for your needs. Here’s how you can open files with specific apps:
- Locate the file you want to open in the File app.
- Right-click on the file or click on the three-dot menu button at the top right corner of the File app.
- Select “Open with” from the dropdown menu.
- A list of compatible apps and extensions will appear. Choose the app you want to open the file with, or click on “Other” to explore additional options.
- The file will now open in the selected app.
If you want to set a specific app as the default for opening a particular file type, follow these steps:
- Right-click on the file of the specific type that you want to open with a particular app.
- Select “Get info” from the dropdown menu.
- A dialog box will appear with information about the file. Look for the “Opens with” section.
- Click on the dropdown menu in the “Opens with” section and select the app you want to set as the default.
- Close the dialog box.
From now on, whenever you double-click on a file of that specific type, it will automatically open with the app you set as the default.
If you’ve installed Android apps on your Chromebook, you can also open files using these apps. Simply locate the file in the File app, right-click on it, and select “Open with” from the dropdown menu. You’ll see a list of Android apps that can handle the file type. Choose the app you want to open the file with, and it will open in the Android app.
With the ability to open files with specific apps, you can tailor your Chromebook experience to suit your preferences. Whether it’s using a particular app for editing documents, viewing images, or playing media files, you have the freedom to choose how you want to work with your files.
Downloading files from the internet
Downloading files from the internet is a common task on any computer, and Chromebooks make it quick and straightforward. Whether you’re downloading documents, images, music, or other types of files, here’s how you can do it:
- Open the Chrome browser on your Chromebook.
- Navigate to the webpage or site where the file is located.
- Click on the link or button that allows you to download the file. It might say “Download,” “Save,” or display an icon representing the file type.
- A pop-up will appear at the bottom of the browser window, showing the name and progress of the download. You can click on the arrow to the right of the file name to choose where to save the file or open it once it’s downloaded.
- By default, downloaded files are saved in the “Downloads” folder in the File app. You can access these files by opening the File app and navigating to the “Downloads” section.
- To open or view the downloaded file, simply click on it in the File app. It will open in the appropriate app, depending on the file type.
If you want to change the default download location for your files, follow these steps:
- Open the Chrome browser on your Chromebook.
- Click on the three-dot menu button at the top right corner of the browser window.
- Select “Settings” from the dropdown menu.
- In the Settings tab, scroll down and click on “Advanced.”
- Under the “Downloads” section, you’ll find the option to change the download location. Click on the “Change” button and select the desired folder where you want your downloads to be saved.
Now, any files you download from the internet will be saved in the new location you specified.
Downloading files from the internet on your Chromebook is a seamless process. With just a few clicks, you can save files to your device and access them anytime using the File app. Whether it’s files for work, entertainment, or personal use, downloading and managing them is a breeze on your Chromebook.
Transferring files from external devices
Transferring files from external devices to your Chromebook is a straightforward process. Whether you want to transfer files from a USB drive, SD card, or other external storage devices, here’s how you can do it:
- Connect the external device, such as a USB drive or SD card, to your Chromebook’s USB port or SD card slot.
- Once connected, a notification will appear at the bottom right corner of your screen, indicating that the device has been detected.
- Click on the notification or open the File app to access the external device. The device will appear in the left sidebar of the File app.
- Click on the external device to browse its contents.
- To transfer files from the external device to your Chromebook, simply locate the files you want to transfer, and either drag and drop them into a desired folder in the File app, or right-click on the files and select “Copy” or “Cut.” Then, navigate to the desired folder in the File app and right-click to select “Paste.”
Alternatively, you can also open two windows of the File app – one for the external device and one for your Chromebook’s storage – to easily drag and drop files between them.
If you’re using a cloud storage provider like Google Drive or Dropbox, you can also transfer files between your external device and the cloud storage by first uploading the files to your cloud storage account using the provider’s respective app or website. Once the files are uploaded, you can access and manage them through the File app.
Remember to safely eject the external device from your Chromebook once you’re done transferring files. This prevents data corruption and ensures that the files are securely saved before removing the device. To safely eject the external device, simply right-click on its icon in the File app and select “Eject.”
With the ability to transfer files from external devices, your Chromebook allows for convenient access and backup of files stored on different types of media. Whether it’s photos, documents, or any other files, transferring them from external devices to your Chromebook is a simple and efficient process.
Managing files in Google Drive
One of the key advantages of using a Chromebook is the integration with Google Drive. Google Drive offers a cloud-based storage solution that allows you to store, organize, and manage your files securely. Here’s how you can effectively manage your files in Google Drive:
- Accessing Google Drive: To access Google Drive, open the File app on your Chromebook and navigate to the “Google Drive” section. Here, you’ll find all your files and folders stored in your Google Drive account.
- Creating folders: To keep your files organized, you can create folders in Google Drive. Simply right-click in an empty area of the File app or click on the three-dot menu button, then select “New folder.” Name the folder and press “Enter” to create it. You can then drag and drop files into the folder for easy organization.
- Uploading files: To upload files from your Chromebook to Google Drive, simply drag and drop the files from the File app into the desired folder in the “Google Drive” section. Alternatively, you can click on the blue “New” button in the File app and select “File upload” to browse and select files from your device.
- Organizing files: Once your files are in Google Drive, you can further organize them by moving or copying files to different folders. Simply right-click on a file, select “Move to,” and choose the desired folder. You can also use the drag and drop method to move files between folders.
- Sharing files: Google Drive makes it easy to collaborate with others by sharing files and folders. Right-click on a file or folder, select “Share,” and enter the email addresses of the people you want to share with. You can choose to allow them to view, comment, or edit the file depending on the level of access you want to grant.
- Searching for files: If you have a large number of files in your Google Drive, finding specific files can be effortless. Simply use the search bar at the top of the File app and type in keywords or the file name to quickly locate the desired file.
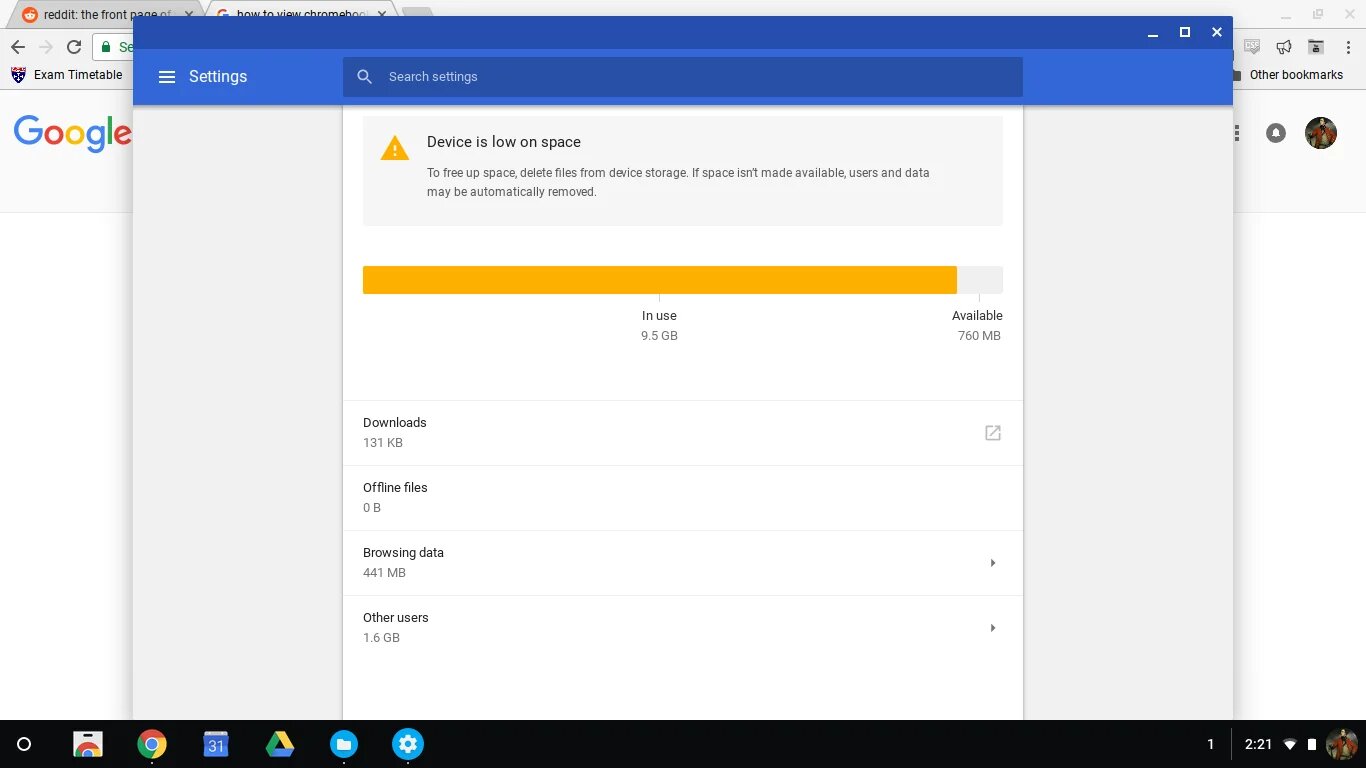
- Managing storage: Google Drive offers a generous amount of storage for free, but if you need more space, you can upgrade to a paid plan. To manage your storage and check how much space you’re using, click on the gear icon in the top right corner of the File app and select “Storage.” Here, you can see your storage usage and upgrade your plan if needed.
By effectively managing your files in Google Drive, you can keep your files organized, easily access them from any device with an internet connection, and collaborate seamlessly with others. Google Drive offers a powerful and convenient way to store and manage your files securely in the cloud.
Deleting or Restoring Files
While managing your files, you may occasionally need to delete or restore files on your Chromebook. Whether you want to free up space or recover mistakenly deleted files, Chrome OS provides simple methods for deleting and restoring files. Here’s how you can do it:
- Deleting files: To delete a file, navigate to the File app and locate the file you want to delete. Right-click on the file and select “Delete.” Alternatively, you can select the file and press the “Delete” key on your keyboard. A dialog box will appear asking you to confirm the deletion. Click “Delete” again to confirm and remove the file from your Chromebook. Deleted files are moved to the “Trash” folder in the File app.
- Restoring files: If you deleted a file by mistake or decide that you need it back, you can easily restore it from the “Trash” folder. Open the File app and locate the “Trash” folder in the left sidebar. Inside the “Trash” folder, you’ll find all the files that you have deleted. Right-click on the file you want to restore and select “Restore.” The file will be moved back to its original location.
- Emptying the Trash: If you want to permanently remove the files from your Chromebook and free up storage space, you can empty the “Trash” folder. Right-click on the “Trash” folder in the File app and select “Empty trash.” A prompt will appear asking you to confirm the deletion. Click “Empty” to permanently delete all files in the “Trash” folder.
- Using Google Drive: Files that are deleted in the File app are also moved to the “Trash” folder in Google Drive. You can access and manage them by opening Google Drive in a browser and navigating to the “Trash” section. From there, you can restore or permanently delete the files, just like in the File app.
It’s important to note that files deleted from the “Trash” folder are permanently removed from your Chromebook. Therefore, exercise caution when deleting files to prevent the accidental loss of important data. If you’re unsure about deleting a file, consider making a backup or moving it to a different folder instead of deleting it.
By understanding how to delete and restore files on your Chromebook, you can effectively manage your files and maintain a clutter-free storage system. Whether it’s deleting unnecessary files or recovering mistakenly deleted ones, Chrome OS provides a straightforward approach to file management.
Using File Manager Apps from the Chrome Web Store
While the built-in File app on your Chromebook offers essential file management features, you may find that additional file manager apps from the Chrome Web Store can enhance your file organization and workflow. These apps provide advanced functionalities and customization options to streamline your file management. Here’s how you can utilize file manager apps:
- Browsing the Chrome Web Store: Open the Chrome Web Store by clicking on the “Launcher” at the bottom left corner of your screen and selecting the “Web Store” icon. Here, you can browse and search for different file manager apps.
- Choosing a file manager app: Look for file manager apps that have positive reviews and meet your specific needs. Pay attention to features such as folder organization, file preview, cloud storage integration, and advanced search options.
- Installing the app: Click on the desired file manager app to open its store page. Review the app’s description, screenshots, and user reviews to ensure it fits your requirements. Once you have decided, click on the “Add to Chrome” or “Install” button to install the app on your Chromebook.
- Accessing the app: Once the app is installed, you can find it by clicking on the “Launcher” and looking for its icon. Some apps may require you to grant permissions or set them as the default file manager.
- Exploring advanced features: File manager apps from the Chrome Web Store often offer additional features beyond the basic capabilities of the built-in File app. These can include advanced search filters, custom folder colors, dual-pane viewing for easy file transfers, and integration with popular cloud storage services.
- Customizing your experience: File manager apps may provide options to customize the interface, colors, and layouts to suit your personal preferences. Take advantage of these customization options to create a file management environment that works best for you.
Using file manager apps from the Chrome Web Store allows you to tailor your file management experience to your specific needs. Whether you need advanced features, different organizational methods, or enhanced integration with other cloud storage services, these apps can provide additional functionality and efficiency to your file management workflow.
It’s worth noting that while the built-in File app is sufficient for most users’ needs, exploring file manager apps from the Chrome Web Store can be beneficial if you require more advanced features and customization options. Experiment with different apps to find the one that best suits your requirements and enhances your productivity.
Conclusion
Managing and accessing files on your Chromebook is essential for a productive and organized computing experience. In this guide, we’ve explored various methods and techniques to help you find, open, transfer, and manage your files effectively.
We started by discussing how to navigate and find files using the File app. We explored the different sections within the app, such as “My Files,” “Google Drive,” and “Downloads,” and learned how to search for specific files or access recent files easily.
We then delved into accessing files from the File app and opening them with specific apps. Whether it’s documents, images, or media files, we explained how to choose the appropriate app for opening different file types and how to set default apps for specific file types.
Next, we covered the process of downloading files from the internet. We discussed the simple steps of downloading files using the Chrome browser and how to change the default download location to suit your preferences.
Transferring files from external devices to your Chromebook was another topic we explored. Whether it’s from USB drives, SD cards, or other external storage devices, we explained how to easily transfer files using the File app.
We then delved into managing files in Google Drive, highlighting features like creating folders, uploading files, organizing files, sharing files, searching for files, and managing storage. Understanding how to utilize Google Drive efficiently can greatly enhance your file management experience.
We also discussed the process of deleting and restoring files on your Chromebook. We explored how to delete files, restore them from the “Trash” folder, and permanently remove files to free up storage space.
Lastly, we mentioned the option of using file manager apps from the Chrome Web Store. These apps offer additional features and customization options beyond the built-in File app, allowing you to tailor your file management experience to your specific needs.
By implementing the techniques and tips mentioned in this guide, you’ll be well-equipped to navigate, manage, and access your files efficiently on your Chromebook. Whether you’re a student, professional, or casual user, effective file management is the key to a smooth and productive computing experience on your Chromebook.


