Introduction
Chromebooks are popular lightweight laptops that run on the Chrome OS, designed to provide a seamless browsing experience. However, like any computer, over time, it’s common for a Chromebook to accumulate unnecessary files, taking up precious disk space and potentially causing the device to slow down.
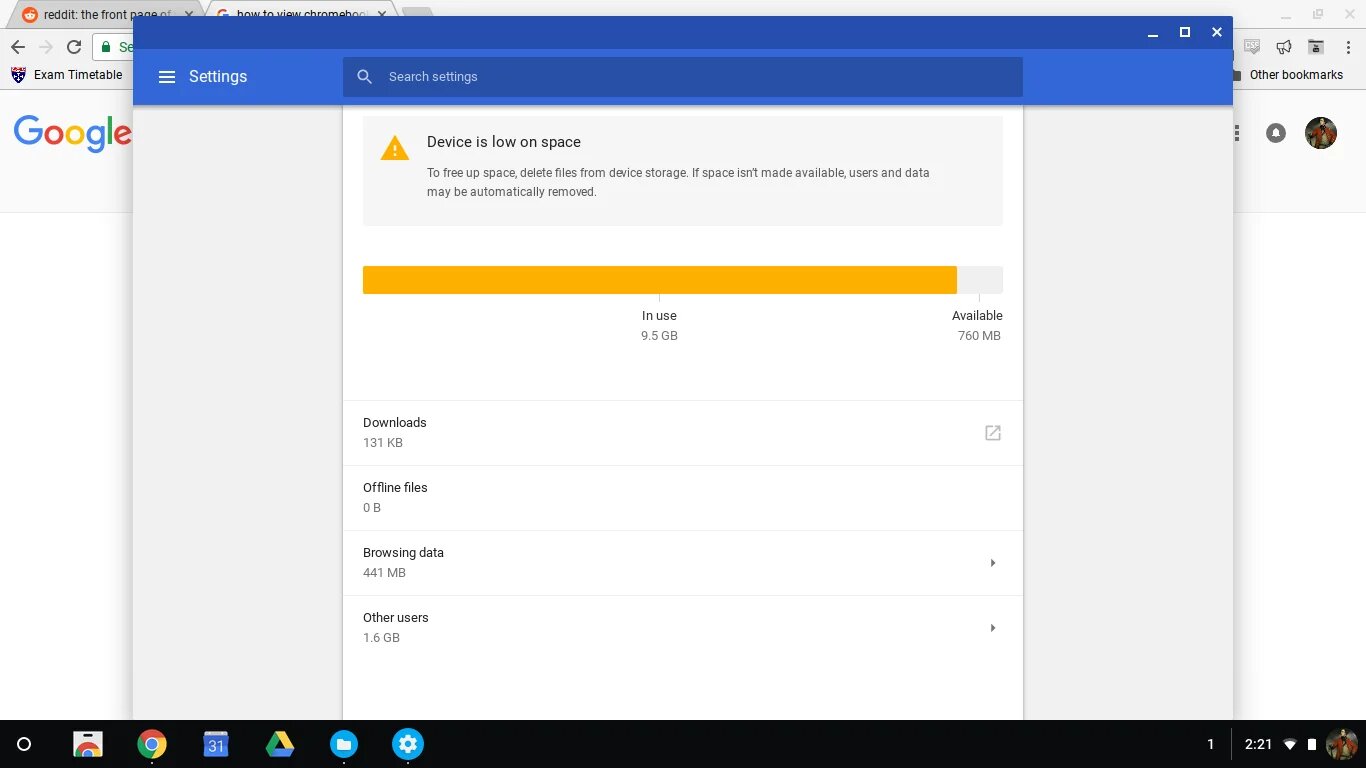
If you’re running low on disk space or notice that your Chromebook’s performance isn’t as snappy as it used to be, don’t worry! There are several simple steps you can take to free up disk space on your Chromebook and optimize its performance.
In this article, we will guide you through the process of clearing cache and browsing history, removing unnecessary downloads, deleting unused extensions and apps, managing offline files, emptying the trash, adjusting sync settings, removing temporary files, and utilizing Google Drive for file storage. By following these steps, you can regain valuable disk space and ensure your Chromebook is running smoothly.
Whether you’re a student, professional, or casual user, these tips will help you keep your Chromebook clean and organized, ensuring you have enough storage space for your important files and applications. Let’s dive in and learn how to free up disk space on your Chromebook!
Clear Cache and Browsing History
Every time you browse the internet on your Chromebook, temporary files and browsing history are stored in the cache. Over time, these files can accumulate and take up valuable disk space. By regularly clearing your cache and browsing history, you can free up space and improve the performance of your Chromebook.
To clear the cache and browsing history, follow these steps:
- Open the Chrome browser on your Chromebook.
- Click on the three dots in the top-right corner to open the menu.
- Select “Settings” from the drop-down menu.
- In the left sidebar, click on “Privacy and security.”
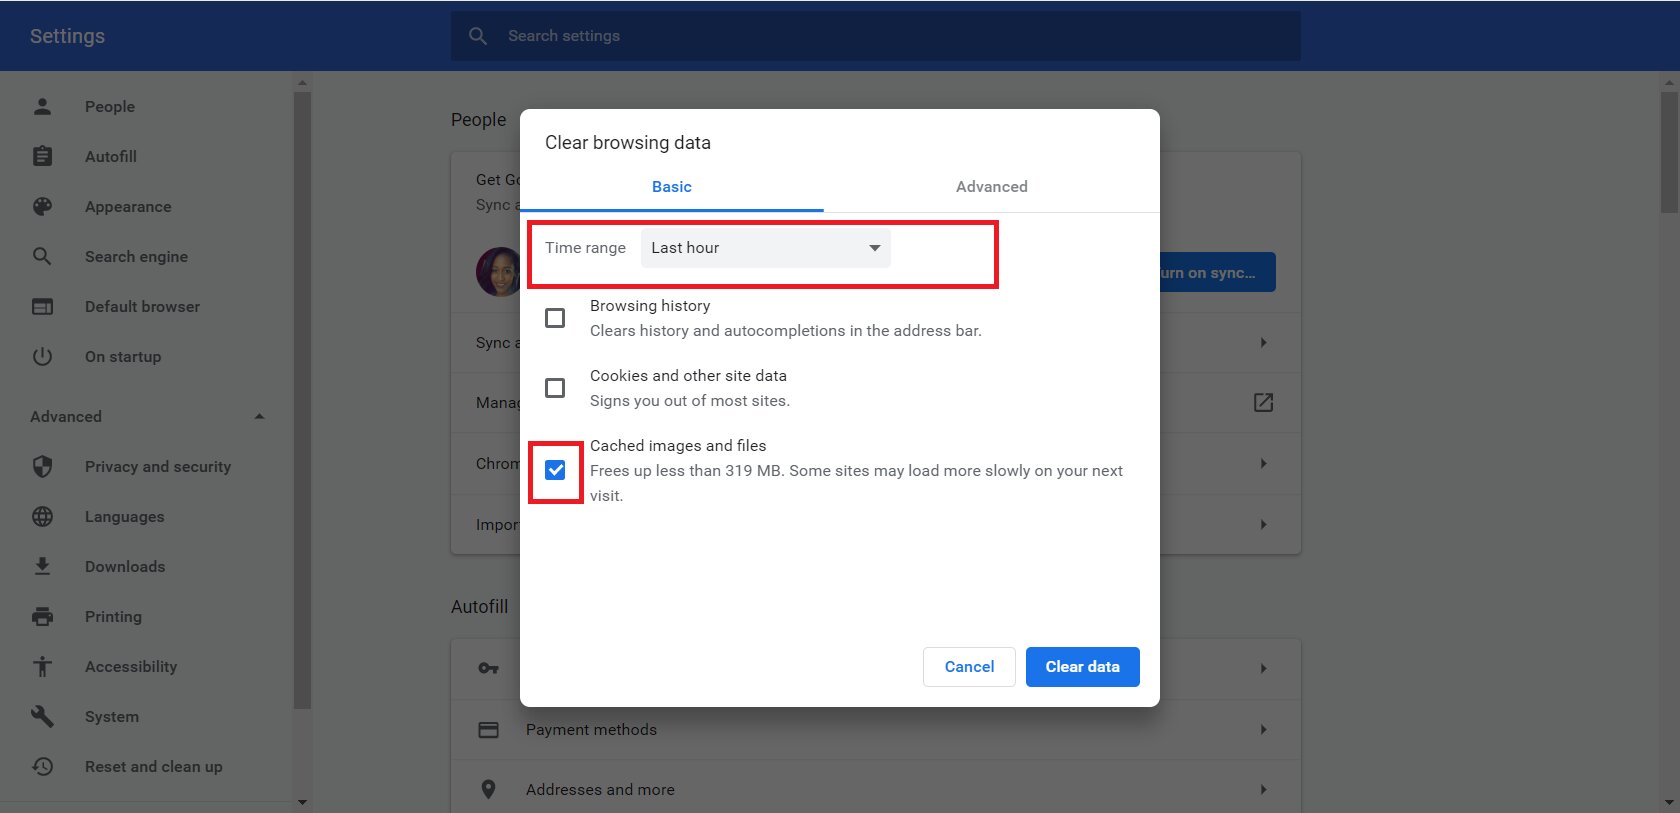
- Under the “Clear browsing data” section, click on “Clear browsing data.”
- Select the time range for which you want to clear the data. If you want to clear everything, choose “All time.”
- Tick the checkboxes next to “Cached images and files” and “Browsing history.”
- Click on the “Clear data” button to remove the selected data from your Chromebook.
After completing these steps, your cache and browsing history will be cleared, freeing up disk space on your Chromebook. Additionally, clearing your browsing history can help protect your privacy by removing records of websites you’ve visited.
Remember, clearing your cache and browsing history only removes temporary files and website data, and won’t affect your bookmarks, saved passwords, or autofill information. If you want to maintain certain cookies or data for specific websites, you can adjust the settings accordingly before clearing the data.
By regularly clearing your cache and browsing history, you can ensure your Chromebook is running at its best performance and maximize available disk space for other important tasks and files.
Remove Unnecessary Downloads
As you use your Chromebook, you may find that you accumulate a collection of downloaded files over time. These files can take up valuable disk space if they are no longer needed. By removing unnecessary downloads, you can free up storage space and improve the performance of your Chromebook.
To remove unnecessary downloads on your Chromebook, follow these steps:
- Click on the Launcher icon in the bottom-left corner of your screen.
- Locate and click on the “Files” app.
- In the left-hand sidebar, click on “Downloads.”
- Review the list of downloaded files and identify the ones you no longer need.
- Select the files you want to remove by clicking on them while holding down the “Ctrl” key for multiple selections.
- Once you’ve selected the files, right-click on one of them and choose “Move to Trash” from the context menu.
- To permanently delete the files and free up disk space, open the “Trash” folder from the left-hand sidebar, right-click on the files, and select “Delete Forever.”
By removing unnecessary downloads, you can free up valuable disk space on your Chromebook. It’s important to review your downloads periodically and delete files that are no longer relevant to avoid clutter and optimize storage.
If you want to ensure that your Chromebook does not clutter up with unnecessary downloads in the future, consider changing the default download location to Google Drive. This way, files you download will be stored in the cloud, freeing up local disk space and making them accessible from any device with an internet connection.
By regularly removing unnecessary downloads and optimizing your storage, you can keep your Chromebook running smoothly and ensure you have sufficient space for important files and applications.
Delete Unused Extensions and Apps
Extensions and apps can greatly enhance the functionality and versatility of your Chromebook. However, as time goes on, you may accumulate a multitude of unused or unnecessary extensions and apps, which can take up valuable disk space and even affect the performance of your device. Deleting these unused extensions and apps is a quick and effective way to free up space on your Chromebook.
To delete unused extensions and apps on your Chromebook, follow these steps:
- Click on the Launcher icon in the bottom-left corner of your screen.
- Locate and right-click on the extension or app you want to remove.
- From the context menu, select “Remove from Chrome” or “Uninstall.”
- Confirm the removal by clicking “Remove” or “Uninstall.”
Repeat these steps for each unused extension or app you want to remove from your Chromebook. By removing unused extensions and apps, you not only free up disk space but also streamline your Chromebook’s functionality, making it easier to navigate and use the extensions and apps you actually need.
It’s essential to review your installed extensions and apps periodically to ensure that you only keep the ones that are relevant and useful to you. By decluttering your Chromebook in this way, you can optimize its performance and create a more organized and efficient workspace.
Additionally, keep in mind that some extensions or apps may have background processes running, even when you’re not actively using them. These processes can consume system resources and impact overall performance. Therefore, it’s worth considering removing any extensions or apps that you no longer use or need, even if they seem dormant.
By regularly pruning your extensions and apps, you can keep your Chromebook running smoothly, improve its performance, and maximize available disk space for more important tasks and files.
Manage Offline Files
One of the convenient features of Chromebooks is the ability to work with files while offline. When you open a file from Google Drive, it gets stored locally on your Chromebook, allowing you to access and edit it even without an internet connection. However, these offline files can consume significant disk space over time. By managing offline files, you can free up storage and optimize the performance of your Chromebook.
To manage offline files on your Chromebook, follow these steps:
- Click on the Launcher icon in the bottom-left corner of your screen.
- Locate and click on the “Files” app.
- In the left-hand sidebar, click on “Downloads” or “My Files.”
- Click on “Offline” in the top menu to view a list of your offline files.
- Review the list and identify the files you no longer need to access offline.
- Select the files you want to remove by clicking on them while holding down the “Ctrl” key for multiple selections.
- Once you’ve selected the files, right-click on one of them and choose “Remove offline” from the context menu.
By managing your offline files, you can selectively remove files that are taking up space but are no longer necessary to access offline. This frees up valuable storage on your Chromebook while still allowing you to access and work with the files when connected to the internet.
In addition to removing unnecessary offline files, you can also adjust the offline settings of specific files or folders. For example, if you have a large file that you rarely need to access offline, you can choose to make it available offline only on demand, saving disk space in the process.
Furthermore, consider using Google Drive’s “Available offline” feature instead of storing multiple copies of files on your Chromebook. With this feature, you can choose specific files or folders to be automatically synced and made available offline, without taking up local storage space.
By managing your offline files and taking advantage of Google Drive’s syncing options, you can optimize your Chromebook’s storage usage and ensure you have enough space for your important files, both online and offline.
Empty the Trash
Similar to other systems, Chromebooks have a Trash or Recycle Bin where deleted files are temporarily stored before being permanently deleted. If you have deleted files on your Chromebook and have not emptied the Trash, these files are still taking up valuable disk space. By emptying the Trash, you can free up storage space and ensure that deleted files are completely removed from your Chromebook.
To empty the Trash on your Chromebook, follow these steps:
- Click on the Launcher icon in the bottom-left corner of your screen.
- Locate and click on the “Files” app.
- In the left-hand sidebar, click on “Trash.”
- Review the files in the Trash folder and make sure you no longer need them.
- Click on the “Empty Trash” button located at the top of the window.
- Confirm the deletion by clicking “Delete” in the confirmation prompt.
Once you have completed these steps, the Trash folder on your Chromebook will be emptied, permanently deleting all the files it contained. This action cannot be undone, so make sure you have reviewed the files and no longer need them before emptying the Trash.
It’s important to note that files in the Trash folder still occupy disk space on your Chromebook. Therefore, it’s a good practice to regularly empty the Trash to free up storage. Deleted files that remain in the Trash can accumulate over time and unnecessarily consume valuable disk space.
Furthermore, keep in mind that files deleted from external storage devices, such as USB drives or SD cards, are not stored in the Chromebook’s Trash folder. Instead, they are permanently deleted. Therefore, be cautious when deleting files from external storage devices as they cannot be recovered from the Trash.
By regularly emptying the Trash on your Chromebook, you can free up storage space, optimize performance, and ensure that deleted files are completely removed from your device.
Adjust Sync Settings
When you sign in to your Chromebook with your Google account, it automatically syncs various settings, including bookmarks, extensions, and apps, across all your devices. While syncing is convenient, it can also consume valuable disk space on your Chromebook. Adjusting the sync settings allows you to control what gets synced and frees up storage space on your device.
To adjust sync settings on your Chromebook, follow these steps:
- Click on the clock in the bottom-right corner of your screen to open the system menu.
- Click on the gear icon to open the Settings menu.
- In the left-hand sidebar, click on “Sync and Google services”.
- Under the “Sync” section, you can toggle various options on or off based on your preferences.
- For example, you can choose to disable syncing of extensions, apps, or even the entire sync feature.
By being selective about what gets synced, you can significantly reduce the amount of data stored on your Chromebook’s local storage. This allows you to free up precious disk space for other important files and applications.
Keep in mind that adjusting sync settings on your Chromebook may affect the sync across your other devices, such as smartphones or other computers. If you disable sync for a particular feature on your Chromebook, it will no longer be available on other devices where you have signed in with the same Google account.
Furthermore, consider removing unnecessary bookmarks, disabling unused extensions, and uninstalling apps that are no longer needed. These actions can help optimize your Chromebook’s storage and improve its overall performance.
By adjusting sync settings on your Chromebook, you can customize what gets synced across your devices and reclaim valuable disk space. Take some time to evaluate your syncing needs and adjust the settings accordingly to optimize performance and storage on your Chromebook.
Remove Temporary Files
Over time, your Chromebook can accumulate temporary files that are no longer needed. These files, which include log files, cached data, and temporary internet files, can take up valuable disk space and potentially slow down your device. Removing temporary files is a simple yet effective way to free up storage and optimize the performance of your Chromebook.
To remove temporary files on your Chromebook, follow these steps:
- Click on the Launcher icon in the bottom-left corner of your screen.
- Locate and click on the “Files” app.
- In the left-hand sidebar, click on “Downloads” or “My Files”.
- Press “Ctrl” + “A” to select all the files and folders in the directory.
- Press “Shift” + “Delete” or right-click and select “Delete” to permanently remove the selected files and folders.
- Confirm the deletion by clicking “Delete” in the confirmation prompt.
By following these steps, you can remove temporary files from your Chromebook and free up disk space. It’s important to note that once the files are deleted, they cannot be recovered. Therefore, make sure to double-check the files you are deleting to prevent the accidental removal of important data.
In addition to manually deleting temporary files, you can also enable the automatic deletion of these files in the Chrome OS settings. This option allows your Chromebook to regularly remove temporary files and cache, keeping your device clean and optimized without manual intervention.
By removing temporary files, you can ensure that your Chromebook operates at its best performance. This action not only frees up valuable storage space but also prevents the accumulation of unnecessary and potentially outdated files, ensuring your device runs smoothly.
Use Google Drive for File Storage
Google Drive is a powerful cloud storage platform that integrates seamlessly with Chromebooks. By utilizing Google Drive for file storage, you can free up local disk space on your Chromebook, enhance file accessibility, and ensure the safety and security of your important documents. Here’s how you can make the most of Google Drive:
Upload Files to Google Drive:
To upload files to Google Drive on your Chromebook, follow these steps:
- Click on the “Launcher” icon in the bottom-left corner of your screen.
- Locate and click on the “Files” app.
- In the left-hand sidebar, click on “My Drive” to navigate to your Google Drive.
- Click on the “New” button and choose the file type you want to upload.
- Locate the file on your Chromebook and select it to initiate the upload process.
By uploading files to Google Drive, you can store them securely in the cloud and access them from any device with an internet connection. This helps to save local disk space on your Chromebook and ensures that your files are protected in case of device loss or damage.
Organize Files and Folders:
To keep your files organized in Google Drive, you can create folders and move files into them. Follow these steps:
- In Google Drive, click on the “New” button and choose “Folder.”
- Provide a name for the folder and press “Enter.”
- To move files into the folder, simply drag and drop them from the main area of Google Drive into the folder.
By organizing your files into folders, you can easily locate and manage your documents, photos, and other files in Google Drive.
Access Files Offline:
To access files from Google Drive offline on your Chromebook, follow these steps:
- Open the “Files” app on your Chromebook.
- In the left-hand sidebar, click on “Drive” to access your Google Drive files.
- Toggle the “Available offline” switch for the specific file or folder you want to access offline.
Enabling the “Available offline” option allows you to access and work on your files even without an internet connection. Any changes you make while offline will automatically sync with your Google Drive once you regain internet connectivity.
Collaborate and Share:
Google Drive makes it easy to collaborate on files with others and share documents or folders. You can share files with specific people or create shareable links for broader access. To share files or folders from Google Drive on your Chromebook:
- Right-click on the file or folder you want to share.
- Select “Share” from the context menu.
- Choose the sharing options you prefer, such as allowing others to view or edit the file.
- Enter the email addresses of the people you want to share the file or folder with.
- Click “Send” to notify them of the shared file or folder.
By utilizing Google Drive, you can streamline collaboration, easily share files with others, and work together on documents in real-time.
By utilizing Google Drive as your primary file storage solution, you can free up local disk space on your Chromebook and take advantage of the convenience and flexibility of cloud storage. Whether you’re a student, professional, or casual user, Google Drive is an excellent tool for organizing, accessing, and sharing your files across devices.
Conclusion
Keeping your Chromebook operating at its optimal performance and ensuring you have sufficient disk space is essential for a smooth and productive experience. By following the steps outlined in this article, you can effectively free up storage space on your Chromebook and enhance its overall performance.
We started by clearing the cache and browsing history, removing unnecessary downloads, and deleting unused extensions and apps. These actions help to eliminate unnecessary files and unused software, creating more room for your important files and applications.
Managing offline files and emptying the Trash folder are crucial steps in maintaining a clean and organized file system on your Chromebook. By regularly reviewing and removing offline files and emptying the Trash, you can prevent unnecessary clutter and ensure that deleted files are permanently removed from your device.
Adjusting sync settings allows you to selectively choose which data gets synced across your devices, saving storage space on your Chromebook while still enjoying the convenience of syncing important files and settings.
Finally, utilizing Google Drive for file storage is a powerful way to free up local disk space on your Chromebook and leverage the benefits of cloud storage. By uploading and organizing files in Google Drive, you can access, collaborate, and share your files seamlessly across devices.
By incorporating these practices into your routine, you can maintain a clean and efficient Chromebook, ensuring that you have ample storage space for your files and that your device performs optimally.
So, take a few moments to apply these steps and enjoy a faster, more organized, and storage-efficient Chromebook experience!