Introduction
Welcome to the world of Chromebooks, where lightweight and efficient laptops run on the power of Google’s Chrome operating system. Whether you’re a student, a professional, or simply someone who appreciates the simplicity and speed of Chromebooks, you may encounter the need to clear the cache on your device. The cache, which stores temporary internet files and data, can sometimes cause issues like slow browsing, outdated webpage content, or even security concerns.
Clearing the cache on a Chromebook is a simple yet effective way to resolve these issues and ensure optimal performance. In this article, we will guide you through various methods to clear the cache on your Chromebook, from clearing browsing data to using Chrome browser settings and even performing a full system recovery.
It’s important to note that clearing the cache will result in the removal of temporary files and website data, but it will not affect your personal files or settings. So, let’s dive into the different methods and learn how to clear the cache on your Chromebook.
Method 1: Clear Cache and Browsing Data
One of the most straightforward ways to clear the cache on your Chromebook is by clearing your browsing data. This method removes temporary files, cookies, and other data accumulated during your browsing sessions. Here’s how you can do it:
- Open the Chrome browser on your Chromebook by clicking on the Chrome icon in the bottom-left corner of your screen.
- Next, click on the three vertical dots in the top-right corner of the browser window to open the menu.
- From the menu, select “Settings” to access the Chromebook settings.
- In the “Settings” tab, scroll down and click on “Privacy and security” in the left-hand menu.
- Under the “Privacy and security” section, click on “Clear browsing data”.
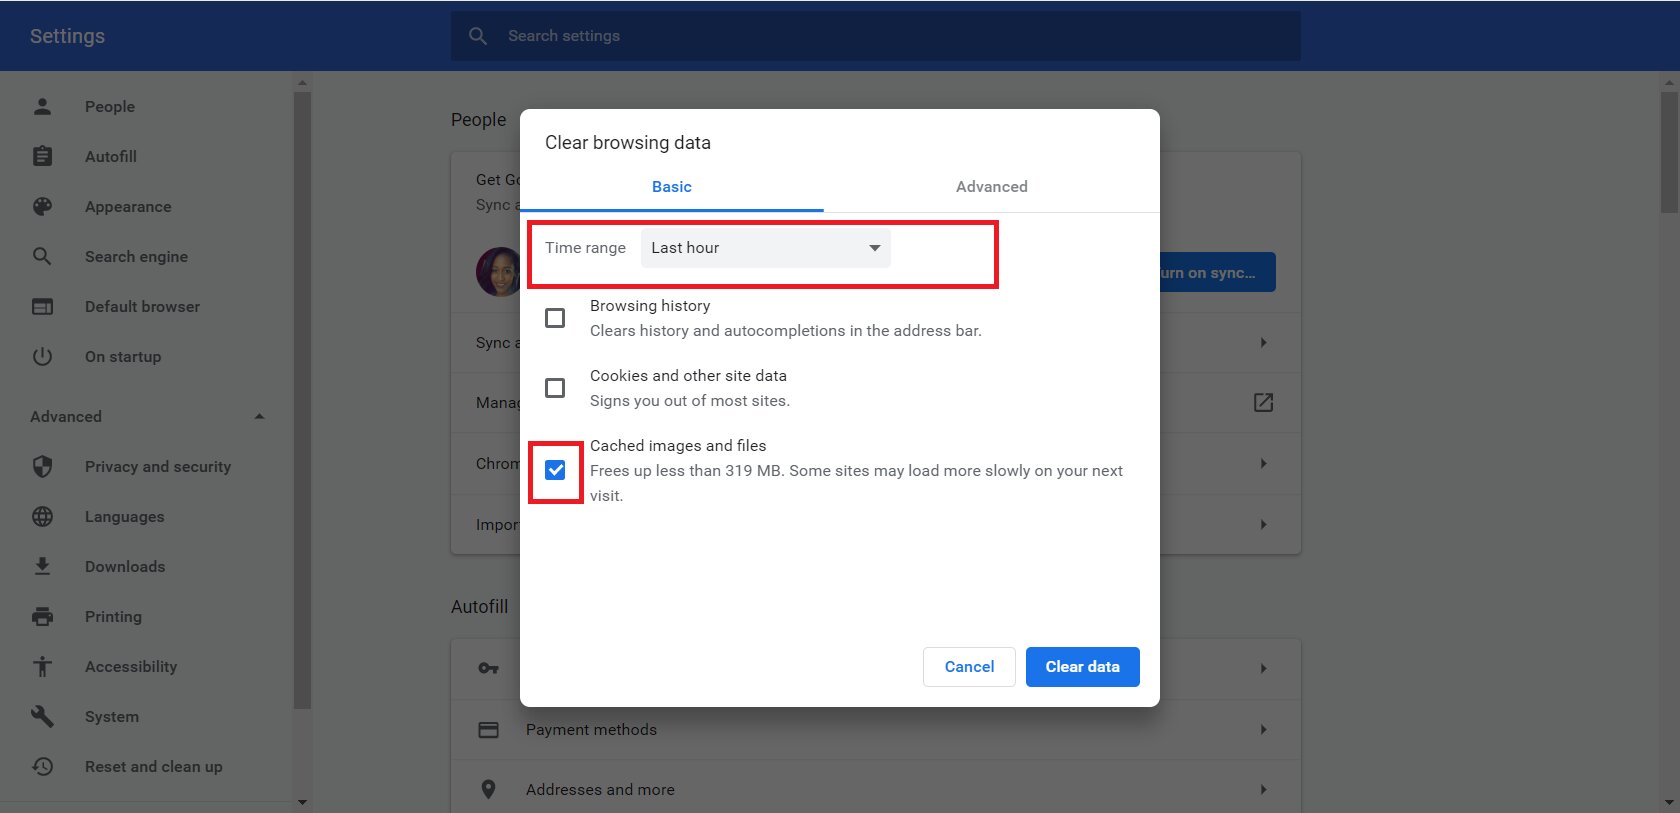
- A dialog box will appear. Ensure that the “Browsing history”, “Cookies and other site data”, and “Cached images and files” options are selected.
- Choose the time range for which you want to clear the data. You can select “All time” to remove all browsing data, or choose a specific time period.
- Finally, click on the “Clear data” button to initiate the clearing process.
Once the clearing process is complete, your cache and browsing data will be removed from your Chromebook. This can help resolve issues related to slow browsing, outdated website content, and other browsing-related problems.
Remember that clearing your browsing data will log you out of any websites or apps that you are currently signed in to, so make sure to save any important work or information before proceeding with this method.
Method 2: Use Chrome Browser Settings
If you prefer a more granular approach to clearing the cache on your Chromebook, you can utilize the Chrome browser settings to specifically clear the cache. This method allows you to clear the cache for individual websites or all sites. Here’s how you can do it:
- Open the Chrome browser on your Chromebook.
- Click on the three vertical dots in the top-right corner of the browser window to open the menu.
- From the menu, hover over the “More tools” option and select “Clear browsing data” from the submenu.
- In the dialog box that appears, ensure that the “Advanced” tab is selected.
- Under the “Advanced” tab, you’ll see a range of options. To clear the cache for a specific website, click on the “Site settings” option.
- Search for the website for which you want to clear the cache. You can type the website address in the search box or manually scroll through the list.
- Once you find the website, click on it to expand the options.
- Under the expanded options, click on the “Clear data” button to remove the cache for that specific website.
- If you want to clear the cache for all websites, go back to the “Advanced” tab and select the time range and other options desired.
- Finally, click on the “Clear data” button to initiate the clearing process.
Using the Chrome browser settings to clear the cache gives you more control over which sites’ data you want to remove. This can be useful if you’re experiencing issues with specific websites or if you want to maintain the cache for other sites that are working fine.
By keeping your cache clean and up-to-date, you can ensure smooth browsing experience and minimize any potential issues caused by outdated or corrupt cache files.
Method 3: Clear Cache Using Powerwash
If you’re looking for a more comprehensive solution to clear the cache on your Chromebook, you can perform a Powerwash. Powerwash is a factory reset feature that erases all the data on your Chromebook and resets it to its original settings. This includes removing all installed apps, user accounts, and, of course, the cache. Here’s how you can perform a Powerwash:
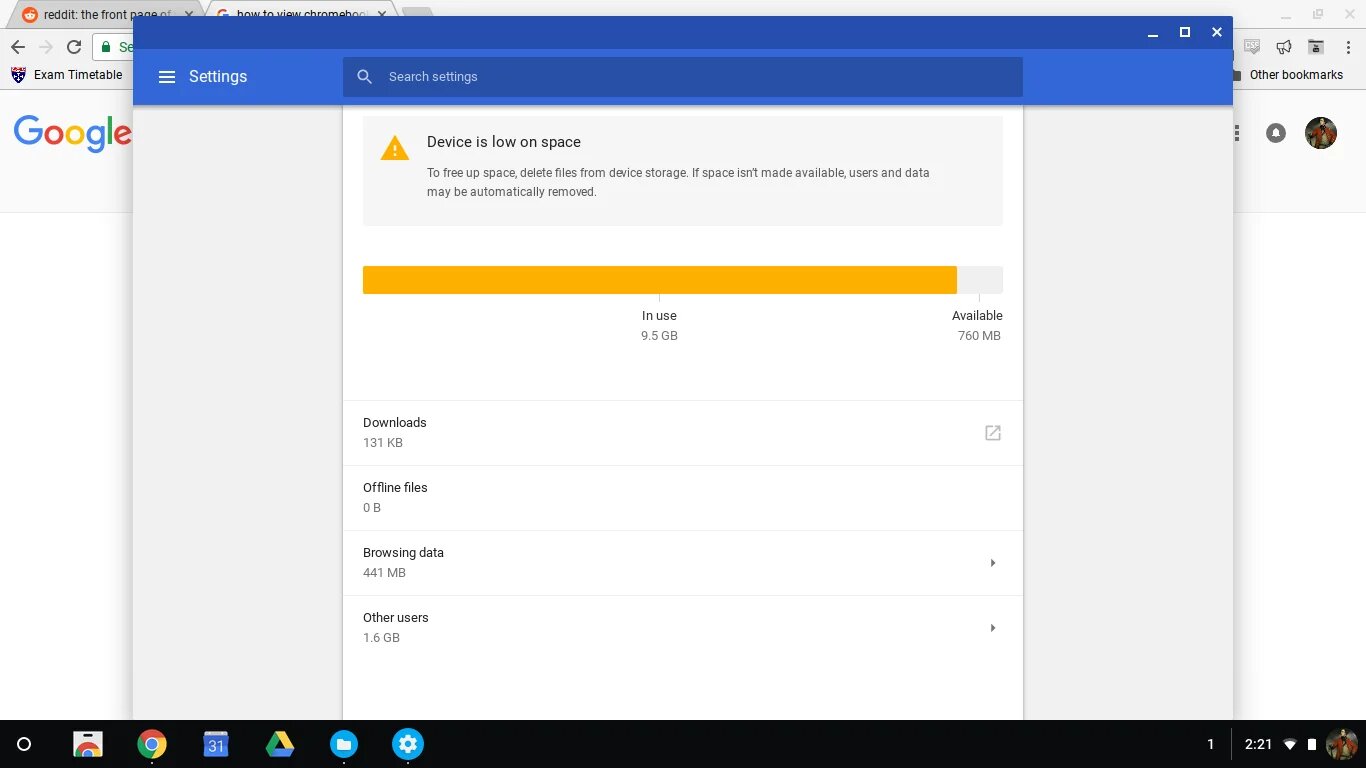
- Click on the time in the bottom-right corner of the screen to open the system menu.
- From the system menu, click on the gear-shaped icon to access the Chromebook settings.
- In the settings menu, scroll down and click on “Advanced” to expand the advanced settings options.
- Under the “Reset settings” section, click on “Powerwash” to start the process.
- A confirmation message will appear, informing you about the consequences of performing a Powerwash. Read the message carefully, as this action will remove all of your personal files and settings.
- If you’re sure you want to proceed, click on the “Powerwash” button to initiate the reset.
- Follow the on-screen instructions to complete the Powerwash process.
Performing a Powerwash will not only clear the cache but also provide a fresh start for your Chromebook. It’s like having a brand-new device, free from any previous issues or data remnants. However, keep in mind that this method will remove all your files and settings, so make sure to back up any important data before proceeding.
Powerwash can be particularly useful if you’re experiencing persistent cache-related problems or if you want to give your Chromebook a clean slate. Once the Powerwash is complete, you can set up your Chromebook as if you were using it for the first time, enjoying a clean and cached-free browsing experience.
Method 4: Clear Cache from Android Apps and Linux Containers
If you use Android apps or Linux containers on your Chromebook, it’s important to note that they have their own separate cache. Clearing the cache for these apps and containers can help resolve any performance issues or outdated data. Here’s how you can clear the cache from Android apps and Linux containers on your Chromebook:
- Open the app drawer on your Chromebook by clicking on the circle icon in the bottom-left corner of your screen.
- Find and open the “Settings” app.
- In the “Settings” app, scroll down and click on “Apps”. This will show you a list of all the installed Android apps and Linux containers.
- Click on the app or container for which you want to clear the cache.
- Inside the app or container settings, click on the “Storage” option.
- You’ll see an option to “Clear cache” or “Clear data”. Click on the “Clear cache” button to remove the app or container’s cache.
- Repeat this process for each app or container that you want to clear the cache for.
Clearing the cache from Android apps and Linux containers ensures that they’re running smoothly and not burdened by excessive cached data. It can also help resolve issues like app crashes, slow performance, or outdated information within the apps.
Keep in mind that clearing the cache for an app or container may log you out of that specific app or container, and you may need to sign in again. Additionally, clearing the cache won’t delete any personal data or app settings, so you can rest assured that your important information remains intact.
Method 5: Utilize Chromebook Recovery Utility
If you’re facing persistent cache-related issues or encountering system errors on your Chromebook, utilizing the Chromebook Recovery Utility can help you clear the cache and restore your device to its factory settings. This method involves reinstalling the Chrome operating system (OS) on your Chromebook. Here’s how you can utilize the Chromebook Recovery Utility:
- On a separate computer, open the Chrome browser.
- Search for “Chromebook Recovery Utility” in the Chrome Web Store and add it as an extension to your browser.
- Once the extension is added, launch the Chromebook Recovery Utility from the Apps menu within the Chrome browser.
- Follow the on-screen instructions to prepare a recovery disk or USB drive using a Chrome OS image. Make sure to have a compatible disk or USB drive available.
- Connect the recovery disk or USB drive to your Chromebook.
- On your Chromebook, press and hold the Esc and Refresh keys simultaneously, then press the Power button.
- Release the keys once a message appears on the screen, indicating that the Chromebook is in Recovery Mode.
- Follow the on-screen instructions to select the recovery media you created and proceed with the recovery process.
- The Chrome OS will be reinstalled, which will clear the cache and restore your Chromebook to its original factory settings.
Utilizing the Chromebook Recovery Utility allows you to start fresh with a clean installation of the Chrome OS, eliminating any persistent cache-related issues or system errors. Be aware that this method will erase all of your personal files, apps, and settings, so make sure to back up any important data beforehand.
The Chromebook Recovery Utility is a powerful tool that can effectively resolve complex cache-related problems and restore the performance and stability of your Chromebook. It is especially useful when other methods have been unsuccessful in resolving cache or system issues.
Conclusion
Clearing the cache on your Chromebook is a simple yet effective way to maintain optimal performance and resolve various issues related to browsing, app performance, and system errors. By following the methods outlined in this article, you can easily clear the cache and ensure a smooth and efficient user experience on your Chromebook.
From clearing browsing data and utilizing Chrome browser settings to performing a Powerwash, clearing the cache from Android apps and Linux containers, or utilizing the Chromebook Recovery Utility, you have a range of options to choose from based on your specific needs and the severity of the cache-related issues you’re facing.
Remember to consider the consequences of each method; some may require backing up your data, signing out of websites or apps, or even reinstalling the entire Chrome OS. By taking necessary precautions and following the instructions carefully, you can safely clear the cache on your Chromebook without losing any important information.
Regularly clearing the cache on your Chromebook is recommended to ensure optimal performance and minimize any potential issues caused by outdated or corrupt cache files. Whether you’re a student, a professional, or someone who values the speed and simplicity of Chromebooks, keeping your cache clean will help you make the most of your device.
So, don’t let a cluttered cache slow you down. Take the time to clear the cache on your Chromebook and enjoy a fast and seamless browsing experience once again!