Introduction
Welcome to the comprehensive guide on how to free up disk space on Windows 10. As you use your computer on a daily basis, files and programs accumulate, eventually leading to a shortage of storage space. This can often cause your computer to slow down and become less efficient. Whether you’re running out of space to store important documents or you simply want to optimize your system’s performance, this guide will provide you with actionable steps to reclaim valuable disk space.
Having sufficient disk space is vital for your computer’s overall functionality. Not only does it allow for smooth operation, but it also enables you to install new software, download files, and save important data without any constraints. With the increasing size of multimedia files and the growing number of applications we use, disk space management has become essential. In this guide, we will explore various methods to free up disk space, ranging from basic cleanup techniques to advanced optimization tactics.
By following the steps outlined in this guide, you will be able to reclaim gigabytes of disk space, effectively speeding up your computer and allowing you to make the most of your storage capacity. From removing unnecessary files and uninstalling unwanted programs to managing system restore points and compressing files, we will cover a variety of strategies to optimize your disk space usage.
Now, let’s dive into the specifics and learn how you can effectively free up disk space on your Windows 10 computer. By implementing the strategies outlined in this guide, you will not only enhance your computer’s performance but also ensure that you have ample space for all your digital needs.
Check Disk Space Usage
Before diving into the process of freeing up disk space, it’s important to first assess how much storage space is being used on your Windows 10 computer. By understanding your current disk usage, you can identify the areas that are consuming the most space and prioritize your cleanup efforts accordingly.
To check your disk space usage on Windows 10, follow these steps:
- Open File Explorer by pressing the Windows key + E on your keyboard.
- Select the drive you want to check (usually the C: drive).
- Right-click on the selected drive and choose Properties from the context menu.
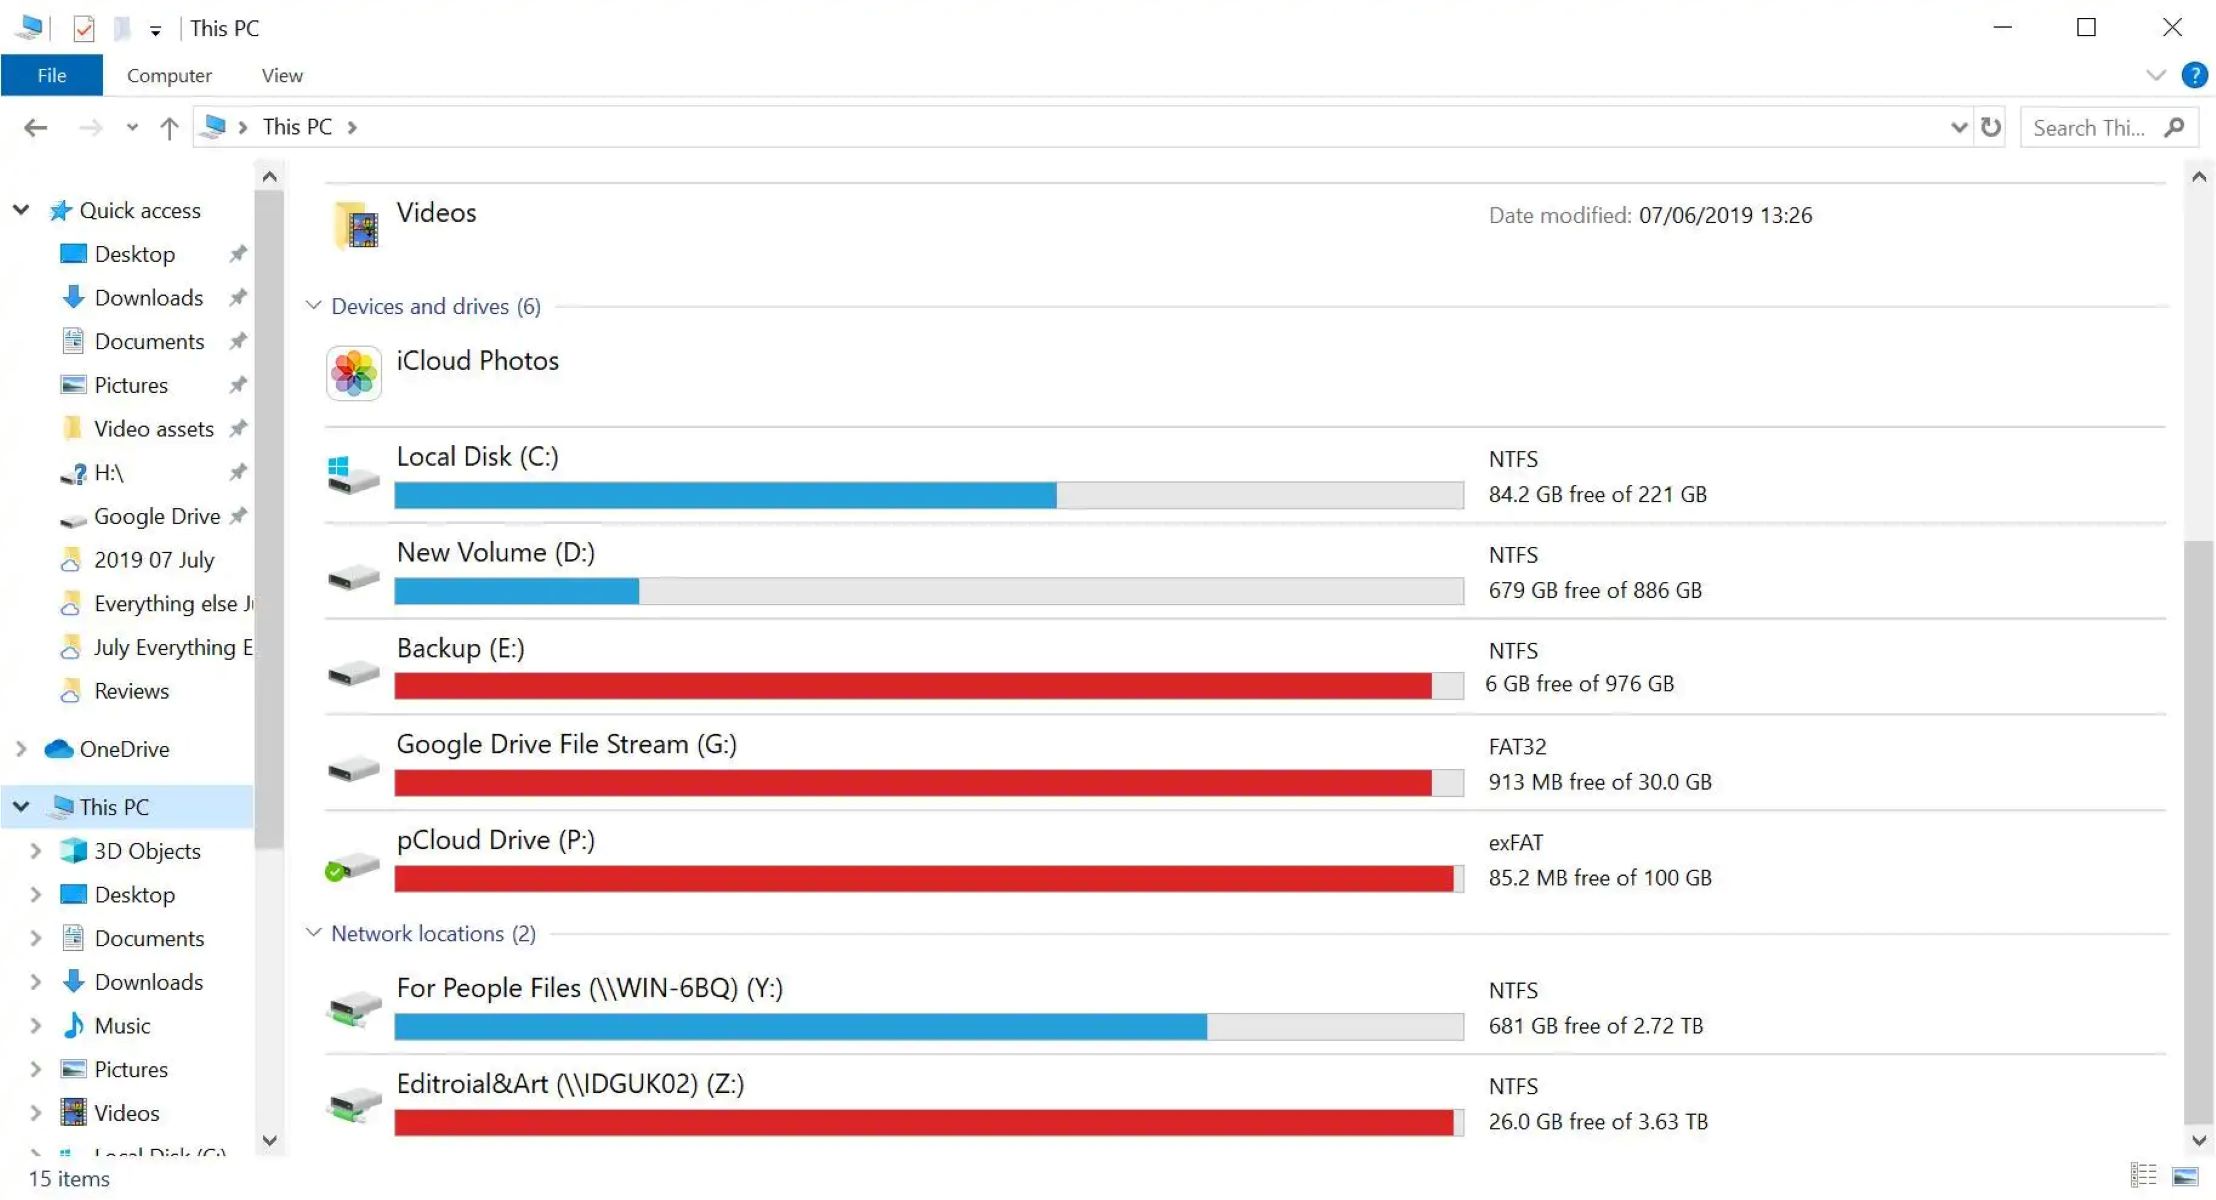
- In the General tab, you will see a visual representation of your disk space usage along with the amount of used and free space. Take note of the percentage of used space and the total capacity of the drive.
By checking your disk space usage, you can determine if you’re nearing the maximum capacity of your drive. If you find that your disk is almost full or that a significant portion of your storage is being utilized, it’s time to take action and free up some space.
Understanding your disk space usage will also help you identify specific folders or files that are taking up a large amount of space. This information can guide your cleanup efforts and allow you to target the areas that will provide the most significant impact in terms of freeing up storage space.
Now that you’ve assessed your current disk space usage, it’s time to move on to the next step and start deleting unnecessary files to free up valuable storage space on your Windows 10 computer.
Delete Unnecessary Files
One of the most effective ways to free up disk space on your Windows 10 computer is to delete unnecessary files. Over time, your system can accumulate a significant amount of temporary files, unused applications, and other types of files that are taking up valuable storage space. By removing these files, you can reclaim storage and improve the overall performance of your computer.
Here are some types of files you can consider deleting:
- Temporary Files: Windows and various applications create temporary files that are no longer needed. You can safely remove these files without affecting the functionality of your computer. To delete temporary files, go to the Windows search bar, type “Disk Cleanup,” and select the Disk Cleanup tool. Choose the drive you want to clean, and the tool will scan for unnecessary files that can be deleted.
- Old Downloads and Documents: Go through your Downloads and Documents folders and delete any files that you no longer need. Often, these folders can accumulate files that you have already used or are deemed irrelevant. Sort the files by date to easily identify the older ones that can be safely deleted.
- Unused Applications: Uninstall any programs or applications that you no longer use. To do this, go to the Settings app, select “Apps,” and navigate to the “Apps & Features” section. From the list of installed programs, select the ones you want to remove and click on the “Uninstall” button.
- Duplicate Files: Duplicate files can take up a significant amount of storage space without you realizing it. There are several duplicate file finder tools available that can scan your computer for duplicate files and help you delete them. This will not only free up disk space but also organize your files more efficiently.
Remember to carefully review the files you are deleting and ensure that you no longer need them. It’s a good practice to back up important files before deleting them, especially if you’re unsure about their significance.
By regularly deleting unnecessary files, you can keep your computer running smoothly and ensure that you have ample storage space for future needs. It’s a simple yet effective strategy to optimize your disk space and improve the overall performance of your Windows 10 computer.
Uninstall Unwanted Programs
Uninstalling unwanted programs is another effective way to free up disk space on your Windows 10 computer. Over time, you may have installed several applications that are no longer necessary or rarely used. These programs can take up a significant amount of storage space, so it’s important to identify and remove them to optimize your disk usage.
Here’s how you can uninstall unwanted programs:
- Open the Settings app by pressing the Windows key + I on your keyboard.
- Select the “Apps” option from the Settings menu.
- In the “Apps & Features” section, you will see a list of installed programs.
- Scroll through the list and identify the programs that you want to uninstall.
- Click on the program you want to remove and select the “Uninstall” button.
- Follow the instructions provided by the uninstaller to complete the removal process.
It’s important to note that some programs may require a restart of your computer to complete the uninstallation process. Additionally, certain applications may leave behind residual files or registry entries even after being uninstalled. In such cases, it may be beneficial to use a third-party uninstaller tool to completely remove any remnants of the program.
When deciding which programs to uninstall, consider removing applications that you no longer use or that are resource-intensive. Some examples include trial versions of software, multimedia players, or outdated utility tools. By removing these unwanted programs, you can free up disk space and potentially improve the overall performance of your computer.
Regularly reviewing and uninstalling unwanted programs is a good practice to maintain a clutter-free system and optimize your disk space usage. It’s an efficient way to ensure that your Windows 10 computer operates smoothly and has enough storage for your essential files and applications.
Clear Temporary Files
Clearing temporary files is a crucial step in freeing up disk space on your Windows 10 computer. Temporary files are created by the operating system and various applications as they perform tasks or store temporary data. Over time, these files can accumulate and take up a significant amount of storage space. Clearing them regularly is essential to optimize your disk usage.
There are multiple methods to clear temporary files on Windows 10:
- Disk Cleanup Tool: Windows 10 offers a built-in tool called Disk Cleanup, which allows you to delete temporary files. To access Disk Cleanup, search for it in the Windows search bar, select the tool, and choose the drive you want to clean. Disk Cleanup will scan your computer and present you with options to delete temporary files, system files, and more.
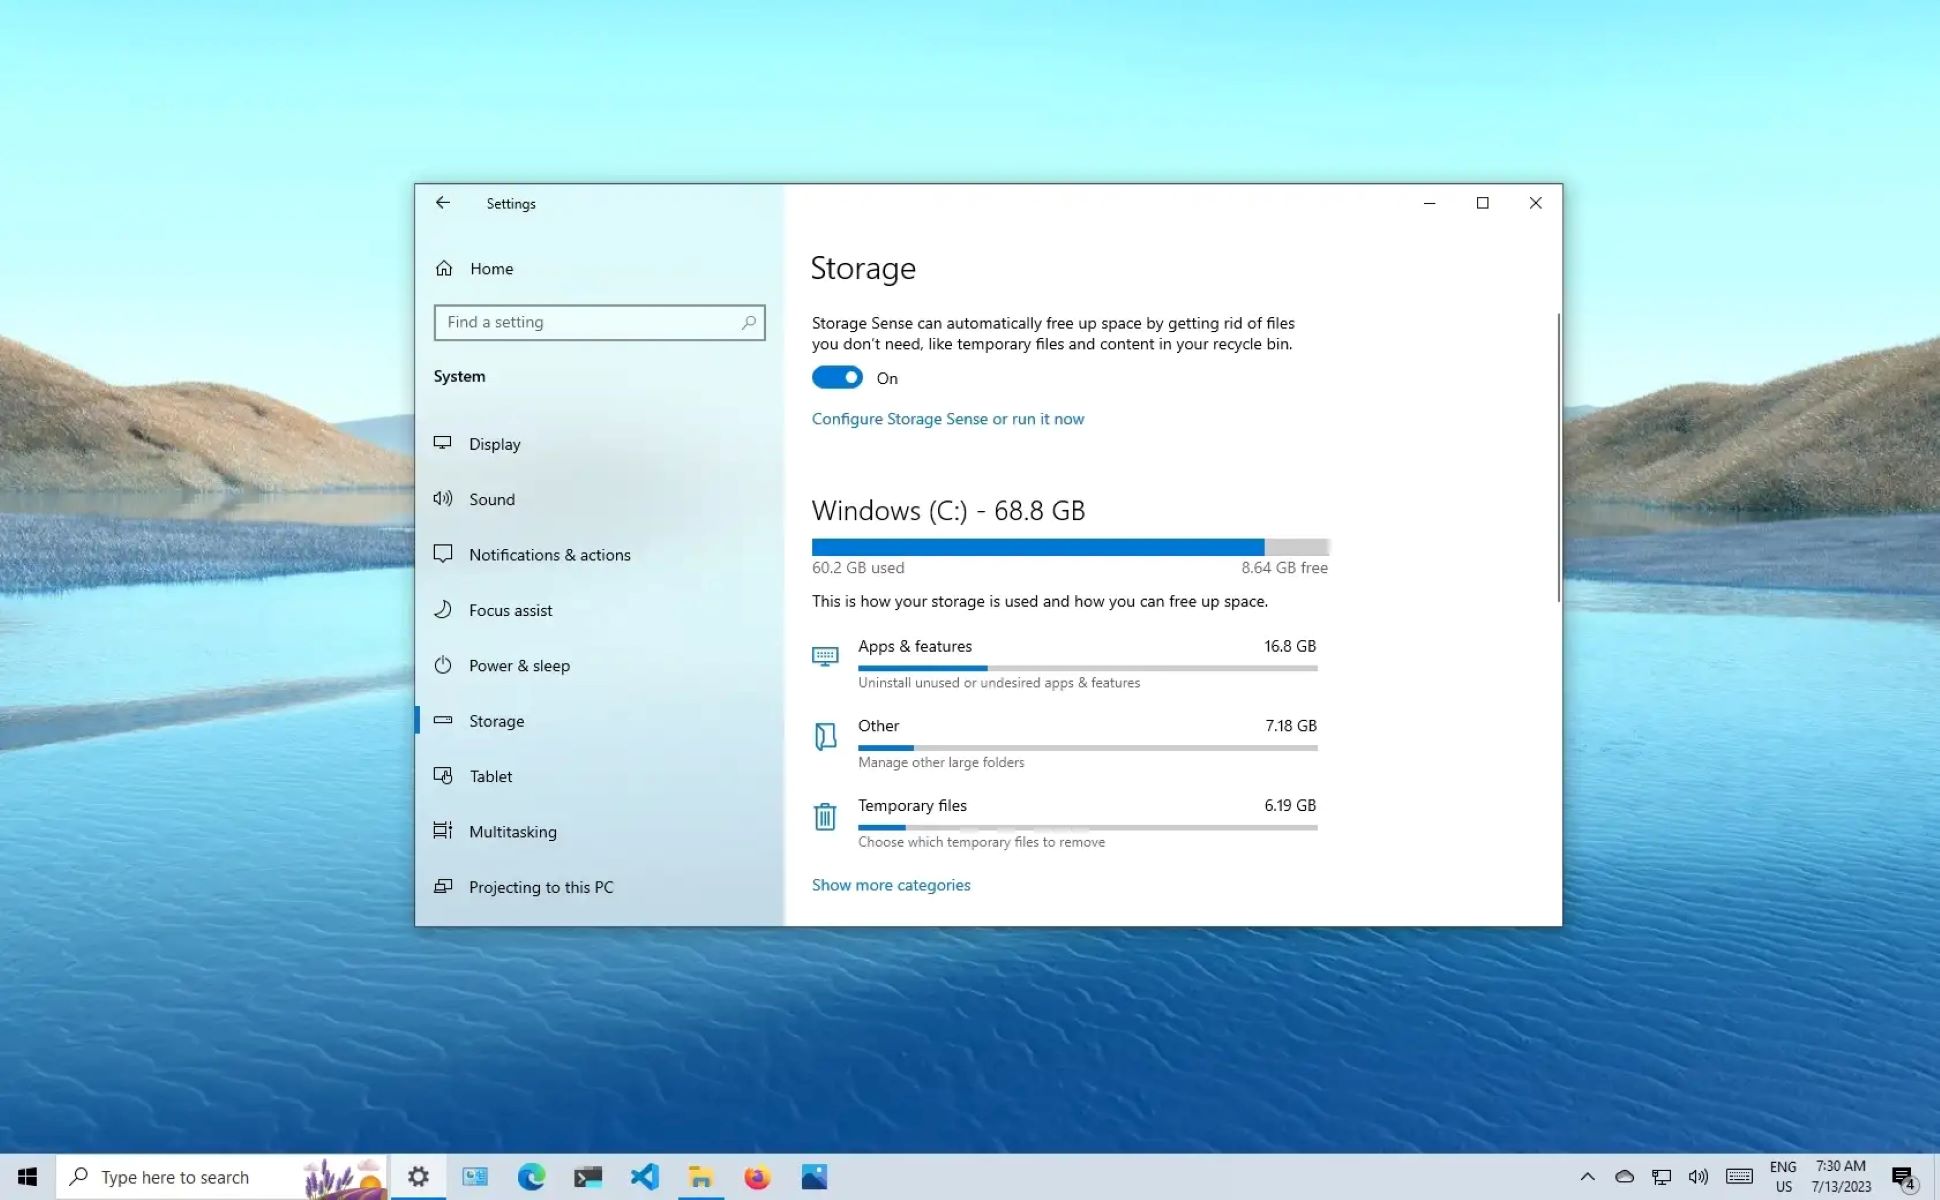
- Storage Sense: Storage Sense is a feature in Windows 10 that automatically frees up disk space. To enable Storage Sense, go to Settings, click on System, and select Storage. Toggle the Storage Sense button to On. This feature will regularly clean up temporary files and other unnecessary files to optimize your disk space automatically.
- Manually deleting temporary files: You can also delete temporary files manually by navigating to a specific folder on your computer. Press the Windows key + R to open the Run dialog, type “%temp%”, and press Enter. This will open the Temp folder, which contains temporary files. Select all the files in the folder using Ctrl + A and delete them by pressing the Delete key.
When clearing temporary files, it’s important to note that some files may be in use by the operating system or running applications. Not all temporary files can be deleted, as they may serve a purpose or be required for proper system functioning. Therefore, it’s recommended to use a trusted tool like Disk Cleanup or enable Storage Sense to automate the process and ensure the safe removal of temporary files.
By regularly clearing temporary files, you can reclaim valuable disk space and enhance the performance of your Windows 10 computer. This process not only improves the efficiency of your system but also allows you to have more space for storing important files, applications, and media.
Manage System Restore Points
System Restore Points are created by the Windows operating system as a way to restore your computer to a previous state in case of system issues or failures. While System Restore Points can be helpful in certain situations, they can also take up a significant amount of disk space over time. Managing and optimizing your System Restore Points can help free up valuable storage on your Windows 10 computer.
Here’s how you can manage System Restore Points:
- Open the Control Panel by searching for it in the Windows search bar.
- Select the “System and Security” option.
- Under the “System” category, click on “System.”
- In the System window, select “System Protection” from the left-hand menu.
- In the System Protection tab, you will see a list of drives with their respective protection status.
- Select the drive where you want to manage System Restore Points and click on the “Configure” button.
- In the Configure window, you can adjust the settings for System Restore, including the amount of disk space allocated for restore points.
- Move the slider to specify the maximum amount of disk space you want to allocate for restore points, or you can choose to disable System Restore entirely for the selected drive.
- Click on the “Apply” and “OK” buttons to save the changes.
By managing System Restore Points, you can control the amount of disk space used by this feature. Adjusting the allocation of disk space for restore points allows you to balance the benefits of system recovery with the need for free storage space.
It’s important to note that reducing the amount of disk space allocated for System Restore Points may limit the number of restore points available and could potentially affect your ability to revert to a previous system state. Therefore, it’s recommended to regularly create backups of important files and consider using other reliable backup solutions to ensure the safety of your data.
By efficiently managing System Restore Points, you can optimize your disk space usage and ensure a healthy balance between system recovery functionality and available storage on your Windows 10 computer.
Disable Hibernation
Hibernation is a power-saving feature in Windows 10 that allows your computer to save its current state on the hard drive and power down completely. While hibernation can be useful for quickly resuming your work, it requires a significant amount of disk space to store the hibernation file. Disabling hibernation can free up valuable disk space on your Windows 10 computer.
Here’s how you can disable hibernation:
- Open the Command Prompt as an administrator by searching for “Command Prompt” in the Windows search bar, right-clicking on it, and selecting “Run as administrator.”
- In the Command Prompt window, type “
powercfg.exe /hibernate off” and press Enter.
Disabling hibernation will remove the hibernation file (hiberfil.sys) from your computer, resulting in saved disk space. However, note that disabling hibernation means you will no longer have the option to hibernate your computer, and resuming from a shutdown will take longer compared to resuming from hibernation.
If you later decide to re-enable hibernation, follow these steps:
- Open the Command Prompt as an administrator.
- In the Command Prompt window, type “
powercfg.exe /hibernate on” and press Enter.
Enabling hibernation will recreate the hibernation file on your computer, allowing you to use the hibernation feature again.
Disabling hibernation is a recommended step if you rarely use the hibernation feature and are looking to free up disk space on your Windows 10 computer. By disabling hibernation, you can optimize your storage capacity and allocate more space for essential files and applications.
Compress Files and Folders
Compressing files and folders is a useful technique to free up disk space on your Windows 10 computer. When you compress a file or folder, the operating system applies a compression algorithm to reduce its size, allowing you to store more data in the same amount of disk space. Compressed files and folders can be easily accessed and used, just like their uncompressed counterparts.
To compress files and folders in Windows 10, follow these steps:
- Locate the file or folder you want to compress.
- Right-click on the file/folder and select “Properties” from the context menu.
- In the Properties window, under the “General” tab, click on the “Advanced…” button.
- In the Advanced Attributes window, check the “Compress contents to save disk space” checkbox.
- Click on “OK” to apply the changes.
- If you are compressing a folder, select the option to “Apply changes to this folder, subfolders, and files” when prompted.
The file or folder will now be compressed, and the operating system will automatically apply file compression to save disk space. Compressed files will be displayed with a different icon to distinguish them from regular files.
It’s important to note that there are certain types of files that are already compressed or do not compress significantly, such as media files (MP3, MP4) or already compressed archive files (ZIP, RAR). Compressing these types of files may not yield significant space savings and can even increase the file size due to the compression algorithm’s overhead.
If you find that compressing certain files doesn’t provide much space savings, it’s recommended to leave them uncompressed to maintain their original quality and avoid potential issues with compatibility or performance.
By selectively compressing files and folders, you can effectively free up disk space on your Windows 10 computer. This strategy is particularly useful for documents, text files, and other uncompressed data that can be effectively compressed without sacrificing usability or quality.
Move Files to External Storage
One of the most straightforward ways to free up disk space on your Windows 10 computer is to move files to external storage. External storage devices, such as USB drives or external hard drives, provide a convenient solution for storing files that you do not frequently access but still want to keep for future use.
To move files to external storage, follow these steps:
- Connect your external storage device to your computer.
- Open File Explorer by pressing the Windows key + E.
- Navigate to the location where the files you want to move are stored.
- Select the files or folders you want to move by clicking and dragging the mouse cursor or by using the Ctrl key and clicking on each file or folder individually.
- Right-click on the selected files or folders and choose “Cut” from the context menu.
- Navigate to the external storage device in File Explorer.
- Right-click in the destination folder on the external storage device and choose “Paste” from the context menu.
The selected files or folders will now be moved to the external storage device, freeing up disk space on your Windows 10 computer.
When moving files to external storage, it’s crucial to ensure that you have a backup of your files elsewhere. External storage devices can be prone to damage or loss, so it’s recommended to keep backups of important files in multiple locations to minimize the risk of data loss.
Moving files to external storage provides a convenient way to declutter your computer’s disk space while still retaining access to the files when needed. By offloading less frequently used files to external storage, you can optimize your computer’s performance and have more available space for files that are regularly accessed.
Clean up Recycle Bin
The Recycle Bin is a temporary storage location on your Windows 10 computer where deleted files are stored before they are permanently removed. These files take up disk space in the Recycle Bin until you empty it. Cleaning up the Recycle Bin is an effective way to free up storage space and ensure that deleted files are permanently erased.
To clean up the Recycle Bin, follow these simple steps:
- Locate the Recycle Bin icon on your desktop.
- Right-click on the Recycle Bin icon and select “Empty Recycle Bin” from the context menu.
- A confirmation message will appear asking if you want to permanently delete all the items in the Recycle Bin. Click on “Yes” to proceed.
This will permanently delete all files and folders that are currently stored in the Recycle Bin, freeing up the associated disk space.
It’s essential to note that once you have emptied the Recycle Bin, the deleted files cannot be recovered. Therefore, before emptying the Recycle Bin, ensure that you have checked its contents to ensure that you have not accidentally deleted any important files.
You can also adjust the settings of the Recycle Bin to automatically delete files after a specified period. To do this:
- Right-click on the Recycle Bin icon and select “Properties” from the context menu.
- In the Properties window, select the drive for which you want to adjust the Recycle Bin settings.
- Under the “Settings for selected location” section, choose the option to “Customize this folder“.
- Adjust the slider to set a specific size limit for the Recycle Bin, or select the option to “Don’t move files to the Recycle Bin” to bypass it entirely.
- Click on “OK” to save the changes.
By regularly cleaning up the Recycle Bin and adjusting its settings, you can effectively manage your disk space and ensure that deleted files are permanently removed from your Windows 10 computer.
Use Disk Cleanup Tool
The Disk Cleanup tool is a built-in utility in Windows 10 that allows you to free up disk space by removing unnecessary files and temporary data from your computer. It’s an effective way to optimize your storage and improve the overall performance of your system.
To use the Disk Cleanup tool, follow these steps:
- Press the Windows key + S on your keyboard to open the search bar.
- Type “Disk Cleanup” in the search bar and select the Disk Cleanup app from the search results.
- In the Disk Cleanup window, select the drive you want to clean up (usually the C: drive) and click “OK“.
- Wait for the tool to calculate the amount of space you can free up. This may take a few moments.
- Once the calculation is complete, you will see a list of file categories that can be cleaned up. These categories may include temporary files, system files, downloaded program files, and more.
- Select the file categories you want to clean up. You can click on each category to see a brief description of what it contains.
- Click “OK” to initiate the cleaning process. You may be asked to confirm your action.
The Disk Cleanup tool will now remove the selected files and free up disk space on your Windows 10 computer.
It’s important to review the categories and options carefully before cleaning up. Some files, such as system files or downloaded program files, may be required for proper functioning of your computer or installed applications. Therefore, exercise caution when selecting the files to be deleted.
Using the Disk Cleanup tool regularly will help you keep your system clean and maintain optimal storage capacity. It’s a valuable utility for removing unnecessary files and freeing up disk space on your Windows 10 computer.
Utilize Storage Sense
Storage Sense is a feature in Windows 10 that automatically helps you manage your disk space by cleaning up unnecessary files. It offers a convenient and automated way to optimize your storage usage without manual intervention.
To utilize Storage Sense on your Windows 10 computer, follow these steps:
- Open the Settings app by pressing the Windows key + I on your keyboard.
- Select the “System” category.
- In the left-hand menu, click on “Storage“.
- On the right-hand side, you will see the “Storage Sense” option. Toggle the switch to “On“.
- Click on “Configure Storage Sense or run it now” for further customization.
- In the Storage Sense settings, you can choose when files should be deleted, such as deleting files in the Recycle Bin after a certain number of days or deleting temporary files that apps are no longer using.
- You can also click on the “Clean Now” button to run Storage Sense immediately and free up disk space.
Storage Sense will automatically clean up files that are safe to delete and are no longer needed, helping you maintain an optimized storage capacity. By regularly utilizing Storage Sense, you can ensure that your Windows 10 computer stays clean and clutter-free.
It’s important to note that Storage Sense will not delete files that you have marked as important or files that are stored in your synced folders (such as OneDrive). It focuses on removing unnecessary temporary files, system files, and other items that are no longer needed.
By using Storage Sense, you can take advantage of an automated and hassle-free method of managing your disk space and ensuring that your Windows 10 computer operates at its best performance. It’s an efficient way to maintain an organized and optimized storage system without manual intervention.
Disable OneDrive Sync
OneDrive is a cloud storage service integrated into Windows 10 that allows you to store and access your files remotely. While it offers convenient synchronization and backup features, syncing files to OneDrive can consume significant disk space on your computer. If you find that OneDrive is using a large amount of storage or if you prefer not to use the service, disabling OneDrive sync can help free up disk space on your Windows 10 computer.
To disable OneDrive sync, follow these steps:
- Click on the OneDrive icon in the system tray (located in the bottom-right corner of the screen).
- In the OneDrive menu, click on the three-dot menu icon and select “Settings“.
- In the Microsoft OneDrive window, go to the “Account” tab.
- Under the “Files On-Demand” section, uncheck the “Save space and download files as you use them” option.
- Click “OK” to save the changes.
Disabling OneDrive sync will stop the synchronization of your files to the cloud, preserving your local storage space. However, please note that disabling sync will only prevent new files from being uploaded or downloaded automatically. Any files previously synced with OneDrive will still remain on your computer.
If you choose to completely remove OneDrive from your computer, you can do so by following these steps:
- Right-click on the OneDrive icon in the system tray and select “Settings“.
- In the Microsoft OneDrive window, go to the “Account” tab.
- Click on the “Unlink this PC” button.
- Follow the prompts to confirm the removal of OneDrive.
Once OneDrive is unlinked and removed from your computer, it will no longer sync files or use any local storage space.
Disabling OneDrive sync can be a practical solution for managing your disk space if you prefer not to use the service or if you have limited storage capacity. By disabling or removing OneDrive, you can reclaim valuable space on your Windows 10 computer and optimize your storage usage according to your preferences.
Utilize Cloud Storage Services
Cloud storage services offer a convenient and efficient way to store files and data remotely, freeing up valuable disk space on your Windows 10 computer. By utilizing cloud storage, you can access your files from any device with an internet connection and reduce the need for physical storage on your computer.
There are various cloud storage services available, each offering different storage capacities and features. Some popular options include:
- OneDrive: OneDrive is Microsoft’s cloud storage service, integrated directly into Windows 10. It provides seamless integration with your computer and allows for easy synchronization of files across devices.
- Google Drive: Google Drive is a cloud storage service provided by Google. It offers a range of storage plans and integrates with other Google services, such as Google Docs and Google Photos.
- Dropbox: Dropbox is a popular cloud storage service that provides secure file storage and sharing capabilities. It offers flexible storage plans and easy collaboration features.
- Box: Box is a cloud storage and file-sharing service designed for businesses. It provides advanced security features and collaboration tools.
To utilize cloud storage services, follow these general steps:
- Create an account with the cloud storage service of your choice.
- Install the desktop client or mobile app provided by the service on your Windows 10 computer.
- Sign in to the client or app with your account credentials.
- Upload files and folders to the cloud storage service by dragging and dropping them into the designated folder or using the provided upload options.
- Access your files from any device with an internet connection, including your Windows 10 computer, by signing in to the cloud storage service.
Cloud storage services offer advantages such as additional backup and security for your files, easy file sharing and collaboration, and the ability to access your files from multiple devices. By utilizing these services, you can reduce the need for physical storage on your computer and free up disk space for other purposes.
It’s important to note that while cloud storage services offer remote access to your files, you should still prioritize the security and privacy of your data. Choose a reliable and reputable service, enable security features like two-factor authentication, and ensure you understand the terms and conditions of the service you have chosen.
By utilizing cloud storage services, you can effectively manage your files, reduce reliance on local storage, and create a seamless and efficient workflow across your devices. It’s a valuable solution for optimizing your storage space on your Windows 10 computer while maintaining accessibility and security for your files.
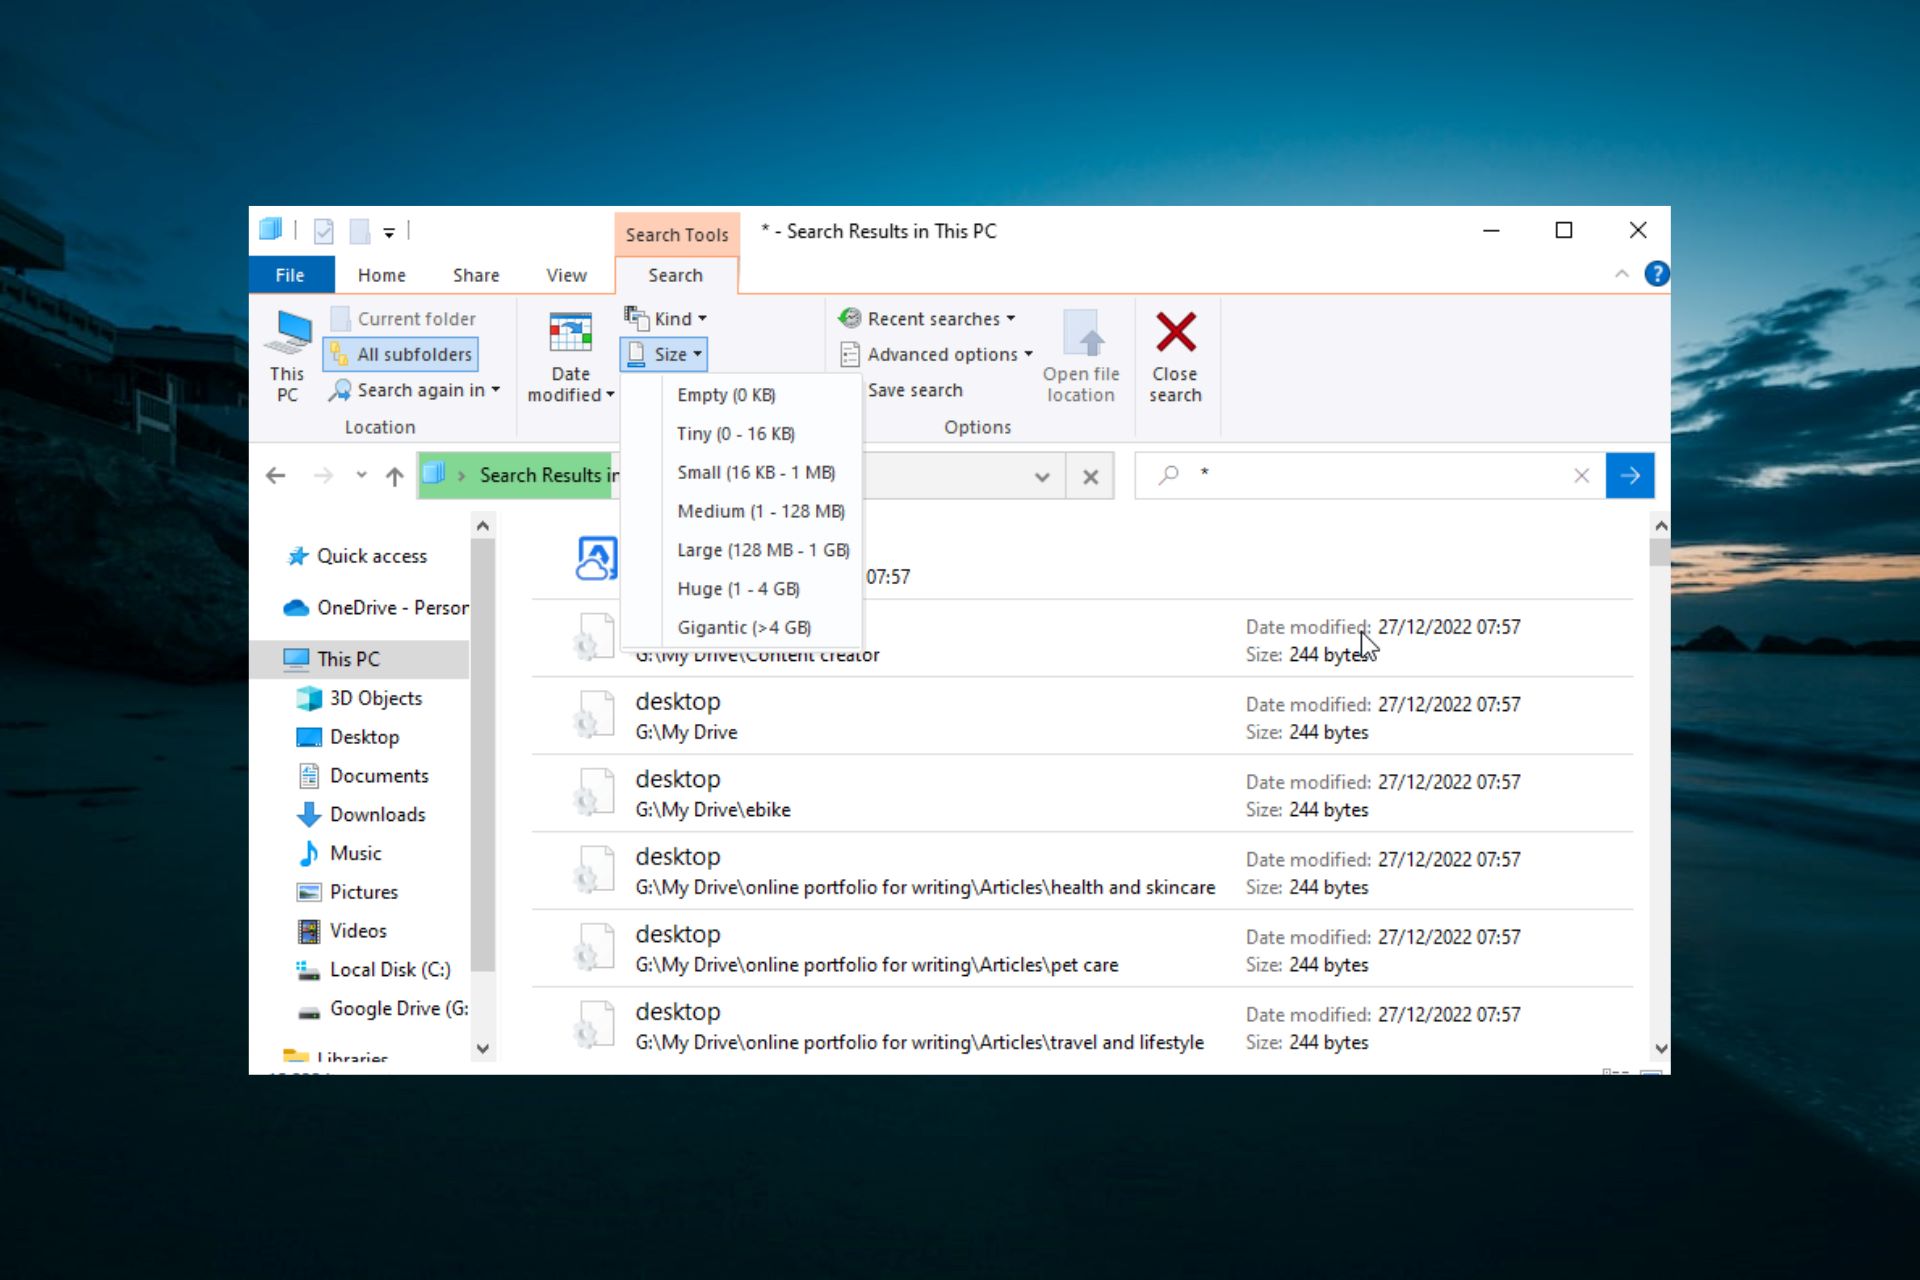
Remove Duplicate Files
Duplicate files take up valuable disk space on your Windows 10 computer, and removing them is an effective way to optimize your storage usage. Over time, duplicated files can accumulate due to various reasons, such as file backups, file transfers, or unintentional duplications. Removing duplicate files not only frees up storage space but also improves organization and reduces clutter.
To remove duplicate files on your Windows 10 computer, you can follow these steps:
- Use the built-in search capability in Windows File Explorer. Open File Explorer by pressing the Windows key + E and navigate to the folder or drive you want to search for duplicates.
- In the search bar, type a search criteria based on file name, extension, or other identifying information.
- Once the search results are generated, sort the files by name, size, or date modified to identify potential duplicates.
- Manually review the files and select the duplicates you want to remove. Be sure to compare file contents and ensure that you are deleting true duplicates.
- Once you have identified the duplicates, right-click on the selected files and choose “Delete” from the context menu.
- Confirm the deletion when prompted to permanently remove the duplicate files.
Alternatively, you can use third-party software specifically designed to find and remove duplicate files. These tools often provide advanced scanning capabilities, allowing you to search for duplicates based on file content, size, and other criteria. Some popular duplicate file finder tools include CCleaner, Duplicate Cleaner, and Auslogics Duplicate File Finder.
When removing duplicate files, exercise caution and ensure that you are not accidentally deleting important or unique files. It’s a good practice to back up your data before performing any deletions to minimize the risk of data loss.
By regularly removing duplicate files, you can free up significant disk space, improve system performance, and keep your files organized. Removing duplicates helps streamline your storage, making it easier to find and manage your files on your Windows 10 computer.
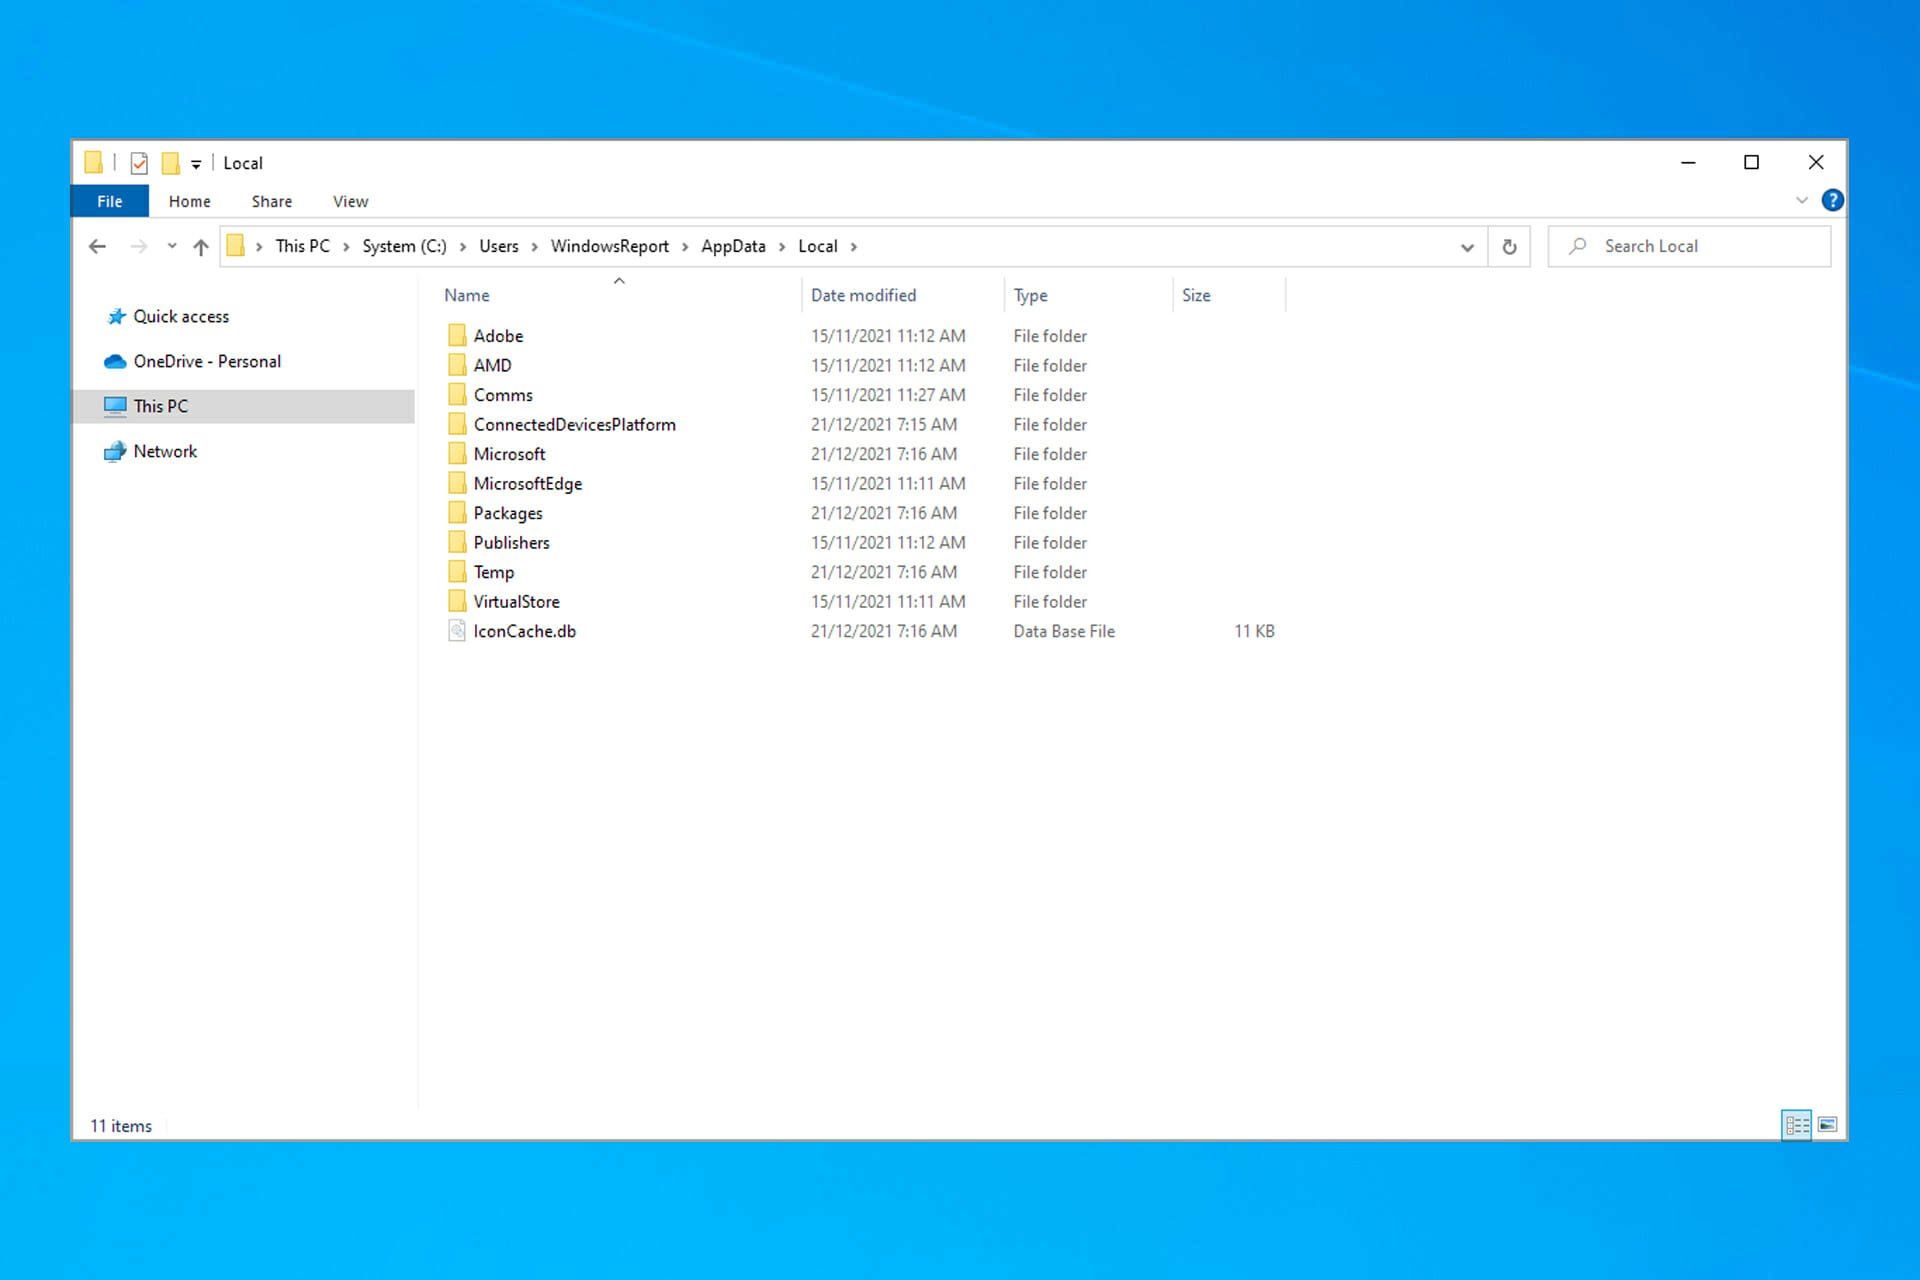
Delete System Files
Deleting unnecessary system files is an effective way to free up disk space and optimize your Windows 10 computer. System files can accumulate over time and consume valuable storage, and removing them can help improve performance and create more room for essential files and applications.
Before you begin deleting system files, it’s important to exercise caution and ensure that you are not deleting critical files necessary for the proper functioning of your operating system. It’s recommended to create a backup or restore point before making any system file deletions.
To delete system files on your Windows 10 computer, follow these steps:
- Open File Explorer by pressing the Windows key + E on your keyboard.
- Navigate to the drive where Windows is installed (usually the C: drive).
- Click on the “Windows” folder to open it.
- Inside the Windows folder, look for folders named “Temp“, “Prefetch“, or “SoftwareDistribution“.
- Right-click on each folder and select “Delete” from the context menu.
- Confirm the deletion when prompted.
Deleting temporary files and other unnecessary system files can help free up disk space significantly. Windows will automatically recreate necessary files as needed, so deleting these temporary files will not harm system functionality.
It’s worth noting that there may be other system files in different folders that can be safely deleted. However, it’s advisable to exercise caution and only delete files that you are certain are no longer necessary. If you are unsure about a particular system file, it’s best to leave it untouched.
Regularly deleting unnecessary system files helps keep your Windows 10 computer clean and optimized. It not only improves storage capacity but also enhances system performance by removing unnecessary clutter from your operating system.
Disable Windows Search Indexing
Windows Search Indexing is a feature in Windows 10 that creates an index of files on your computer, allowing for faster file searches. While this feature can be helpful, it can also consume significant system resources and take up disk space. If you rarely use the search function or prefer to sacrifice search speed for improved performance, you may consider disabling Windows Search Indexing.
To disable Windows Search Indexing, follow these steps:
- Open the Control Panel by searching for it in the Windows search bar.
- Select the “System and Security” category.
- Under the “Administrative Tools” section, click on “Services“.
- In the Services window, locate and right-click on “Windows Search“.
- Select “Properties” from the context menu.
- In the Windows Search Properties window, select the “Startup type” drop-down menu and choose “Disabled“.
- Click “Apply” and then “OK” to save the changes.
By disabling Windows Search Indexing, the search feature on your Windows 10 computer will still work, but searches may take longer to complete as files are not indexed for faster retrieval. However, this trade-off can free up system resources and improve overall performance.
If you later decide to enable Windows Search Indexing, follow the same steps and set the “Startup type” to “Manual” or “Automatic“. This will allow the indexing service to run and create an index of your files for faster searches.
It’s important to note that disabling Windows Search Indexing may impact the speed and efficiency of file searches on your computer. If you frequently rely on the search function to find and access files, it might be beneficial to leave Windows Search Indexing enabled or consider other search alternatives, such as using third-party search tools.
Disabling Windows Search Indexing can be a viable option if you prioritize performance over the speed of file searches. By customizing your search settings, you can optimize your Windows 10 computer’s resources according to your specific needs.
Clear Browser Cache and Cookies
Clearing your browser’s cache and cookies is a simple yet effective way to free up disk space and improve browsing performance on your Windows 10 computer. As you browse the internet, your browser stores temporary files, images, and website data in its cache, as well as cookies that remember your browsing preferences. Over time, these files can accumulate and take up valuable storage space.
To clear cache and cookies on popular web browsers:
- Google Chrome: Click on the three-dot menu icon in the top-right corner, go to “More Tools“, and select “Clear browsing data“. Choose the time range and check the boxes next to “Cached images and files” and “Cookies and other site data”. Click on “Clear data“.
- Mozilla Firefox: Click on the three-line menu icon in the top-right corner, select “Options“, go to the “Privacy & Security” tab, and click on “Clear Data“. Check the boxes next to “Cookies and Site Data” and “Cached Web Content”, and click on “Clear“.
- Microsoft Edge: Click on the three-dot menu icon in the top-right corner, go to “Settings“, click on “Privacy, search, and services“, and under “Clear browsing data“, click on “Choose what to clear“. Check the boxes next to “Cached data and files” and “Cookies and other site data”, and click on “Clear“.
Clearing cache and cookies will remove temporary files and data that websites store on your computer. This can help improve browsing speed, resolve website loading issues, and ensure you have the most up-to-date content.
It’s important to note that clearing cookies will sign you out of websites and remove any saved preferences or settings associated with those sites. However, it can also enhance your privacy by clearing stored login information and tracking data.
Regularly clearing cache and cookies is a good practice to keep your browser running smoothly and prevent excessive storage usage. It not only optimizes your Windows 10 computer’s performance but also ensures a more secure and private browsing experience.
Disable Windows Update Files
Windows Update automatically downloads and installs updates to keep your Windows 10 computer secure and up to date. While it’s important to regularly update your system, the downloaded update files can accumulate over time and consume a significant amount of disk space. If you prefer to manage updates manually or have limited storage capacity, you can disable the automatic downloading of Windows Update files.
To disable Windows Update files on your Windows 10 computer, follow these steps:
- Open the Settings app by pressing the Windows key + I on your keyboard.
- Select the “Update & Security” category.
- In the left-hand menu, click on “Windows Update“.
- Click on “Advanced options“.
- Under the “Choose how updates are installed” section, click on “Automatic (recommended)“.
- Select the “Notify to schedule restart” option.
- Close the Settings app.
By changing the default update setting to “Notify to schedule restart,” your Windows 10 computer will no longer automatically download and install updates. Instead, you will receive notifications when updates are available, allowing you to choose when to initiate the update process.
It’s important to note that while disabling automatic updates can free up disk space, it’s crucial to stay vigilant with installing necessary security updates and patches. Regularly check for updates manually by opening the Settings app, navigating to “Update & Security“, and clicking “Check for updates“.
Alternatively, if you want to free up disk space by removing previously downloaded Windows Update files, you can use the built-in Disk Cleanup tool. Open the Disk Cleanup tool, select the drive where Windows is installed (usually the C: drive), and check the box next to “Windows Update Cleanup“. Click “OK” to remove the accumulated update files.
Managing Windows Update files can provide you with more control over your system’s storage usage while still ensuring your Windows 10 computer remains secure and updated.
Conclusion
By following the various methods outlined in this guide, you can effectively free up disk space and optimize the performance of your Windows 10 computer. From deleting unnecessary files and uninstalling unwanted programs to managing system restore points and disabling Windows Search Indexing, each strategy plays a role in optimizing storage and enhancing system efficiency.
Regularly clearing cache and cookies, utilizing cloud storage services, and removing duplicate files are additional steps that can further streamline your storage and organization. Disabling unnecessary features like Windows Search Indexing and automatic Windows Update downloads can also help reclaim valuable disk space and allow for more manual control over system processes.
Remember to exercise caution when making changes to your system, such as deleting system files or disabling critical functions. Always make sure to back up important files and create restore points before performing any modifications.
Optimizing your disk space not only improves the performance of your Windows 10 computer but also ensures that you have ample storage for your essential files, programs, and media. By employing these techniques regularly, you can maintain a clutter-free and efficient system that meets your needs.