Introduction
Welcome to the world of search engine optimization (SEO) writing! In this article, we will explore the topic of optimizing the hard disk drive on Windows 10. As technology continues to advance, it is crucial to keep our devices running smoothly and efficiently. One such way to achieve this is by optimizing the hard disk drive (HDD).
Before we dive into the details, let’s define what disk optimization is. Essentially, disk optimization is the process of reorganizing and consolidating the data on your hard disk drive, making it easier and faster for your computer to access information. This can lead to improved overall system performance and faster data retrieval.
So why should you bother optimizing your hard disk drive? Well, over time, your hard disk drive can become fragmented, meaning that files are scattered across different physical locations on the disk. This fragmentation can slow down your computer, as it takes longer to retrieve data from different locations on the disk. By optimizing the hard disk drive, you can reduce fragmentation and enhance the speed and efficiency of your computer.
Now that we understand the importance of disk optimization, let’s delve into the steps to optimize the hard disk drive on Windows 10. Whether you’re a tech-savvy individual or a novice computer user, these steps are straightforward and can be easily implemented to optimize your system.
What is disk optimization?
Disk optimization is a process that involves reorganizing and consolidating the data stored on your hard disk drive (HDD) to improve the performance and efficiency of your computer. As you use your computer over time, files and data can become fragmented, meaning that they are scattered in various locations on the disk. This fragmentation can lead to slower performance and longer load times. Disk optimization aims to minimize fragmentation by rearranging the data on the disk, allowing your computer to access files more quickly and efficiently.
When your HDD becomes fragmented, it takes the computer longer to locate and retrieve data, as the system needs to access multiple physical locations on the disk. Think of it like a jigsaw puzzle where the pieces are spread out over different areas. It takes more time and effort to gather all the pieces and complete the puzzle. Similarly, when your files are fragmented, the computer has to do more work to gather all the pieces of data, resulting in slower performance.
During disk optimization, the operating system’s built-in tools analyze the content and structure of the data on your disk. It then rearranges and organizes the fragments to create contiguous blocks of data. This reorganization helps reduce the seek time, which is the time it takes for the disk head to move from one location to another. By minimizing seek time, disk optimization improves the overall efficiency of your computer.
It’s important to note that disk optimization is different from disk cleanup. Disk cleanup primarily focuses on freeing up space on your hard disk by deleting unnecessary files, while disk optimization specifically addresses the fragmentation issue.
Several factors can contribute to disk fragmentation. Continuous installation and uninstallation of software, frequent updates, and regular file modifications can all lead to fragmentation. Additionally, if you have limited free disk space, your computer may struggle to find contiguous blocks to store new files, further exacerbating fragmentation.
Regular disk optimization can provide several benefits to your computer. By reducing fragmentation, you can experience faster data access speeds, shorter boot times, quicker application launches, and improved overall system performance. It’s a simple yet effective way to ensure your computer operates at its best.
Why should you optimize your hard disk drive?
Optimizing your hard disk drive (HDD) is essential for maintaining the performance and longevity of your computer. Here are a few compelling reasons why you should prioritize disk optimization:
- Improved system performance: When your HDD becomes fragmented, it takes longer for your computer to access files and data. By optimizing the hard disk drive, you can reduce fragmentation and significantly improve the performance of your system. You’ll experience faster boot times, quicker application launches, and smoother overall operation.
- Faster data access: With a fragmented disk, the read and write heads of your hard drive have to travel to different locations to retrieve the scattered data. This increased seek time leads to slower data access. By optimizing your hard disk drive, you can minimize seek time and access files more efficiently, resulting in quicker data retrieval.
- Extended hardware lifespan: A heavily fragmented hard disk drive causes the drive to work harder to access data, which can generate more heat and put additional strain on the components. Over time, this increased wear and tear can lead to premature hardware failure. By optimizing your HDD, you reduce the workload on the drive and help extend its lifespan.
- Maximized disk space: As files become fragmented, they take up more space on the disk due to the gaps between the fragmented blocks. This reduces the amount of available free space and can limit your ability to store new files and applications. Disk optimization reorganizes the data and fills in the gaps, maximizing your usable disk space.
- Prevention of data loss: Fragmentation increases the risk of file corruption and data loss. When files are scattered across different locations on the disk, the chances of an error or malfunction occurring during data retrieval are higher. By optimizing your hard disk drive, you reduce the likelihood of data loss and ensure the integrity of your files.
It is recommended to regularly optimize your hard disk drive to maintain optimal performance. Depending on your usage, performing disk optimization once a month or every few months should suffice. By making disk optimization a regular part of your computer maintenance routine, you can enjoy a faster, more efficient, and reliable computing experience.
Steps to optimize the hard disk drive on Windows 10
Optimizing the hard disk drive on Windows 10 is a straightforward process and can be done using the built-in Disk Optimization tool. Follow these steps to optimize your hard disk drive:
- Step 1: Open the Disk Optimization tool: Press the Windows key + R on your keyboard to open the Run dialog box. Type “dfrgui” and press Enter to open the Disk Optimization tool.
- Step 2: Select the disk to optimize: In the Disk Optimization tool, you’ll see a list of available drives. Select the hard disk drive (HDD) that you want to optimize. If you have multiple drives, such as an SSD and HDD, it is recommended to focus on optimizing the HDD as SSDs do not require regular optimization.
- Step 3: Schedule optimization: By default, the Disk Optimization tool is set to run on a schedule. Check the schedule and ensure that it is set to run automatically. You can also choose to optimize the disk immediately by clicking on the “Optimize” button.
- Step 4: Manually optimize the disk: If you prefer to manually optimize the disk, you can click on the “Change settings” button in the Disk Optimization tool. This will allow you to adjust the schedule or choose to optimize the disk only when you initiate it manually.
By following these steps, you can optimize your hard disk drive and improve the performance of your Windows 10 computer. It’s important to note that the duration of the optimization process may vary depending on the size and fragmentation level of your disk. It’s recommended to avoid interrupting the optimization process to ensure its effectiveness.
Additionally, keep in mind that disk optimization may not be necessary for solid-state drives (SSDs) as they function differently than traditional hard disk drives (HDDs). SSDs do not experience the same level of fragmentation and may have built-in optimization algorithms. However, it is still a good practice to check your manufacturer’s recommendations regarding disk optimization for SSDs.
Now that you’re familiar with the steps to optimize your hard disk drive on Windows 10, you can incorporate this maintenance task into your regular computer care routine. By optimizing your disk regularly, you can ensure that your computer runs smoothly and efficiently for optimal performance.
Step 1: Open the Disk Optimization tool
Opening the Disk Optimization tool is the first step in optimizing your hard disk drive on Windows 10. Here’s how you can do it:
- Press the Windows key + R on your keyboard. This will launch the Run dialog box.
- Type “dfrgui” in the Run dialog box and press Enter. This command will open the Disk Optimization tool.
- Alternatively, you can also access the Disk Optimization tool by following these steps:
- Click on the Start menu and select “Settings”.
- In the Settings window, click on “System”.
- Under the System menu, select “Storage”.
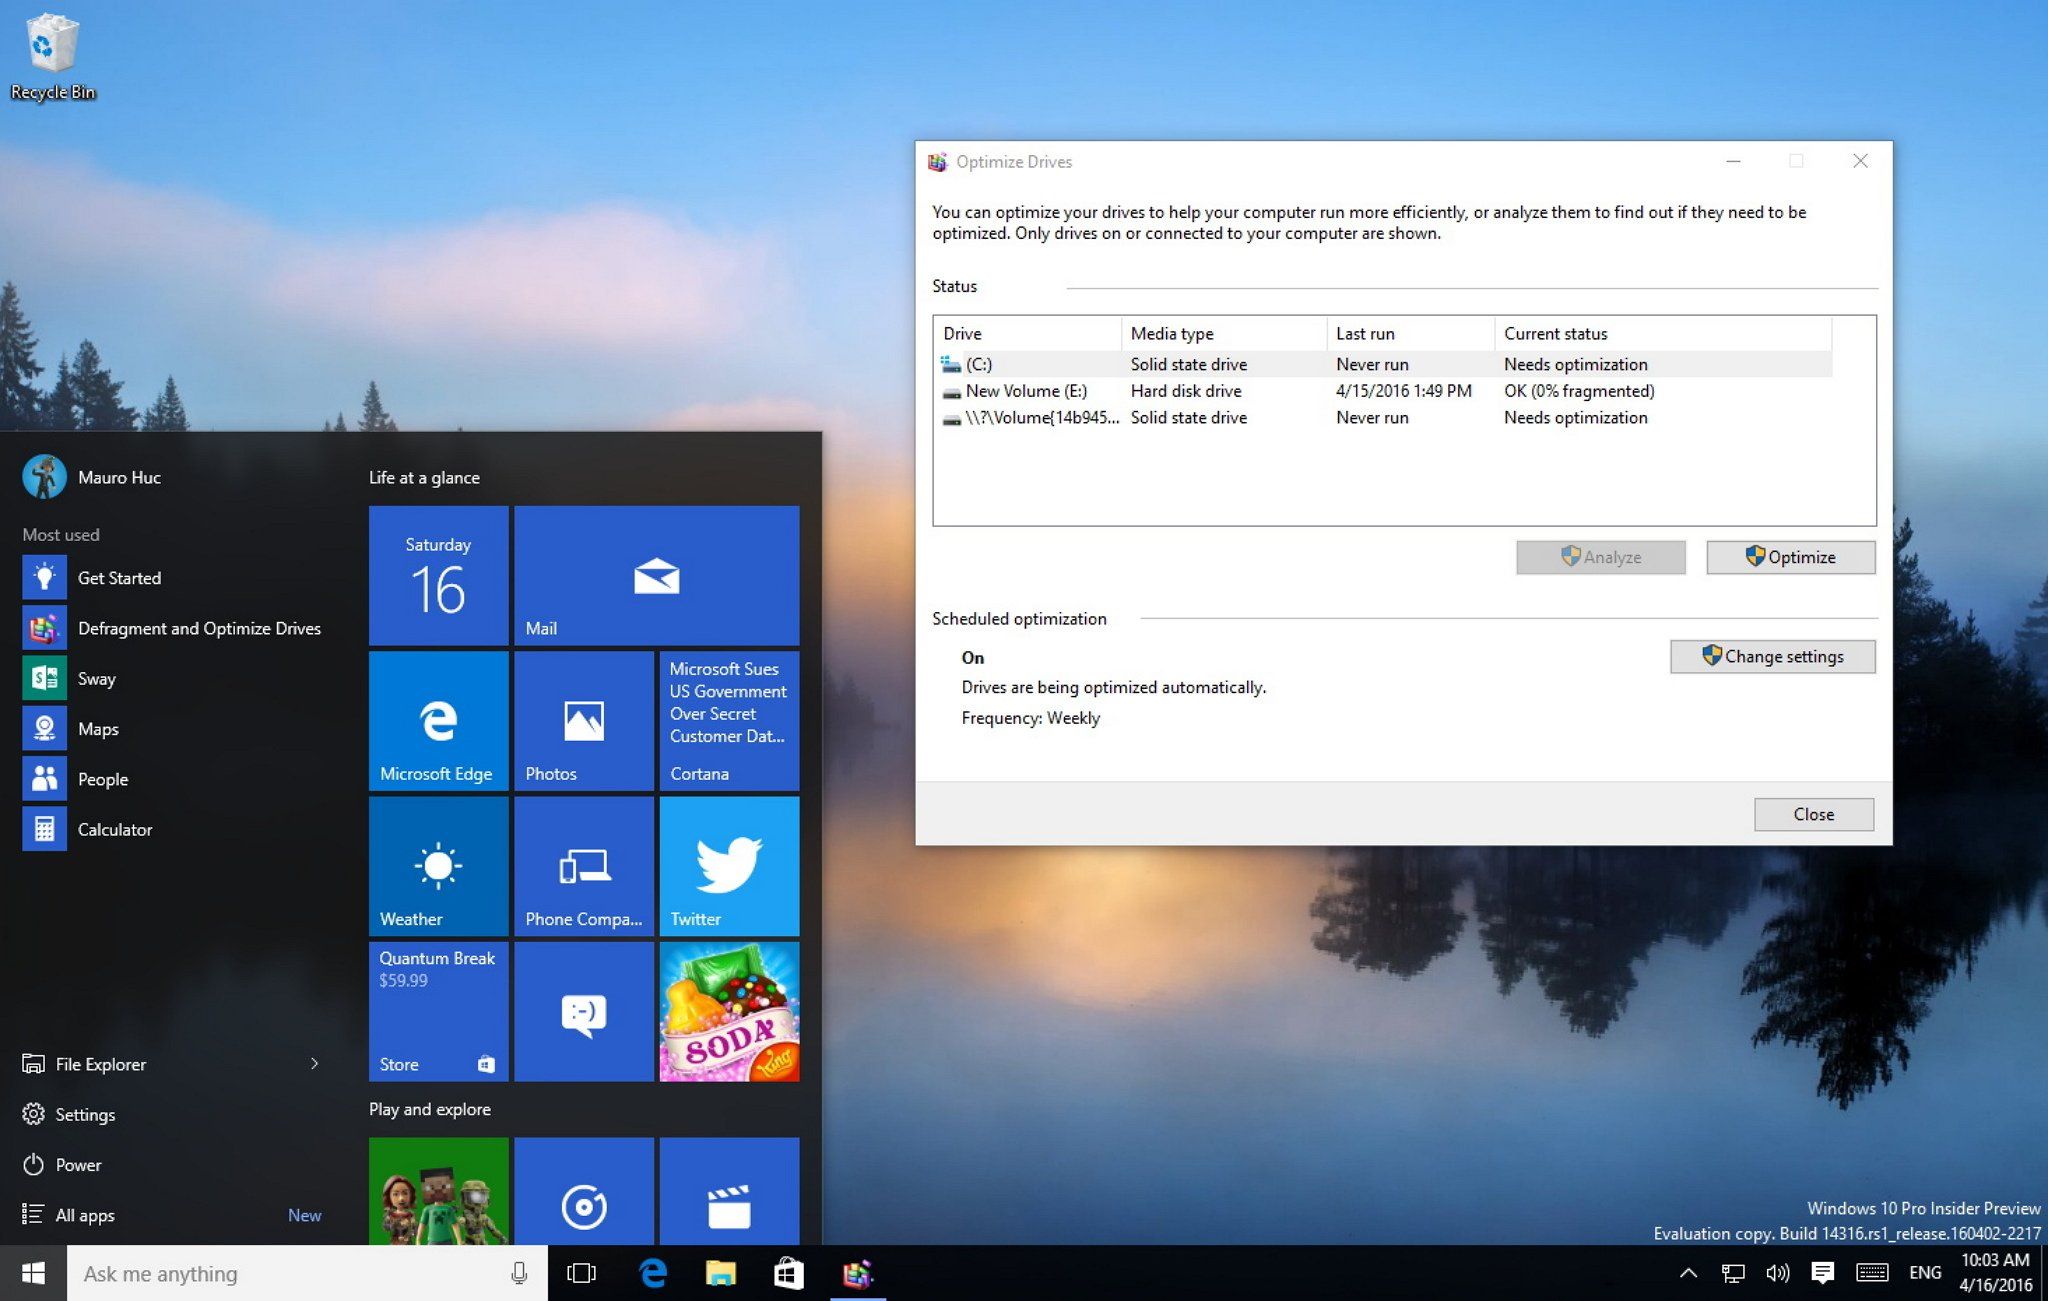
- Scroll down and click on “Optimize Drives”.
- Regardless of the method you choose, the Disk Optimization tool will open, displaying a list of available drives on your computer.
Once you have successfully opened the Disk Optimization tool, you can proceed to the next step of selecting the specific hard disk drive that you want to optimize.
It’s worth noting that the Disk Optimization tool in Windows 10 replaces the previous “Disk Defragmenter” utility and includes additional features to optimize both traditional hard disk drives (HDDs) and solid-state drives (SSDs). The tool automatically detects the type of drive and applies the appropriate optimization method.
By regularly opening the Disk Optimization tool, you can stay on top of maintaining the performance of your hard disk drive and ensure that your files are organized for efficient data access.
Step 2: Select the disk to optimize
Once you have opened the Disk Optimization tool in Windows 10, the next step is to select the specific hard disk drive (HDD) that you want to optimize. Follow these instructions to proceed:
- In the Disk Optimization tool window, you will see a list of available drives on your computer.
- Select the hard disk drive (HDD) that you want to optimize. If you have multiple drives, such as an SSD and HDD, it is recommended to focus on optimizing the HDD. Solid-state drives (SSDs) operate differently and generally do not require regular optimization.
- If you are unsure which drive to select, you can check the “Media Type” column in the Disk Optimization tool. This column will indicate whether a drive is a hard disk drive (HDD) or a solid-state drive (SSD).
- Take note that the Disk Optimization tool provides information about each drive, including its status, media type, and the last time it was optimized. This information can help you make an informed decision when selecting the drive to optimize.
Choosing the correct drive to optimize is important to ensure that the optimization process focuses on the appropriate disk and delivers the desired performance improvements. By selecting the specific hard disk drive that you want to optimize, you can improve its efficiency and reduce fragmentation, leading to faster data access speeds and smoother overall system performance.
Remember to regularly check the Disk Optimization tool to see if any drives require optimization. This will help you stay proactive in maintaining the performance of your hard disk drives and keeping your computer running at its best.
Step 3: Schedule optimization
After selecting the hard disk drive (HDD) that you want to optimize in the Disk Optimization tool, the next step is to schedule the optimization process. Follow these steps to schedule the optimization:
- Within the Disk Optimization tool, you will find a list of the available drives and their current optimization status.
- Check the schedule settings to ensure that the Disk Optimization tool is set to run automatically. By default, Windows 10 is configured to automatically optimize drives on a weekly schedule.
- If you wish to adjust the schedule, click on the “Change settings” button in the Disk Optimization tool. This will open the Optimize Drives window where you can modify the optimization schedule.
- In the Optimize Drives window, you can choose to modify the frequency at which optimization occurs by selecting a different time interval from the drop-down menu. Options include daily, weekly, or monthly optimization.
- Additionally, you can choose to optimize the drives only when the computer is idle. This option ensures that the optimization process runs in the background without interrupting your work.
- If you prefer to manually initiate the optimization process, you can deselect the option to “Run on a schedule”. This allows you to optimize the drive at your convenience by clicking on the “Optimize” button within the Disk Optimization tool.
By scheduling optimization, you ensure that Windows 10 takes care of the regular maintenance tasks for optimizing your hard disk drive. This proactive approach helps to reduce fragmentation, improve overall system performance, and keep your computer running smoothly.
It’s important to note that the duration of the optimization process may vary depending on the size and fragmentation level of your hard disk drive. So, it’s advisable to let the optimization process run without interruption to ensure its effectiveness.
By following these scheduling steps, you can establish a routine for optimizing your hard disk drive on Windows 10 and ensure that your system remains efficient and responsive over time.
Step 4: Manually optimize the disk
If you prefer to have more control over the optimization process or want to optimize your hard disk drive (HDD) immediately, you can follow these steps to manually initiate the optimization:
- Open the Disk Optimization tool by pressing the Windows key + R, typing “dfrgui”, and pressing Enter. Alternatively, you can access it through the Settings menu and navigate to “Optimize Drives”.
- In the Disk Optimization tool, you will see a list of available drives on your computer.
- Select the hard disk drive (HDD) that you wish to optimize. Ensure that the drive you choose requires optimization and is not already optimized (status will be displayed in the tool).
- Click on the “Optimize” button to initiate the manual optimization process for the selected drive.
- Allow the disk optimization process to complete without interruption. The duration of the optimization depends on the size of the drive and the level of fragmentation.
- Once the optimization is finished, you can close the Disk Optimization tool. Your hard disk drive will now be more organized and efficient, leading to improved performance.
By manually initiating the optimization process, you can optimize your hard disk drive at your convenience, ensuring that it fits into your schedule and meets your specific requirements. This approach is particularly useful if you notice a significant decrease in performance or if you have recently made substantial changes to your files or applications.
Remember that regular disk optimization is crucial for maintaining the performance of your HDD. It is recommended to optimize your hard disk drive once a month or every few months, depending on your usage and the fragmentation level of the drive.
By following these steps to manually optimize your disk, you can take proactive measures to keep your hard disk drive in optimal condition, resulting in faster data access and a smoother computing experience.
Additional tips for disk optimization
While using the Disk Optimization tool is an effective way to optimize your hard disk drive (HDD) on Windows 10, here are some additional tips that can further enhance the optimization process:
- Keep your HDD defragmented: In addition to using the Disk Optimization tool, try to minimize fragmentation by regularly organizing your files. Avoid constantly creating, modifying, and deleting large files, as this can lead to increased fragmentation. It’s good practice to periodically clean up unnecessary files and folders.
- Ensure sufficient free disk space: Aim to have ample free disk space on your HDD. When a drive becomes nearly full, it can impede the optimization process and make it difficult to defragment files. A general rule of thumb is to maintain at least 15-20% free disk space. Consider moving large or infrequently accessed files to an external storage device.
- Disable automatic defragmentation for SSDs: While the Disk Optimization tool is SSD-aware and will not defragment solid-state drives (SSDs), it’s a good idea to double-check the automatic defragmentation settings. SSDs have a limited number of read/write cycles, and frequent defragmentation can unnecessarily consume those cycles. Ensure that automatic defragmentation is disabled for all SSDs.
- Consider third-party optimization software: Although the built-in Disk Optimization tool is sufficient for most users, there are third-party disk optimization software options available that provide additional features and customization. Do thorough research and read reviews before selecting any third-party optimization software to ensure it is reputable and compatible with your system.
- Keep your operating system and drivers up to date: Regularly update your operating system and device drivers as new updates often include performance enhancements and bug fixes. Having an up-to-date system can contribute to a smoother optimization process and overall improved performance.
By following these additional tips, you can maximize the effectiveness of your disk optimization efforts and keep your hard disk drive performing at its best. Remember that disk optimization is an ongoing process, and regular maintenance is key to maintaining the efficiency of your HDD and ensuring a seamless computing experience.
Conclusion
Optimizing the hard disk drive (HDD) on your Windows 10 computer is an essential maintenance task that can significantly improve system performance. By reducing fragmentation and organizing data more efficiently, disk optimization allows for faster data access, shorter load times, and an overall smoother user experience.
In this article, we explored the steps to optimize the hard disk drive on Windows 10. We learned how to open the Disk Optimization tool, select the specific drive to optimize, schedule automatic optimizations, and manually initiate the optimization process. These steps provide the foundation for maintaining the performance of your HDD over time.
Additionally, we discussed the importance of disk optimization and how it contributes to improved system performance, extended hardware lifespan, maximized disk space, and prevention of data loss. Regular disk optimization helps ensure that your computer runs efficiently, reducing the risk of hardware failures and data corruption.
Furthermore, we provided some additional tips for disk optimization, such as keeping your HDD defragmented, maintaining sufficient free disk space, disabling automatic defragmentation for SSDs, considering third-party optimization software, and keeping your operating system and drivers up to date.
By incorporating these tips and following the steps outlined in this article, you can keep your hard disk drive optimized, resulting in a faster and more reliable computing experience.
So, take some time to optimize your hard disk drive today and enjoy the benefits of a more efficient and responsive system.