Introduction
Windows 10 is a popular operating system used by millions of people around the world. While it offers numerous features and improvements over its predecessors, some users may experience sluggish performance, leading to frustration and decreased productivity. If you find yourself wondering, “Why is my computer so slow on Windows 10?” you’re not alone.
There can be various factors contributing to the slow performance of your Windows 10 computer. Identifying the root cause is essential in order to implement effective solutions and restore your computer”s speed and efficiency. This article will explore the common reasons behind slow performance and provide tips to speed up Windows 10.
Whether you are using a desktop or laptop, understanding the potential causes can help you troubleshoot the issue and ensure that your computer runs smoothly and optimally.
It is important to note that the solutions provided in this article are primarily focused on improving software-related performance issues. If you suspect that your hardware components, such as the processor or hard drive, may be causing the slowdown, it is advisable to consult with a professional IT technician for further assistance.
Reasons for Slow Performance in Windows 10
There are several common reasons that can contribute to slow performance in Windows 10. Understanding these factors will help you identify the underlying issues and implement appropriate solutions. Let’s explore these reasons in more detail:
- Insufficient Memory (RAM): One of the primary reasons for a slow computer is insufficient memory, also known as RAM. When your system doesn’t have enough memory to handle multiple tasks and applications, it can result in sluggish performance. Windows 10 requires a minimum of 4GB of RAM to function smoothly, and having more RAM can further improve performance.
- High CPU Usage: If your computer’s CPU usage is consistently high, it can cause your system to slow down. This can happen due to resource-intensive applications, background processes, or malware. To identify and resolve high CPU usage, you can use the Task Manager to monitor and close any unnecessary programs or processes.
- Fragmented Hard Drive: Over time, files on your hard drive can become fragmented, meaning that they are scattered in separate locations. This can lead to longer load times and overall slow performance. Running a disk defragmentation tool can rearrange the files on your hard drive, improving access times and overall system speed.
- Outdated Drivers: Outdated or incompatible device drivers can significantly impact system performance. It is crucial to regularly update your drivers to ensure that they are compatible with the latest Windows 10 updates and optimize system performance. You can check for driver updates through the Device Manager or by visiting the manufacturer’s website.
- Malware and Virus Infections: Malware and viruses can not only compromise your data but also slow down your computer. They can consume system resources and interfere with various processes, causing a noticeable decrease in performance. Running a comprehensive antivirus scan and regularly updating your security software can help detect and remove any malicious programs.
These are just a few of the common reasons for slow performance in Windows 10. Other factors like excessive startup programs, hard drive errors, and system overheating can also contribute to a sluggish computer. In the following sections, we will explore methods to speed up Windows 10 and improve overall system performance.
Insufficient Memory (RAM)
One of the primary reasons for a slow computer is insufficient memory, also known as RAM. RAM is responsible for temporarily storing data that the operating system and applications need to access quickly. When your system doesn’t have enough memory to handle multiple tasks and applications, it can result in sluggish performance.
In Windows 10, the minimum recommended RAM is 4GB for smooth operation. However, if you frequently use resource-intensive applications or engage in multitasking, having more RAM can significantly improve performance.
To check your current RAM usage, you can open the Task Manager by pressing Ctrl + Shift + Esc and navigate to the “Performance” tab. Look for the “Memory” section to see how much memory is being used. If it is consistently close to or at maximum capacity, your computer may benefit from additional RAM.
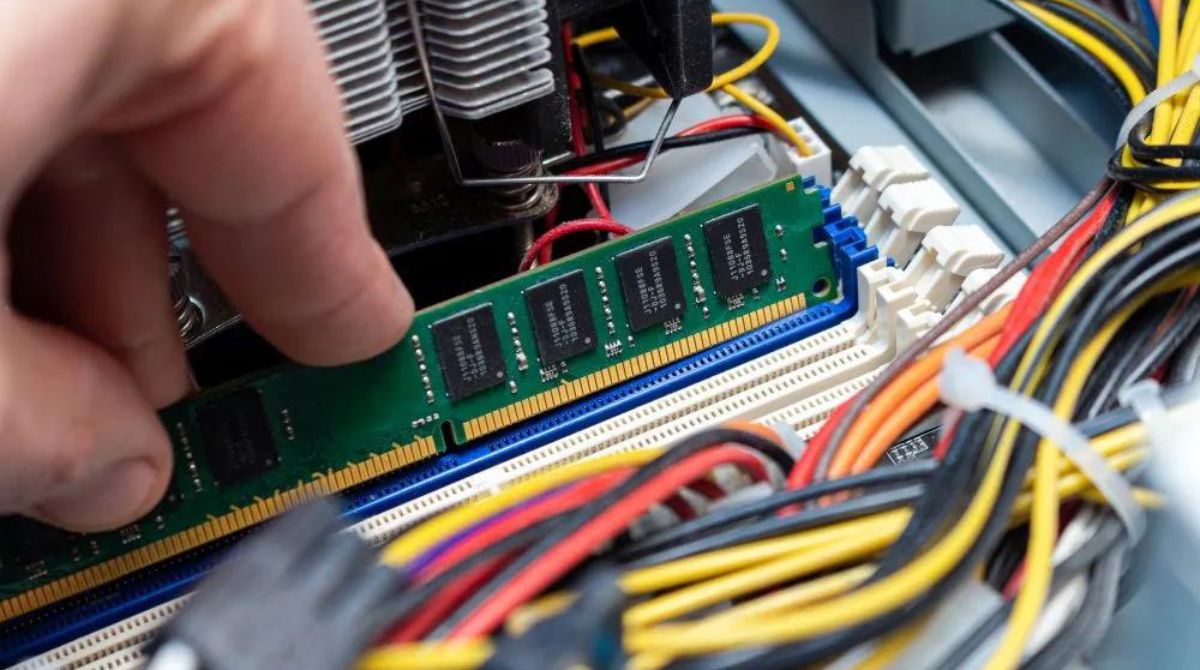
Upgrading your RAM can be a cost-effective way to enhance your computer’s performance. Before purchasing new RAM, ensure that you know the maximum amount your computer can support and the type of RAM it requires (e.g., DDR3 or DDR4). You can usually find this information in your computer’s user manual or by checking the manufacturer’s website.
Installing RAM is a relatively straightforward process. First, power off your computer and unplug it from the wall. Open your computer’s case by removing the screws or latches, then locate the RAM slots on the motherboard. Insert the new RAM modules carefully, ensuring they’re aligned and properly seated. Once the installation is complete, close the case and power on your computer.
After installing new RAM, your computer should experience improved performance, allowing for smoother multitasking and faster application loading times. The additional memory will provide more headroom for your operating system and programs, reducing the need for constant data swapping between the RAM and the hard drive.
It’s important to note that while adding more RAM can improve performance, it may not solve all performance issues if other factors, such as high CPU usage or malware, are also present. Therefore, it is recommended to address any other potential issues in conjunction with upgrading your RAM for optimal results.
High CPU Usage
High CPU usage can significantly impact your computer’s performance and lead to a slow system. When your CPU is operating at or near its maximum capacity, it struggles to handle the tasks and processes required by your operating system and applications, resulting in sluggish performance and delayed response times.
There are several factors that can lead to high CPU usage, including:
- Resource-Intensive Applications: Some applications, particularly those that require a significant amount of processing power, can cause your CPU usage to spike. This is often the case with programs like video editing software, 3D rendering applications, and gaming platforms. While it is expected for these programs to push your CPU to its limits, if your CPU usage remains high even when idle or during basic tasks, it may be worth investigating further.
- Background Processes: Many applications and processes run in the background even when you’re not actively using them. These background processes can consume a significant amount of CPU resources and impact system performance. To identify and close unnecessary background processes, open the Task Manager (press Ctrl + Shift + Esc) and navigate to the “Processes” tab. Look for processes that are consuming a high percentage of CPU resources and consider closing them.
- Malware or Virus Infections: Malicious software can also cause high CPU usage by running unauthorized processes and consuming system resources. If you suspect that malware or a virus may be the cause of high CPU usage, it is crucial to run a thorough antivirus scan to detect and remove any harmful programs.
To monitor your CPU usage, open the Task Manager and navigate to the “Performance” tab. Look for the “CPU” section to see the real-time CPU usage graph. Ideally, your CPU usage should be within a reasonable range, typically below 80% during normal usage.
There are several steps you can take to address high CPU usage:
- Update or Disable Resource-Intensive Applications: If certain applications are consistently causing high CPU usage, consider updating them to the latest version or disabling any unnecessary features or plugins.
- Clean Boot: Performing a clean boot can help identify if a third-party program or service is causing high CPU usage. This involves starting your computer with only essential services and processes, allowing you to pinpoint the culprit. Instructions for performing a clean boot can be found on Microsoft’s support website.
- Scan for Malware: Regularly scanning your computer for malware and viruses is essential. Use reputable antivirus software to perform a thorough scan and remove any detected threats.
- Limit Startup Programs: Many programs automatically launch during system startup, causing unnecessary strain on your CPU. Limit the number of programs that start automatically by opening the Task Manager, navigating to the “Startup” tab, and disabling any unnecessary programs.
By addressing high CPU usage, you can significantly improve your computer’s performance and ensure a smoother and more responsive experience.
Fragmented Hard Drive
Over time, files on your hard drive can become fragmented, meaning that they are scattered across different locations. This can occur when you frequently add, modify, or delete files, causing gaps to form between data blocks. When your hard drive is fragmented, it takes longer for the operating system to access and retrieve the data, resulting in slower performance.
To check if your hard drive is fragmented, you can use the built-in Windows Disk Defragmenter tool. Simply follow these steps:
- Open the Start menu and search for “Defragment and Optimize Drives”.
- Click on the search result to open the Defragment and Optimize Drives utility.
- Select the drive you want to defragment (typically the C: drive where the operating system is installed).
- Click on the “Analyze” button to determine the level of fragmentation on the drive.
- If the analysis shows a significant level of fragmentation, click on the “Optimize” button to start the defragmentation process.
- Wait for the utility to complete the defragmentation process, which can take a while depending on the size and fragmentation level of your drive.
Defragmenting your hard drive rearranges the fragmented files, placing them closer together and reducing the time it takes for the operating system to retrieve data. This can lead to improved performance and faster file access times.
It’s worth noting that Windows 10 automatically defragments your hard drive by default on a regular basis. However, if you frequently add, modify, or delete large files, it is advisable to manually defragment your hard drive to ensure optimal performance.
While the Disk Defragmenter tool in Windows 10 is sufficient for most users, if you require more advanced features and control over the defragmentation process, there are third-party defragmentation software options available as well.
It is recommended to defragment your hard drive periodically, especially if you notice a significant decrease in system performance. This process can help optimize your hard drive and improve overall speed and responsiveness.
Outdated Drivers
Outdated or incompatible device drivers can significantly impact the performance of your Windows 10 computer. Drivers act as a bridge between the operating system and your hardware components, allowing them to communicate effectively. When drivers become outdated, they may not be able to handle newer software updates or use hardware efficiently, resulting in decreased performance and functionality.
Common signs of outdated drivers include slow system response, frequent crashes or errors, and hardware components not working correctly.
Here are steps you can take to address outdated drivers:
- Windows Update: Windows 10 regularly checks for driver updates and installs them automatically through Windows Update. It is essential to keep your system updated by installing the latest Windows updates. To check for updates, open the Settings app, go to “Update & Security”, and click on “Check for updates”.
- Device Manager: The Device Manager in Windows 10 allows you to manage and update drivers manually. To access the Device Manager, right-click on the Start button, select “Device Manager” from the menu, and expand the categories to locate the device for which you want to update the driver. Right-click on the device and select “Update driver”. You can choose to search for drivers automatically or browse your computer for driver software.
- Manufacturer’s Website: If Windows Update or the Device Manager does not provide the latest driver updates, you can visit the manufacturer’s website for your hardware component and download the drivers directly from there. Locate the support or downloads section of the website, enter the model number or product name of your device, and download the appropriate drivers for your operating system.
- Driver Update Software: Alternatively, you can use third-party driver update software that can scan your computer’s hardware and automatically update outdated drivers. Popular options include Driver Booster, Driver Easy, and Snappy Driver Installer.
Regularly updating your drivers can resolve compatibility issues, patch security vulnerabilities, and improve overall system performance. It is recommended to check for driver updates periodically, especially after major Windows updates or when you notice any performance-related issues.
Remember to only download drivers from reputable sources, such as the manufacturer’s official website or trusted driver update software. Installing drivers from unreliable sources can lead to compatibility issues or even malware infection.
By keeping your drivers up to date, you can ensure that your hardware components are functioning optimally and that your Windows 10 computer operates at its best performance level.
Malware and Virus Infections
Malware and viruses are a common cause of slow performance in Windows 10. These malicious programs can infect your computer through various means, such as unsafe downloads, malicious email attachments, or insecure websites. Once infected, they can consume system resources, interfere with normal processes, and compromise your personal information.
Here are some signs that your computer may be infected with malware or viruses:
- Slow system performance, including longer boot times and delayed program launches.
- Frequent system crashes or freezes.
- Unauthorized changes to your homepage or default search engine.
- Unusual pop-up ads or redirecting web pages.
- Unexplained high network activity.
To protect your Windows 10 computer from malware and viruses and restore its performance, follow these steps:
- Install Antivirus Software: Install reputable antivirus software on your computer and keep it up to date. Good antivirus software should include real-time scanning, automatic updates, and regular system scans.
- Perform Full System Scan: Run a full system scan regularly to detect and remove any malicious programs. Schedule automatic scans to ensure continuous protection.
- Update Operating System and Software: Keep your Windows 10 operating system and other software updated with the latest security patches. Manufacturers release these updates to address vulnerabilities that malware can exploit.
- Exercise Safe Browsing Habits: Be cautious when browsing the internet and avoid downloading files or visiting unknown websites. Be skeptical of email attachments from unfamiliar senders and be wary of clicking on suspicious links.
- Use a Firewall: Enable the built-in Windows Firewall or use a third-party firewall to prevent unauthorized access to your computer and network.
- Regularly Back up Your Data: Create regular backups of your important files and documents in case your computer becomes infected. This ensures that you can restore your data even if it is compromised.
If you suspect that your computer is infected with malware or viruses, and your antivirus software cannot remove them, consider seeking assistance from a professional IT technician who can guide you through the removal process.
By implementing these measures and practicing safe online behavior, you can help protect your Windows 10 computer from malware and viruses, maintaining its performance and safeguarding your personal information.
Startup Programs and Background Processes
Having too many startup programs and background processes running on your Windows 10 computer can contribute to slow performance. Startup programs are applications that automatically launch when you boot up your computer, while background processes are programs that run in the background, even when you’re not actively using them.
Here are some reasons why too many startup programs and background processes can impact system performance:
- Resource Consumption: Each program or process running on your computer consumes system resources, such as CPU, memory, and disk usage. When numerous programs are running simultaneously, it can strain your system and lead to slow performance.
- Delayed Boot Time: Having a long list of startup programs can significantly increase the time it takes for your computer to boot up. This can be frustrating, especially if you’re eager to start using your computer quickly.
- Background Updates and Scans: Some programs will run background processes to check for updates or perform scheduled scans. While these processes can be useful, they can also impact system performance if they are too frequent or resource-intensive.
To improve system performance by managing startup programs and background processes, follow these steps:
- Disable Unnecessary Startup Programs: Open the Task Manager by pressing Ctrl + Shift + Esc. Navigate to the “Startup” tab and review the list of programs set to launch during startup. Right-click on any program you want to disable and select “Disable”. Be cautious not to disable critical system processes.
- Manage Background Processes: Open the Task Manager and navigate to the “Processes” tab. Review the list of processes and identify any that are unnecessarily consuming system resources. Right-click on the selected process and choose “End Task” to stop it. Exercise caution when ending processes to avoid terminating essential system functions.
- Configure Automatic Updates: Some programs have options to adjust the frequency of automatic updates or scans. Open the settings for each program and customize the update or scan schedule according to your preferences. Consider setting updates to occur during non-working hours to minimize disruption.
- Uninstall Unnecessary Programs: Review the list of installed programs on your computer and uninstall any that you no longer use or need. This can free up valuable system resources and improve performance.
Regularly reviewing and managing startup programs and background processes is essential for optimizing system performance. By reducing the number of resource-intensive programs and processes, you can ensure that your computer operates more efficiently and responds more quickly to your commands.
Hard Drive Errors
Hard drive errors can contribute to slow performance and system instability on your Windows 10 computer. These errors can occur due to various factors, including power outages, improper shutdowns, physical damage, or software-related issues. When your hard drive contains errors, it can lead to slower read and write speeds, data corruption, and even system crashes.
Here are some common hard drive errors that can impact performance:
- Bad Sectors: A bad sector is a portion of a hard drive that is physically damaged or unable to hold data. When your hard drive has too many bad sectors, it can result in slow read and write operations, as well as potential data loss.
- File System Corruption: File system corruption can occur when there are issues with how files are organized and stored on your hard drive. This can lead to slow file access times, program crashes, and difficulty in retrieving or saving data.
- Disk Errors: Disk errors can manifest in various ways, including frequent system freezes, unexpected restarts, or the infamous “blue screen of death” (BSOD). These errors can be caused by physical damage to the hard drive or issues with file system structures.
To address hard drive errors and improve performance, you can follow these steps:
- Check Disk Utility: Windows 10 includes a built-in Check Disk utility that can scan your hard drive for errors and attempt to correct them. Open the Command Prompt as an administrator by right-clicking on the Start button and selecting “Command Prompt (Admin)”. Type the command
chkdsk C: /fand press Enter. Replace “C:” with the drive letter of the hard drive you want to check. The utility will scan the drive for errors and attempt to fix them if possible. - S.M.A.R.T. Monitoring: S.M.A.R.T. (Self-Monitoring, Analysis, and Reporting Technology) is a feature built into most modern hard drives that monitors their health and performance. You can use third-party software, such as CrystalDiskInfo, to check the S.M.A.R.T. status of your hard drive and identify any potential issues.
- Backup Important Data: Before attempting any repairs or diagnostic procedures on your hard drive, it is crucial to back up any important data to prevent potential data loss.
- Professional Assistance: If you suspect that your hard drive is physically damaged or the errors persist despite your attempts to fix them, it is recommended to seek professional assistance from a data recovery specialist or computer technician. They have the expertise and tools to diagnose and repair hard drive issues.
Regularly scanning and repairing hard drive errors can improve performance, prevent data loss, and extend the lifespan of your hard drive. It is important to address any detected errors promptly to ensure optimal system performance and reliability.
Overheating
Overheating is a common cause of slow performance and system instability in Windows 10 computers. When your computer’s internal components, such as the CPU or graphics card, become too hot, it can lead to decreased performance, unexpected shutdowns, and even permanent damage to the hardware.
Here are some reasons why overheating can impact system performance:
- Thermal Throttling: When your computer detects that its internal temperature is getting too high, it may activate a feature called thermal throttling. This reduces the performance of the CPU or other components to prevent overheating, resulting in slower processing speeds.
- System Instability: Overheating can cause system instability, leading to frequent crashes, freezes, or errors. This can disrupt your workflow and decrease productivity.
- Decreased Hardware Lifespan: Continuous exposure to high temperatures can shorten the lifespan of your computer’s hardware components. This can result in more frequent hardware failures or the need for costly repairs or replacements.
There are several factors that can contribute to overheating, including:
- Dust and Dirt Buildup: Dust and dirt can accumulate inside your computer, blocking airflow and preventing proper cooling. This can lead to increased internal temperatures and reduced performance.
- Faulty Cooling System: A malfunctioning or inadequate cooling system, including fans or heat sinks, can contribute to overheating. It is important to ensure that your computer’s cooling system is functioning correctly and providing sufficient airflow.
- Environmental Factors: Operating your computer in a hot or poorly ventilated environment can exacerbate overheating issues. It is advisable to use your computer in a cool, well-ventilated area.
To prevent overheating and improve system performance, you can take the following steps:
- Clean Out Dust and Dirt: Regularly clean the inside of your computer, including fans, heat sinks, and vents, to remove accumulated dust and dirt. Use compressed air or a soft brush to gently clean these components.
- Ensure Proper Ventilation: Place your computer on a flat, stable surface that allows for proper airflow. Avoid placing it on soft surfaces or obstructing the vents, as this can impede cooling.
- Monitor Temperatures: Use software tools, such as HWMonitor or SpeedFan, to monitor the temperatures of your computer’s components. If you notice excessively high temperatures, consider taking additional steps to mitigate overheating.
- Check Cooling System: Ensure that your computer’s cooling system, including fans and heat sinks, is functioning correctly. Clean or replace any malfunctioning components as needed.
- Consider Additional Cooling: If your computer continues to experience overheating issues, you may want to invest in additional cooling solutions, such as an external cooling pad or upgraded fans.
By addressing overheating issues, you can improve system performance, extend the lifespan of your hardware components, and enjoy a more reliable and efficient Windows 10 computer.
Tips to Speed Up Windows 10
If you’re looking to boost the speed and performance of your Windows 10 computer, there are several tips and optimizations you can implement. Here are some effective methods to speed up your Windows 10 system:
- Disable Unnecessary Startup Programs: Open the Task Manager by pressing Ctrl + Shift + Esc, go to the “Startup” tab, and disable any unnecessary programs from launching at startup. This can reduce the resources consumed during system boot-up and improve overall performance.
- Manage Visual Effects: Adjusting the visual effects settings can enhance system performance. Open the Control Panel, search for “Performance Options,” and click on “Adjust the appearance and performance of Windows”. From here, you can choose between pre-defined options or manually customize visual effects to prioritize performance.
- Remove Bloatware and Unnecessary Programs: Uninstall any pre-installed bloatware and unnecessary applications that you rarely use. Open the Settings app, go to “Apps”, and review the list of installed programs. Select any unwanted applications and click on “Uninstall”.
- Optimize Power Settings: Adjusting your power settings to prioritize performance can improve system responsiveness. Open the Control Panel, search for “Power Options,” and choose the “High Performance” power plan. However, note that this may slightly reduce battery life on laptops.
- Clean up Disk Space: Regularly clean up unnecessary files to free up disk space. You can use the built-in Windows Disk Cleanup tool or a third-party disk cleaning utility to remove temporary files, system caches, and other unnecessary data that can slow down your system.
- Perform System Maintenance: Windows 10 includes various built-in maintenance tasks that can help improve system performance. Open the Control Panel, search for “Security and Maintenance,” and click on “Maintenance”. From here, you can schedule automatic maintenance tasks, such as disk optimization and system diagnostics.
- Upgrade to an SSD: Consider upgrading your traditional hard drive to a solid-state drive (SSD). SSDs offer faster data access speeds and reduced load times, significantly enhancing overall system performance.
- Keep Windows and Drivers Updated: Install the latest Windows updates to ensure that your system benefits from bug fixes and security patches. Additionally, regularly update your device drivers for optimal compatibility and performance.
- Run System Defragmentation: In addition to disk cleanup, occasional disk defragmentation can optimize file placement and improve read/write speeds. Use the built-in Windows Defragment and Optimize Drives tool to analyze and defragment your hard drive.
Implementing these tips can help improve the speed and performance of your Windows 10 computer. Keep in mind that the effectiveness of each tip may vary depending on your specific system configuration and usage. It’s recommended to experiment with these optimizations to find the ones that work best for you.
Conclusion
Having a slow computer can be frustrating and hinder productivity. However, by understanding the common reasons for slow performance in Windows 10 and implementing the appropriate solutions, you can significantly improve your system’s speed and efficiency.
In this article, we explored various factors that can contribute to slow performance, such as insufficient memory (RAM), high CPU usage, fragmented hard drives, outdated drivers, malware and virus infections, startup programs, hard drive errors, overheating, and more. Each of these issues can impact your computer’s performance and require specific steps to address them.
We provided tips and recommendations to tackle these issues effectively. From upgrading your RAM and managing startup programs to running antivirus scans, defragmenting your hard drive, and ensuring proper cooling, these measures can make a notable difference in the performance of your Windows 10 computer.
It’s important to note that not all solutions will work for everyone, as each computer setup is unique. It may require a combination of these tips to achieve the desired results. Additionally, regular maintenance, such as updating Windows and device drivers, cleaning up disk space, and optimizing power settings, can significantly contribute to improving overall system performance.
By implementing these recommendations and staying proactive in maintaining your Windows 10 computer, you can enjoy a faster, more responsive, and efficient computing experience. Remember to regularly review and optimize your system to ensure optimal performance for years to come.