Introduction
Windows P2P (Peer-to-Peer) settings, also known as Windows Update Delivery Optimization, are designed to help users download Windows updates and Microsoft Store apps faster. This feature allows your computer to receive updates not only from Microsoft’s servers but also from other Windows 10 devices on your local network or even from the internet. While this can be beneficial in terms of faster downloads and reduced internet bandwidth usage for Microsoft, some users may prefer to disable this feature for various reasons.
Whether it’s concerns about privacy, limited internet connectivity, or simply the desire to have more control over network usage, there are several valid reasons why you might want to turn off Windows P2P settings on your computer. In this article, we will explore various methods to disable Windows P2P settings and regain control over how your computer downloads updates.
It’s important to note that disabling Windows P2P settings will not prevent you from receiving Windows updates altogether. You will still receive updates directly from Microsoft’s servers; the difference is that your computer will not act as a distribution point for updates to other devices.
In the following sections, we will walk you through different methods to disable Windows P2P settings on your Windows 10 computer. Whether you prefer using the Control Panel, the Settings app, the Group Policy Editor, or the Registry Editor, we’ve got you covered.
What is Windows P2P Settings?
Windows P2P settings, also known as Windows Update Delivery Optimization, is a feature introduced in Windows 10 that allows users to download Windows updates and Microsoft Store apps not only from Microsoft’s servers but also from other computers on the local network or even from the internet. Essentially, it turns your computer into a distribution point for these updates, creating a peer-to-peer network of devices sharing update files.
When Windows P2P settings are enabled, your computer can receive updates and apps not only from Microsoft, but also from nearby computers that have already downloaded the updates. This helps to reduce internet bandwidth usage for Microsoft and speeds up the update process for users within the same network.
The Windows P2P feature is designed to be efficient and transparent, meaning that it operates in the background without causing any noticeable impact on your computer’s performance. It intelligently chooses the best sources (Microsoft, local network, or internet) to download updates from, based on factors like network availability and connection speed.
By default, the Windows P2P settings are set to “PCs on my local network and PCs on the internet” which means your computer can download updates from both local devices and those connected to the internet. However, you have the flexibility to choose different options depending on your preferences:
- PCs on my local network: This option allows your computer to receive updates only from devices connected to the same network. It’s useful in scenarios where you have multiple computers on a local network that can share update files with each other.
- PCs on the internet: This option allows your computer to receive updates from other devices on the internet. It expands the pool of available sources for updates, potentially speeding up the download process.
- PCs on my local network and PCs on the internet: This option is the default setting and allows your computer to receive updates from both local devices and those connected to the internet. It provides the widest range of sources for updates.
While the Windows P2P feature offers advantages in terms of faster updates and reduced internet bandwidth usage, some users may have concerns about privacy or prefer to have more control over their network usage. If you fall into these categories, you may want to disable the Windows P2P settings on your computer.
Why Turn Off Windows P2P Settings?
While Windows P2P settings can be advantageous for faster downloads and reduced internet bandwidth usage, there are several reasons why you might want to turn off this feature on your Windows 10 computer:
- Privacy Concerns: Some users may have concerns about their data being shared with other devices on the network, especially if they are connected to public networks or shared environments. Disabling Windows P2P settings ensures that your computer does not act as a distribution point for updates, providing greater control over your data privacy.
- Limited Internet Connectivity: If you have limited internet connectivity with a low data cap or a slow internet speed, Windows P2P settings may consume a significant portion of your data or bandwidth. Turning off this feature can help you conserve limited resources and ensure a smoother internet experience.
- Network Optimization: In some cases, the Windows P2P feature may cause network congestion or slow down other network activities, especially on networks with many devices. Disabling this feature can help in optimizing your network performance and ensuring a better overall user experience.
- Control over Updates: By disabling Windows P2P settings, you regain full control over how your computer downloads updates. This means that your computer will receive updates directly from Microsoft’s servers, ensuring that you are always getting the latest and most secure updates directly from the source.
- Conserving System Resources: If you find that your computer’s resources (CPU, memory, or network bandwidth) are being utilized heavily by the Windows P2P feature, disabling it can help free up these resources and improve the overall performance of your computer.
It’s important to note that disabling Windows P2P settings won’t prevent you from receiving Windows updates. You will still receive updates directly from Microsoft’s servers; the difference is that your computer will not act as a distribution point for updates to other devices.
Now that you understand the reasons why turning off Windows P2P settings can be beneficial, let’s explore different methods to disable this feature on your Windows 10 computer.
Method 1: Disabling Windows P2P Settings through the Control Panel
The Control Panel provides a straightforward method to disable Windows P2P settings on your Windows 10 computer. Follow the steps below to turn off this feature:
- Open the Control Panel by clicking on the Start menu and searching for “Control Panel”.
- In the Control Panel, select “System and Security”.
- Click on “Windows Update”.
- In the Windows Update window, click on the “Advanced options” link.
- Scroll down and click on “Choose how updates are delivered”.
- In the next window, toggle off the switch that says “Allow downloads from other PCs”.
Once you’ve completed these steps, Windows P2P settings will be disabled on your computer. This means that your computer will only download updates directly from Microsoft’s servers and will not act as a distribution point for other devices on the network.
It’s worth noting that disabling Windows P2P settings through the Control Panel will only affect the current user account. If you have multiple user accounts on your computer, you may need to repeat these steps for each account.
Now that you know how to disable Windows P2P settings through the Control Panel, let’s explore an alternative method using the Settings app.
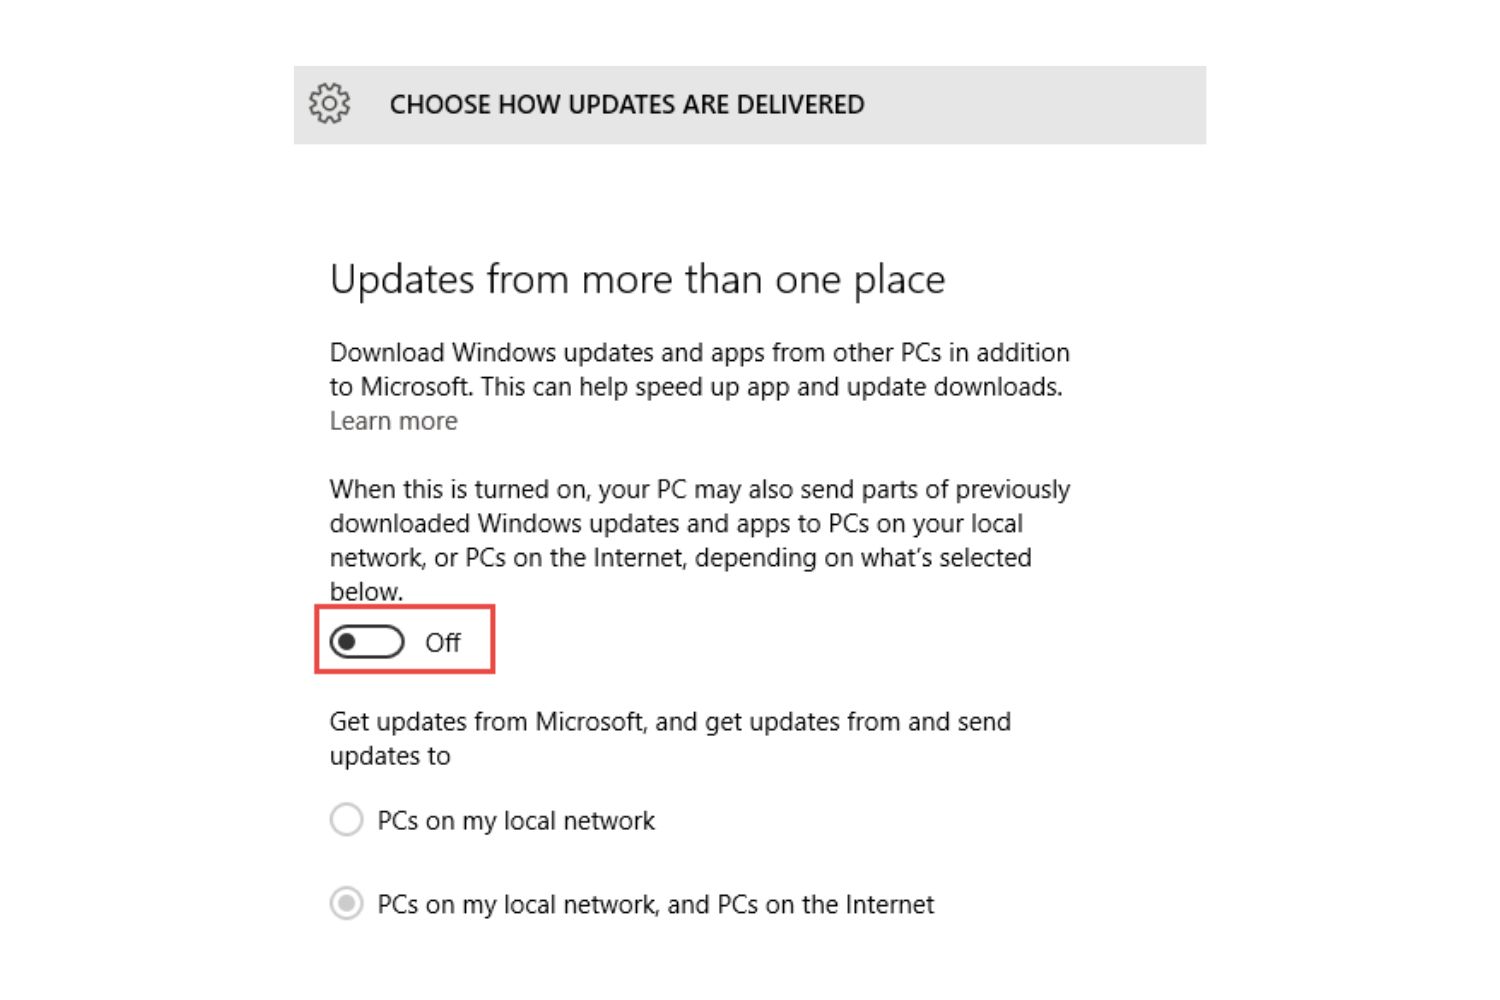
Method 2: Disabling Windows P2P Settings through the Settings App
The Settings app provides another convenient way to disable Windows P2P settings on your Windows 10 computer. Follow the steps below to turn off this feature:
- Open the Settings app by clicking on the Start menu and selecting the gear icon.
- In the Settings app, click on “Update & Security”.
- From the left sidebar, select “Windows Update”.
- In the Windows Update settings, click on “Advanced options”.
- Scroll down and click on “Delivery Optimization”.
- Under the “Allow downloads from other PCs” section, toggle off the switch.
Once you’ve completed these steps, the Windows P2P settings will be disabled on your computer. This means that your computer will only download updates directly from Microsoft’s servers and will not act as a distribution point for other devices on the network.
Similar to the Control Panel method, disabling Windows P2P settings through the Settings app will only affect the current user account. If you have multiple user accounts on your computer, you may need to repeat these steps for each account.
Now that you know how to disable Windows P2P settings through the Settings app, let’s explore an advanced method using the Group Policy Editor.
Method 3: Disabling Windows P2P Settings using Group Policy Editor
If you have a Windows 10 Pro edition, you can use the Group Policy Editor to disable Windows P2P settings. The Group Policy Editor provides more advanced configuration options for managing Windows settings. Here’s how you can use it to turn off Windows P2P settings:
- Press the Windows key + R on your keyboard to open the Run dialog box.
- Type “gpedit.msc” into the Run dialog box and press Enter. This will open the Group Policy Editor.
- In the Group Policy Editor, navigate to “Computer Configuration” > “Administrative Templates” > “Windows Components” > “Delivery Optimization”.
- Double-click on the “Allow downloads from other PCs” policy to open its properties.
- Select the “Disabled” option and click on “Apply” and then “OK”.
- Close the Group Policy Editor.
By following these steps, you have successfully disabled Windows P2P settings using the Group Policy Editor. This means that your computer will no longer act as a distribution point for updates, and it will only download updates directly from Microsoft’s servers.
Note that the Group Policy Editor is only available in the Windows 10 Pro edition. If you have a different edition, such as Windows 10 Home, you can use alternative methods mentioned earlier to disable Windows P2P settings.
Now that you know how to disable Windows P2P settings using the Group Policy Editor, let’s explore another method using the Registry Editor.
Method 4: Disabling Windows P2P Settings through Registry Editor
If you’re comfortable working with the Windows Registry, you can use the Registry Editor to disable Windows P2P settings. Here’s how you can do it:
- Press the Windows key + R on your keyboard to open the Run dialog box.
- Type “regedit” into the Run dialog box and press Enter. This will open the Registry Editor.
- In the Registry Editor, navigate to the following path:
HKEY_LOCAL_MACHINE\SOFTWARE\Policies\Microsoft\Windows\DeliveryOptimization. If the “DeliveryOptimization” key doesn’t exist, you may need to create it. - Right-click on the “DeliveryOptimization” key, select “New”, and then choose “DWORD (32-bit) Value”.
- Name the new value as
DODownloadMode. - Double-click on the
DODownloadModevalue and set its data to0. - Click on “OK” and then close the Registry Editor.
After completing these steps and restarting your computer, the Windows P2P settings will be disabled. Your computer will no longer act as a distribution point for updates, and it will only download updates directly from Microsoft’s servers.
Important: Modifying the Windows Registry can cause system instability or even render your computer inoperable if done incorrectly. It’s highly recommended to create a backup of your registry or create a system restore point before making any changes.
Now that you know how to disable Windows P2P settings through the Registry Editor, you have explored four different methods to turn off this feature on your Windows 10 computer. Choose the method that works best for you and regain control over how your computer downloads updates.
Conclusion
Windows P2P settings, also known as Windows Update Delivery Optimization, can be a useful feature for faster downloads and reduced internet bandwidth usage. However, there are various reasons why you might want to turn off this feature on your Windows 10 computer.
In this article, we explored four methods to disable Windows P2P settings: through the Control Panel, the Settings app, the Group Policy Editor, and the Registry Editor. Depending on your edition of Windows 10 and your comfort level with different tools, you can choose the method that is most suitable for you.
By disabling Windows P2P settings, you can address concerns about privacy, limited internet connectivity, network optimization, and have more control over updates and system resources.
Remember, even if you disable Windows P2P settings, you will still receive updates directly from Microsoft’s servers. Disabling this feature simply prevents your computer from acting as a distribution point for other devices on the network.
Before making any changes to your system settings, it’s always a good idea to create a backup or a system restore point to safeguard against any potential issues.
We hope this article has provided you with the information and guidance you need to disable Windows P2P settings on your Windows 10 computer. Choose the method that fits your needs and preferences, and enjoy a more personalized and controlled update experience.