Introduction
DNS, which stands for Domain Name System, is a crucial component of the internet infrastructure that translates human-readable domain names into machine-readable IP addresses. It acts as a phonebook of the internet, allowing users to access websites by simply typing in a URL instead of a complicated series of numbers.
While DNS is typically a seamless process, there are times when it can become sluggish or even fail to resolve domain names correctly. This can lead to browsing issues, slow internet speeds, and difficulties accessing certain websites. In such cases, flushing the DNS cache can often help resolve these issues and restore smooth internet connectivity.
Flushing the DNS cache essentially means clearing out all the stored domain name and IP address mappings on your Windows 10 computer, forcing it to retrieve fresh information from the DNS server. This can help resolve any conflicts or outdated entries, allowing you to access websites more efficiently.
In this article, we will explore different methods to flush the DNS cache on Windows 10 and get your internet connection running smoothly again.
What is DNS?
The Domain Name System (DNS) is a hierarchical and decentralized naming system that maps domain names to their corresponding IP addresses. It serves as an essential part of the internet infrastructure, enabling users to access websites and other online resources by using easy-to-remember domain names instead of complex IP addresses.
When you enter a URL in your web browser, such as example.com, the DNS system kicks into action. It checks the DNS cache on your computer first to see if it already has the IP address mapped to that domain name. If the information is not already stored in the cache or if it has expired, your computer communicates with a DNS server to retrieve the correct IP address.
The DNS system works in a hierarchical manner. It consists of various DNS servers, which are organized into a tree-like structure. At the top of the tree are the root DNS servers, which maintain information about the top-level domains (TLDs) such as .com, .net, and .org. Below the root servers are the authoritative DNS servers for each domain, which contain the specific IP addresses associated with the domain names.
The DNS system is crucial for the functioning of the internet as it allows for the efficient and reliable communication between devices. Without DNS, we would have to memorize and type in the IP addresses of every website we want to visit, which would be both impractical and confusing.
Overall, DNS plays a vital role in ensuring a seamless browsing experience for users and is an integral part of the internet infrastructure that we rely on every day.
Why should you flush DNS?
Over time, the DNS cache on your Windows 10 computer can become cluttered with outdated or incorrect information. This can lead to various issues such as slow internet speeds, difficulty accessing certain websites, or even complete failure to resolve domain names. Flushing the DNS cache can help resolve these problems and improve your overall internet connectivity.
Here are a few reasons why you might consider flushing your DNS cache:
- Resolve browsing issues: If you are experiencing problems accessing certain websites or encountering errors while browsing, flushing the DNS cache can help. It clears out any outdated or conflicting entries, allowing your computer to retrieve fresh DNS information for optimal website access.
- Improve internet speed: When the DNS cache becomes cluttered, it can slow down the time it takes for your computer to resolve domain names into IP addresses. By flushing the cache, you force your computer to fetch the latest DNS information, potentially resulting in faster internet speeds.
- Fix DNS-related errors: Some DNS-related errors, such as the “DNS_PROBE_FINISHED_NXDOMAIN” or “ERR_NAME_NOT_RESOLVED” errors, can be resolved by flushing the DNS cache. These errors occur when your computer fails to resolve the IP address of a domain name, and flushing the cache can help clear any issues causing these errors.
- Ensure up-to-date DNS information: Flushing the DNS cache ensures that your computer has the most recent DNS information from the DNS server. This is particularly useful when a website migrates to a new server or changes its IP address, as it allows your computer to retrieve the updated information without relying on old, cached data.
It’s important to note that flushing the DNS cache is a safe and non-destructive process. It does not affect your personal files, settings, or installed applications. Rather, it simply clears out temporary DNS data, allowing your computer to fetch fresh information when needed.
Now that we understand the benefits of flushing the DNS cache, let’s explore different methods to accomplish this on a Windows 10 computer.
How to flush DNS in Windows 10
Flushing the DNS cache in Windows 10 is a relatively simple process and can be done using various methods. In this section, we will explore three different methods to flush the DNS cache on your Windows 10 computer.
Method 1: Using Command Prompt
- Open the Command Prompt by typing “cmd” in the Windows search bar and selecting the “Command Prompt” app.
- In the Command Prompt window, type the following command and press Enter:
ipconfig /flushdns - Wait for the command to execute. Once complete, you will see a message confirming that the DNS resolver cache has been successfully flushed.
Method 2: Using Windows PowerShell
- Open the Windows PowerShell by typing “PowerShell” in the Windows search bar and selecting the “Windows PowerShell” app.
- In the PowerShell window, enter the following command and press Enter:
Clear-DnsClientCache - Wait for the command to execute. Once complete, you will receive a confirmation message that the DNS client cache has been successfully cleared.
Method 3: Using Network Connections
- Right-click on the network icon in the system tray and select “Open Network & Internet Settings.”
- In the Network & Internet Settings window, select “Change adapter options.”
- Right-click on your active network connection and select “Properties.”
- In the Properties window, scroll down and locate “Internet Protocol Version 4 (TCP/IPv4).” Select it and click on the “Properties” button.
- In the Internet Protocol Version 4 (TCP/IPv4) Properties window, click on the “Advanced” button.
- In the Advanced TCP/IP Settings window, select the “DNS” tab.
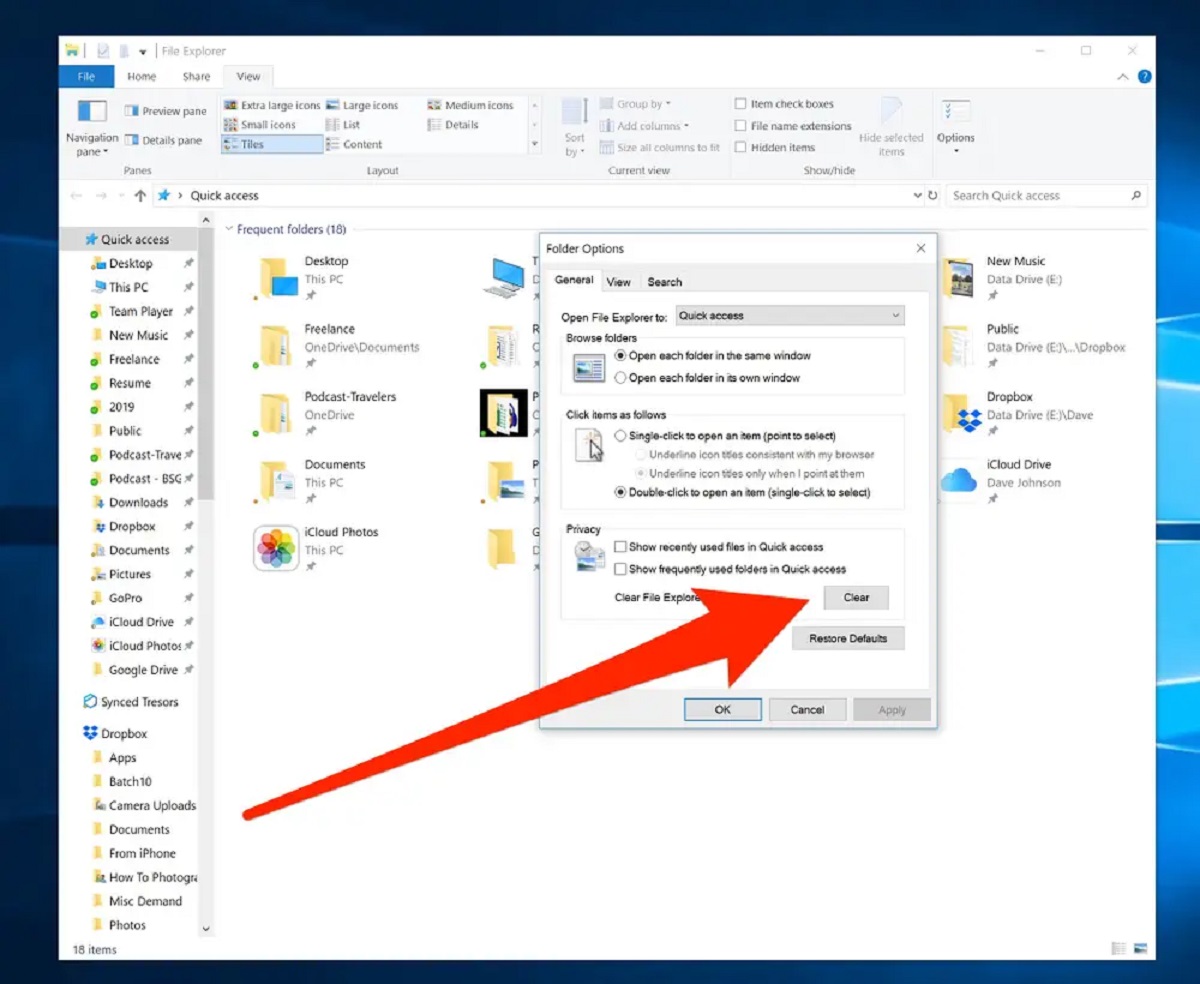
- Click on the “Clear” button next to the “DNS server addresses” section.
- Once the cache is cleared, click “OK” to close all open windows.
After following any of these methods and flushing the DNS cache, you should notice an improvement in your internet connectivity. If the issue persists, you may want to try restarting your router or contacting your internet service provider for further assistance.
Method 1: Using Command Prompt
One of the easiest ways to flush the DNS cache on your Windows 10 computer is by using the Command Prompt. Follow the steps below to complete the process:
- Open the Command Prompt by typing “cmd” in the Windows search bar and selecting the “Command Prompt” app.
- In the Command Prompt window, type the following command and press Enter:
ipconfig /flushdns - Wait for the command to execute. Once complete, you will see a message confirming that the DNS resolver cache has been successfully flushed.
The Command Prompt method is quick and efficient, making it a popular choice for flushing the DNS cache. Here’s a brief explanation of each step:
- Step 1: Opening the Command Prompt is as simple as typing “cmd” in the Windows search bar and selecting the corresponding app. This will launch a black window with a command line interface.
- Step 2: In the Command Prompt window, you need to enter the command
ipconfig /flushdnsexactly as shown. Once entered, press Enter to execute the command. - Step 3: After executing the command, the DNS resolver cache will be flushed, and you will receive a confirmation message. This message indicates that the cache has been successfully cleared, allowing your computer to retrieve fresh DNS information when needed.
With the DNS cache successfully flushed using the Command Prompt, you should notice an improvement in your internet connection and browsing experience. If you continue to experience issues, you may want to try additional methods or seek further assistance from your internet service provider.
Now that you’re familiar with the Command Prompt method, let’s explore another method using Windows PowerShell to flush the DNS cache on Windows 10.
Method 2: Using Windows PowerShell
Another method to flush the DNS cache on your Windows 10 computer is by using Windows PowerShell. Follow the steps below to complete the process:
- Open Windows PowerShell by typing “PowerShell” in the Windows search bar and selecting the “Windows PowerShell” app.
- In the PowerShell window, enter the following command and press Enter:
Clear-DnsClientCache - Wait for the command to execute. Once complete, you will receive a confirmation message that the DNS client cache has been successfully cleared.
The Windows PowerShell method offers a straightforward way to flush the DNS cache. Here’s a breakdown of each step:
- Step 1: Opening Windows PowerShell can be done by typing “PowerShell” in the Windows search bar and selecting the corresponding app. This will launch the PowerShell window.
- Step 2: In the PowerShell window, you need to enter the command
Clear-DnsClientCacheexactly as shown. Press Enter to execute the command. - Step 3: After executing the command, you will receive a confirmation message indicating that the DNS client cache has been cleared successfully. This ensures that your computer can now fetch fresh DNS information from the servers.
By using Windows PowerShell to flush the DNS cache, you can quickly resolve any DNS-related issues and improve your internet connection. If you encounter any difficulties, you may want to try alternative methods or seek assistance from your internet service provider for further troubleshooting.
Now that you’re familiar with the Windows PowerShell method, let’s explore another approach for flushing the DNS cache using Network Connections.
Method 3: Using Network Connections
If you prefer a graphical interface, you can flush the DNS cache on your Windows 10 computer using the Network Connections settings. Follow the steps below to complete the process:
- Right-click on the network icon in the system tray and select “Open Network & Internet Settings.”
- In the Network & Internet Settings window, select “Change adapter options.”
- Right-click on your active network connection and select “Properties.”
- In the Properties window, scroll down and locate “Internet Protocol Version 4 (TCP/IPv4).” Select it and click on the “Properties” button.
- In the Internet Protocol Version 4 (TCP/IPv4) Properties window, click on the “Advanced” button.
- In the Advanced TCP/IP Settings window, select the “DNS” tab.
- Click on the “Clear” button next to the “DNS server addresses” section.
- Once the cache is cleared, click “OK” to close all open windows.
By using the Network Connections method, you can easily flush the DNS cache using the graphical interface. Here’s a breakdown of each step:
- Step 1: Begin by right-clicking on the network icon located in the system tray. From the context menu, select “Open Network & Internet Settings.”
- Step 2: In the Network & Internet Settings window, choose the “Change adapter options” option. This will open the Network Connections window.
- Step 3: Right-click on your active network connection and select “Properties” from the menu.
- Step 4: In the Properties window, locate and select “Internet Protocol Version 4 (TCP/IPv4).” Click on the “Properties” button.
- Step 5: In the Internet Protocol Version 4 (TCP/IPv4) Properties window, click on the “Advanced” button.
- Step 6: In the Advanced TCP/IP Settings window, navigate to the “DNS” tab.
- Step 7: Click on the “Clear” button next to the “DNS server addresses” section. This will remove any cached DNS entries.
- Step 8: Once you have cleared the DNS cache, click “OK” to close all open windows and apply the changes.
By following these steps, you can effectively flush the DNS cache using the Network Connections method. Clearing the cache ensures that your computer retrieves fresh DNS information and helps resolve any DNS-related issues you may encounter.
Now that you’re familiar with all three methods for flushing the DNS cache on Windows 10, you can choose the one that suits you best and improve your internet connectivity.
Conclusion
Flushing the DNS cache on your Windows 10 computer can be a helpful solution to resolve various internet connectivity issues. When the DNS cache becomes cluttered or contains outdated information, it can slow down browsing speeds and cause difficulty in accessing certain websites. By following the methods outlined in this article, you can easily flush the DNS cache and improve your internet connection.
We explored three different methods to flush the DNS cache on Windows 10:
- Method 1: Using Command Prompt: This method involves opening the Command Prompt and entering the command “ipconfig /flushdns” to flush the DNS cache.
- Method 2: Using Windows PowerShell: With this method, you open Windows PowerShell and execute the command “Clear-DnsClientCache” to clear the DNS client cache.
- Method 3: Using Network Connections: This method allows you to clear the DNS cache through the Network Connections settings, accessed by right-clicking on the network icon in the system tray.
Remember, flushing the DNS cache is a safe and non-destructive process that helps ensure your computer retrieves up-to-date DNS information, enhancing your browsing experience.
If you’re experiencing slow internet speeds or encountering difficulties accessing certain websites, it’s worth considering flushing the DNS cache using one of the methods described. However, if the problems persist even after flushing the cache, you may need to troubleshoot further or seek assistance from your internet service provider.
By staying proactive and performing regular maintenance tasks like flushing the DNS cache, you can optimize your Windows 10 computer and enjoy smoother internet browsing.