Introduction
The Hosts file is a plain text file used by the Windows operating system to map IP addresses to corresponding domain names. It acts as a local DNS (Domain Name System) resolver, allowing you to control and override the default DNS resolution of your computer. By modifying the Hosts file, you can redirect website traffic, block access to certain websites, or create custom DNS entries.
In Windows 10, finding and editing the Hosts file may seem like a daunting task, especially for users who are not familiar with the system’s file structure. However, once you understand the process, it becomes a simple and effective way to manage network connections and enhance your online experience.
This article will provide you with an overview of the Hosts file in Windows 10 and guide you through the steps to locate, edit, and save changes to the file. Whether you need to troubleshoot network issues, block unwanted websites, or set up custom DNS entries, understanding how to access and modify the Hosts file is an essential skill for any Windows 10 user.
Overview of the Hosts file in Windows 10
The Hosts file, located in the Windows system folder, is a plain text file that acts as a local DNS resolver. It allows you to manually assign IP addresses to specific domain names, effectively bypassing the default DNS lookup process. By editing the Hosts file, you can control how your computer resolves domain names and customize network connections.
One of the primary uses of the Hosts file is to block or redirect certain websites. By adding entries to the file, you can prevent your computer from accessing specific domains, effectively blocking unwanted content or known malicious websites. This can be particularly useful if you want to add an extra layer of protection against phishing attempts or prevent access to inappropriate content.
Another key feature of the Hosts file is the ability to override DNS resolution. For example, if a website’s IP address changes frequently or if you want to use a specific server for a particular domain, you can simply add an entry to the Hosts file. This allows you to bypass the DNS lookup process and specify the IP address directly, ensuring your computer always connects to the desired server.
The Hosts file can also be used to create local development environments. By mapping domain names to local IP addresses, developers can test websites or applications before they are deployed to a public server. This helps to ensure that all functionality and design aspects are working correctly before going live.
It’s important to note that the Hosts file overrides DNS settings only on the local machine. This means that the changes made to the file will not affect other devices on the network. Additionally, modifying the Hosts file requires administrative privileges, so you will need to have the necessary permissions to make changes.
Now that you have a basic understanding of the Hosts file and its capabilities, let’s move on to locating the file on your Windows 10 machine.
Locating the Hosts file
Before you can start editing the Hosts file in Windows 10, you need to locate its file path. The Hosts file is typically stored in the “etc” folder within the system directory. Here are two methods you can use to find the Hosts file:
Method 1: Using File Explorer
- Open File Explorer by pressing the Windows key + E.
- In the address bar at the top, enter the following path:
C:\Windows\System32\drivers\etc. - Press Enter to navigate to the “etc” folder.
- Scroll down and look for a file named “hosts”. This is the Hosts file.
Once you have located the Hosts file, you can proceed to edit it. However, since the file requires administrative privileges to make changes, you may encounter some restrictions when trying to modify it directly. To bypass this, you can use Command Prompt to open the Hosts file with administrative privileges.
Method 2: Using Command Prompt
- Open the Start menu and search for “Command Prompt”.
- Right-click on “Command Prompt” and select “Run as administrator”.
- In the Command Prompt window, type the following command:
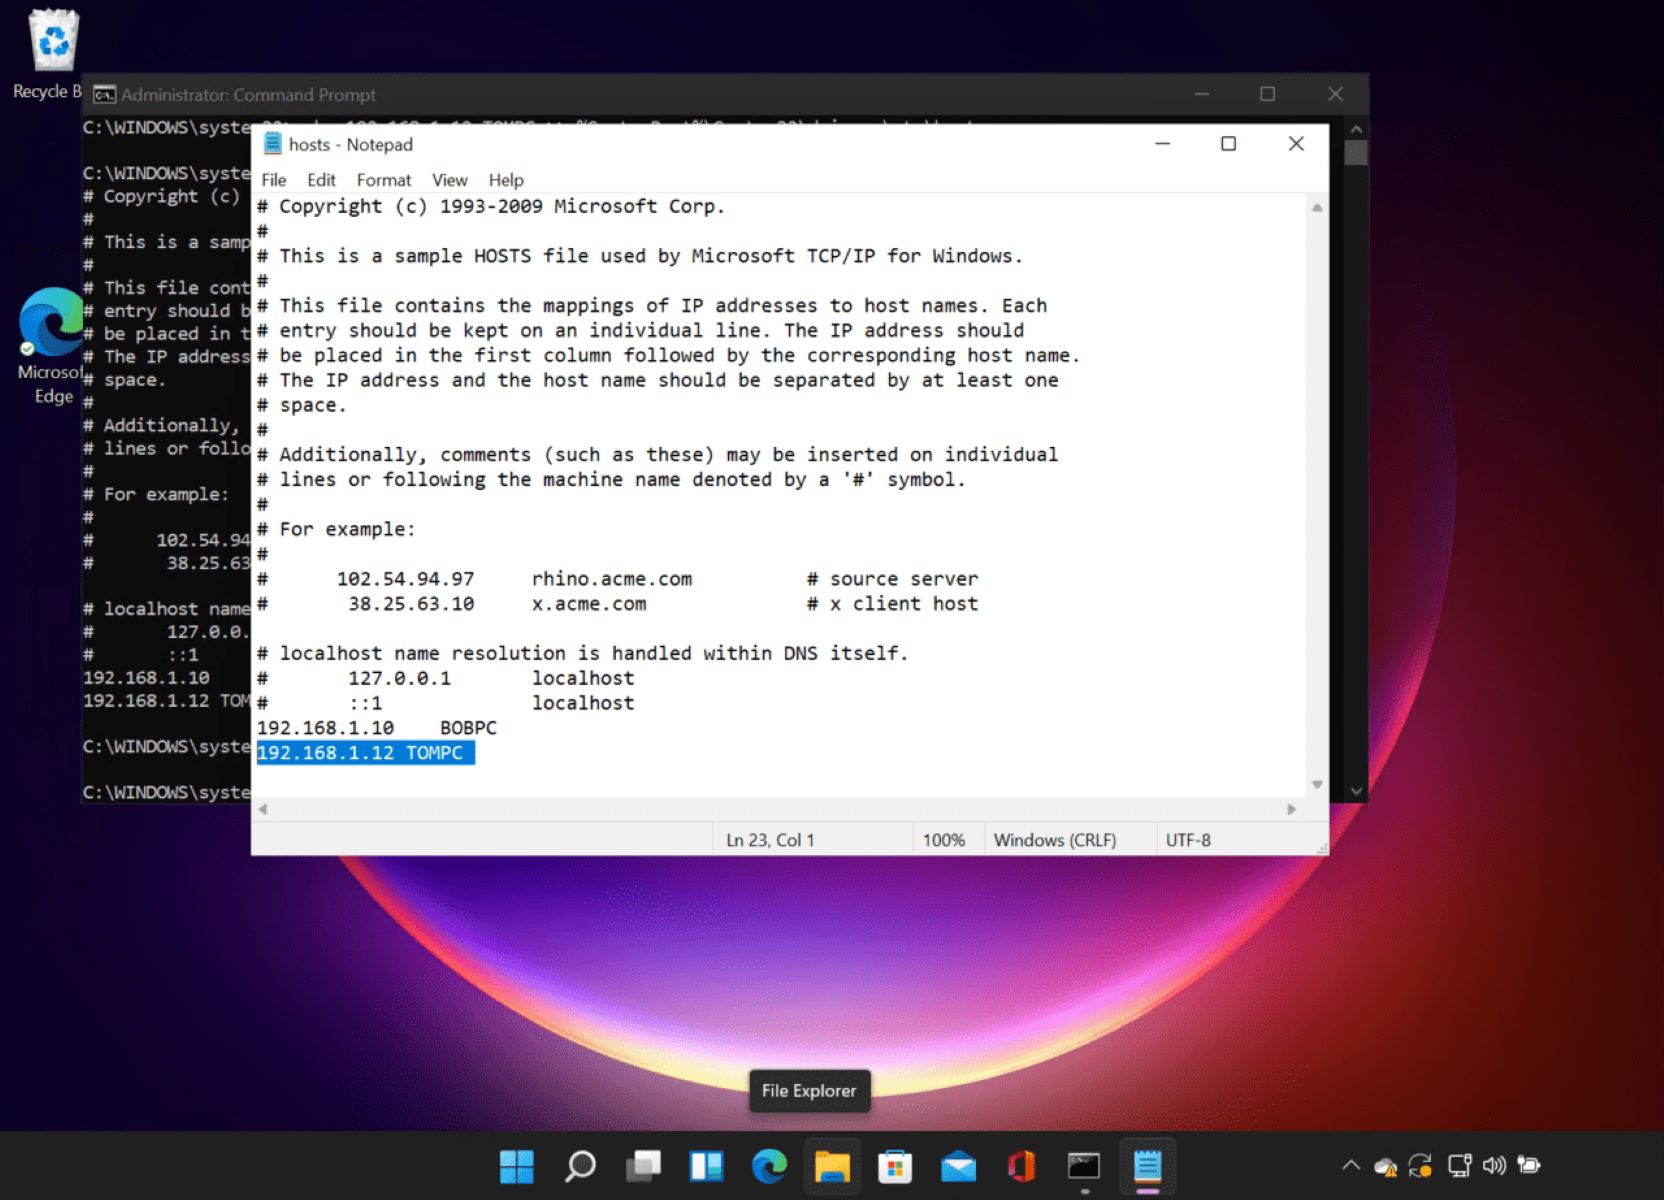
notepad C:\Windows\System32\drivers\etc\hosts - Press Enter to open the Hosts file in Notepad with the necessary administrative privileges.
Now that you know how to locate the Hosts file using either File Explorer or Command Prompt, you are ready to proceed with editing the file to make the desired changes.
Method 1: Using File Explorer
Editing the Hosts file in Windows 10 is a straightforward process, and there are multiple methods you can use. One of the simplest ways to edit the Hosts file is by using File Explorer. Here’s how you can do it:
- Open File Explorer by pressing the Windows key + E or by clicking on the folder icon in the taskbar.
- In the address bar at the top, enter the following path:
C:\Windows\System32\drivers\etc. - Press Enter to navigate to the “etc” folder.
- Scroll down and look for a file named “hosts”. This is the Hosts file.
- Right-click on the “hosts” file and select “Open with” from the context menu. Choose a text editor, such as Notepad or Notepad++, to open the file.
Once the Hosts file is open in your preferred text editor, you can edit the file as needed. Each entry within the Hosts file follows a specific format. The file typically contains commented-out lines (starting with a “#”) to provide instructions and examples. To add a new entry, simply type the IP address followed by a space or tab character, and then the domain name you want to map to that IP address.
Here’s an example of how a Hosts file entry looks:
127.0.0.1 localhostIn this example, the IP address “127.0.0.1” is mapped to the domain name “localhost”. You can add your own entries following this format. Remember to save the changes after editing the Hosts file.
It’s worth noting that modifying the Hosts file requires administrative privileges. If you encounter an error while trying to save the changes, make sure you are running your text editor with administrative rights.
Using File Explorer to edit the Hosts file is a simple and effective method. However, if you prefer using the command line interface, there is another method you can try. Let’s explore that option next.
Method 2: Using Command Prompt
If you prefer using the command line interface, you can edit the Hosts file in Windows 10 using Command Prompt. This method offers a quick and efficient way to make changes to the file. Here’s how you can do it:
- Open the Start menu by clicking on the Windows icon in the lower-left corner of the screen.
- Search for “Command Prompt” and right-click on the top result. Select “Run as administrator” from the context menu.
- If prompted by the User Account Control (UAC) dialog, click “Yes” to grant administrative privileges to Command Prompt.
- In the Command Prompt window, type the following command and press Enter:
notepad C:\Windows\System32\drivers\etc\hosts
Executing this command will open the Hosts file in Notepad with the necessary administrative privileges. You can now make the desired changes to the file. Each entry in the Hosts file follows a specific format, with the IP address mapped to the corresponding domain name. To add a new entry, simply type the IP address followed by a space or tab character, and then the domain name.
After making the necessary edits, save the changes by clicking “File” in the Notepad menu, and then selecting “Save”. Alternatively, you can press Ctrl+S to save the file. If prompted by User Account Control, click “Yes” to confirm the change.
It’s important to note that command prompt access is required to edit the Hosts file. If you encounter any issues saving the changes, make sure you have administrative privileges in Command Prompt.
Using Command Prompt to edit the Hosts file offers a convenient and efficient way to make changes without relying on a graphical user interface. However, if you prefer a more feature-rich text editor, you can use a third-party text editor to open and modify the Hosts file. Let’s explore that option next.
Editing the Hosts file
Now that you have located the Hosts file on your Windows 10 machine, it’s time to make the necessary changes. Editing the Hosts file allows you to control how your computer resolves domain names and customize network connections. There are two commonly used methods for editing the Hosts file: using Notepad or using third-party text editors.
Method 1: Using Notepad
The most straightforward way to edit the Hosts file is by using Notepad, the default text editor in Windows. Here’s how you can do it:
- Locate the Hosts file using one of the methods mentioned earlier in this article.
- Right-click on the Hosts file and select “Open with” from the context menu.
- Choose Notepad from the list of available applications. You may need to click on “More apps” if Notepad is not visible.
- Once the Hosts file is open in Notepad, you can proceed to make the necessary changes.
Each entry in the Hosts file follows a specific format: the IP address followed by a space or tab character, and then the domain name you want to map to that IP address. To add a new entry, simply type the IP address, followed by the domain name.
After making the desired changes, save the file by clicking on “File” in the Notepad menu and selecting “Save”. Alternatively, you can press Ctrl+S to save the changes. If prompted by User Account Control, click “Yes” to confirm the change.
Method 2: Using third-party text editors
While Notepad is functional for editing the Hosts file, it may lack advanced features that some users prefer. If you need a more feature-rich text editor, you can use a third-party application like Notepad++ or Sublime Text. Here’s how:
- Locate the Hosts file using one of the methods mentioned earlier in this article.
- Right-click on the Hosts file and select “Open with” from the context menu.
- Choose your preferred text editor from the list of available applications, such as Notepad++ or Sublime Text.
- Once the Hosts file is open in your chosen text editor, you can make the necessary changes and save the file.
Using a third-party text editor provides you with additional features, such as syntax highlighting and advanced search and replace options, to facilitate editing the Hosts file more efficiently.
Now that you understand how to edit the Hosts file using either Notepad or a third-party text editor, it’s time to save the changes and apply them to your system. Let’s explore that next.
Method 1: Using Notepad
One of the simplest and most common ways to edit the Hosts file in Windows 10 is by using the default text editor, Notepad. Notepad provides a straightforward interface and is suitable for basic editing tasks. Here’s how you can edit the Hosts file using Notepad:
- Locate the Hosts file on your Windows 10 machine using the methods mentioned earlier in this article.
- Right-click on the Hosts file and select “Open with” from the context menu.
- In the list of available applications, choose “Notepad”. If Notepad is not visible, click on “More apps” to expand the list.
- The Hosts file will open in Notepad, displaying the contents of the file.
Now that you have the Hosts file open in Notepad, you can proceed to make the necessary changes. Each entry in the Hosts file follows a specific format: the IP address followed by a space or tab character, and then the corresponding domain name. To add a new entry, simply type the IP address followed by the domain name.
For example:
127.0.0.1 localhostIn this example, the IP address “127.0.0.1” is mapped to the domain name “localhost”.
After making the desired changes, save the file by clicking on “File” in the Notepad menu and selecting “Save”. Alternatively, you can press Ctrl+S to save the changes.
If you encounter any issues while saving the Hosts file, ensure that you have administrative privileges. Modifying the Hosts file requires administrative access, so make sure you are running Notepad as an administrator.
Using Notepad to edit the Hosts file offers a straightforward and simple method to make the necessary changes. However, if you prefer a more feature-rich text editor, you can explore using third-party applications like Notepad++ or Sublime Text. Let’s explore that option next.
Method 2: Using third-party text editors
If you prefer a more feature-rich text editor with advanced functionalities, you can edit the Hosts file in Windows 10 using third-party applications like Notepad++ or Sublime Text. These text editors offer additional features that can enhance your editing experience. Here’s how you can use a third-party text editor to edit the Hosts file:
- Locate the Hosts file on your Windows 10 machine using the methods mentioned earlier in this article.
- Right-click on the Hosts file and select “Open with” from the context menu.
- In the list of available applications, choose your preferred third-party text editor, such as Notepad++ or Sublime Text.
- The Hosts file will open in your chosen text editor, displaying the contents of the file with the added functionalities.
Now that you have the Hosts file open in your preferred text editor, you can proceed to edit the file to make the necessary changes. Each entry in the Hosts file follows a specific format: the IP address followed by a space or tab character, and then the corresponding domain name.
For example:
127.0.0.1 localhostIn this example, the IP address “127.0.0.1” is mapped to the domain name “localhost”.
Using a third-party text editor provides you with additional features, such as syntax highlighting, advanced search and replace options, and the ability to work with multiple files simultaneously. These features can greatly enhance your editing efficiency and accuracy.
After making the necessary changes to the Hosts file, save the file in your chosen text editor by clicking on “File” in the menu and selecting “Save”. Alternatively, you can use the keyboard shortcut specific to your text editor to save the changes.
It’s important to note that when using a third-party text editor, ensure that you have the necessary administrative privileges to save the Hosts file. Modifying the Hosts file requires administrative access, so make sure you are running the text editor as an administrator.
Using third-party text editors to edit the Hosts file offers a more feature-rich and customized editing experience. Notepad++ and Sublime Text are widely popular options among users, but there are other text editors available that you can explore as well.
Saving changes and applying them
After you have made the necessary changes to the Hosts file in Windows 10, it’s important to save the changes and apply them to your system. Here’s how you can save the changes you made to the Hosts file:
- In the text editor where you have opened the Hosts file, click on “File” in the menu.
- Select “Save” or use the keyboard shortcut specific to your text editor to save the changes.
By saving the Hosts file, you ensure that the modifications you made are stored and ready to be applied. However, saving the file alone doesn’t apply the changes immediately. To apply the changes made in the Hosts file, you may need to restart certain applications or flush the DNS cache on your Windows 10 machine.
If you have made changes to the Hosts file to block or redirect websites, these changes are typically applied immediately. However, some web browsers may still need to refresh their DNS cache, so it’s a good idea to close and reopen your browser to ensure the changes take effect.
In certain cases, you may also want to flush the DNS cache on your Windows 10 machine to ensure that the changes in the Hosts file are applied globally. Here’s how you can flush the DNS cache:
- Open the Start menu and search for “Command Prompt”.
- Right-click on “Command Prompt” and select “Run as administrator” from the context menu.
- In the Command Prompt window, type the following command and press Enter:
ipconfig /flushdns
This command will flush the DNS cache on your Windows 10 machine, ensuring that any changes made to the Hosts file are implemented globally.
After saving the changes to the Hosts file and optionally flushing the DNS cache, you should now see the effects of the modifications you made. Websites will be redirected or blocked according to the entries you added to the Hosts file.
Remember that when troubleshooting network-related issues or making extensive modifications to the Hosts file, it’s always a good practice to create a backup of the original Hosts file. This way, you can revert to the original file if needed.
Now that you know how to save changes in the Hosts file and apply them, you are ready to manage your network connections, block unwanted websites, or create custom DNS entries with ease.
Common issues and troubleshooting tips
While editing the Hosts file in Windows 10 is a relatively straightforward process, you may encounter some common issues or face challenges. Here are a few common issues that users may encounter when working with the Hosts file and some troubleshooting tips:
1. File permission issues
If you are unable to save the changes you made to the Hosts file, it may be due to file permission restrictions. Ensure that you are running the text editor or Command Prompt with administrative privileges. Right-click on the application and select “Run as administrator” to access the necessary permissions.
2. Inaccurate formatting
The Hosts file follows a specific formatting structure. Ensure that each entry is on a separate line and follows the IP address followed by a space or tab character, and then the corresponding domain name. Avoid inserting unnecessary or incorrect characters to maintain the integrity of the file.
3. DNS caching issues
Even after making changes to the Hosts file, your computer or web browser may still cache the previous DNS information. To overcome this, close and reopen your web browser or flush the DNS cache using the Command Prompt. Enter the command ipconfig /flushdns to clear the DNS cache and allow the changes to take effect.
4. Excessive entries slowing down resolution
Having too many entries in the Hosts file can slow down the DNS resolution process. If you experience slow network connections, consider cleaning up the Hosts file and removing any unnecessary entries. Keep the file clean and only include entries that are relevant to your needs.
5. Creating a backup
Before making any significant changes to the Hosts file, it’s a good practice to create a backup of the original file. This way, you can revert to the original file if any issues arise or if you need to restore the previous configurations.
By being aware of these common issues and following the troubleshooting tips provided, you can effectively manage and troubleshoot any problems that may arise when editing the Hosts file in Windows 10.
Summary
The Hosts file in Windows 10 serves as a local DNS resolver, allowing you to control and override the default DNS resolution on your computer. By editing the Hosts file, you can redirect website traffic, block access to certain domains, or create custom DNS entries. Understanding how to locate, edit, and save changes to the Hosts file is a valuable skill for managing network connections and enhancing your online experience.
In this article, we explored two methods to locate the Hosts file: using File Explorer and using Command Prompt. Once you have found the Hosts file, you can edit it using either Notepad or third-party text editors such as Notepad++ or Sublime Text. Remember to save the changes after editing the file, ensuring that you have administrative privileges and considering the need to flush the DNS cache to apply the modifications globally.
We also discussed common issues that users may encounter when working with the Hosts file, including file permission issues, formatting errors, DNS caching, and excessive entries. By addressing these issues and following the troubleshooting tips provided, you can efficiently overcome any challenges that arise during the editing process.
Now armed with the knowledge of how to edit the Hosts file, you can confidently customize your network connections, block unwanted websites, and create tailored DNS configurations on your Windows 10 machine. Keep in mind the importance of making backups and reviewing your changes to stay in control of your network environment.