Introduction
When using a Windows 10 computer, you may notice that over time it starts to slow down or experience performance issues. One common cause of these issues is an accumulation of cache files. Cache files are temporary data stored on your computer or web browser to help speed up future interactions with websites or applications.
While cache files can provide a quicker and more efficient experience, they can also take up valuable disk space and potentially cause conflicts or errors. Clearing the cache in Windows 10 is an effective way to optimize system performance and resolve various issues.
In this article, we will guide you through the process of clearing cache in Windows 10. We will explain the importance of clearing cache, highlight the different types of cache in Windows 10, and provide you with a step-by-step guide on how to clear cache in your web browser, applications, system, and DNS.
By the end of this article, you will have a better understanding of why clearing cache is necessary, how it can benefit your Windows 10 computer, and the specific steps to follow to ensure a smooth and optimized experience.
So, let’s dive in and explore the world of cache in Windows 10 and how clearing it can improve your system’s performance.
Why Clearing Cache in Windows 10 is Important
Clearing the cache in Windows 10 is important for several reasons. Here are some key reasons why you should consider clearing your cache regularly:
1. Free up disk space: Cache files can accumulate over time and take up a significant amount of space on your hard drive. By clearing the cache, you can free up valuable disk space and prevent your computer from becoming cluttered.
2. Improved system performance: As cache files build up, they can slow down your system’s performance. By clearing the cache, you can remove unnecessary data and optimize system operations, resulting in a faster and more responsive computer.
3. Resolve software conflicts and errors: In some cases, cache files can become corrupted or outdated, leading to software conflicts or errors. Clearing the cache can help resolve these issues, allowing your applications to function properly.
4. Ensure privacy and security: Cache files may contain sensitive information, such as login credentials or browsing history. Clearing the cache regularly can help protect your privacy and prevent unauthorized access to your personal data.
5. Improve browser performance: Web browsers store cache files to load websites faster. However, an excessive amount of cached data can lead to browser slowdowns or compatibility issues. Clearing the browser cache can help improve browsing speed and resolve website loading problems.
6. Get the latest content: Clearing the cache ensures that you are accessing the most up-to-date versions of websites and applications. Cache files can sometimes cause outdated content to be displayed, clearing them ensures you are getting the freshest information.
In summary, clearing the cache in Windows 10 is important for optimizing system performance, freeing up disk space, resolving software conflicts, protecting your privacy, improving browser performance, and accessing the latest content. By regularly clearing cache files, you can maintain a smooth and efficient computing experience.
Different Types of Cache in Windows 10
Cache in Windows 10 is not limited to a single type. It can be categorized into several different types, each serving a specific purpose. Here are the various types of cache you may encounter on your Windows 10 computer:
1. Browser Cache: Web browsers such as Chrome, Firefox, and Edge store temporary data to speed up website loading times. This includes images, scripts, and stylesheets. Clearing the browser cache can help resolve website display issues and improve performance.
2. App Cache: Many applications on your Windows 10 computer, such as photo editors or video players, store temporary files to enhance their functionality. Clearing app cache can free up storage space and potentially resolve app-related issues.
3. System Cache: Windows 10 itself utilizes cache to store frequently accessed data. This can include system files, icons, thumbnails, and font caches. Clearing the system cache can help improve system performance and free up disk space.
4. DNS Cache: Windows 10 keeps a record of previously visited websites to speed up future visits. This is known as the DNS cache. Clearing the DNS cache can resolve DNS-related errors and ensure you are accessing the most up-to-date website addresses.
5. Windows Store Cache: If you use the Microsoft Store to download apps, it stores cache files related to the installation and update process. Clearing the Windows Store cache can help resolve issues with app downloads and updates.
6. Thumbnail Cache: Windows 10 generates thumbnail images for files and folders to provide a preview. These thumbnails are stored in the thumbnail cache. Clearing the thumbnail cache can free up disk space and address issues with incorrect or missing thumbnails.
It’s worth noting that not all cache files need to be cleared regularly. Some cache files can be beneficial, as they improve performance and enhance user experience. However, when encountering specific issues related to a particular cache type, clearing it can be an effective troubleshooting step.
In the following sections, we will provide step-by-step guides on how to clear cache in Windows 10 for different cache types, ensuring that you take the necessary actions to optimize your system’s performance.
Clearing Cache in Windows 10: Step by Step Guide
Clearing cache in Windows 10 is a straightforward process that can be done through various methods, depending on the type of cache you want to clear. In this section, we will provide step-by-step instructions on how to clear cache in different areas of Windows 10.
1. Clearing Browser Cache:
– For Google Chrome: Press Ctrl+Shift+Delete to open the Clear browsing data menu. Select the desired time range and check the Cached images and files option. Click on Clear data.
– For Mozilla Firefox: Press Ctrl+Shift+Delete to access the Clear All History menu. Choose the time range and check the Cache option. Click on the Clear Now button.
– For Microsoft Edge: Press Ctrl+Shift+Delete to open the Clear browsing data menu. Select the time range and check the Cached data and files option. Click on Clear.
2. Clearing App Cache:
– Press Windows Key + I to open the Settings menu. Go to the System category and select Storage. Under the local storage section, click on the app you want to clear cache for. Click on the Temporary files option and then choose the files you want to delete. Click on Remove files.
3. Clearing System Cache:
– Press Windows Key + R to open the Run dialog box. Type “temp” and press Enter. Select all the files and folders in the Temp folder and press Shift + Delete to permanently delete them.
– Press Windows Key + R again and type “%temp%” to open the Temporary folder. Delete all the files and folders in this folder as well.
4. Clearing DNS Cache:
– Press Windows Key + X and select Command Prompt (Admin) or Windows PowerShell (Admin) from the menu. Type “ipconfig /flushdns” and press Enter. Wait for the process to complete.
5. Clearing Windows Store Cache:
– Press Windows Key + R and type “wsreset.exe” in the Run dialog box. Press Enter. This will open the Windows Store, and the cache will be cleared automatically.
6. Clearing Thumbnail Cache:
– Open File Explorer and navigate to the following directory: C:\Users\YourUsername\AppData\Local\Microsoft\Windows\Explorer. Delete all files in this folder.
Remember to exercise caution when clearing cache files, as some cache types may be necessary for your system or applications to function optimally. Only clear cache when you encounter specific issues or performance problems.
By following these step-by-step instructions, you can effectively clear cache in different areas of Windows 10 and maintain a clean and efficient system.
Clearing Browser Cache in Windows 10
Clearing the browser cache in Windows 10 can help improve browsing speed, resolve website display issues, and ensure you are accessing the most up-to-date content. Here is a step-by-step guide on how to clear the browser cache in popular web browsers on Windows 10:
For Google Chrome:
1. Open Google Chrome and click on the three-dot menu icon in the top-right corner.
2. Select “More tools” and then click on “Clear browsing data”.
3. In the new tab that opens, choose the time range for which you want to clear the cache.
4. Check the “Cached images and files” option.
5. You can also select other options like “Cookies and other site data” or “Browsing history” if desired.
6. Click on the “Clear data” button at the bottom to clear the selected cache.
For Mozilla Firefox:
1. Open Mozilla Firefox and click on the three-line menu icon in the top-right corner.
2. Select “Options” and then click on “Privacy & Security” in the left-hand menu.
3. Scroll down to the “Cookies and Site Data” section and click on “Clear Data”.
4. In the dialog box that appears, make sure the “Cached Web Content” option is checked.
5. You can also select other options like “Cookies and Site Data” or “Offline Website Data” if desired.
6. Click on “Clear” to clear the selected cache.
For Microsoft Edge:
1. Open Microsoft Edge and click on the three-dot menu icon in the top-right corner.
2. Select “Settings” and then click on “Privacy, search, and services” in the left-hand menu.
3. Under the “Clear browsing data” section, click on “Choose what to clear”.
4. Check the “Cached images and files” option.
5. You can also select other options like “Cookies and other site data” or “Browsing history” if desired.
6. Click on “Clear” to clear the selected cache.
It’s important to note that clearing the browser cache will also remove stored passwords, form data, and other browsing-related information. Make sure to carefully select the options you want to clear to avoid losing any important data.
By following these steps, you can easily clear the browser cache in Windows 10 and enjoy a faster and more optimized browsing experience.
Clearing App Cache in Windows 10
Clearing the app cache in Windows 10 can help free up storage space and resolve issues related to app performance or functionality. Here is a step-by-step guide on how to clear app cache in Windows 10:
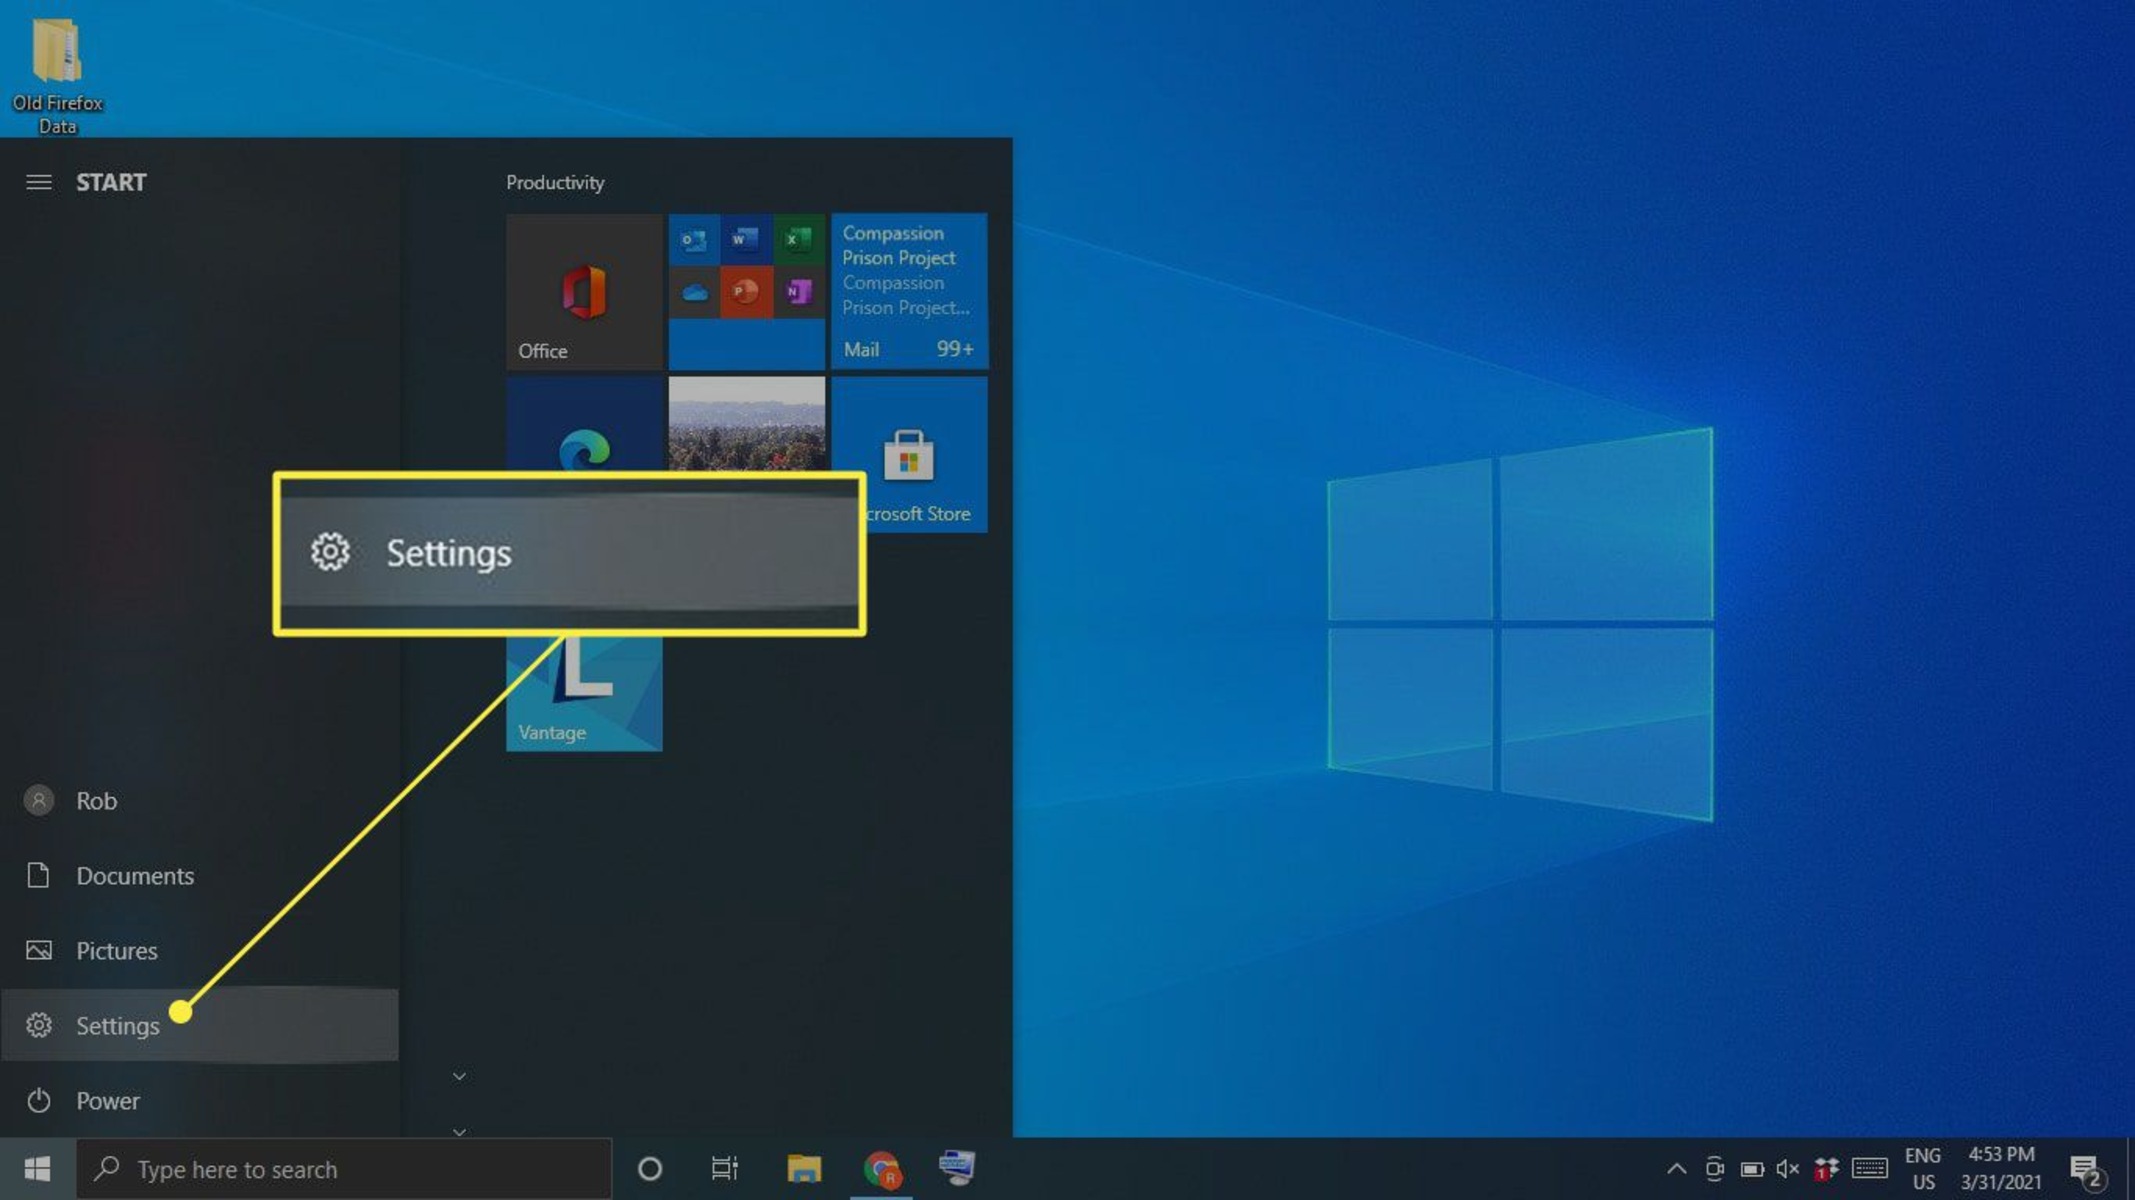
1. Open the Settings:
– Press the Windows key + I to open the Settings menu.
2. Navigate to the Apps & features section:
– Click on “Apps” or “Apps & features” from the Settings menu.
3. Select the desired app:
– Scroll through the list of installed apps or use the search bar to find the app for which you want to clear the cache.
4. Access the app’s storage settings:
– Once you have selected the app, click on it to expand its options.
– Look for the “Advanced options” or “Storage” section and click on it.
5. Clear the app cache:
– In the storage settings for the selected app, you will find an option to clear the app’s cache.
– Click on the “Clear” or “Clear cache” button to remove the cached data for the app.
6. Repeat for other apps (if necessary):
– If you want to clear the cache for multiple apps, repeat steps 3 to 5 for each app.
It’s important to note that clearing the app cache will remove temporary files and data that the app has stored for quicker access and improved performance. However, it may also reset certain app settings or preferences.
Clearing the app cache can be particularly useful for apps that are exhibiting slow performance, crashing, or displaying outdated information. By clearing the cache, you can often resolve these issues and improve the overall functioning of the app.
Remember that not all apps provide the option to clear their cache through the Settings menu. Some apps may require cache clearing through their own settings or preferences within the app itself.
By following these steps, you can easily clear the app cache in Windows 10 and ensure that your applications continue to run smoothly and efficiently.
Clearing System Cache in Windows 10
Clearing the system cache in Windows 10 can help improve system performance, free up disk space, and resolve various issues related to cached system files. Here is a step-by-step guide on how to clear the system cache in Windows 10:
1. Open the Run dialog:
– Press the Windows key + R to open the Run dialog box.
2. Type in the command:
– In the Run dialog box, type “temp” (without quotes) and press Enter.
– This will open the Temp folder.
3. Select all files and folders:
– In the Temp folder, press Ctrl + A to select all files and folders.
4. Delete the selected files and folders:
– Once all files and folders are selected, press Shift + Delete on your keyboard.
– A confirmation dialog box will appear asking if you want to permanently delete the selected files. Click Yes to proceed.
5. Open the Temporary folder:
– Return to the Run dialog box by pressing Windows key + R again.
– This time, type “%temp%” (without quotes) and press Enter.
– This will open the Temporary folder.
6. Delete all files and folders in the Temporary folder:
– Similar to step 3, press Ctrl + A to select all files and folders in the Temporary folder.
– Press Shift + Delete to permanently delete the selected items.
By following these steps, you can effectively clear the system cache in Windows 10. This process frees up disk space by removing unnecessary temporary files, such as system logs, cache files, and error reports. Additionally, it helps in resolving system-related issues and optimizing system performance.
It’s important to note that the Temp folder and Temporary folder contain files that are no longer needed by the system. However, exercise caution when deleting these files, as some may still be in use by running processes. If prompted with any files that cannot be deleted, skip those and proceed to delete the remaining items.
Clearing the system cache should be done periodically to ensure that your Windows 10 computer operates smoothly and efficiently. It can greatly improve overall system responsiveness and prevent potential conflicts or errors caused by outdated cache files.
By regularly clearing the system cache, you can maintain a clean and optimized Windows 10 system that is free from unnecessary temporary files.
Clearing DNS Cache in Windows 10
Clearing the DNS cache in Windows 10 can help resolve DNS-related issues, such as website loading problems or incorrect IP address mappings. Here is a step-by-step guide on how to clear the DNS cache in Windows 10:
1. Open the Command Prompt:
– Press the Windows key + X to open the Power User menu.
– Select “Command Prompt (Admin)” or “Windows PowerShell (Admin)” from the menu.
* Note: You need administrator privileges to clear the DNS cache.
2. Run the command to flush the DNS cache:
– In the Command Prompt window, type the following command and press Enter:
ipconfig /flushdns
3. Wait for the process to complete:
– After executing the command, wait for a moment until you see the message “Successfully flushed the DNS Resolver Cache.”
4. Close the Command Prompt:
– Once the DNS cache has been successfully flushed, you can close the Command Prompt window.
By following these steps, you can clear the DNS cache in Windows 10 and ensure that your computer is using the most up-to-date DNS information when accessing websites or network resources.
Clearing the DNS cache can be particularly helpful when you are experiencing DNS resolution issues, such as websites not loading, incorrect IP address mappings, or DNS-related errors. Flushing the DNS cache forces your computer to discard any outdated or incorrect DNS information and retrieve fresh DNS records when needed.
It’s important to note that clearing the DNS cache does not delete your DNS settings or configuration. It simply removes the locally cached DNS records, allowing your computer to fetch new DNS information from your network or internet service provider.
Performing this action periodically or when you encounter DNS-related problems can help maintain a stable and reliable network connection in Windows 10. However, keep in mind that clearing the DNS cache may temporarily slow down DNS resolution for the first few requests as your computer rebuilds the cache with fresh DNS information.
By clearing the DNS cache, you can ensure a smoother browsing experience and resolve DNS-related issues on your Windows 10 computer.
Benefits of Clearing Cache in Windows 10
Clearing cache files in Windows 10 offers several benefits that contribute to improved system performance, storage optimization, and a smoother user experience. Here are some key benefits of clearing cache in Windows 10:
1. Enhanced System Performance:
– Accumulated cache files can slow down system performance over time. Clearing cache helps to remove temporary files, freeing up storage space and ensuring smoother system operations.
2. Optimal Disk Space Utilization:
– Clearing cache files allows you to reclaim valuable disk space. By removing unnecessary temporary files, you can make room for important data and prevent your system from becoming cluttered.
3. Resolution of Software Conflicts and Errors:
– Corrupted or outdated cache files can cause software conflicts or errors. Clearing the cache helps to resolve these issues, ensuring that applications function properly and reducing the occurrence of crashes or glitches.
4. Privacy and Security Improvement:
– Cache files may contain sensitive information such as login credentials or browsing history. Clearing the cache regularly helps protect your privacy by removing this data, minimizing the risk of unauthorized access.
5. Improved Browser Performance:
– Clearing browser cache in Windows 10 can enhance browsing speed and resolve compatibility issues. By deleting cached data, you can ensure that websites load correctly and quickly, providing a smoother browsing experience.
6. Access to the Latest Content:
– Clearing the cache ensures you are always accessing the most up-to-date versions of websites, applications, and files. By removing cached data, you can prevent outdated information from being displayed and stay updated with the latest content.
7. Troubleshooting Potential Issues:
– Clearing cache files can be an effective troubleshooting step for various issues in Windows 10. Whether it’s slow performance, software conflicts, or website loading problems, clearing cache can often resolve these issues and restore optimal functionality.
Regularly clearing cache in Windows 10 is a proactive measure to maintain system performance, optimize storage, and prevent potential issues. It ensures that your computer operates at its best and provides a seamless user experience.
Remember, the frequency of cache clearing may vary depending on your usage patterns and the specific cache types. Some caches may need more frequent clearing, while others may require it less often. By understanding the benefits of clearing cache and following the appropriate steps, you can ensure a more efficient and hassle-free experience with your Windows 10 system.
Conclusion
Clearing cache in Windows 10 is an essential maintenance task that can significantly enhance system performance, free up disk space, and resolve various issues. By following the step-by-step guides provided in this article, you can easily clear different types of cache in Windows 10, including browser cache, app cache, system cache, and DNS cache.
Regularly clearing the cache offers a range of benefits, including improved system responsiveness, optimal disk space utilization, resolution of software conflicts and errors, enhanced privacy and security, improved browser performance, access to the latest content, and effective troubleshooting.
Whether you are experiencing slow system performance, encountering software conflicts, or facing website loading problems, clearing cache can often be a simple yet effective solution to these issues. It removes temporary files and outdated data, ensuring a cleaner and more efficient computing environment.
Remember to exercise caution when clearing cache and avoid deleting cache files that are necessary for the normal functioning of certain applications or system processes. Only clear cache when you encounter specific issues or notice a significant decline in system performance.
By incorporating cache clearing as part of your regular system maintenance routine, you can optimize the performance of your Windows 10 computer, keep your storage space organized, and ensure a smooth and enjoyable user experience.
So, take a few moments to follow the step-by-step guides provided in this article and clear the cache in Windows 10. Your computer will thank you with improved performance, faster browsing, and a cleaner overall experience.