Introduction
Welcome to the world of remote desktop access! In today’s digital era, being able to connect to your computer from anywhere is a remarkable convenience. Whether you’re on the go or working remotely, having the ability to access your files and programs remotely can save you time and effort. One of the most popular remote desktop solutions is the built-in Remote Desktop feature in Windows 10.
In this guide, we will walk you through the steps to enable remote desktop on your Windows 10 machine so that you can access it from another device, such as a laptop or smartphone. With remote desktop access, you can work remotely, provide technical support, or collaborate with colleagues seamlessly.
Before we get started, it is important to note that enabling remote desktop access on Windows 10 requires administrative privileges. Make sure you have the necessary permissions to make changes to your system settings. Additionally, ensure that you have a stable internet connection on both your local and remote devices for a smooth and uninterrupted remote desktop experience.
Now, let’s dive into the steps to enable remote desktop on Windows 10 and unlock the power of accessing your computer remotely.
Step 1: Check if Remote Desktop is Enabled
Before you can enable remote desktop on your Windows 10 machine, it’s important to verify whether it is already enabled or not. Here’s how you can check:
- Begin by pressing the Windows key on your keyboard or click on the Windows Start button located at the bottom left of your screen.
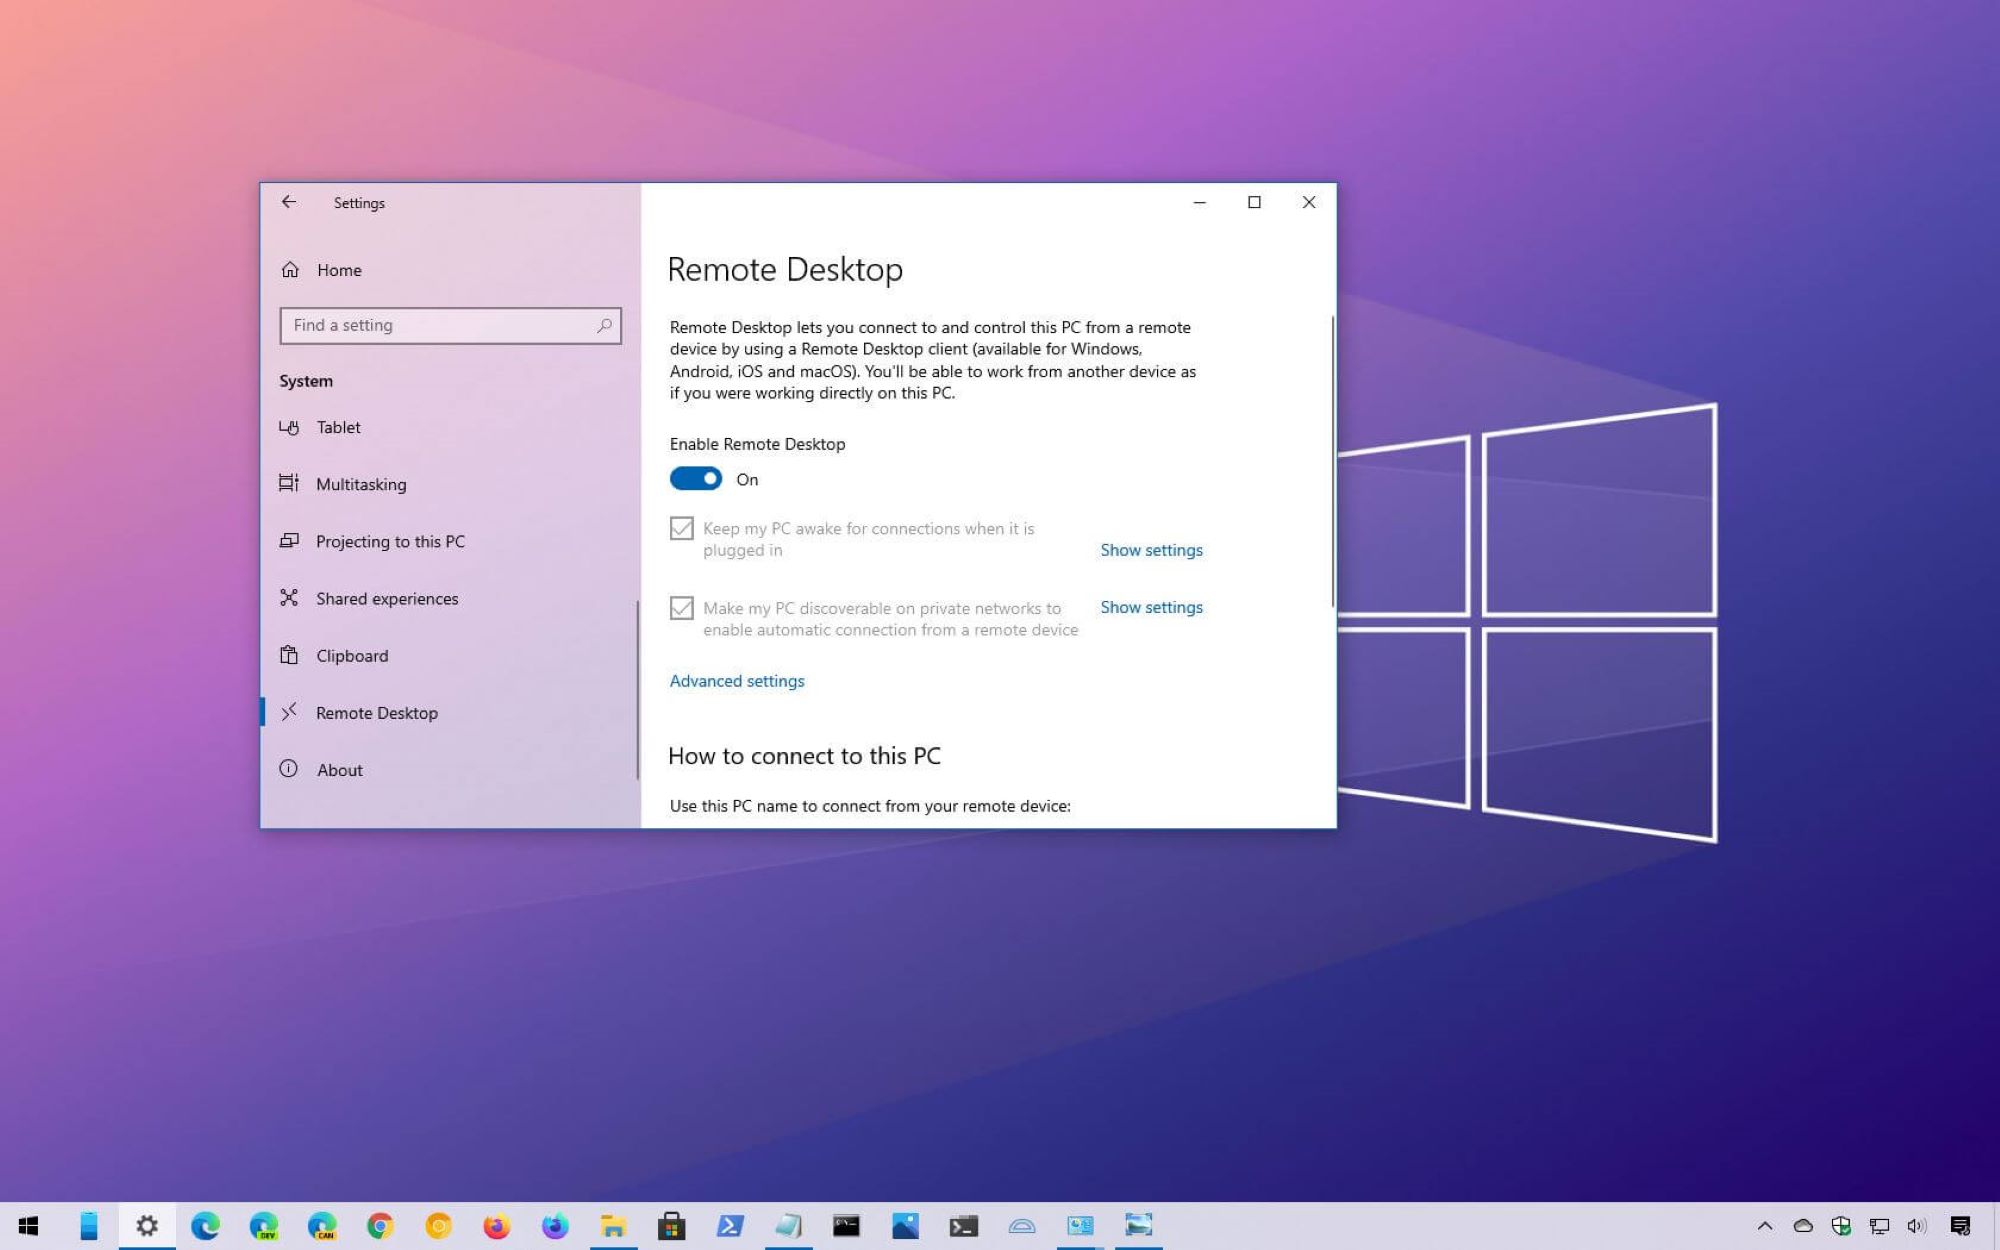
- In the Windows Start menu, type “remote desktop settings” and press Enter. This will open up the Remote Desktop Settings window.
- Within the Remote Desktop Settings window, you will see a toggle switch labeled “Enable Remote Desktop”. If the switch is set to Off, it means that remote desktop is currently disabled on your Windows 10 computer.
If the toggle switch is already set to On, it means that remote desktop is already enabled on your Windows 10 machine, and you can skip to Step 3 to configure the remote desktop settings. If the switch is set to Off, don’t worry, we’ll guide you through the process of enabling remote desktop in the next step.
Enabling remote desktop allows you to establish a connection with your computer from another device, turning it into a remote access hub. This feature is especially useful if you need to access your files, open applications, or troubleshoot issues on your Windows 10 machine while away from it.
Now that you’ve determined the current status of remote desktop on your Windows 10 computer, let’s move on to the next step to enable this powerful feature.
Step 2: Enable Remote Desktop
Now that you’ve confirmed that remote desktop is currently disabled on your Windows 10 machine, let’s proceed with enabling it. Follow these simple steps:
- Open the Remote Desktop Settings window as explained in Step 1.
- Click on the toggle switch labeled “Enable Remote Desktop” to turn it On. This will activate the remote desktop feature on your Windows 10 machine.
- Once you’ve turned on remote desktop, you may see a warning message stating that enabling remote desktop will allow a computer to control this computer remotely. Click “Confirm” or “Allow” to proceed with enabling remote desktop. This step is crucial to ensure that you have authorized access to your computer.
Enabling remote desktop grants you the ability to access your Windows 10 machine from another device. It is essential to keep security in mind while enabling this feature, so only allow remote desktop access from devices you trust.
After completing these steps, remote desktop will be enabled on your Windows 10 machine. However, there are some additional settings you can configure to enhance the remote desktop experience. In the next step, we will explore how to adjust these settings to tailor remote desktop to your preferences.
Now that remote desktop is enabled on your Windows 10 computer let’s move on to the next step and configure the remote desktop settings.
Step 3: Configure Remote Desktop Settings
Now that you have enabled remote desktop on your Windows 10 machine, it’s time to configure the settings to optimize your remote desktop experience. Follow these steps:
- Open the Remote Desktop Settings window by typing “remote desktop settings” in the Windows Start menu and pressing Enter.
- Within the Remote Desktop Settings window, you will find a section named “Remote Desktop” where you can customize various settings.
- First, consider changing the “PC Name” to a meaningful name. This will make it easier to identify your computer when accessing it remotely.
- Below the PC Name, you will find an option labeled “Advanced settings”. Click on it to open the advanced settings menu.
- In the advanced settings menu, you can adjust settings such as screen resolution, color depth, and remote audio playback. Customize these settings according to your preferences and the capabilities of your remote device.
- Additionally, you can specify which users are allowed to access your Windows 10 machine remotely. By default, the system will allow connections from administrators, but you can add specific users or groups by clicking on the “Select users that can remotely access this PC” option.
Configuring the remote desktop settings allows you to tailor the experience to your liking and ensure optimal performance. You can adjust the settings based on the capabilities of your remote device and the bandwidth available for the remote connection.
Remember, while configuring the settings, it’s important to strike a balance between performance and visual quality, especially if you have a slow or limited internet connection.
After configuring the remote desktop settings to your satisfaction, you’re ready to move on to the next step and set up a remote desktop connection.
Step 4: Set Up a Remote Desktop Connection
Now that you have enabled and configured remote desktop on your Windows 10 computer, it’s time to set up a remote desktop connection. Follow these steps:
- On the device you want to use to connect to your Windows 10 machine remotely, ensure that you have a remote desktop client installed. There are various remote desktop clients available for different devices and operating systems, such as Microsoft Remote Desktop for Windows, Microsoft Remote Desktop for Mac, and third-party options for smartphones and tablets.
- Launch the remote desktop client on your device and enter the name or IP address of your Windows 10 computer in the appropriate field. You can find the computer’s name by going to Start, right-clicking on Computer, and selecting Properties. Alternatively, you can use the IP address of your computer for the connection.
- If connecting from outside your local network, you may need to configure port forwarding on your router to allow remote desktop connections. Refer to your router’s documentation or consult your network administrator for assistance with port forwarding.
- Enter your Windows 10 computer’s username and password in the respective fields. Make sure to use the correct credentials with administrative privileges, as specified during the remote desktop setup.
- Click “Connect” or “Log In” to establish the remote desktop connection.
Once the connection is established, you should see your Windows 10 desktop on your remote device. You can now access your files, applications, and settings, just as if you were sitting in front of your computer.
During the remote desktop session, you may notice some performance differences, depending on the speed of your internet connection and the specifications of the device you’re using to connect. Adjusting the remote desktop settings, as mentioned in Step 3, can help optimize the performance and visual quality of the connection.
With a successful remote desktop connection set up, you can now enjoy the convenience of accessing your Windows 10 machine from anywhere, anytime.
Step 5: Connect to the Remote Desktop
Now that you have set up a remote desktop connection, it’s time to connect to your Windows 10 computer from your remote device. Follow these steps:
- Launch the remote desktop client on your device that you installed in Step 4.
- Locate the connection for your Windows 10 computer in the remote desktop client and click on it to initiate the connection.
- Enter your Windows 10 computer’s username and password when prompted. Make sure to use the correct credentials with administrative privileges, as specified during the remote desktop setup. If desired, you can save the login credentials for future connections.
- Click “Connect”, “Log In”, or the equivalent button in your remote desktop client to establish the remote desktop connection.
- Wait for a moment while the client establishes the connection to your Windows 10 machine. If successful, you should see your Windows 10 desktop displayed on your remote device.
Once connected, you can now interact with your Windows 10 computer through the remote desktop client on your device. You can open and use applications, access files, and perform various tasks seamlessly.
Remember that maintaining a stable internet connection is crucial for a smooth remote desktop experience. If you encounter any issues during the connection or experience slow performance, double-check your internet connection and the remote desktop settings on both devices.
When you’re finished using the remote desktop connection, make sure to log out properly to secure your computer. Closing the remote desktop client will simply disconnect from the remote session but leave your Windows 10 machine logged in.
Congratulations! You’ve successfully connected to your Windows 10 computer remotely and can now enjoy the benefits of accessing your files and programs from anywhere in the world.
Conclusion
Enabling remote desktop on your Windows 10 computer opens up a world of possibilities for remote access and collaboration. Whether you’re working from home, on a business trip, or simply need to access your computer while away, remote desktop allows you to stay productive and connected.
In this guide, we’ve covered the steps to enable remote desktop, configure the settings, set up a remote desktop connection, and connect to your Windows 10 computer from a remote device. By following these steps, you can take advantage of the convenience and flexibility offered by remote desktop access.
Remember to prioritize security by enabling remote desktop access only on trusted devices and networks. Additionally, regularly update your Windows 10 computer and remote desktop client software to ensure you have the latest security patches and bug fixes.
With remote desktop enabled, you can access your files, run applications, troubleshoot issues, and even provide technical support to others without physically being in front of your Windows 10 machine. This saves time, enhances productivity, and enables seamless collaboration across geographical boundaries.
Remote desktop access has become an indispensable tool in the modern workplace and beyond. Take advantage of this feature and enjoy the convenience of accessing your Windows 10 computer remotely, making your work and personal life much more flexible and efficient.