Introduction
In today’s rapidly evolving digital landscape, secure remote access to computers and servers is crucial for professionals and organizations. SSH, or Secure Shell, is a widely-used protocol that provides a secure and encrypted connection between computers. While SSH is commonly associated with Unix-like operating systems, such as Linux, it is also possible to use SSH on Windows machines.
SSH offers numerous benefits, including secure file transfers, remote command execution, and secure access to network services. By enabling SSH on Windows, you can easily establish remote connections, manage and administer Windows servers, and securely transfer files.
This article aims to guide you through the process of SSH on Windows, from installation to configuration and connecting to a Windows machine using SSH. Whether you are a system administrator, a developer, or someone who needs remote access to Windows machines, this article will help you set up SSH and leverage its features.
Before diving into the installation and configuration process, there are a few prerequisites to keep in mind. It is essential to ensure that you have administrative access to the Windows machine you intend to connect to. Additionally, you should have basic knowledge of the Windows command prompt environment, as well as an understanding of networking concepts such as IP addresses and ports.
Now let’s explore the step-by-step process of setting up SSH on a Windows machine, allowing you to establish secure remote connections and streamline your workflow.
What is SSH?
SSH, which stands for Secure Shell, is a network protocol used for secure communication between two remote computers. It provides a secure and encrypted connection, making it a popular choice for remote access, file transfers, and remote command execution.
The primary purpose of SSH is to establish a secure channel over an insecure network, such as the internet. This ensures that the data transmitted between the two computers is encrypted and protected from unauthorized access.
When you establish an SSH connection, the client and server use cryptographic techniques to authenticate each other and establish a secure connection. This authentication process typically involves the exchange of encryption keys to verify the identity of both parties.
One of the key features of SSH is its ability to provide secure remote access to a computer or server. Once an SSH connection is established, you can remotely log in to a remote machine and have full control over the command line, just as if you were physically sitting in front of it.
In addition to remote access, SSH also enables secure file transfers. Using tools like SCP (Secure Copy) or SFTP (SSH File Transfer Protocol), you can securely transfer files between your local machine and the remote server, or even between two remote servers.
Furthermore, SSH allows for remote command execution. You can execute commands on the remote machine from your local machine, enabling efficient and streamlined administration and management of remote systems.
Overall, SSH is a critical protocol for secure remote access, file transfers, and command execution. It provides a secure and encrypted channel, ensuring the confidentiality and integrity of data transmitted over the network. With its wide range of features and capabilities, SSH is invaluable in various scenarios such as system administration, software development, and network management.
Why SSH Windows?
While SSH has long been associated with Unix-like operating systems, such as Linux, it is also possible to utilize SSH on Windows machines. Incorporating SSH into your Windows environment offers several advantages and opens up new possibilities for remote access and management.
One of the primary reasons to use SSH on Windows is enhanced security. SSH utilizes strong encryption algorithms to protect data transmitted between the client and server. This ensures that sensitive information, such as login credentials and data transfers, is secure from prying eyes and potential hackers.
By enabling SSH on Windows, you can establish secure remote connections to Windows machines. This allows you to access and manage your Windows servers or workstations from anywhere in the world. Whether you’re a system administrator needing to troubleshoot server issues or a developer requiring remote access to test your applications, SSH on Windows provides a reliable and secure solution.
Additionally, SSH on Windows enables secure file transfers. Utilizing tools like SCP or SFTP, you can securely transfer files between your local machine and remote Windows servers. This eliminates the risks associated with traditional file transfer methods such as FTP, which transmit data in plain text and are susceptible to interception.
Another advantage of SSH on Windows is the ability to perform remote command execution. With SSH, you can execute commands on remote Windows machines from your local machine’s command prompt. This allows for efficient system administration and management, as you can remotely perform tasks without physically being present at the Windows machine.
Furthermore, SSH on Windows is widely supported and compatible with various SSH clients and servers available for Windows. Whether you prefer a graphical user interface (GUI) or a command-line interface (CLI), there are SSH clients that cater to your preferred workflow. This flexibility makes SSH on Windows accessible to users of all levels of technical expertise.
Overall, incorporating SSH into your Windows environment offers increased security, remote access and management capabilities, secure file transfers, and efficient remote command execution. By utilizing SSH on Windows, you can enhance productivity, streamline workflows, and ensure the security of your remote connections and data transfers.
Prerequisites for SSH Windows
Before you can begin setting up SSH on your Windows machine, there are a few prerequisites that you need to ensure are in place. These prerequisites will help facilitate the installation and configuration process smoothly.
First and foremost, you need to have administrative access to the Windows machine you intend to connect to. Administrative access is required to install and configure the necessary components for SSH on Windows.
Additionally, it is crucial to verify which edition of Windows you are running. SSH is supported on Windows 10 version 1809 or later, Windows Server 2019, and Windows Server version 1809 or later. If you are using an older version of Windows, it may not have native support for SSH, and you will need to explore alternative solutions.
You should also have a basic understanding of the Windows command prompt environment. Knowledge of basic commands, such as navigating directories and executing commands, will come in handy during the installation and configuration process.
Furthermore, having a grasp of networking concepts is beneficial. Understanding IP addresses, ports, and how network connections work will help you troubleshoot any potential issues that may arise during the SSH setup.
Lastly, it is essential to have a clear understanding of the security implications of implementing SSH on your Windows machine. While SSH offers secure encrypted connections, it is crucial to follow best practices for configuring and managing SSH to ensure a high level of security. This includes regularly updating SSH components, using strong authentication mechanisms, and securely managing SSH keys.
By ensuring these prerequisites are met, you can set the stage for a smooth and successful SSH installation and configuration process. Now that you’re familiarized with the necessary prerequisites, let’s dive into the step-by-step process of setting up SSH on your Windows machine.
Step 1: Installing OpenSSH
The first step in setting up SSH on Windows is to install OpenSSH, the open-source implementation of the SSH protocol. OpenSSH provides the necessary components to enable SSH functionality on your Windows machine.
Starting with Windows 10 version 1809 and Windows Server 2019, OpenSSH is included as a Windows feature, making it easy to install without the need for third-party software. Here’s how to install OpenSSH:
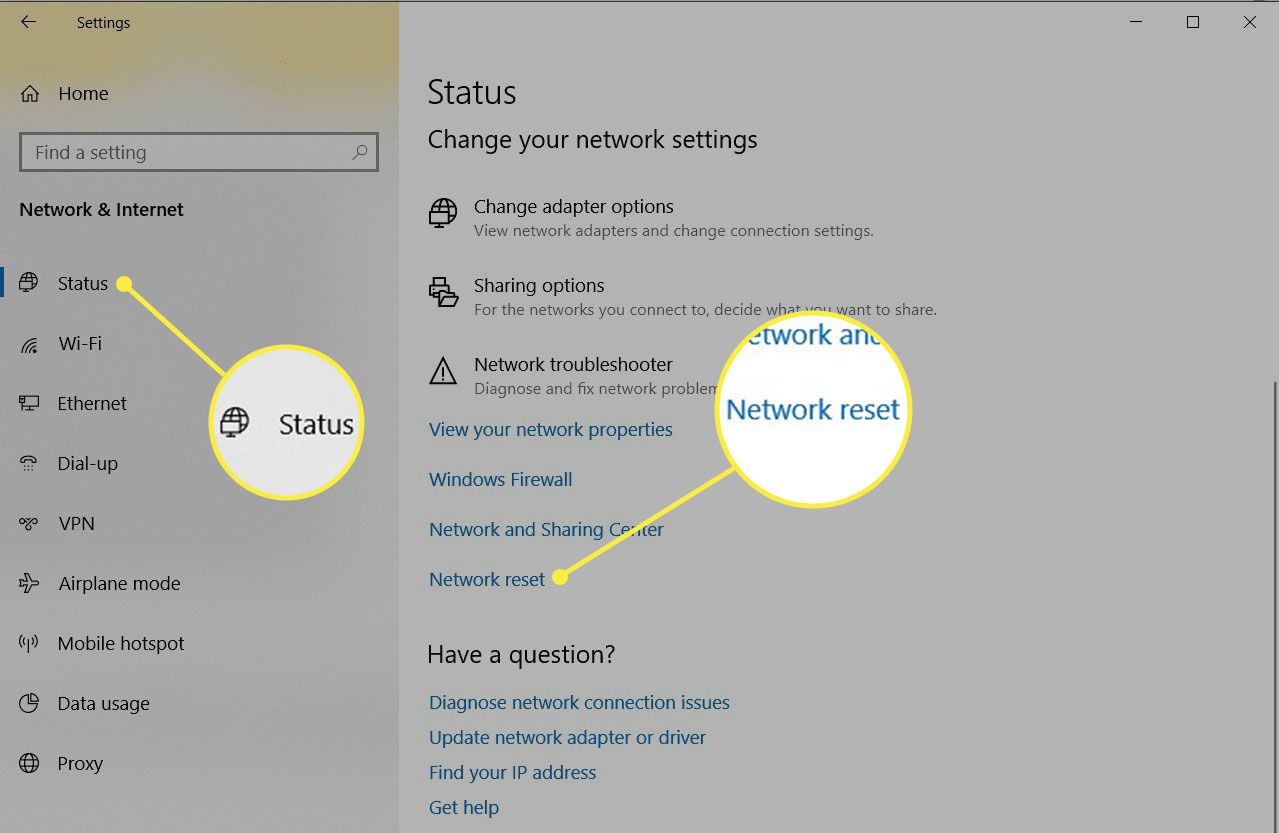
- Launch the Windows Settings app by pressing the Windows key + I on your keyboard.
- Click on “Apps” and then select “Optional features” in the left sidebar.
- Click on the “Add a feature” button.
- In the list of available features, locate “OpenSSH Client” and “OpenSSH Server”. Depending on your use case, you may choose to install either or both features.
- Select the desired features and click on the “Install” button to begin the installation process.
- Wait for the installation to complete. This may take a few minutes.
Once the installation is finished, you now have OpenSSH installed on your Windows machine. This enables you to establish SSH connections and utilize SSH functionality.
Note that if you are using an older version of Windows that does not include OpenSSH as a Windows feature, you can opt to install third-party SSH clients such as PuTTY, SecureCRT, or Bitvise SSH Client. These clients offer similar SSH functionality and can be installed separately.
Now that OpenSSH is installed, we can move on to configuring OpenSSH to tailor it to our specific needs.
Step 2: Configuring OpenSSH
Once OpenSSH is installed on your Windows machine, the next step is to configure it to customize its behavior and ensure it aligns with your specific requirements. The configuration process involves modifying the SSH server settings to enable certain features and enhance security.
To configure OpenSSH on Windows, follow these steps:
- Open the Windows Start menu and search for “OpenSSH Server”.
- Click on the “Edit the system environment variables” option.
- In the System Properties window, click on the “Environment Variables” button.
- In the System Variables section, locate and select the “Path” variable, and then click on the “Edit” button.
- Add the path of the OpenSSH installation directory to the “Variable value” field. By default, the path is C:\Windows\System32\OpenSSH.
- Click on “OK” to save the changes.
- Next, open the OpenSSH configuration file. The file is located at C:\ProgramData\ssh\sshd_config.
- Use a text editor, such as Notepad, to open and modify the configuration file.
- Within the configuration file, you can make various adjustments according to your needs. Typical configuration options include port numbers, authentication methods, and user access settings.
- Save the changes to the configuration file.
After configuring OpenSSH, it is essential to restart the OpenSSH service for the changes to take effect. To do this, follow these steps:
- Open the Windows Services Manager by pressing the Windows key + R and then typing “services.msc”.
- Locate the “OpenSSH SSH Server” entry in the list of services.
- Right-click on “OpenSSH SSH Server” and select “Restart”.
Once the service is restarted, the OpenSSH server will be running with the newly applied configurations. You can now proceed to the next step of generating SSH keys.
Configuration settings may vary depending on your specific requirements and environment. It is essential to refer to the OpenSSH documentation for additional configuration options and best practices.
Step 3: Generating SSH Keys
SSH keys are cryptographic keys that are used for secure authentication and encryption during SSH connections. In this step, we will generate SSH keys that will allow you to securely connect to Windows machines using SSH.
To generate SSH keys on Windows, follow these steps:
- Open a command prompt by pressing the Windows key + R, typing “cmd”, and clicking on “OK”.
- In the command prompt window, navigate to the OpenSSH directory by entering the command:
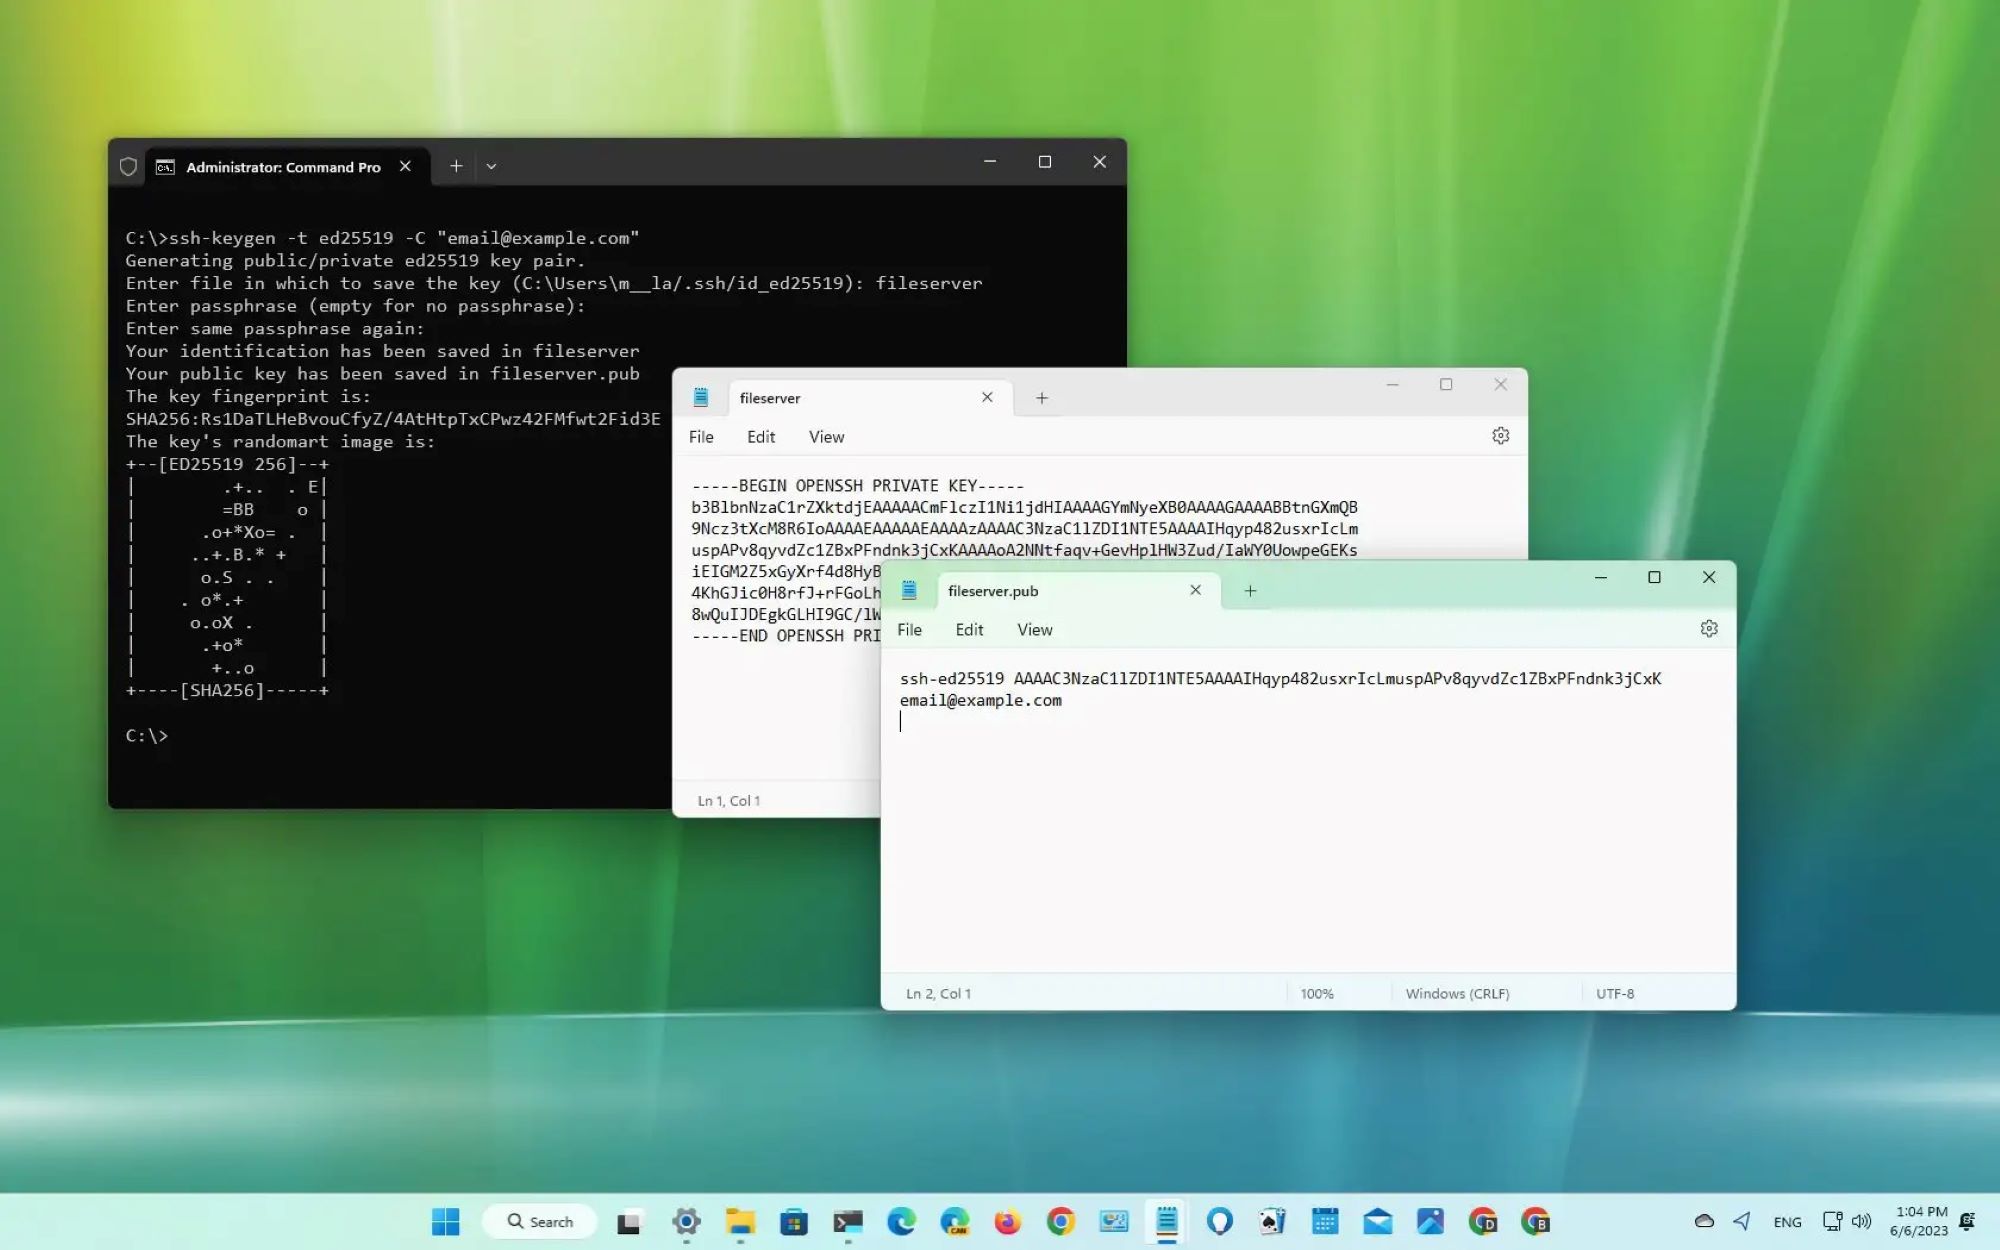
cd C:\ProgramData\ssh - Once inside the OpenSSH directory, generate a new SSH key pair by running the following command:
ssh-keygen -t rsa - You will be prompted to enter a file name to save the key pair. You can leave it as the default or specify a custom name.
- Next, you will be prompted to enter a passphrase for the key pair. A passphrase adds an extra layer of security to your keys, but it’s optional. If you choose to use a passphrase, make sure it is strong and memorable.
- Once the key pair generation is complete, you will see a success message indicating the location of the public and private key files.
By default, the public key file will be saved as “id_rsa.pub” and the private key file as “id_rsa” in the .ssh directory within your user profile.
It is important to note that the private key file should be kept secure and not shared with anyone. The public key file, on the other hand, can be shared with the remote Windows machine that you want to connect to.
Now that you have generated your SSH key pair, you can proceed to the next step of connecting to a Windows machine using SSH.
Remember to securely store your private key and avoid sharing it over insecure channels to maintain the integrity and security of your SSH connections.
Step 4: Connecting to a Windows Machine Using SSH
Now that you have installed OpenSSH, configured it, and generated your SSH key pair, you can proceed to connect to a Windows machine using SSH. This step allows you to establish a secure and encrypted connection to the remote Windows machine.
To connect to a Windows machine using SSH, follow these steps:
- Open the command prompt on your local machine.
- Use the following SSH command to connect to the remote Windows machine:
ssh username@remote-ip - Replace “username” with your username on the remote Windows machine and “remote-ip” with the IP address or hostname of the remote Windows machine.
- If this is your first time connecting to the remote machine, you will be prompted to accept the host key. Enter “yes” to proceed.
- If you have set a passphrase for your private key during the SSH key generation process, you will be prompted to enter it now.
- Once authenticated, you will have a secure shell session on the remote Windows machine.
From the shell session, you can execute commands on the remote machine, transfer files using SCP or SFTP, and perform various administrative tasks.
It is worth noting that if you are using a different SSH client, such as PuTTY, you will need to import your private key into the client and configure the connection settings accordingly.
If you encounter any issues while connecting to the remote Windows machine, double-check your SSH configuration settings, ensure that the OpenSSH service is running on the remote machine, and verify that the correct SSH port is open.
By following these steps, you can connect to a Windows machine using SSH and leverage the secure and encrypted communication it provides.
Now that you have successfully connected to the remote Windows machine, you can remotely manage and administer the system, transfer files securely, and execute commands as needed.
Troubleshooting SSH Windows Issues
While setting up and using SSH on Windows is generally straightforward, it is not uncommon to encounter issues along the way. In this section, we will discuss some common problems you may encounter when working with SSH on Windows and how to troubleshoot them.
1. Connection refused: If you are unable to establish an SSH connection to the remote Windows machine and receive a “Connection refused” error, ensure that the OpenSSH service is running on the remote machine. You can check the service status in the Windows Services Manager.
2. Firewall blocking SSH: If you are unable to connect to a Windows machine using SSH, check if there is a firewall or security software blocking SSH traffic. Ensure that port 22, which is the default SSH port, is open in the firewall settings.
3. Incorrect authentication: If your SSH connection fails due to authentication issues, verify that you are using the correct username and password or that your SSH keypair is correctly configured. Double-check the SSH server’s configuration file to ensure that the appropriate authentication methods are enabled.
4. Permissions: Ensure that proper permissions are set for the SSH key files on both the client and server side. The private key file should have restricted permissions (e.g., only readable by the owner) to maintain its security.
5. Incompatible SSH versions: If you encounter compatibility issues when connecting to a remote Windows machine from an SSH client, ensure that the SSH client and server versions are compatible. Different versions of SSH may have different encryption algorithms or protocols, which can cause connectivity problems.
6. Logging and debugging: Enable logging and debugging options in the SSH client or server to gather more information about the connection issues. This can help identify the root cause of the problem and guide troubleshooting efforts.
When troubleshooting SSH issues, it is essential to consult the documentation and resources specific to your SSH client and server software. Additionally, search for online forums or communities where users discuss common problems and solutions related to SSH on Windows.
By following these troubleshooting steps and leveraging the available resources, you can effectively resolve SSH-related issues on Windows and ensure smooth and secure remote access and management.
Conclusion
Setting up and utilizing SSH on Windows opens up a world of possibilities for secure remote access, file transfers, and remote command execution. By following the steps outlined in this guide, you can successfully install OpenSSH, configure it according to your requirements, generate SSH keys, and establish secure connections to Windows machines.
SSH provides a secure and encrypted channel for remote access and management, allowing you to efficiently administer Windows servers, transfer files securely, and execute remote commands. It enhances the overall security of your connections and protects sensitive data from unauthorized access.
Throughout the process, it is important to ensure that you meet the prerequisites, follow best practices for configuring SSH, and troubleshoot any issues that may arise. This will help maximize the effectiveness and security of your SSH connections.
Remember to regularly update your SSH components, securely manage your SSH keys, and implement strong authentication mechanisms to further enhance the security of your SSH connections.
With SSH on Windows, you can streamline your workflow, improve productivity, and securely manage your remote Windows machines. Whether you are a system administrator, developer, or simply need secure remote access to your Windows devices, SSH is an invaluable tool.
By harnessing the power of SSH, you can confidently and securely connect to Windows machines, manage them efficiently, and enjoy the benefits of remote access in a secure and encrypted environment.