Introduction
Formatting a Solid State Drive (SSD) is an essential step when setting up a new SSD or if you want to wipe all existing data from it. The process of formatting involves preparing the SSD for use by creating a file system and initializing it to store and retrieve data efficiently.
Whether you have recently acquired a Windows 11 system or you are upgrading your existing computer, knowing how to format a SSD in Windows 11 is crucial. By following the correct procedure, you can ensure that your SSD is properly configured and ready to deliver optimal performance.
Before we dive into the step-by-step process of formatting a SSD in Windows 11, it’s important to note that formatting will erase all the data on the drive. Therefore, it is essential to back up any important files and documents beforehand. Additionally, make sure that your computer meets the necessary requirements and that your SSD is compatible with Windows 11.
In this guide, we will walk you through the process of formatting a SSD in Windows 11, ensuring that you have a clean and properly formatted drive for your data storage needs. So, let’s get started!
Step 1: Check Compatibility and Backup Your Data
Before you begin formatting your SSD in Windows 11, it’s crucial to check if your system meets the required specifications and ensure that you have a backup of all your important data.
Firstly, verify if your computer is compatible with Windows 11. Windows 11 has specific hardware requirements, including processor, RAM, and storage specifications. You can check Microsoft’s official website for the system requirements or use the PC Health Check tool to determine if your computer is compatible.
Once you have confirmed compatibility, it’s time to back up your data. Formatting a SSD erases all the data on the drive, so it’s vital to create a backup to prevent any potential loss of important files. You can use an external hard drive, cloud storage services, or even another internal storage device to create a backup.
Start by identifying the files and folders you want to back up. Consider your documents, pictures, videos, music, and any other files that are important to you. Create a folder on your backup storage and copy these files into it. Make sure to double-check that you have copied everything you need before proceeding.
Backing up your data provides an extra layer of security and peace of mind during the formatting process. In the unlikely event that something goes wrong or if you accidentally erase important files, you can easily restore them from your backup.
Once you have completed the backup process and ensured that you have all your important files safely stored, you are ready to proceed with the formatting of your SSD in Windows 11. Following the upcoming steps will guide you through the process and help you achieve a properly formatted SSD for optimal performance.
Step 2: Connect the SSD to Your System
Once you have confirmed compatibility and backed up your data, the next step is to physically connect the SSD to your system. Here’s how to do it in Windows 11:
1. Shut down your computer and disconnect the power cable. This is an important safety precaution to avoid any electrical damage to your system.
2. Open your computer case or access the external storage enclosure where you will install the SSD. If you’re unsure about the location of the storage bays, consult the documentation or the manufacturer’s website for your specific computer or enclosure model.
3. Locate an available SATA or M.2 slot, depending on the type of SSD you have. A SATA port will have a data cable that connects to your motherboard, while an M.2 slot is a smaller, rectangular slot on the motherboard itself.
4. Carefully insert the SSD into the slot, aligning the notches or connectors on the SSD with the ones on the slot. Be gentle and avoid applying excessive force.
5. Secure the SSD in place using the appropriate screws or brackets. This step may vary depending on your specific computer or enclosure model. Refer to the documentation for guidance if needed.
6. Once the SSD is securely connected, reassemble your computer case or close the enclosure. Make sure all connections are secure before proceeding to the next step.
7. Finally, reconnect the power cable and turn on your computer. Windows 11 should detect the newly connected SSD, and you’re ready to move on to the next step of formatting.
Connecting the SSD to your system is a crucial step to ensure that it is recognized and ready for formatting. Once the SSD is properly connected, you can proceed to the next step of opening Disk Management in Windows 11.
Step 3: Open Disk Management
After connecting the SSD to your system, the next step in formatting it in Windows 11 is to open Disk Management. Disk Management is a built-in tool that allows you to manage and configure storage devices on your computer.
Here’s how you can open Disk Management in Windows 11:
1. Right-click on the Start button located at the bottom left corner of your screen. A context menu will appear.
2. From the context menu, select “Disk Management.” This will launch the Disk Management tool.
Alternatively, you can also open Disk Management by pressing the Windows key + X on your keyboard and selecting “Disk Management” from the menu that appears.
Once Disk Management is open, you will see a list of all the storage devices connected to your system, including the newly connected SSD.
Note: If the SSD is not showing up in Disk Management, make sure that it is properly connected to your system and recognized by the BIOS or UEFI. You may need to double-check the physical connection and ensure that the SSD is powered on.
With Disk Management open and the SSD visible, you are ready to move on to the next step of initializing the SSD in Windows 11. Initializing the SSD prepares it for formatting and allows you to create a new partition on the drive.
Keep in mind that initializing the SSD will erase any existing data on it, so make sure you have backed up all important files before proceeding.
Now that you have successfully opened Disk Management, you can proceed to initialize the SSD in Windows 11 and create a new partition on the drive.
Step 4: Locate and Select the SSD
Once you have opened Disk Management in Windows 11, the next step is to locate and select the SSD that you want to format. This will allow you to perform actions such as initialization, partition creation, and formatting on the specific SSD.
Follow these steps to locate and select the SSD in Disk Management:
1. In the Disk Management window, you will see a list of all the storage devices connected to your system. The drives will be listed at the bottom of the window under the “Disk #” column.
2. Locate the SSD by looking for its corresponding disk number. The disk number will vary depending on the number of storage devices connected to your system. Make sure to identify the correct disk associated with the SSD you want to format.
3. Identify the SSD by checking the capacity and other relevant information listed under the “Size,” “Status,” and “Partition Style” columns. This will help you ensure that you are selecting the correct SSD.
4. Once you have identified the SSD, right-click on its entry in the Disk Management window. A context menu will appear.
5. From the context menu, select the appropriate action you want to perform on the SSD. Depending on your specific needs, you can choose to initialize the disk, create a new simple volume, or format the existing partition(s).
Selecting the SSD allows you to perform various operations on it, such as initializing it to prepare it for partitioning and formatting or formatting existing partitions.
Note: If the SSD does not appear in Disk Management or if it shows as “Not initialized” or “Offline,” you may need to troubleshoot the connection or check the BIOS settings to ensure proper recognition of the SSD.
Once you have located and selected the SSD in Disk Management, you can proceed to the next step of initializing the SSD or creating a new partition, depending on your requirements.
Step 5: Initialize the SSD
After locating and selecting the SSD in Disk Management, the next step in formatting the SSD in Windows 11 is to initialize it. Initializing the SSD prepares it for partitioning and formatting, allowing you to use it for storing and retrieving data.
Follow these steps to initialize the SSD in Disk Management:
1. Right-click on the selected SSD in Disk Management. A context menu will appear.
2. From the context menu, select “Initialize Disk.” This will open the Initialize Disk window.
3. In the Initialize Disk window, you will see the selected SSD listed with its disk number and an indication that it is “Not initialized.”
4. Choose the partition style for the SSD. The available options are MBR (Master Boot Record) and GPT (GUID Partition Table). Select the appropriate option based on your needs and compatibility with your system.
5. Check the box next to “Perform a quick format” if you want to speed up the formatting process. Note that this option does not securely erase the data on the SSD but simply prepares it for use.
6. Click on the “OK” button to begin the initialization process. Windows 11 will initialize the SSD and prepare it for partitioning.
7. Once the initialization process is complete, you will see the SSD listed as “Online” and with an “Unallocated” status in Disk Management. This indicates that the SSD is now ready for partitioning.
Initializing the SSD is an important step in the formatting process as it sets the foundation for creating partitions and formatting the drive. Once the SSD is initialized, you can proceed to create a new partition or format existing partitions to start using the SSD for storing your data.
Remember to double-check that you have backed up all important data from the SSD before proceeding with the initialization and formatting process.
Now that you have successfully initialized the SSD, you can move on to the next step of creating a new partition on the disk or formatting existing partitions.
Step 6: Create a New Partition
After initializing the SSD in Windows 11, the next step in formatting the SSD is to create a new partition. Creating a partition allows you to divide the SSD into separate sections for organizing and managing your data more effectively.
Follow these steps to create a new partition on the SSD in Disk Management:
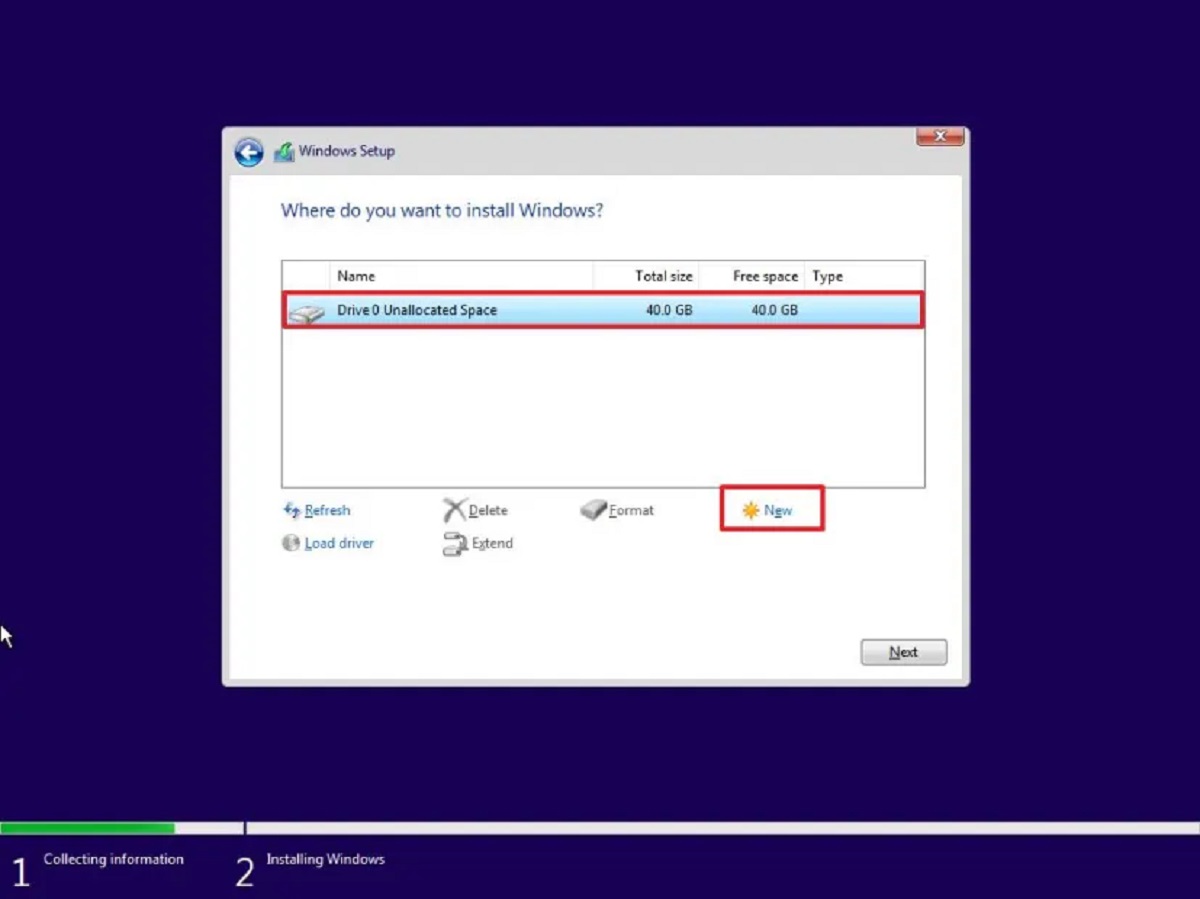
1. Right-click on the “Unallocated” space of the initialized SSD in Disk Management. A context menu will appear.
2. From the context menu, select “New Simple Volume.” This will open the New Simple Volume Wizard.
3. In the New Simple Volume Wizard, click “Next” to proceed.
4. Specify the size of the new partition. The default value represents the maximum available space for the partition. You can choose to allocate a specific size if desired.
5. Select a drive letter for the new partition. Windows will assign a default drive letter, but you can choose a different letter if needed. Alternatively, you can choose to mount the partition in an empty NTFS folder on an existing volume.
6. Choose the file system for the new partition. The recommended file system for most users is NTFS. You can also choose other file systems such as FAT32 or exFAT depending on your requirements.
7. Enter a meaningful name for the new partition. This can help you identify the partition easily in the future.
8. Check the “Perform a quick format” box if you want to speed up the formatting process. Again, note that this option does not securely erase the data but simply prepares the partition for use.
9. Click “Next” and then “Finish” to create the new partition on the SSD. Disk Management will format the partition and assign the chosen drive letter or mount point.
Once the new partition is created and formatted, it will be listed in Disk Management as a separate volume on the SSD. You can now start using this partition to store your files and data.
Remember to double-check that you have backed up all important data from the SSD before creating a new partition to avoid any accidental data loss.
Now that you have successfully created a new partition on the SSD, you can proceed to the final step of formatting the SSD.
Step 7: Format the SSD
After creating a new partition on the SSD in Windows 11, the final step in formatting the SSD is to format the partition. Formatting allows you to prepare the partition for storing data by setting up the file system and allocating necessary resources.
Follow these steps to format the SSD partition in Disk Management:
1. Locate the newly created partition on the SSD in Disk Management. It will be listed as a separate volume under the “Volumes” section.
2. Right-click on the partition and select “Format” from the context menu. This will open the Format window.
3. In the Format window, you can specify the volume label, file system, and allocation unit size. The volume label is a name that you can give to the partition for easy identification.
4. Choose the desired file system for the partition. The recommended file system for most users is NTFS due to its advanced features and compatibility with Windows operating systems.
5. Select an appropriate allocation unit size. The default allocation unit size is usually recommended, but you can choose a different size if desired.
6. Check the “Perform a quick format” box if you want to speed up the formatting process. Keep in mind that this option does not securely erase the data on the partition.
7. Click on the “OK” button to proceed with the formatting process. Windows 11 will format the partition, and it should only take a few moments.
Once the formatting process is complete, you will see the partition listed as a healthy volume in Disk Management. This indicates that the SSD is now fully formatted and ready for use.
It’s important to note that formatting erases any existing data on the partition. Therefore, make sure you have backed up any important files before proceeding with the formatting process.
Now that you have successfully formatted the SSD partition, you can start using it to store your data. Whether it’s for documents, media files, or applications, your newly formatted SSD is ready to provide quick and reliable storage.
Step 8: Apply the Changes and Complete the Formatting Process
After formatting the SSD partition in Windows 11, the final step is to apply the changes and complete the formatting process. Applying the changes ensures that the formatting settings are saved and implemented on the SSD.
Follow these steps to apply the changes and complete the formatting process in Disk Management:
1. Double-check that the formatting settings are correct and that you have backed up any important data from the SSD partition.
2. Once you are confident with your choices, click on the “Apply” or “OK” button in the Format window. This will prompt a confirmation dialogue box.
3. Review the details in the confirmation dialogue box to ensure that you are applying the changes to the correct SSD partition.
4. If everything is in order, click on the “Yes” or “OK” button to confirm and apply the changes. Disk Management will now complete the formatting process.
5. Depending on the size of the SSD and the formatting options chosen, the process may take a few minutes. You can monitor the progress in the Status column of Disk Management.
6. Once the formatting process is complete, Disk Management will display the SSD partition as a healthy volume with the chosen file system and drive letter. The SSD is now fully formatted and ready to be used.
7. To verify that the formatting process was successful, you can open File Explorer and navigate to the newly formatted SSD partition. It should be listed and ready for you to start saving and accessing your files.
By completing the formatting process, you have successfully prepared and configured your SSD in Windows 11. The SSD is now set up for optimal performance and efficient data storage.
Remember to regularly back up your data to ensure its safety and security. Additionally, make sure to keep your operating system and drivers up to date to maintain stability and compatibility with your SSD.
Now that you have completed the final step of applying the changes, congratulations! You have successfully formatted the SSD in Windows 11 and it’s ready to meet your storage needs.
Conclusion
Formatting a Solid State Drive (SSD) in Windows 11 is a crucial process that allows you to prepare the drive for efficient data storage and retrieval. By following the step-by-step guide outlined above, you can successfully format your SSD and ensure optimal performance.
Starting with checking compatibility and backing up your data, you can ensure that your system meets the necessary requirements and avoid any potential loss of important files. Connecting the SSD to your system and opening Disk Management are crucial steps in preparing the SSD for formatting.
Once the SSD is located and selected in Disk Management, you can proceed with initializing the drive and creating a new partition. These steps allow you to divide the SSD into logical sections for better organization and data management.
After creating a new partition, formatting the SSD ensures that the file system is set up, and the partition is ready for storing and accessing your data. Applying the changes and completing the formatting process will finalize the setup and make the SSD fully operational.
Remember to regularly back up your important files and keep your system and SSD drivers up to date for optimal performance and security. By following these steps and best practices, you can ensure a properly formatted SSD that meets your storage needs.
Now that you have successfully formatted your SSD in Windows 11, you can enjoy the benefits of fast and reliable storage for your documents, media files, and applications.