Introduction
Welcome to the world of SSDs and Windows 11! If you’re looking to optimize the performance and organization of your SSD, partitioning is a crucial step to consider. Partitioning allows you to divide your SSD into separate sections, each functioning as an independent drive. This can provide numerous benefits, including better file management, improved system performance, and enhanced data security. In this article, we will explore the various methods to partition a SSD in Windows 11.
Windows 11, the latest operating system from Microsoft, offers a variety of built-in tools and features to help you accomplish this task. Whether you’re a novice or an experienced user, partitioning your SSD can be done with relative ease. However, it’s important to take certain precautions before diving into the partitioning process to avoid any potential data loss or system issues.
In the following sections, we will provide you with step-by-step instructions on how to partition your SSD in Windows 11 using different methods. We’ll start with the built-in Disk Management tool, which is suitable for most users. Then, we’ll delve into using the powerful Diskpart command for advanced users who prefer the command-line approach. Finally, we’ll discuss the option of using third-party partitioning software for added flexibility and advanced features.
Whether you want to create multiple partitions for better organization, allocate space for dual booting, or simply optimize your SSD’s performance, this guide will cover everything you need to know. So, let’s get started with the partitioning process and unleash the full potential of your SSD in Windows 11!
Why Partitioning SSD is Important?
Partitioning your SSD serves several important purposes that can greatly benefit your overall computing experience. Let’s explore the reasons why partitioning your SSD is important:
- Improved File Management: By creating multiple partitions on your SSD, you can categorize and organize your files more efficiently. Each partition acts as a separate drive, allowing you to allocate specific space for different types of data, such as documents, media files, or system backups. This not only makes it easier to locate and access files but also helps to keep your SSD clutter-free and maintain optimal performance.
- Enhanced System Performance: Partitioning your SSD can lead to improved system performance. By separating your operating system and program files from user data, you minimize the chances of fragmentation and ensure smoother and faster access to critical system files. Additionally, partitioning allows you to allocate dedicated space for swap files and temporary files, further optimizing your system’s performance.
- Better Data Organization: Partitioning can provide a logical structure for your data, allowing for better organization and easier backup and recovery. With separate partitions, you can isolate your important files and folders from the operating system and other software installations. This separation reduces the risk of data loss or corruption, as well as simplifies the backup process by targeting specific partitions rather than the entire drive.
- Flexibility for Dual Booting: If you want to run multiple operating systems on your computer, partitioning your SSD is essential. By creating separate partitions for each operating system, you can easily switch between them without interfering with one another. This flexibility enables you to explore different platforms or use specific software that may not be compatible with your primary operating system.
- Enhanced Data Security: Partitioning can help enhance data security by isolating sensitive files and folders. You can create a separate partition specifically for confidential or private data, and apply encryption or additional security measures to that specific partition. This adds an extra layer of protection, reducing the risk of unauthorized access or data breaches.
With these important advantages in mind, it’s clear that partitioning your SSD is a valuable practice that can greatly optimize your computing experience. Whether it’s for better file management, improved performance, organizing data, dual-booting, or data security, partitioning your SSD in Windows 11 is a worthwhile endeavor.
Precautions to Take Before Partitioning SSD
Before you embark on the partitioning process for your SSD in Windows 11, it’s important to take certain precautions to ensure a smooth and safe experience. Here are some essential precautions to consider:
- Backup Your Data: One of the most crucial precautions is to back up your data before initiating any partitioning actions. While partitioning is generally a safe process, there’s always a risk of data loss or unexpected errors. Creating a backup of your important files and folders ensures that even if something goes wrong during partitioning, you’ll still have a copy of your data.
- Check for Defragmentation: Before partitioning, it’s advisable to check if your SSD needs defragmentation. However, it’s important to note that unlike traditional hard drives, SSDs do not require frequent defragmentation as they operate differently. In fact, excessive defragmentation can negatively impact the lifespan of an SSD. Therefore, it’s generally recommended to skip defragmentation on SSDs and focus on optimizing the partitioning process instead.
- Ensure Sufficient Free Space: Before attempting to create new partitions, ensure that you have enough free space on your SSD. Depending on the size of your SSD and the intended purpose of the partitions, it’s important to allocate an appropriate amount of space for each partition. This will allow for smooth functioning and prevent any potential issues related to insufficient space in the future.
- Choose the Right Partitioning Method: Windows 11 offers different methods for partitioning your SSD, such as using built-in tools like Disk Management or Diskpart, or utilizing third-party software. Before proceeding, it’s important to research and understand the pros and cons of each method to determine the most suitable approach for your needs and level of expertise.
- Be Cautious when Modifying System Partitions: If you plan to modify or resize system partitions, exercise extra caution, as any mistakes can lead to system instability or inability to boot into Windows. It’s recommended to create a system backup or recovery point before making any modifications to system partitions to ensure you can revert back in case of any issues.
- Stay Updated and Use Reliable Software: Ensure that your Windows 11 operating system and related partitioning software are up to date. Software updates often include bug fixes and improvements that can contribute to a smoother and more reliable partitioning process. Additionally, always use reputable and trusted software from reliable sources to minimize the risk of potential malware or data corruption.
By taking these necessary precautions before partitioning your SSD in Windows 11, you can minimize the risk of data loss, avoid potential system errors, and ensure a successful partitioning experience. It’s better to be safe than sorry, so don’t overlook these essential steps before diving into the partitioning process.
Step-by-Step Guide to Partition a SSD in Windows 11
If you’re ready to partition your SSD in Windows 11, follow this step-by-step guide to ensure a smooth and successful partitioning process:
- Step 1: Backup Your Data: Before you begin, it’s crucial to back up your important data to a separate storage device or cloud service.
- Step 2: Open Disk Management: Press the Windows key + X on your keyboard and select “Disk Management” from the menu that appears. Alternatively, you can right-click the Start button and choose “Disk Management” from the context menu.
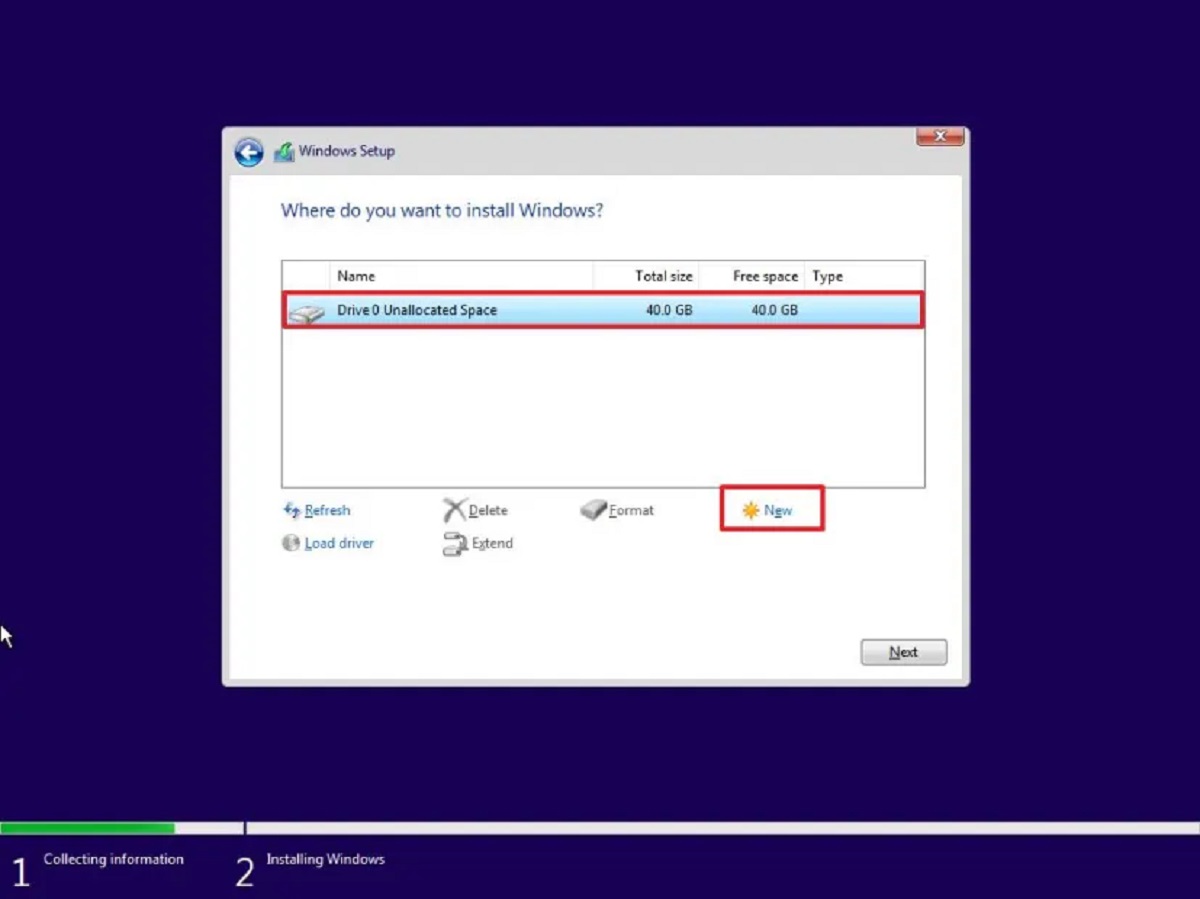
- Step 3: Identify the SSD: In the Disk Management window, locate your SSD. It will be listed as a disk with unallocated space or existing partitions.
- Step 4: Create a New Partition: Right-click on the unallocated space or a partition on the SSD and choose “New Simple Volume” from the context menu.
- Step 5: Follow the Wizard: The “New Simple Volume Wizard” will launch. Follow the on-screen instructions to specify the partition size, assign a drive letter or mount point, and choose the file system (NTFS is recommended).
- Step 6: Complete the Process: Once you’ve completed the wizard, click “Finish” to create the partition. The newly created partition will now be visible in Disk Management.
- Step 7 (Optional): Resize or Modify Partitions: If you need to resize or modify existing partitions, right-click on the partition and choose the desired option from the context menu. You can extend, shrink, or delete partitions as needed.
- Step 8: Verify and Test: After partitioning, it’s essential to verify that the partitions are functioning correctly. Open File Explorer, and ensure that each partition appears as a separate drive with its own assigned letter or mount point.
It’s worth noting that the above guide demonstrates the partitioning process using the built-in Disk Management tool in Windows 11. However, you can also explore other methods, such as using the Diskpart command or third-party partitioning software, for more advanced options and features.
Remember, partitioning your SSD requires careful consideration and should be done with caution. Always double-check your actions and be mindful of the impact on your system and data. Following this step-by-step guide will help you successfully partition your SSD in Windows 11 and optimize your storage experience.
Method 1: Using Disk Management
The built-in Disk Management tool in Windows 11 provides a straightforward and user-friendly interface for partitioning your SSD. Follow these steps to partition your SSD using Disk Management:
- Step 1: Open Disk Management: Press the Windows key + X on your keyboard and select “Disk Management” from the menu that appears. Alternatively, right-click the Start button and choose “Disk Management” from the context menu.
- Step 2: Locate the SSD: In the Disk Management window, look for your SSD, which will be listed as a disk with unallocated space or existing partitions.
- Step 3: Create a New Partition: Right-click on the unallocated space or an existing partition on the SSD and choose “New Simple Volume” from the context menu.
- Step 4: Follow the Wizard: The “New Simple Volume Wizard” will appear. Click “Next” and follow the on-screen instructions to specify the partition size, assign a drive letter or mount point, and choose the file system (NTFS is recommended).
- Step 5: Complete the Process: After configuring the settings, click “Next” and review your selections. Click “Finish” to create the partition.
- Step 6: Verify and Test: Open File Explorer and ensure that the newly created partition appears as a separate drive with its own assigned letter or mount point.
- Step 7 (Optional): Resize or Modify Partitions: If you need to resize or modify existing partitions, right-click on the partition in Disk Management and choose the desired option from the context menu.
With the Disk Management method, you can create, resize, and modify partitions on your SSD in a straightforward manner. It provides the essential tools for basic partitioning needs. However, it’s worth noting that Disk Management has some limitations and may not offer advanced features compared to other third-party partitioning software.
Before proceeding with Disk Management, it’s important to consider your specific requirements and whether the built-in tools will meet your needs. For more advanced partitioning options and functionalities, you may want to explore alternative methods like the Diskpart command or third-party partitioning software.
By following this method, you can efficiently partition your SSD using the Disk Management tool in Windows 11 and optimize your storage space according to your preferences.
Method 2: Using Diskpart Command
If you prefer a command-line approach or require more advanced partitioning options, using the Diskpart command in Windows 11 is a powerful method to partition your SSD. Follow these steps to partition your SSD using Diskpart:
- Step 1: Open Command Prompt as Administrator: Press the Windows key, type “Command Prompt,” right-click on it, and select “Run as Administrator.”
- Step 2: Launch Diskpart: In the Command Prompt window, type “diskpart” and press Enter to launch the Diskpart utility.
- Step 3: List and Select the SSD: Type “list disk” to display a list of available disks. Identify your SSD based on its size and other characteristics. Then, type “select disk [number]” (replace [number] with the corresponding disk number of your SSD).
- Step 4: Create a New Partition: Type “create partition primary size=[size]” to create a new partition on the selected SSD. Replace [size] with the desired size for the partition in megabytes (MB).
- Step 5: Assign a Drive Letter: Type “assign letter=[letter]” to assign a drive letter to the newly created partition. Replace [letter] with the desired letter (such as “D” or “E”).
- Step 6: Format the Partition: Type “format fs=ntfs quick” to quickly format the partition with the NTFS file system. If you prefer a different file system, you can specify accordingly (e.g., “format fs=fat32 quick”).
- Step 7: Verify and Test: Open File Explorer and verify that the newly created partition is visible with the assigned drive letter or mount point.
- Step 8 (Optional): Resize or Modify Partitions: If needed, you can use additional Diskpart commands, such as “extend” or “shrink,” to resize or modify existing partitions on your SSD.
Using the Diskpart command provides fine-grained control over the partitioning process, making it suitable for advanced users and specific partitioning requirements. However, it’s important to exercise caution and double-check your commands, as any mistakes can result in data loss or system instability.
While the Diskpart method offers more flexibility, it may not be as intuitive as using graphical tools like Disk Management. Therefore, it’s recommended for users who are familiar with command-line interfaces and have a solid understanding of partitioning concepts.
By following this method, you can leverage the power of the Diskpart command in Windows 11 to partition your SSD according to your specific needs and preferences.
Method 3: Using Third-Party Partitioning Software
If you’re looking for additional features, advanced options, and a more intuitive interface for partitioning your SSD, using third-party partitioning software is a viable option. These software solutions often provide a user-friendly experience with comprehensive partitioning functionalities. Follow these general steps to partition your SSD using third-party partitioning software:
- Step 1: Research and Choose Reliable Software: Explore various third-party partitioning software options available and choose a reputable and reliable tool that suits your needs.
- Step 2: Download and Install the Software: Visit the software provider’s website and follow the instructions to download and install the partitioning software on your Windows 11 system.
- Step 3: Launch the Software: Open the partitioning software from the Start menu or desktop shortcut.
- Step 4: Identify the SSD: In the software’s interface, locate and select your SSD from the list of available disks.
- Step 5: Create New Partitions: Depending on the software, you may have various options to create new partitions on your SSD. Typically, you can specify the partition size, assign a drive letter, choose the file system, and define other settings.
- Step 6: Modify Existing Partitions (Optional): If needed, the third-party software allows for resizing, merging, or modifying existing partitions on your SSD. You can use these features to optimize your SSD’s storage space as per your requirements.
- Step 7: Apply the Changes: After configuring your desired partition layout, review the changes and apply them using the software’s interface.
- Step 8: Verify and Test: Open File Explorer and confirm that the newly created partitions are visible with their assigned drive letters or mount points.
Using third-party partitioning software provides you with a wide range of powerful features and advanced partitioning options. These software solutions often have user-friendly interfaces, making it easier for both beginners and experienced users to manage their SSD partitions.
Remember to choose a trusted and reliable third-party partitioning software from reputable sources to ensure the security and integrity of your data. Additionally, familiarize yourself with the software’s documentation and guidelines to make the most out of its features.
By utilizing third-party partitioning software, you can tap into the advanced capabilities and flexibility it offers to efficiently partition your SSD and optimize your storage space according to your specific needs.
Tips for Optimizing SSD Partitioning
Once you have successfully partitioned your SSD in Windows 11, there are a few tips you can follow to further optimize your SSD’s performance and maximize its potential:
- Allocate Adequate Space: Ensure that you allocate sufficient space to each partition on your SSD. Overcrowding a partition can lead to decreased performance and potential system issues. Plan your partition sizes based on your specific needs and make adjustments as necessary.
- Keep Operating System and Applications Separate: Consider creating a dedicated partition for your operating system and applications. This separation allows for easier maintenance, faster access to critical files, and better system performance overall.
- Regularly Update Your SSD Firmware: Check for and install any available firmware updates for your SSD. These updates often include performance enhancements, bug fixes, and improved compatibility with the latest operating systems.
- Optimize Your SSD with TRIM: Enable TRIM functionality on your SSD. TRIM helps maintain the performance and lifespan of your SSD by efficiently managing and freeing up space that is no longer in use. To check if TRIM is enabled, open Command Prompt as Administrator and enter the command “fsutil behavior query DisableDeleteNotify”. If the result is “0,” TRIM is enabled.
- Regularly Run Disk Cleanup: Use the built-in Disk Cleanup tool in Windows 11 to remove unnecessary files and temporary data from your SSD. This helps free up storage space and can improve overall system performance.
- Defragmentation is Not Required: Unlike traditional hard drives, SSDs do not require defragmentation. In fact, defragmenting an SSD can have a negative impact on its performance and lifespan. Windows 11 automatically disables scheduled defragmentation for SSDs, so there is no need to manually defragment your SSD.
- Keep Your SSD Cool: SSD performance can be affected by high temperatures. Ensure that your SSD is properly ventilated and not subjected to excessive heat. This can help maintain optimal performance and prolong its lifespan.
- Maintain Regular Backups: Regardless of how well you partition and optimize your SSD, data loss can still occur due to various reasons. It is crucial to regularly back up your important files and folders to an external storage device or cloud service to safeguard your data.
By following these tips, you can further enhance the performance, longevity, and overall optimization of your SSD partitions. Remember that regular maintenance and monitoring of your SSD will contribute to its continued health and efficient operation.
Conclusion
Properly partitioning your SSD in Windows 11 is crucial for optimizing storage space, improving performance, and enhancing data organization. Whether you choose to use the built-in Disk Management tool, the powerful Diskpart command, or third-party partitioning software, the methods outlined in this guide provide you with the flexibility and options necessary to meet your specific partitioning needs.
Disk Management, with its easy-to-use interface, is suitable for most users and offers basic partitioning capabilities. Diskpart, on the other hand, provides a command-line approach and advanced features for more experienced users who require precise control over partitioning actions. Third-party partitioning software provides additional functionalities and intuitive interfaces that cater to various partitioning requirements.
However, regardless of the method you choose, it is essential to take precautions before partitioning your SSD. Backup your data, ensure sufficient free space, and familiarize yourself with the process to minimize the risk of data loss or system issues. Additionally, following best practices such as allocating adequate space, separating the operating system from applications, and optimizing your SSD with TRIM can further enhance performance.
By properly partitioning and optimizing your SSD in Windows 11, you can experience improved file management, enhanced system performance, better data organization, flexibility for dual booting, and enhanced data security. Regular maintenance, firmware updates, and keeping your SSD cool are also crucial for maintaining its longevity and efficient operation.
Remember, the partitioning process can vary depending on your specific requirements and comfort level. Take the time to understand your needs and explore the available options to determine the best method for partitioning your SSD in Windows 11. By doing so, you can unlock the full potential of your SSD and ensure an optimized storage experience.