Introduction
Welcome to our guide on how to partition a SSD in Windows 7! If you’ve recently upgraded to a solid-state drive (SSD) or are planning to do so, partitioning your SSD can help you optimize its performance and organize your data more efficiently. Partitioning involves dividing your SSD into multiple sections, each acting as a separate storage unit.
Partitioning a SSD can provide several benefits. Firstly, it allows you to separate your operating system, applications, and personal files, making it easier to manage and locate specific data. Additionally, partitioning can enhance your computer’s overall performance by reducing file fragmentation, optimizing disk space utilization, and improving data access times. By partitioning your SSD, you can also isolate and protect important files from accidental deletion or corruption.
Before diving into the partitioning process, it’s important to note that Windows 7 is an older operating system, and newer versions like Windows 10 provide more advanced partitioning features. However, if you’re using Windows 7 and prefer to stick with it, this guide will walk you through the steps to successfully partition your SSD.
In the following sections, we will discuss the steps required to partition a SSD in Windows 7. We will guide you through the preparation process, including backing up important data and creating a Windows 7 installation media. You will also learn how to configure your BIOS settings and install Windows 7 on your SSD. Once the installation is complete, we will cover the steps to create and format partitions on your SSD.
It’s worth mentioning that partitioning a SSD will result in the loss of all data on the drive. Therefore, it’s crucial to backup any important files before proceeding with the partitioning process. With that said, let’s dive into the world of SSD partitioning and unleash the full potential of your device!
Understanding SSD Partitioning
SSD partitioning involves dividing your solid-state drive into distinct sections or partitions, each with its own file system and storage capacity. Understanding the concept of partitioning is crucial before proceeding with the process.
When you initially purchase a new SSD, it typically comes unpartitioned, meaning it’s treated as a single storage unit by your operating system. However, dividing your SSD into multiple partitions offers several advantages.
Firstly, partitioning allows you to separate your operating system, applications, and personal files into different sections. By doing so, it becomes easier to manage and locate specific data. For example, you can keep your Windows system files on one partition while storing your personal files, such as documents, photos, and videos, on another.
Partitioning also helps to optimize your SSD’s performance. Since data is stored independently on each partition, file fragmentation is reduced, resulting in faster access times. Additionally, by allocating specific partitions for certain tasks, you can avoid one partition from affecting or filling up the space on another, thus improving overall system performance.
Another benefit of partitioning is the ability to isolate and protect important files. By separating your crucial data onto a separate partition, you can minimize the risk of accidental deletion or corruption. This is particularly useful when it comes to system crashes or malware infections, as it reduces the likelihood of losing your valuable files.
It’s important to keep in mind that the number of partitions you create on your SSD should be based on your specific needs and preferences. While it’s possible to create numerous partitions, having too many can lead to decreased overall storage capacity and potentially complicate file management.
Before partitioning your SSD, it’s crucial to understand the types of partitioning available. The two main options are primary partitions and extended partitions. Primary partitions are bootable partitions that can be used to install an operating system or storage partitions for data. On the other hand, extended partitions are used to create logical partitions, which function as additional storage spaces within an extended partition.
Now that you have a better understanding of SSD partitioning and its benefits, let’s move on to the next section, where we’ll discuss the necessary preparations before partitioning your SSD in Windows 7.
Preparing for Partitioning
Before diving into the partitioning process, there are several essential steps you need to take to ensure a smooth and successful experience. Preparing for SSD partitioning involves backing up important data, creating a Windows 7 installation media, and configuring the BIOS settings. Let’s explore each step in detail.
Step 1: Backing Up Important Data
Partitioning your SSD will involve modifying its existing structure, and there’s always a risk of data loss. Therefore, it’s vital to back up any important files or data before proceeding with the partitioning process. You can choose to back up your data using an external hard drive, cloud storage, or any other reliable backup method.
Step 2: Creating a Windows 7 Installation Media
To perform the partitioning process, you’ll need a Windows 7 installation media. If you don’t have one, you can create it by downloading the Windows 7 ISO file from Microsoft’s official website and using a tool like Rufus to create a bootable USB drive.
Step 3: Configuring the BIOS Settings
Before installing Windows 7, it’s essential to configure the BIOS settings to ensure that your computer boots from the Windows 7 installation media. To access the BIOS, restart your computer and look for the specific key to enter the BIOS settings (such as F2 or Delete). Once in the BIOS, navigate to the “Boot” tab and set the USB drive or DVD drive with the Windows 7 installation media as the primary boot device.
By following these preliminary steps, you’ll be well-prepared for the partitioning process. Now that you have backed up your data, created a Windows 7 installation media, and adjusted the BIOS settings, you’re ready to proceed with installing Windows 7 and partitioning your SSD. In the next section, we’ll cover the step-by-step process of installing Windows 7 and partitioning your SSD during the installation process.
Step 1: Backing Up Important Data
Before embarking on the partitioning journey, it’s crucial to safeguard your valuable data by backing it up. Partitioning involves modifying the structure of your SSD, and although the risk of data loss is low, it’s better to be safe than sorry. By backing up your important files, you can ensure that they are protected and easily recoverable if anything goes wrong during the partitioning process.
There are several methods you can use to back up your data. One option is to make use of an external hard drive or a USB flash drive with enough storage capacity to accommodate your files. Simply connect the external storage device to your computer and copy the necessary files and folders onto it. Alternatively, you can utilize cloud storage services, such as Google Drive, Dropbox, or Microsoft OneDrive, to store your files securely in the cloud.
When deciding what to back up, focus on personal files, such as documents, photos, videos, music, and any other data that you consider important or irreplaceable. It’s not necessary to back up system files or applications, as these can be reinstalled later on. However, for added peace of mind, you may choose to back up the entire system using a disk imaging tool, such as Macrium Reflect or Acronis True Image.
It’s essential to ensure that your backup is complete and up to date before proceeding with the partitioning process. Double-check that you’ve included all the necessary files and that the backup is stored in a secure location. Take the time to verify the integrity of your backup by testing the restoration process on a small subset of files to ensure everything is in working order.
By taking the time to back up your important data, you are protecting yourself against any potential mishaps during the partitioning process. This guarantees that even if something unexpected occurs, your files remain safe, and you can easily restore them after the partitioning is complete.
Now that you’ve successfully backed up your data, you’re ready to proceed with the partitioning process. In the next steps, we’ll guide you through the process of creating a Windows 7 installation media and configuring the BIOS settings to prepare your system for partitioning.
Step 2: Creating a Windows 7 Installation Media
In order to proceed with partitioning your SSD in Windows 7, you’ll need to create a Windows 7 installation media. This will allow you to install the operating system on your SSD and carry out the partitioning process. Here’s how you can create a Windows 7 installation media:
1. Obtain a Windows 7 ISO File: The first step is to obtain a Windows 7 ISO file. You can download the ISO file from the official Microsoft website or obtain it from a trusted source. Ensure that you download the ISO file that corresponds to your version of Windows 7 (e.g., Home Premium, Professional, or Ultimate).
2. Use a USB Drive or DVD: Once you have the Windows 7 ISO file, you can use either a USB flash drive or a DVD to create the installation media. Both methods are effective, but using a USB drive is generally faster and more convenient.
3. Create a Bootable USB Drive: If you decide to use a USB drive, you will need a tool to create a bootable drive from the Windows 7 ISO file. One popular tool is Rufus, which can be downloaded for free online. Launch Rufus and select your USB drive from the device list. Choose the Windows 7 ISO file as the bootable image, and then click “Start” to initiate the process. Note that all data on the USB drive will be erased, so make sure you have backed up any important files.
4. Burn the ISO to a DVD: If you prefer to use a DVD, you can burn the Windows 7 ISO file to a blank DVD using a DVD burning software. Popular options include ImgBurn, CDBurnerXP, and Nero Burning ROM. Open your chosen burning software, select the “Burn Image” option, and choose the Windows 7 ISO file. Insert a blank DVD into your computer’s DVD drive and start the burning process.
5. Verifying the Installation Media: After creating the installation media, it’s important to verify its integrity. Most installation media creation tools, such as Rufus, have a built-in feature to check the integrity of the bootable USB drive or DVD. This will ensure that the media was created successfully and is ready for use.
Once you have created the Windows 7 installation media, you are one step closer to partitioning your SSD in Windows 7. In the next step, we will guide you on configuring the BIOS settings to ensure that your computer boots from the installation media. This will allow you to install Windows 7 and proceed with the partitioning process.
Step 3: Configuring the BIOS Settings
To begin the partitioning process on your SSD in Windows 7, it’s essential to configure the BIOS settings of your computer. Configuring the BIOS ensures that your computer boots from the Windows 7 installation media and allows you to proceed with the installation process. Here’s how you can configure the BIOS settings:
1. Restart Your Computer: Start by performing a system reboot. Make sure any critical files or applications are saved and close any open programs.
2. Access the BIOS: During the startup process, you will need to access the BIOS settings. The key to enter the BIOS varies depending on your computer’s manufacturer (e.g., F2, Delete, F10, or Esc). Look for the corresponding key mentioned on the screen during the startup process.
3. Navigate to the “Boot” Tab: Once you enter the BIOS settings, you will find various tabs. Navigate to the “Boot” tab using the arrow keys. The “Boot” tab could be labeled differently, such as “Boot Options,” “Boot Order,” or similar.
4. Set the Boot Device: Look for the section titled “Boot Device Priority” or a similar setting. In this section, you will see a list of devices that your computer can boot from. To boot from the Windows 7 installation media, you need to set the USB drive or DVD drive as the primary boot device. Use the arrow keys to select the USB drive or DVD drive and move it to the top of the list.
5. Save and Exit: Once you have configured the boot device priority, navigate to the “Exit” tab or a similar option. Confirm the changes by saving and exiting the BIOS settings. The computer will restart automatically.
After configuring the BIOS settings, your computer will boot from the Windows 7 installation media when it restarts. This will allow you to proceed with the Windows 7 installation and eventually partition your SSD. In the next step, we will guide you through the process of installing Windows 7 on your SSD.
Step 4: Installing Windows 7
Now that you have prepared your SSD and configured the BIOS settings, it’s time to install Windows 7. Installing the operating system is an essential step before partitioning your SSD. Here’s how you can install Windows 7:
1. Insert the Installation Media: Start by inserting the Windows 7 installation media into your computer’s USB port or DVD drive. Ensure that your computer is powered on and that the installation media is properly inserted.
2. Restart Your Computer: Restart your computer to start the installation process. As your computer boots up, it will detect the Windows 7 installation media and begin loading the necessary files.
3. Select Language and Other Preferences: Follow the on-screen prompts to select your preferred language and other settings for the installation process. Click “Next” to proceed.
4. Accept the License Agreement: Read and accept the license terms and agreement for using Windows 7. Click the checkbox to indicate your acceptance and then click “Next.”
5. Choose Install Type: You will be presented with two installation options: “Upgrade” and “Custom (advanced)”. Select the “Custom (advanced)” option to perform a clean installation of Windows 7.
6. Select the SSD: On the next screen, you will see a list of available drives on your computer. Select your SSD from the list and click “Next.” This will initiate the installation process on your SSD.
7. Wait for the Installation: Windows 7 will now begin installing on your SSD. The installation process may take some time, so be patient and do not interrupt the process. Your computer will restart multiple times during the installation.
8. Set Up User Account and Settings: After the installation is complete, you will be prompted to set up your user account and other settings, such as the computer name and password. Follow the on-screen instructions to configure these settings.
9. Windows 7 Updates: Once you’ve completed the initial setup, it’s crucial to install the latest Windows 7 updates to ensure optimum performance and security. Open the Windows Update settings and check for updates. Install any available updates and restart your computer.
Once you have successfully installed Windows 7 on your SSD, you’re now ready to proceed with the partitioning process. In the next steps, we will guide you through the process of partitioning your SSD during the installation process and allocating disk space for partitioning. Stay tuned!
Step 5: Partitioning the SSD during the Installation Process
During the installation of Windows 7, you have the option to partition your SSD and allocate disk space for the partitions. This step allows you to create separate sections on your SSD to organize your data. Here’s how you can partition your SSD during the installation process:
1. Choose the “Custom (advanced)” Installation Option: When prompted during the installation process, select the “Custom (advanced)” option instead of the “Upgrade” option. This will allow you to have more control over the partitioning process.
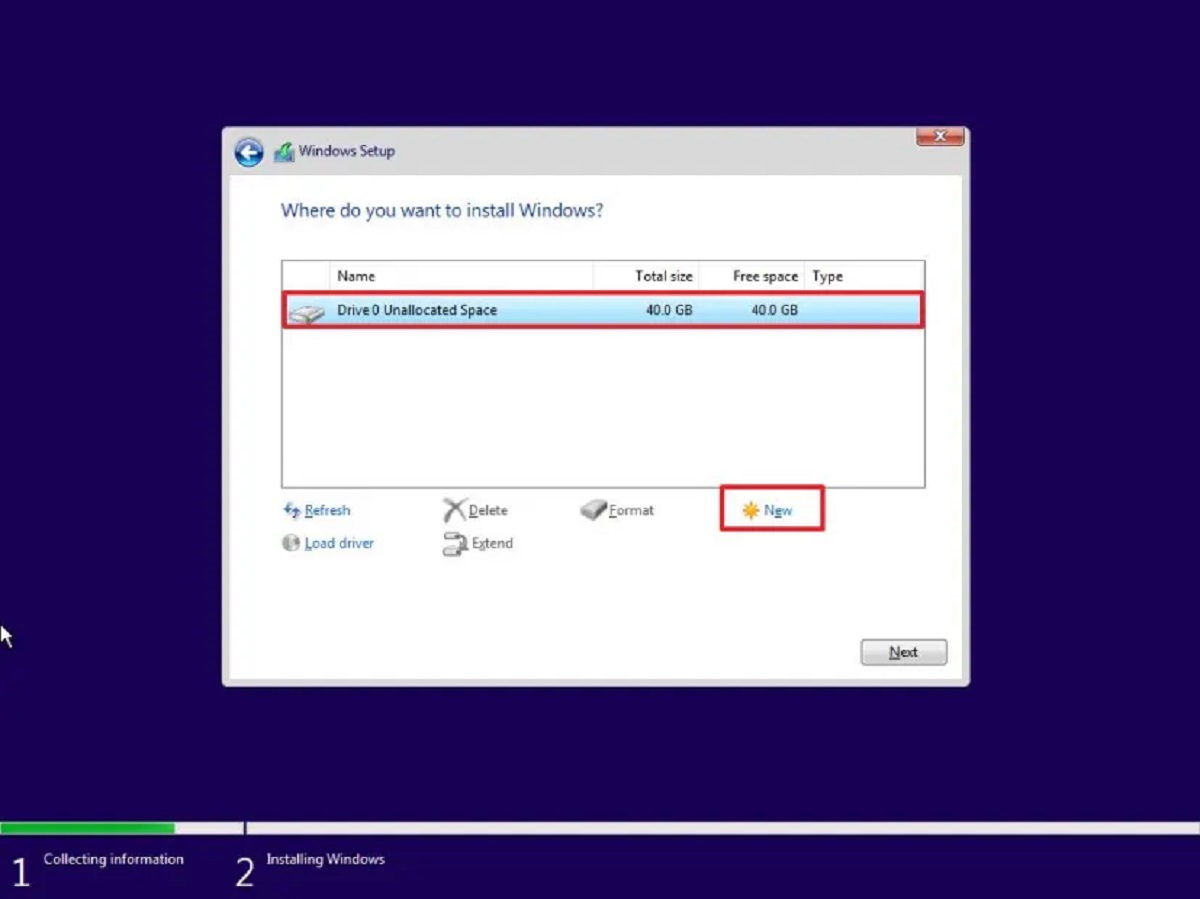
2. Select the Unallocated Space: On the next screen, you will see the list of available drives and their partitions. Look for the unallocated space on your SSD. This is the space that has not been assigned to any partitions yet.
3. Create New Partitions: Select the unallocated space and click on the “New” button. This will open a dialogue box where you can specify the size of the partition. Enter the desired size for the partition and click “Apply” to create it. Repeat this step for each partition you want to create.
4. Adjust Partition Sizes: If you decide later that you want to adjust the size of a partition, select the partition and click on the “Extend” or “Shrink” option. Follow the on-screen instructions to modify the partition size accordingly.
5. Formatting the Partitions: Once you have created the necessary partitions, select each partition and click on the “Format” option. Choose the file system and the allocation unit size for the partition, and click “OK” to format it. Formatting a partition prepares it for use and erases any existing data.
6. Assigning Drive Letters: After formatting the partitions, you can assign drive letters to each partition to identify them easily. Select a partition, click on the “Drive Options” button, and choose the “Change” option to assign a drive letter to the partition. Repeat this step for each partition.
7. Continue with Windows 7 Installation: Once you have created and formatted the partitions on your SSD, click on the “Next” button to continue with the Windows 7 installation process. Windows 7 will be installed on the partition you selected during the installation setup.
By following these steps, you can partition your SSD during the installation process of Windows 7. Creating separate partitions on your SSD allows you to organize your data and optimize its performance. In the next steps, we will guide you on formatting the partitions and assigning drive letters to complete the partitioning process. Stay tuned!
Step 6: Allocating Disk Space for Partitioning
Allocating disk space for partitioning is a crucial step in the process of organizing your SSD. By properly allocating disk space, you can ensure that each partition has enough capacity to store your data efficiently. Here’s how you can allocate disk space for partitioning:
1. Determine your Storage Needs: Before allocating disk space, assess your storage requirements. Consider the types of files and data you will be storing on each partition. Determine how much space you will need for the operating system, applications, and personal files.
2. Plan Partition Sizes: Based on your storage needs, plan the sizes for each partition. Decide how much space you want to allocate for the Windows partition, application partition, and data partition. Ensure that each partition has sufficient capacity for its intended purpose.
3. Consider Future Growth: It’s essential to consider future growth when allocating disk space. Leave some room for expansion and potential data growth. This will prevent your partitions from running out of space too quickly, especially if you anticipate adding more files or applications in the future.
4. Adjust Partition Sizes: During the installation process, you can adjust the sizes of partitions as needed. If you realize that you need more or less space for a specific partition, you can resize and adjust the sizes accordingly. However, keep in mind that resizing partitions may require rearranging data and can be time-consuming.
5. Balance Partition Sizes: Strive for a balance when allocating disk space for partitioning. Avoid allocating too much space to one partition while neglecting others. Ideally, each partition should have enough space to accommodate its specific purpose and anticipated growth.
6. Consider System Requirements: Take into account the system requirements for Windows 7, applications, and any other software you plan to install. Verify the minimum and recommended system requirements and ensure that you allocate sufficient disk space for them.
7. Prioritize Important Data: If you have critical or frequently accessed data, such as work documents or creative projects, allocate sufficient space for these files. Prioritize them on a separate partition to ensure easy access and to reduce the risk of accidental deletion or corruption.
8. Miscellaneous Partitions: Consider creating additional partitions for specific purposes, such as a separate partition for system backups or a partition for virtual machines. Allocate appropriate storage space for these miscellaneous partitions based on their specific requirements.
By following these steps and considering your storage needs, growth potential, and system requirements, you can effectively allocate disk space for partitioning your SSD. In the next steps, we will guide you through the process of creating partitions on your SSD and formatting them. Stay tuned!
Step 7: Creating Partitions on the SSD
Creating partitions on your SSD is an important step in organizing your data and optimizing your storage. By creating separate partitions, you can allocate specific sections of your SSD for different purposes, such as the operating system, applications, and personal files. Here’s how you can create partitions on your SSD:
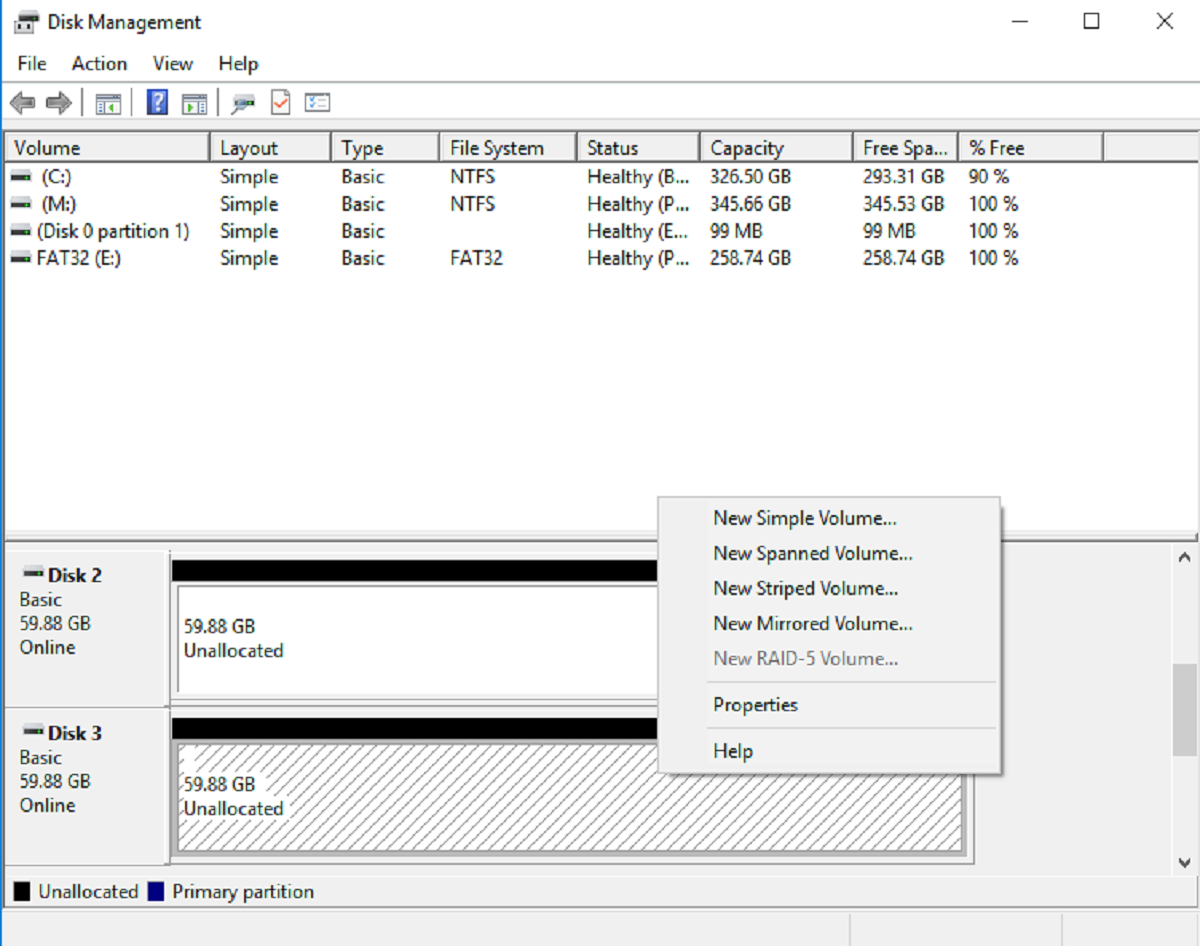
1. Open Disk Management: To create partitions on your SSD, you can use the Disk Management utility in Windows 7. Press the Windows key + R to open the Run dialog box, type “diskmgmt.msc,” and hit Enter. This will open the Disk Management window.
2. Identify the Unallocated Space: In the Disk Management window, you will see a graphical representation of your SSD and its partitions. Look for any unallocated space on your SSD. This is the space that has not been assigned to any partitions yet.
3. Right-click on Unallocated Space: Right-click on the unallocated space and select the “New Simple Volume” option from the context menu. This will open the New Simple Volume Wizard, which will guide you through the process of creating a partition.
4. Specify Partition Size: In the New Simple Volume Wizard, you can specify the size for the partition. Enter the desired size for the partition in megabytes (MB) or accept the default size if it suits your needs. Keep in mind that 1 gigabyte (GB) is equal to 1024 megabytes (MB).
5. Assign a Drive Letter: In the next step of the wizard, you will be prompted to assign a drive letter to the partition. Choose a drive letter that is not already in use by another partition or device. Alternatively, you can choose the option to mount the partition in an empty NTFS folder.
6. Format the Partition: After assigning a drive letter, you can choose the file system and the allocation unit size for the partition. For most cases, NTFS is the recommended file system. Choose a suitable allocation unit size or accept the default size, and provide a volume label if desired. Click “Next” to proceed.
7. Complete the Wizard: In the final step of the wizard, review the settings you have configured for the partition. If everything looks correct, click “Finish” to create the partition on your SSD. The Disk Management utility will then format and prepare the partition for use.
8. Repeat for Additional Partitions: If you want to create more partitions, repeat the above steps for each unallocated space on your SSD. Create partitions based on your storage needs and desired organization.
By following these steps, you can create partitions on your SSD and establish a structure that suits your needs. Once the partitions are created, you can move on to the next step of formatting them to ensure they are ready for use. In the next step, we will guide you through the process of formatting the partitions on your SSD. Stay tuned!
Step 8: Formatting the Partitions
After creating partitions on your SSD, the next step is to format them. Formatting a partition involves preparing it for use by assigning a file system and organizing the storage structure. Here’s how you can format the partitions on your SSD:
1. Open Disk Management: Launch the Disk Management utility by pressing the Windows key + R to open the Run dialog box, typing “diskmgmt.msc,” and hitting Enter. This will open the Disk Management window.
2. Locate the Partition: In the Disk Management window, you will see a list of partitions, including the new partitions you created. Locate the partition you want to format and ensure that it is in the “Healthy (Primary Partition)” state.
3. Right-click on the Partition: Right-click on the partition you want to format and select the “Format” option from the context menu. This will open the Format dialog box.
4. Choose the File System: In the Format dialog box, choose the desired file system for the partition. The recommended file system for most situations is NTFS (New Technology File System), which provides advanced features and security. You can also choose FAT32 for compatibility with older systems, but note that it has limitations on file size and partition capacity.
5. Set the Allocation Unit Size: Specify the allocation unit size for the partition. The default allocation unit size is recommended for most situations, but you can choose a different size if necessary. Smaller allocation unit sizes are more efficient for smaller files, while larger sizes are more efficient for larger files.
6. Enter a Volume Label (Optional): You can provide a volume label for the partition to help identify it. The volume label is the name that will be displayed for the partition in Windows Explorer. Enter a descriptive label if you want, or leave it blank to use the default label.
7. Perform a Quick Format (Optional): By default, the format process performs a full format, which checks the partition for bad sectors. If you want to speed up the process, you can enable the “Quick Format” option. Note that a quick format does not check for bad sectors and is suitable only for new or healthy drives.
8. Confirm and Start the Formatting: Review the formatting settings in the Format dialog box and ensure they are correct. If everything looks good, click “OK” to start the formatting process. This will erase any existing data on the partition and format it according to the specified settings.
9. Repeat for Other Partitions: Repeat the above steps for each partition you want to format on your SSD. Customize the file system, allocation unit size, and volume label for each partition based on your requirements.
By following these steps, you can format the partitions on your SSD and prepare them for use. The formatting process ensures that the partitions are organized and ready to store your data efficiently. In the next step, we will guide you through assigning drive letters to the partitions on your SSD. Stay tuned!
Step 9: Assigning Drive Letters to the Partitions
After formatting the partitions on your SSD, the next step is to assign drive letters to each partition. Drive letters make it easier to identify and access the partitions in Windows Explorer. Here’s how you can assign drive letters to the partitions:
1. Open Disk Management: Open the Disk Management utility by pressing the Windows key + R, typing “diskmgmt.msc,” and hitting Enter. The Disk Management window will open with a list of your partitions.
2. Locate a Partition: In the Disk Management window, locate the partition to which you want to assign a drive letter. Ensure that it is formatted and healthy.
3. Right-click on the Partition: Right-click on the partition and select the “Change Drive Letter and Paths” option from the context menu. This will open the Change Drive Letter and Paths dialog box.
4. Select “Add”: In the Change Drive Letter and Paths dialog box, click the “Add” button to assign a drive letter to the partition. This will open the Assign Drive Letter or Path dialog box.
5. Choose a Drive Letter: In the Assign Drive Letter or Path dialog box, you can choose an available drive letter from the drop-down menu. Select a letter that is not already in use by another partition or device.
6. Confirm and Apply: After choosing a drive letter, click “OK” to confirm the assignment. The partition will now have the assigned drive letter, and you can access it using that letter in Windows Explorer.
7. Repeat for Other Partitions: Repeat the above steps for each partition you want to assign a drive letter to. Assign a unique drive letter to each partition to make them easily identifiable.
8. Verify Drive Letters: After assigning drive letters to all the partitions, verify that each partition has a unique and meaningful drive letter. This will help you to navigate and manage your data more efficiently.
Assigning drive letters to the partitions on your SSD makes it convenient to access and manage your data. By following these steps, you can easily assign drive letters to each partition, ensuring smooth navigation and organization of your files. In the final step, we will guide you on installing Windows 7 updates to ensure your system is up to date. Stay tuned!
Step 10: Installing Windows 7 Updates
After successfully installing Windows 7 and partitioning your SSD, the final step is to ensure that your operating system is up to date by installing Windows 7 updates. These updates include important security patches, bug fixes, and performance enhancements that can improve the stability and functionality of your system. Here’s how you can install Windows 7 updates:
1. Open Windows Update: Click on the Start button, go to the Control Panel, and then click on the “Windows Update” option. This will open the Windows Update settings.
2. Check for Updates: In the Windows Update settings, click on the “Check for updates” button. Windows 7 will connect to the Microsoft servers and search for available updates for your system.
3. Install Important and Recommended Updates: After the search is complete, Windows 7 will display a list of available updates. Look for the important and recommended updates that are marked for installation. These updates typically include security patches and critical bug fixes.
4. Select Updates for Installation: Choose the updates you want to install by selecting the corresponding checkboxes. You can also click on the “Install updates” button to install all the selected updates at once.
5. Install Updates: Click on the “OK” or “Install” button to start the installation process. Windows 7 will download and install the selected updates. The installation progress will be shown, and your computer may restart multiple times to complete the update process.
6. Repeat the Update Process: After the initial installation, it’s a good practice to repeat the update process until no more updates are available. Some updates may depend on the installation of previous updates, so it may require several rounds of updating to ensure your system is fully up to date.
7. Configure Automatic Updates (Optional): To ensure that your system stays up to date in the future, you can configure Windows 7 to install updates automatically. In the Windows Update settings, select the “Change settings” option and choose the desired update settings, such as “Install updates automatically” or “Download updates but let me choose whether to install them.”
By installing Windows 7 updates, you can keep your system secure and up to date. Regularly checking for and installing updates ensures that your computer benefits from the latest features, improvements, and security enhancements. With this final step, you have successfully completed the process of partitioning your SSD in Windows 7 and ensuring that your system is optimized for performance and functionality.
Conclusion
Congratulations! You have successfully partitioned your SSD in Windows 7. By following the step-by-step instructions in this guide, you have optimized your storage, organized your data, and improved the overall performance of your system.
Through the understanding of SSD partitioning, you have learned the benefits of dividing your SSD into separate partitions to manage files efficiently, reduce fragmentation, and isolate important data. You have also prepared for the partitioning process by backing up your important data, creating a Windows 7 installation media, and configuring the BIOS settings.
During the installation process, you allocated disk space for partitioning and created partitions on your SSD. By formatting the partitions and assigning drive letters, you enabled easy access and ensured that each partition is ready for use.
Remember to install Windows 7 updates to keep your system secure and up to date. Regularly checking for and installing updates enhances the functionality and stability of your system.
Partitioning your SSD in Windows 7 is a valuable skill that can help you optimize your storage and improve your computing experience. However, it’s important to note that newer operating systems like Windows 10 offer more advanced partitioning features, so consider upgrading if you require additional capabilities.
We hope this guide has provided you with the knowledge and confidence to successfully partition your SSD in Windows 7. Enjoy your organized and efficient storage, and happy computing!