Introduction
Welcome to this guide on how to format a write-protected SD card. If you’ve ever encountered the frustrating message that prevents you from writing or deleting files on your SD card, then you are likely dealing with write protection. In this article, we’ll explore what write protection is, why it may occur, and various methods to format a write-protected SD card.
SD cards are widely used in cameras, smartphones, and other electronic devices to store photos, videos, and other types of data. Write protection is a security feature that prevents accidental deletion or modification of data on the SD card. While this feature is beneficial in protecting valuable files, it can also be an inconvenience when you need to manage or reformat the card.
There can be several reasons why an SD card becomes write-protected. It often happens when the physical lock switch on the side of the card is activated, which prevents any changes to the data. Sometimes, a glitch or software error can trigger write protection, or it may be an intentional measure to protect against malware or unauthorized access.
Before we dive into the methods of formatting a write-protected SD card, it is crucial to take some precautions. First, ensure that you have a backup of any important files on the card. Formatting will erase all data, so having a copy of your files is essential. Additionally, make sure that you have the necessary permissions and administrative access on your computer to perform the formatting process.
In the following sections, we will walk you through five different methods to format a write-protected SD card. These methods range from using the physical lock switch, to utilizing command-line tools and third-party software. Each method is suitable for different scenarios and platforms, so you can choose the one that best fits your needs.
What is write protection?
Write protection is a feature that prevents any modifications or deletions to the data stored on an SD card. When write protection is enabled, you cannot add new files, delete existing files, or make any changes to the data on the card.
The primary purpose of write protection is to safeguard important files from accidental deletion or corruption. It acts as a read-only mode, allowing you to access the data but preventing any writing operations. By enabling write protection, you can ensure the integrity and security of your files on the SD card.
There are two primary ways in which write protection is implemented on an SD card:
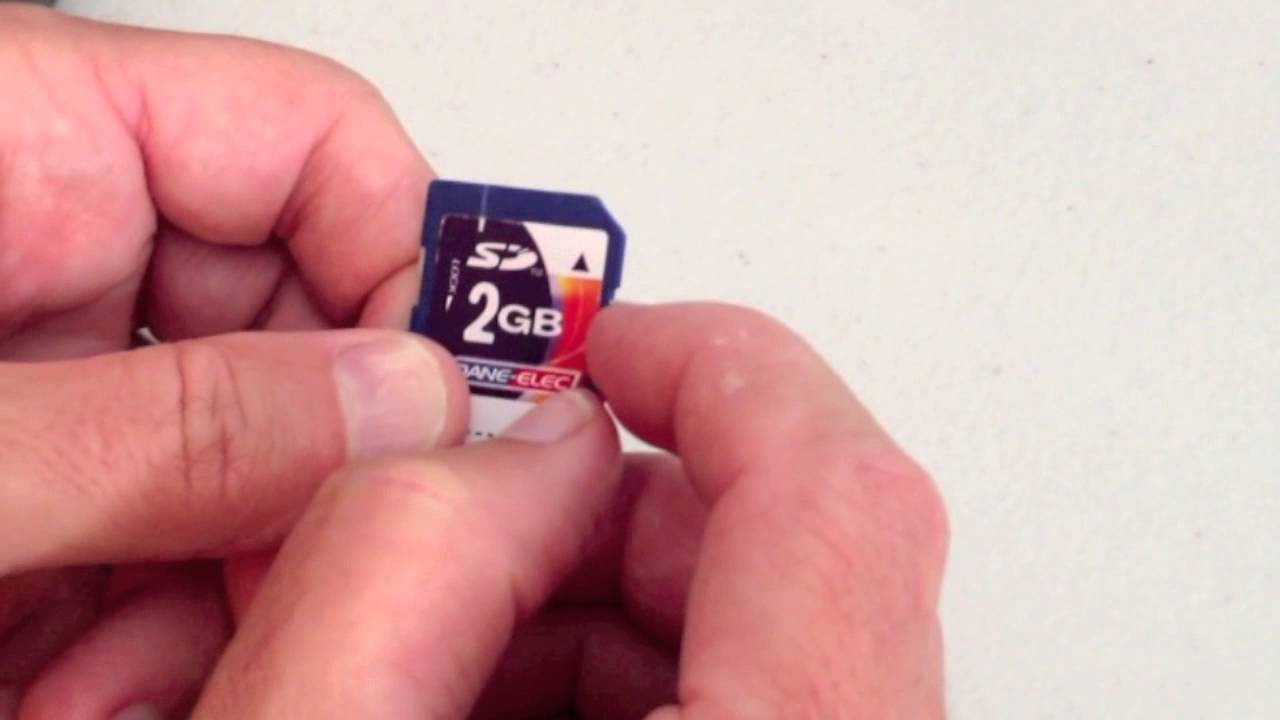
- Physical Lock Switch: Many SD cards have a physical lock switch located on the side. When this switch is in the locked position, it activates write protection, and you won’t be able to modify the data on the card. Moving the switch to the unlocked position disables write protection and allows you to make changes.
- Software Write Protection: In some cases, write protection can be enabled through software settings or commands. This can be done on compatible devices or operating systems. Software write protection offers an additional layer of security as it requires specific authorization or administrative privileges to remove the protection.
It’s important to note that write protection is a feature of the SD card itself and is independent of the device you use it with. Whether you insert the card into a camera, smartphone, or computer, the write protection status remains the same.
By default, most SD cards come without write protection enabled. However, there are instances where write protection is applied, either intentionally by the user or automatically by the device or software. It’s essential to understand how to identify and manage write protection to ensure the smooth functioning of your SD card.
Now that we have a clear understanding of what write protection is and the different ways in which it can be implemented, let’s explore the reasons why an SD card may become write-protected and how to overcome this restriction.
Reasons for write protection
There are several reasons why an SD card may become write-protected. Understanding these reasons can help you troubleshoot the issue and find the appropriate solution. Here are some common causes of write protection:
- Physical Lock Switch: As mentioned earlier, many SD cards have a physical lock switch on the side. If this switch is in the locked position, write protection is enabled. Accidentally moving the switch or forgetting to unlock it can result in write protection.
- File System Errors: Errors in the file system of the SD card can trigger write protection. This can occur due to improper ejection of the card, power outages, or software glitches. When the file system detects inconsistencies or errors, it may activate write protection as a precautionary measure.
- Virus or Malware: In some cases, a virus or malware infection on the SD card can enable write protection. This is done to prevent the malicious software from spreading or modifying files. It’s important to regularly scan your SD card for potential threats and take appropriate measures to remove any detected malware.
- Permissions and Restrictions: Operating systems or devices sometimes impose write protection to restrict certain actions on the SD card. This can be implemented to prevent accidental data loss or unauthorized access. In such cases, specific permissions or administrative rights may be required to modify the write protection settings.
- Faulty Card or Adapter: A defective SD card or card reader adapter can also cause write protection issues. Physical damage or internal errors within the card can trigger write protection as a safety mechanism to prevent further data corruption.
Identifying the specific reason for write protection is essential to determine the most appropriate method to remove it. In the following sections, we will explore multiple methods to format a write-protected SD card, allowing you to overcome the restrictions and regain full control over the card’s data.
Precautions before formatting a write-protected SD card
Before proceeding with the formatting process for a write-protected SD card, it is important to take certain precautions to ensure the safety of your data and the successful execution of the task. Here are some crucial steps to follow:
- Backup your data: Formatting an SD card will erase all the data stored on it. Therefore, it is imperative to create a backup of any important files or documents that you want to keep. Copy the files to a secure location, such as your computer’s hard drive or an external storage device, to prevent data loss.
- Verify the write protection status: Ensure that the write protection is indeed enabled on your SD card. Check for the physical lock switch on the side of the card and confirm that it is in the locked position. If the switch is already in the unlocked position, there may be other reasons for the write protection, and alternative solutions will need to be explored.
- Check for permissions and administrative access: Depending on your operating system and device settings, you may require administrative access or appropriate permissions to modify the write protection status. Make sure you have the necessary privileges to perform the formatting task. If required, log in with an account that has administrative rights.
- Update your device drivers: Outdated or incompatible device drivers can sometimes cause write protection issues. Ensure that the drivers for your SD card reader or device are up-to-date. Visit the manufacturer’s website or use driver update software to check for any available updates.
- Scan for viruses: Before formatting the SD card, it is advisable to perform a thorough virus scan. This helps detect and remove any malware or viruses that may have caused the write protection. Use a reliable antivirus program and ensure that it is up-to-date to effectively identify and eliminate any potential threats.
By following these precautions, you can minimize the risk of data loss and ensure a smooth formatting process for your write-protected SD card. Once you have completed these necessary steps, you are ready to proceed with the methods we will discuss in the following sections to remove the write protection and format your SD card.
Method 1: Using the physical lock switch
One of the simplest and most straightforward methods to remove write protection from an SD card is by using the physical lock switch located on the side of the card. Follow these steps to utilize this method:
- Remove the SD card from the device or card reader in which it is currently inserted.
- Locate the physical lock switch on the side of the SD card. It is typically a small sliding switch.
- Check the current position of the switch. If the switch is in the locked position, it means write protection is enabled.
- Move the switch to the unlocked position by sliding it in the opposite direction.
- Once the switch is in the unlocked position, reinsert the SD card into the device or card reader.
By switching the physical lock to the unlocked position, you should now be able to modify the data on the SD card without any write protection restrictions. However, it’s important to note that this method may not work if the write protection is caused by other factors, such as software settings or file system errors.
If the physical lock switch method doesn’t resolve the write protection issue, continue to the next methods we’ll discuss. These methods provide alternative solutions to format a write-protected SD card and ensure its optimal functionality.
Method 2: Using Diskpart (Windows)
If the physical lock switch method didn’t solve the write protection issue, you can try using Diskpart, a command-line utility built into the Windows operating system. Here’s how you can use Diskpart to format a write-protected SD card:
- Insert the write-protected SD card into your computer’s SD card reader.
- Open the Command Prompt by pressing the Windows key + R, then typing “cmd” and hitting Enter.
- In the Command Prompt window, type “diskpart” and press Enter to launch the Diskpart utility.
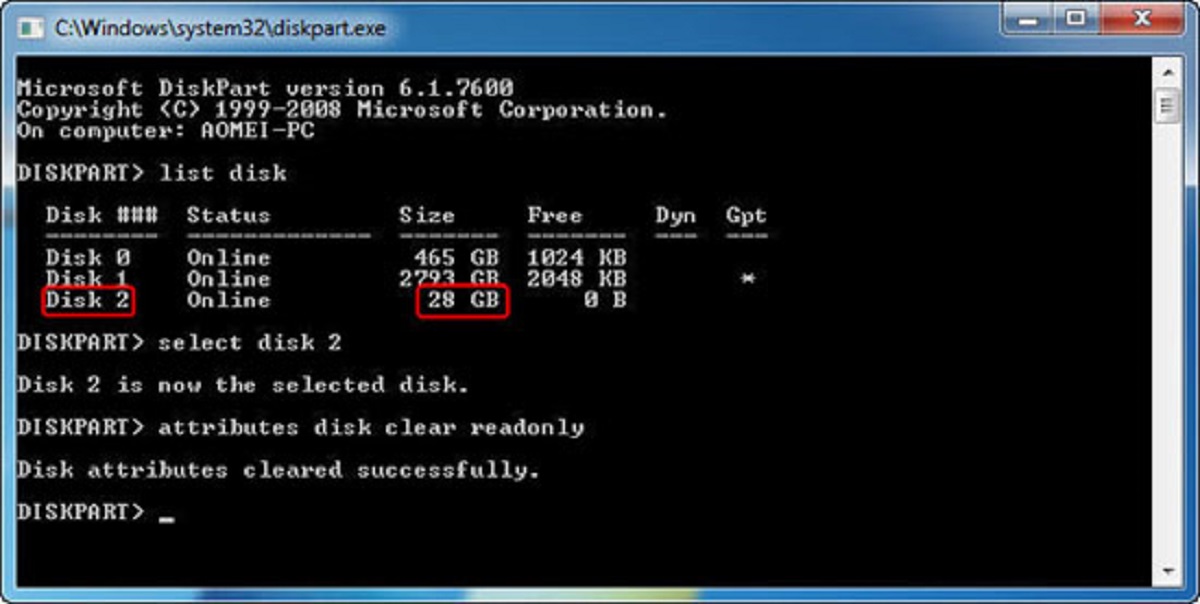
- Once in the Diskpart utility, type “list disk” and press Enter to view a list of available disks on your computer.
- Locate your SD card in the list based on its size and other identifying information. Note the disk number associated with the SD card.
- Type “select disk [disk number]” and press Enter, replacing “[disk number]” with the number corresponding to your SD card.
- Once the SD card is selected, type “attributes disk clear readonly” and press Enter to clear the write protection attribute on the SD card.
- Finally, type “clean” and press Enter to remove all existing partitions and format the SD card.
After the formatting process is complete, you can close the Diskpart utility and safely remove the SD card from the card reader. Your SD card should now be writeable and free from any write protection restrictions.
It’s important to exercise caution when using Diskpart, as the utility deals with disk partitions and can potentially erase data if used incorrectly. Double-check the disk number and ensure that you select the correct disk before proceeding with the format command.
If the Diskpart method doesn’t resolve the write protection issue, there are still alternative methods available. Let’s explore the next methods, which involve using Terminal on Mac or File Explorer on Windows to format a write-protected SD card.
Method 3: Using Terminal (Mac)
If you are using a Mac and encounter a write-protected SD card, you can utilize Terminal, a built-in command-line interface, to format the card. Follow these steps to format a write-protected SD card using Terminal:
- Insert the write-protected SD card into the SD card slot or use a card reader to connect it to your Mac.
- Open Terminal by going to Applications > Utilities and searching for Terminal or using the Spotlight Search.
- In the Terminal window, type “diskutil list” and press Enter to display a list of connected disks on your Mac.
- Identify your SD card by checking the disk identifier and size. Note the disk identifier associated with the SD card.
- Next, type “diskutil unmountDisk /dev/[disk identifier]” and press Enter, replacing “[disk identifier]” with the identifier of your SD card. This will unmount the SD card from your Mac.
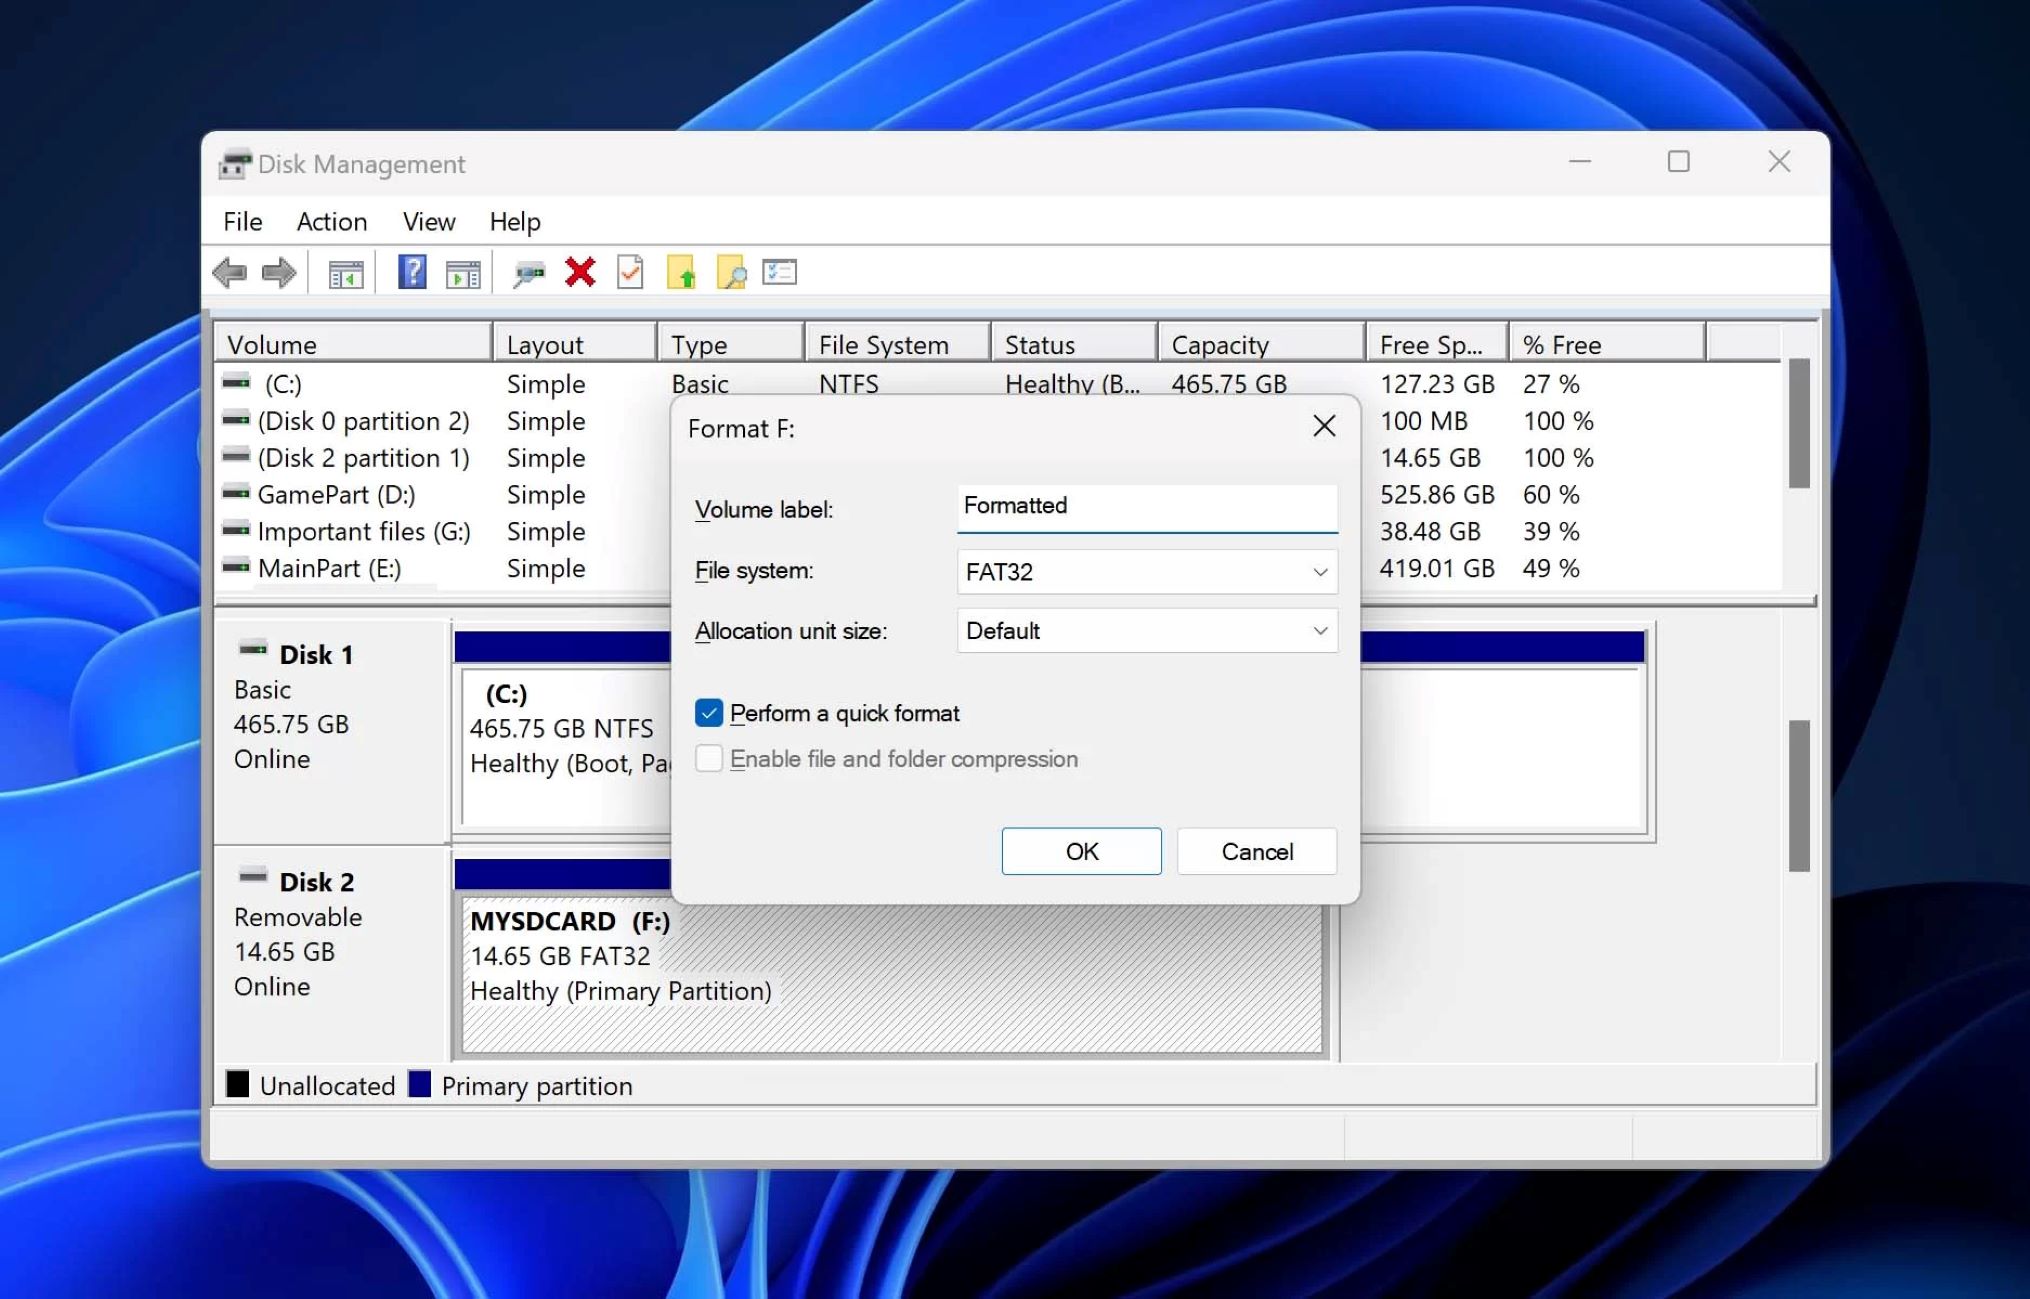
- Once the SD card is unmounted, type “sudo diskutil eraseDisk FAT32 MYSDCARD MBRFormat /dev/[disk identifier]” and press Enter. Replace “MYSDCARD” with your desired name for the SD card and “[disk identifier]” with the identifier of your SD card.
- Enter your admin password when prompted and press Enter.
- Terminal will format the SD card to the FAT32 file system and create a new partition.
After the formatting process is complete, you can close Terminal and safely remove the SD card from your Mac. The SD card should now be free from write protection and ready for use.
It’s important to exercise caution when using Terminal, as it gives you direct access to the system’s functionalities. Make sure to double-check the disk identifier and take extra care while entering commands to avoid potential data loss on other disks.
If the write protection persists even after trying the Terminal method, there are still additional methods to explore. Let’s proceed to the next method, which involves using File Explorer on Windows to format a write-protected SD card.
Method 4: Using File Explorer (Mac)
If you’re using a Mac and want to format a write-protected SD card, you can use the File Explorer application, which provides a graphical user interface to manage files and storage devices. Follow these steps to format a write-protected SD card using File Explorer:
- Insert the write-protected SD card into the SD card slot or use a card reader to connect it to your Mac.
- Open a new Finder window by clicking on the Finder icon in the Dock or using the Command + N keyboard shortcut.
- In the Finder window, locate and click on the “Applications” section in the sidebar.
- Scroll down and find the “Utilities” folder. Open it and double-click on the “Disk Utility” application.
- In the Disk Utility window, you will see a list of connected disks and storage devices on the left-hand side. Select your SD card from the list.
- Click on the “Erase” tab at the top of the Disk Utility window.
- Choose a suitable format for your SD card from the drop-down menu. For cross-platform compatibility, select “MS-DOS (FAT)” or “ExFAT”.
- Enter a name for the SD card in the “Name” field.
- Click on the “Erase” button to begin the formatting process. This will erase all data on the SD card and remove the write protection.
- Once the formatting process is complete, you can close Disk Utility and safely eject the SD card from your Mac.
After following these steps, your write-protected SD card should now be successfully formatted, and you can use it without any restrictions. It’s important to note that formatting will erase all data on the card, so make sure to back up any important files before proceeding.
If the write protection issue persists or if you’re using a different operating system, there are still additional methods to explore. Let’s move on to the next method, which involves using third-party software to format a write-protected SD card.
Method 5: Using third-party software
If the previous methods didn’t resolve the write protection issue on your SD card, you can consider using third-party software specifically designed to handle write-protected storage devices. These tools often provide advanced features and additional functionality, offering an alternative solution to format write-protected SD cards. Here’s how you can use third-party software to format a write-protected SD card:
- Research and choose a reputable third-party software that specializes in formatting write-protected storage devices.
- Visit the software developer’s website and download the latest version of the software compatible with your operating system.
- Install the software on your computer following the provided instructions.
- Launch the software and follow the on-screen prompts to connect and identify your write-protected SD card.
- Locate the formatting options within the software, ensuring that it specifically mentions write-protected SD cards.
- Select the appropriate formatting options based on your requirements, such as file system type and disk label.
- Start the formatting process and allow the software to complete the task.
- Once the formatting process is finished, close the software and safely eject the SD card from your computer.
Using third-party software can be an effective way to overcome write protection issues on SD cards. However, it’s essential to exercise caution and choose reputable software from trusted sources to minimize the risk of malware or other security concerns. Additionally, keep in mind that third-party software may have its own interface and specific instructions, so follow the provided guidelines or consult the software’s documentation for more detailed information.
By utilizing third-party software, you can efficiently format your write-protected SD card and regain full control over its usage and data management.
Now that we have explored various methods to format write-protected SD cards, you can choose the method that is most suitable for your specific situation and operating system. Remember to take the necessary precautions, such as backing up your data, before proceeding with the formatting process to ensure the safety of your files.
Conclusion
In conclusion, encountering a write-protected SD card can be frustrating, but there are several methods available to solve this issue and format the card. We discussed five different methods:
- Using the physical lock switch
- Using Diskpart (Windows)
- Using Terminal (Mac)
- Using File Explorer (Mac)
- Using third-party software
The first method involves checking and adjusting the physical lock switch on the SD card. If that doesn’t work, you can try using Diskpart in Windows or Terminal in Mac, which are command-line tools to manipulate disk partitions and attributes. Alternatively, you can use the graphical interface provided by File Explorer on Mac to format the write-protected SD card. Lastly, third-party software designed for handling write-protected storage devices can be an effective solution.
Before formatting a write-protected SD card, it is crucial to take precautions like backing up your data, checking permissions and administrative access, and scanning for viruses. Different methods may work in different scenarios, so you can choose the most appropriate one based on your circumstances.
Remember to exercise caution when using command-line tools or third-party software, as they have the potential to cause data loss if not used correctly. Double-check the instructions and ensure you have selected the correct disk or SD card before proceeding with the formatting process.
By following the methods outlined in this guide, you can overcome write protection on your SD card and regain the ability to modify, delete, and manage the data stored on it. Whether you encounter write protection due to a physical lock switch, file system errors, or software restrictions, these methods offer reliable solutions.
Remember to always handle your SD card and other storage devices with care, and regularly backup your important files to prevent data loss. With the knowledge and tools provided in this guide, you can confidently tackle write-protected SD cards and ensure a smooth experience with your valuable data.