Introduction
Welcome to this step-by-step guide on how to save text messages on your Galaxy S5 to an SD card. If you’re someone who heavily relies on text messages for important conversations, keeping a backup is a smart move. By saving your text messages to an SD card, you not only create a backup but also free up space on your device, making it run more smoothly.
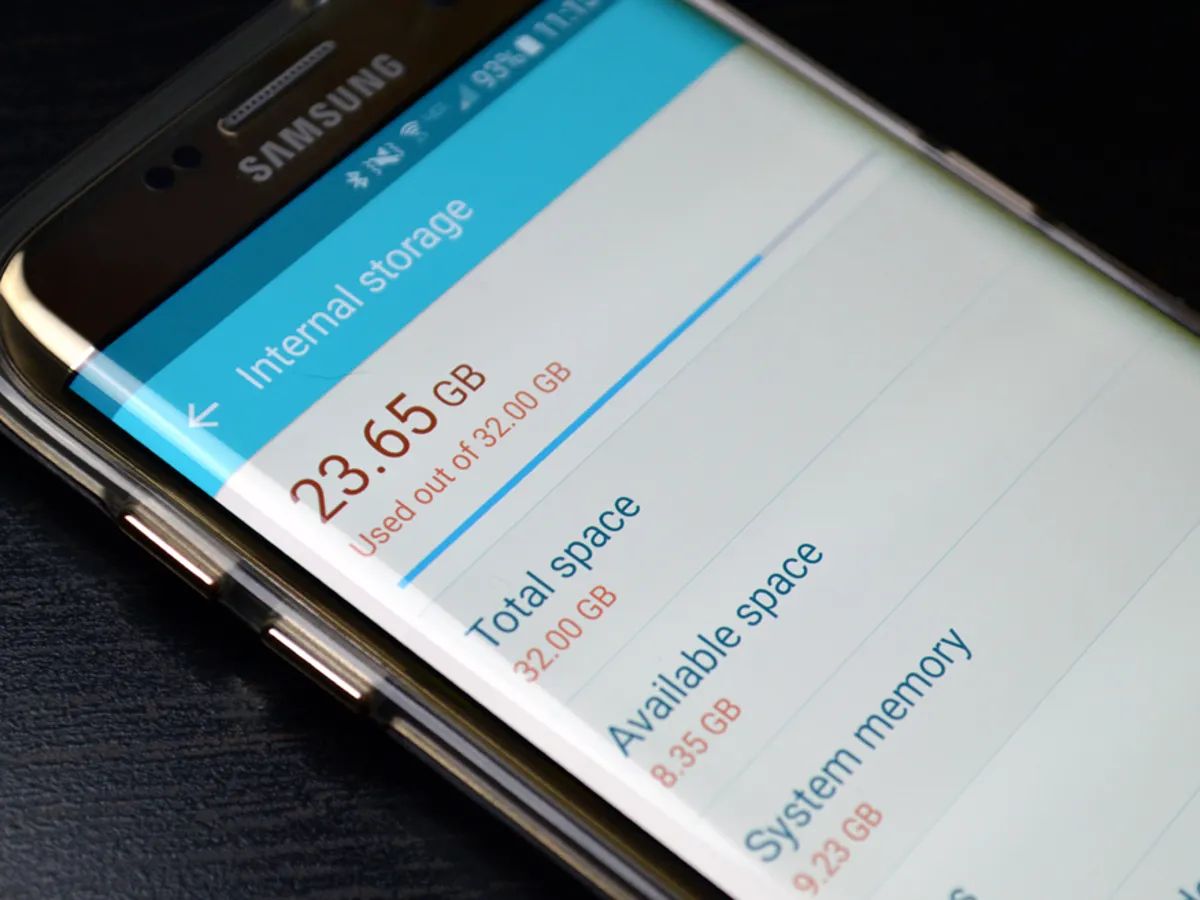
The Samsung Galaxy S5 is a popular Android smartphone with a large internal storage capacity. However, over time, your text messages can accumulate and consume a significant portion of your device’s storage. That’s where saving them to an SD card can come in handy.
In this guide, we’ll walk you through the process of saving your text messages to an SD card, ensuring that your valuable conversations are securely backed up and easily accessible whenever you need them. Before we get started, make sure you have an SD card with sufficient storage capacity inserted into your Galaxy S5.
Now, let’s dive into the step-by-step instructions on how to save text messages on your Galaxy S5 to an SD card.
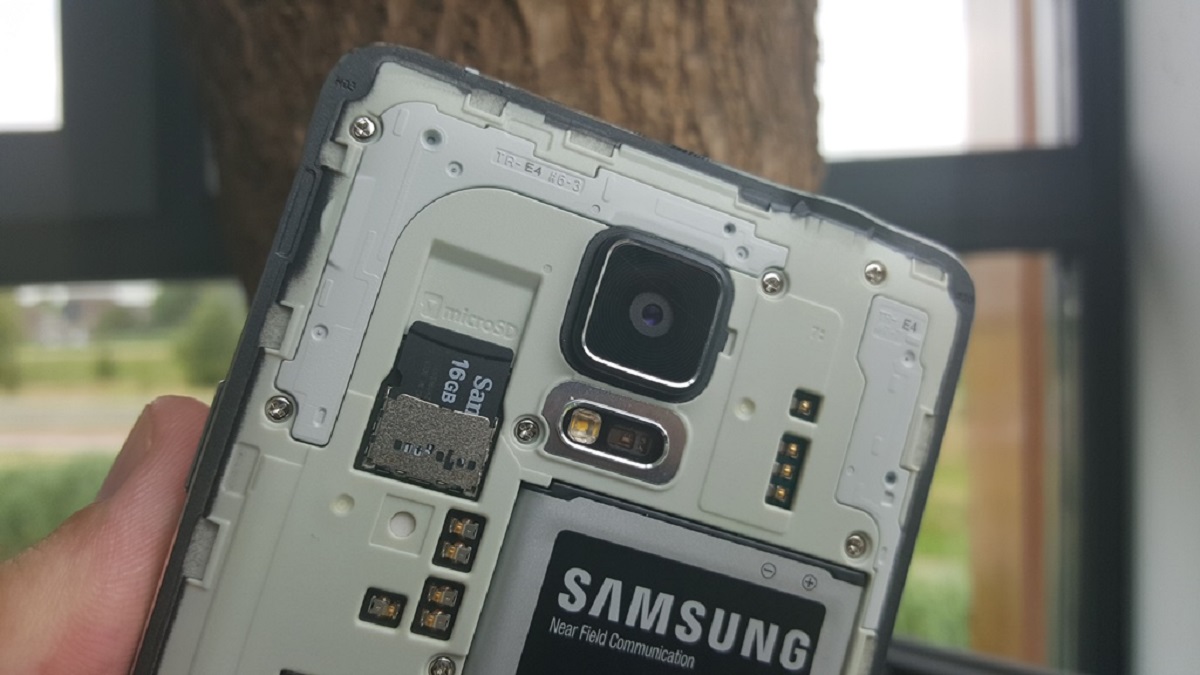
Step 1: Insert an SD card into your Galaxy S5
The first step in saving text messages on your Galaxy S5 to an SD card is to make sure you have an SD card inserted into your device. The SD card will serve as the storage location for your backed-up text messages.
To insert an SD card into your Galaxy S5, follow these simple steps:
- Locate the SD card slot on your Galaxy S5. It is usually located on the side of the device, near the power button.
- Using a SIM card removal tool or a small pin, gently push the tool into the small hole beside the SD card slot. This will release the memory card tray.
- Remove the memory card tray from the Galaxy S5.
- Insert the SD card into the memory card tray. Make sure that the metal contacts on the card are facing down and aligned with the contacts in the tray.
- Once the SD card is securely in place, reinsert the memory card tray into the Galaxy S5.
- Push the tray back into the device until it clicks into place.
After following these steps, your Galaxy S5 should recognize the SD card, and you are now ready to proceed to the next step in saving your text messages to the SD card.
Step 2: Install a File Manager app from the Play Store
In order to navigate and manage the files on your Galaxy S5, you will need to install a File Manager app from the Google Play Store. This app will allow you to easily access and manipulate the files and folders on your device, including the SMS/MMS folder where your text messages are stored.
Follow these steps to install a File Manager app on your Galaxy S5:
- Open the Google Play Store on your Galaxy S5 by tapping on its icon in the app drawer.
- In the Play Store, use the search bar at the top of the screen to search for “File Manager.”
- From the search results, select a File Manager app that has good ratings and reviews.
- Tap on the “Install” button to begin the installation process.
- Wait for the app to download and install on your Galaxy S5. This may take a few moments, depending on your internet connection speed.
- Once the app is installed, tap on the “Open” button to launch it.
Now that you have installed a File Manager app, you are ready to proceed to the next step and access the SMS/MMS folder to save your text messages to the SD card.
Step 3: Open the File Manager app and navigate to the SMS/MMS folder
After installing a File Manager app on your Galaxy S5, it’s time to open the app and navigate to the SMS/MMS folder where your text messages are stored. This folder is where you’ll be able to access and manage your text messages before saving them to the SD card.
Follow these steps to open the File Manager app and locate the SMS/MMS folder:
- Locate the File Manager app on your Galaxy S5. You can usually find it in the app drawer or on the home screen.
- Tap on the File Manager app to open it.
- Once the app is open, you’ll see a list of folders and files on your device.
- Navigate through the folders until you find the “Internal storage” or “Phone storage” option. Tap on it to access the internal storage of your Galaxy S5.
- Look for the “SMS” or “Text Messages” folder within the internal storage. Depending on the File Manager app, it may be labeled differently.
- Tap on the SMS/MMS folder to open it.
Now that you have successfully opened the File Manager app and located the SMS/MMS folder, you are ready to proceed to the next step and select the text messages you want to save to the SD card.
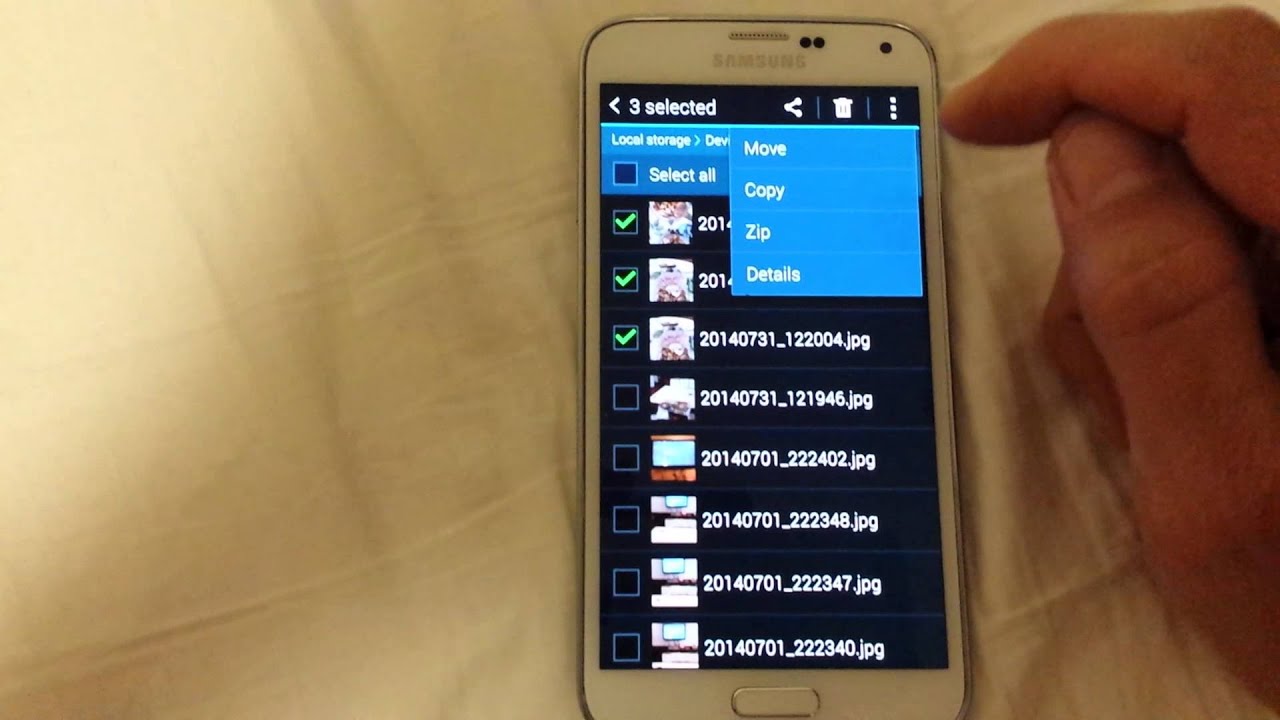
Step 4: Select the text messages you want to save to the SD card
Now that you have accessed the SMS/MMS folder using the File Manager app on your Galaxy S5, you can proceed to select the specific text messages you want to save to the SD card. This step allows you to choose the conversations or individual messages that you want to create a backup for.
Follow these steps to select the text messages you want to save:
- Within the SMS/MMS folder, you will see a list of files or subfolders, each representing a different conversation or contact.
- Navigate through the folders to find the specific text message conversation or contact that you want to save.
- Tap on the folder or file representing the conversation to open it. You may see a list of text message files or subfolders within the conversation folder.
- Select the individual text message files or subfolders that you want to back up. You can do this by tapping and holding on a file or folder to bring up the selection options.
- Continue selecting the desired text message files or folders until you have chosen all the messages you want to save.
By following these steps, you have successfully selected the text messages you want to save to the SD card. Now, in the next step, we will explore how to copy or move these selected text messages to the SD card.
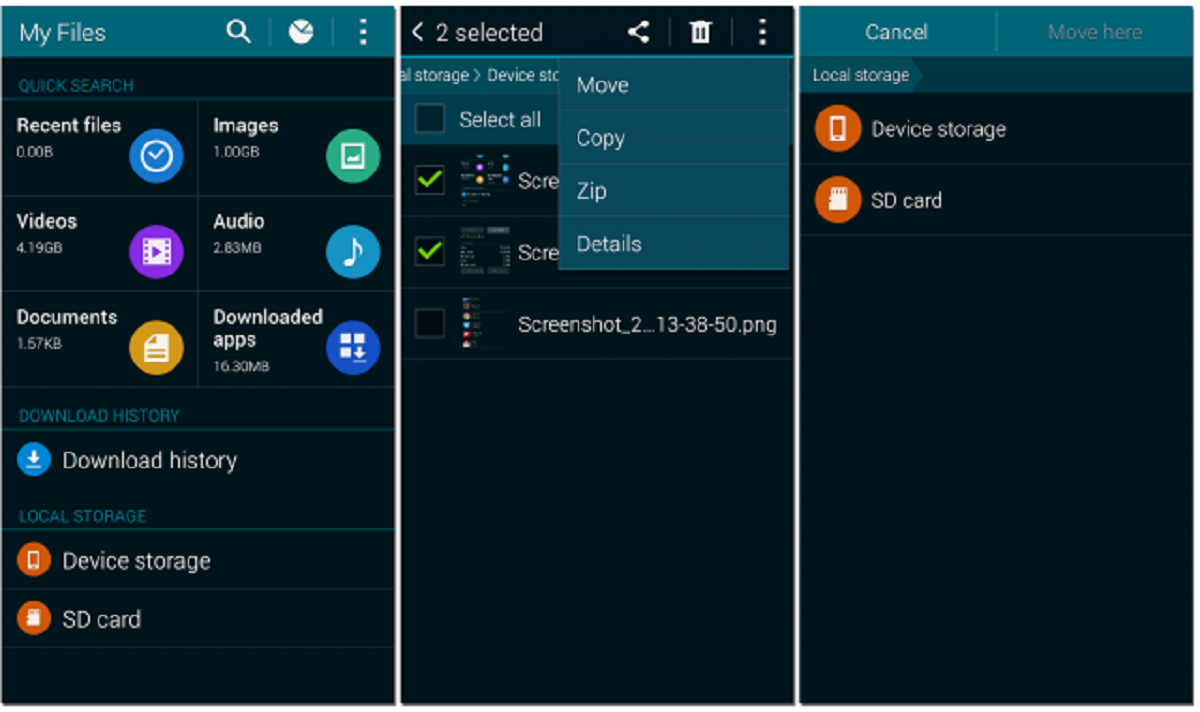
Step 5: Tap on the “Copy” or “Move” option
After selecting the text messages you want to save to the SD card, it’s time to choose whether you want to copy or move them to the SD card. Copying the messages will create a duplicate copy on the SD card, while moving them will transfer the messages from the internal storage to the SD card.
Follow these steps to initiate the copy or move process:
- Once you have selected the desired text messages, tap on the options or settings icon within the File Manager app. This icon is usually represented by three vertical dots or horizontal lines.
- From the menu that appears, look for the “Copy” or “Move” option and tap on it.
- A confirmation prompt may appear, asking for your permission to grant the app access to copy or move the selected files. Tap on “Allow” or “OK” to proceed.
- After granting permission, you will be presented with a list of available destinations. Look for and select the SD card or the directory corresponding to the SD card as the destination for the copied or moved text messages.
- Tap on the “Copy” or “Move” button to initiate the process.
By following these steps, you have successfully selected the copy or move option to transfer the selected text messages to the SD card. In the next step, we will explore how to verify that the text messages have been successfully saved on the SD card.
Step 6: Choose the SD card as the destination folder
After selecting the “Copy” or “Move” option in the previous step, you will be prompted to choose the destination folder for the copied or moved text messages. In this step, we will guide you through the process of selecting the SD card as the destination folder, ensuring that your text messages are saved in the appropriate location.
Follow these steps to choose the SD card as the destination folder:
- After tapping on the “Copy” or “Move” option, a list of available destinations will appear on your screen.
- Look for and select the SD card or the directory corresponding to the SD card as the destination for your text messages. It may be labeled as “SD card,” “External storage,” or have a specific name assigned to it.
- If necessary, navigate through the folders within the SD card to select the desired location for the copied or moved text messages. You can tap on the folders to open them and view their contents.
- Once you have chosen the appropriate destination on the SD card, tap on the “Select” or “OK” button to confirm your selection.
By following these steps, you have successfully chosen the SD card as the destination folder for your copied or moved text messages. Next, in the following step, we will discuss how to wait for the text messages to be copied or moved to the SD card.
Step 7: Wait for the text messages to be copied or moved to the SD card
After selecting the SD card as the destination folder for your text messages, you will need to wait for the files to be copied or moved from the internal storage to the SD card. The time it takes for this process to complete will depend on the number and size of the text message files being transferred.
Here’s what you need to do while waiting for the text messages to be copied or moved:
- Once you have confirmed the destination folder on the SD card, the File Manager app will begin the copying or moving process.
- During this time, avoid closing the File Manager app or interrupting the transfer process to ensure that all the text message files are successfully copied or moved.
- Depending on the size of the text messages and the speed of your device, the transfer process may take a few seconds to several minutes.
- Keep an eye on the progress indicator within the File Manager app, if available, to get an idea of the transfer’s progress.
- It’s important to remain patient and allow the app to complete the copying or moving process. Avoid performing any other tasks that could potentially interfere with the transfer.
By following these steps, you have successfully initiated the copying or moving process of your selected text messages to the SD card. Once the transfer is complete, we can move on to the final step of verifying that the text messages have been successfully saved on the SD card.
Step 8: Verify that the text messages are saved on the SD card
After the copying or moving process is complete, it’s important to verify that your text messages have been successfully saved on the SD card. This step ensures that your backup is complete and allows you to confirm the integrity of the transferred files.
Follow these steps to verify that your text messages are saved on the SD card:
- Open the File Manager app on your Galaxy S5.
- Navigate to the SD card or the specific directory where you chose to save your text messages.
- Look for a folder or subfolder within the SD card that corresponds to the text messages you copied or moved.
- Tap on the folder to open it and inspect the contents.
- Verify that the text messages you selected and transferred are present in the folder. You should see the individual message files or subfolders you selected.
- If you are able to view and access the text messages within the SD card folder, this indicates that the transfer was successful.
- Alternatively, you can also disconnect the SD card from your Galaxy S5 and insert it into a computer or another compatible device to check the contents and confirm the presence of the transferred text message files.
By following these steps and verifying that your text messages are saved on the SD card, you can have peace of mind knowing that your important conversations are securely backed up and easily accessible whenever you need them.
Conclusion
Congratulations! You have successfully learned how to save text messages on your Galaxy S5 to an SD card. By following the simple steps outlined in this guide, you can now create a backup of your important conversations and free up valuable storage space on your device.
We started by inserting an SD card into your Galaxy S5, ensuring that you have the necessary storage capacity. Then, we installed a File Manager app from the Play Store to help us navigate and manage our files effectively.
Next, we opened the File Manager app and accessed the SMS/MMS folder, where your text messages are stored. We then selected the specific text messages we wanted to save by tapping and holding on the corresponding files or folders.
In the subsequent steps, we chose the “Copy” or “Move” option to initiate the transfer process and selected the SD card as the destination folder. We patiently waited for the text messages to be copied or moved, ensuring that we did not interrupt the process.
Finally, we verified that the text messages were successfully saved on the SD card by opening the File Manager app once again and navigating to the designated folder on the SD card.
By following these steps, you can now enjoy the peace of mind that comes with having a backup of your important text messages. Remember to periodically repeat this process to ensure that your backups are up to date.
Thank you for following this guide, and we hope it has been helpful to you. If you have any further questions or need additional assistance, don’t hesitate to reach out. Happy saving!