Introduction
The Samsung Galaxy S5 is a popular smartphone known for its impressive camera capabilities. If you’re the proud owner of this device and want to download pictures from it, you’ve come to the right place. In this article, we will guide you through several methods that you can use to easily transfer your photos from your Samsung Galaxy S5 to your computer or other storage devices.
Whether you want to back up your precious memories, share your beautiful shots with friends and family, or simply clear up space on your phone, these methods will help you accomplish your goal. From using a USB cable to leveraging cloud storage solutions and microSD cards, we will cover various options to suit your needs.
While the specific steps may vary slightly depending on your operating system and personal preferences, the general concepts explained in this article will apply to most users. With that said, let’s dive into the different methods you can use to download pictures from your Samsung Galaxy S5.
Method 1: Using a USB Cable
One of the simplest and most straightforward ways to download pictures from your Samsung Galaxy S5 is by using a USB cable. This method allows you to directly connect your phone to your computer and transfer files seamlessly.
Here is a step-by-step guide on how to do it:
- Start by ensuring that you have the necessary USB cable that came with your Samsung Galaxy S5.
- Connect one end of the USB cable to your phone and the other end to an available USB port on your computer.
- On your Samsung Galaxy S5, you will see a notification in the status bar indicating that your device is connected via USB. Pull down the notification panel and tap on “USB charging this device” or “The connected device is charging.”
- A menu will pop up on your phone’s screen. Select “Transfer files” or “File transfer” to initiate the data transfer between your phone and computer.
- On your computer, open File Explorer (Windows) or Finder (Mac).
- In the file explorer window, you should see your Samsung Galaxy S5 listed as a connected device. Click on it to access your phone’s internal storage or SD card storage.
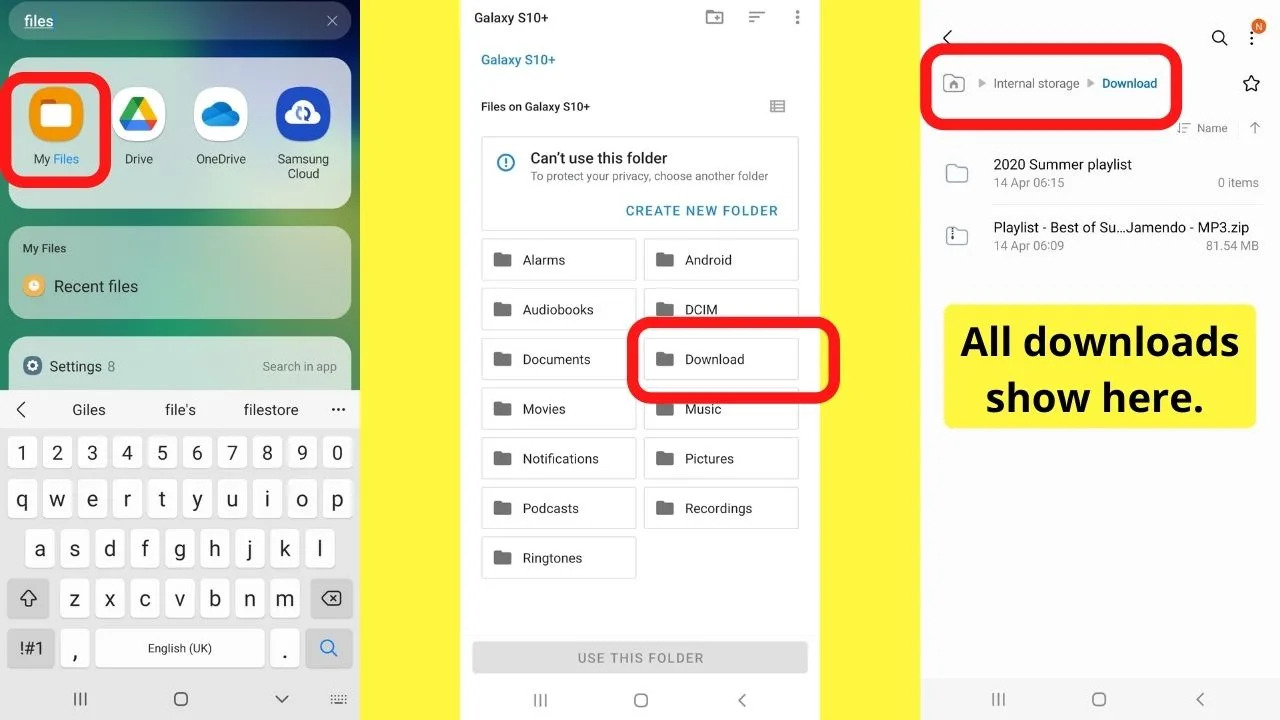
- Navigate to the “DCIM” folder, which contains your phone’s photos and videos.
- Select the pictures you want to download by either holding the Ctrl key (Windows) or Command key (Mac) and clicking on each file, or by dragging the cursor to select multiple files.
- Right-click on the selected pictures and choose “Copy” or “Cut”.
- Navigate to the desired folder on your computer where you want to save the photos. Right-click and choose “Paste” to transfer the files from your Samsung Galaxy S5 to your computer.
Once the transfer is complete, you can safely disconnect your phone from the computer by removing the USB cable. Now you have successfully downloaded your pictures from your Samsung Galaxy S5 using a USB cable.
Method 2: Using Samsung Smart Switch
An alternative method to download pictures from your Samsung Galaxy S5 is by utilizing the Samsung Smart Switch application. This software allows you to transfer not only photos but also other data, such as contacts, messages, and apps, from your phone to your computer.
Here’s how you can use Samsung Smart Switch to download your pictures:
- First, ensure that you have Samsung Smart Switch installed on your computer. If not, you can download it from the official Samsung website.
- Connect your Samsung Galaxy S5 to your computer using a USB cable.
- Launch Samsung Smart Switch on your computer.
- Once the application detects your phone, you will see its name displayed on the screen. Click on it to proceed.
- On your computer screen, you will see different categories of data that you can transfer. To download pictures, click on the “Photos” category.
- Choose the specific albums or folders that contain the pictures you want to download. You can select multiple albums by holding the Ctrl key (Windows) or Command key (Mac) while clicking on the albums.
- Click on the “Transfer” button to initiate the download process.
- Samsung Smart Switch will start transferring the selected pictures from your Samsung Galaxy S5 to the designated location on your computer.
- Once the transfer is complete, you can disconnect your phone from the computer.
Using Samsung Smart Switch provides a convenient and efficient way to download your pictures, especially if you want to transfer other types of data simultaneously. It also offers additional features, such as backup and restore functionality, making it a versatile tool for managing your Samsung Galaxy S5.
Method 3: Using Samsung Cloud
If you’re looking for a cloud-based solution to download pictures from your Samsung Galaxy S5, Samsung Cloud is the perfect option. This service allows you to sync and backup your phone’s data, including photos, to the cloud and access them from any compatible device.
Follow these steps to use Samsung Cloud to download your pictures:
- Ensure that your Samsung Galaxy S5 is connected to a Wi-Fi network.
- On your phone, go to “Settings” and tap on “Accounts and backup.”
- Select “Samsung Cloud” from the list of options.
- If prompted, sign in to your Samsung account or create a new one.
- In the Samsung Cloud settings, enable the “Sync” option for “Gallery” or “Photos.”
- Wait for your pictures to sync with Samsung Cloud. The time it takes will depend on the number of photos and the speed of your internet connection.
- Once the sync is complete, you can download your pictures on your computer by accessing the Samsung Cloud website or using the Samsung Cloud desktop application.
- Sign in to your Samsung account on your computer and navigate to the “Gallery” or “Photos” section.
- Select the pictures you want to download by clicking on them or holding the Ctrl key (Windows) or Command key (Mac) to select multiple pictures.
- Click on the “Download” button or right-click and choose “Download” to start the download process.
- Specify the location on your computer where you want to save the pictures and click “Save.”
Using Samsung Cloud provides a seamless way to access and download your pictures from any device with an internet connection. It ensures the safety and backup of your photos, giving you peace of mind in case of accidental loss or device failure.
Method 4: Using Google Photos
If you prefer to store and access your pictures using a cloud-based service that is not specific to Samsung devices, Google Photos is an excellent option. This widely used platform allows you to back up and download your photos across various devices, including your Samsung Galaxy S5.
Here’s how you can use Google Photos to download your pictures:
- Make sure you have the Google Photos app installed on your Samsung Galaxy S5. If not, download it from the Google Play Store.
- Open the Google Photos app and sign in to your Google account.
- Tap on the three horizontal lines in the top-left corner to open the sidebar menu.
- Select “Settings” from the menu and then tap on “Backup & sync.”
- Toggle the “Backup & sync” option to enable it.
- Allow Google Photos to access your phone’s photos and media.
- Wait for the backup process to complete. This may take some time, depending on the number of photos and the speed of your internet connection.
- Once your photos are backed up, you can access them on any device with Google Photos installed, including your computer.
- On your computer, open a web browser and go to the Google Photos website (photos.google.com).
- Sign in to your Google account that is linked to the same Google Photos app on your Samsung Galaxy S5.
- Navigate to the “Photos” tab to view all your backed-up pictures.
- Select the photos you want to download by clicking on them or holding the Shift key to select multiple photos.
- Click on the three vertical dots at the top-right corner and choose “Download” from the dropdown menu.
Google Photos offers a user-friendly interface and unlimited storage for high-quality photos. It not only allows you to download your pictures but also provides powerful features for organizing, editing, and sharing your precious moments with ease.
Method 5: Using a microSD Card
If your Samsung Galaxy S5 has a microSD card slot, another convenient method to download pictures is by using a microSD card. This method allows you to directly transfer photos from your phone’s internal storage to the microSD card, which can then be easily accessed on any device with a compatible card reader.
Follow these steps to use a microSD card to download your pictures:
- Insert a microSD card into the microSD card slot on your Samsung Galaxy S5. Ensure that the card is properly inserted and securely seated.
- On your phone, open the “Gallery” app or any other photo viewing app you prefer.
- Navigate to the album or folder containing the pictures you want to download.
- Select the photos you want to transfer to the microSD card by tapping on them or holding the Ctrl key (Windows) or Command key (Mac) to select multiple photos.
- Tap on the “Share” or “More” button, usually represented by three dots or an arrow pointing upwards.
- Choose the option to “Move” or “Copy” the selected photos.
- In the file browser that appears, locate the microSD card as the destination for the photos.
- Tap on the microSD card to open it and select the desired folder where you want to save the photos.
- Tap on “Move here” or “Copy here” to transfer the selected photos from your phone’s internal storage to the microSD card.
- Wait for the transfer process to complete. This may take some time, depending on the number and size of the photos.
Once the transfer is complete, you can safely remove the microSD card from your Samsung Galaxy S5. Insert the microSD card into a compatible card reader on your computer to access and download the pictures.
Using a microSD card provides a straightforward and portable way to transfer and access your pictures. It allows you to expand the storage capacity of your Samsung Galaxy S5 and take your photos with you wherever you go.
Conclusion
Downloading pictures from your Samsung Galaxy S5 can be easily accomplished using various methods discussed in this article. From the convenience of a USB cable connection to the flexibility of cloud-based solutions like Samsung Cloud and Google Photos, you have multiple options to transfer and access your photos.
The USB cable method provides a direct and reliable way to transfer pictures to your computer. Samsung Smart Switch offers a comprehensive solution for not only photos but also other types of data. Samsung Cloud allows for seamless syncing and backup, ensuring the safety of your pictures. Google Photos provides a cloud-based platform with extensive features for managing and sharing your photos. Lastly, using a microSD card allows for portable storage and easy access across different devices.
When choosing the most suitable method for you, consider factors such as convenience, storage space, and desired accessibility. You may also find it beneficial to combine multiple methods to have different backup options and ensure the safety of your photos.
Remember to regularly download and back up your pictures to prevent the loss of your valuable memories. Whether you’re archiving your photos, sharing them with others, or simply freeing up space on your Samsung Galaxy S5, these methods provide you with the flexibility and control over your picture downloads.
Now that you’re equipped with the knowledge and understanding of how to download pictures from your Samsung Galaxy S5, you can confidently manage your photo collection and enjoy sharing your memories with others. Embrace the various methods available and explore the endless possibilities of preserving and showcasing your pictures.