Introduction
Welcome to a step-by-step guide on how to transfer photos to an SD card on your Galaxy S5. If you find that your phone’s internal storage is running low or you want to back up your precious photos, transferring them to an SD card is a great option. The Galaxy S5 allows you to easily move your photos to an external storage device, providing you with more space and peace of mind.
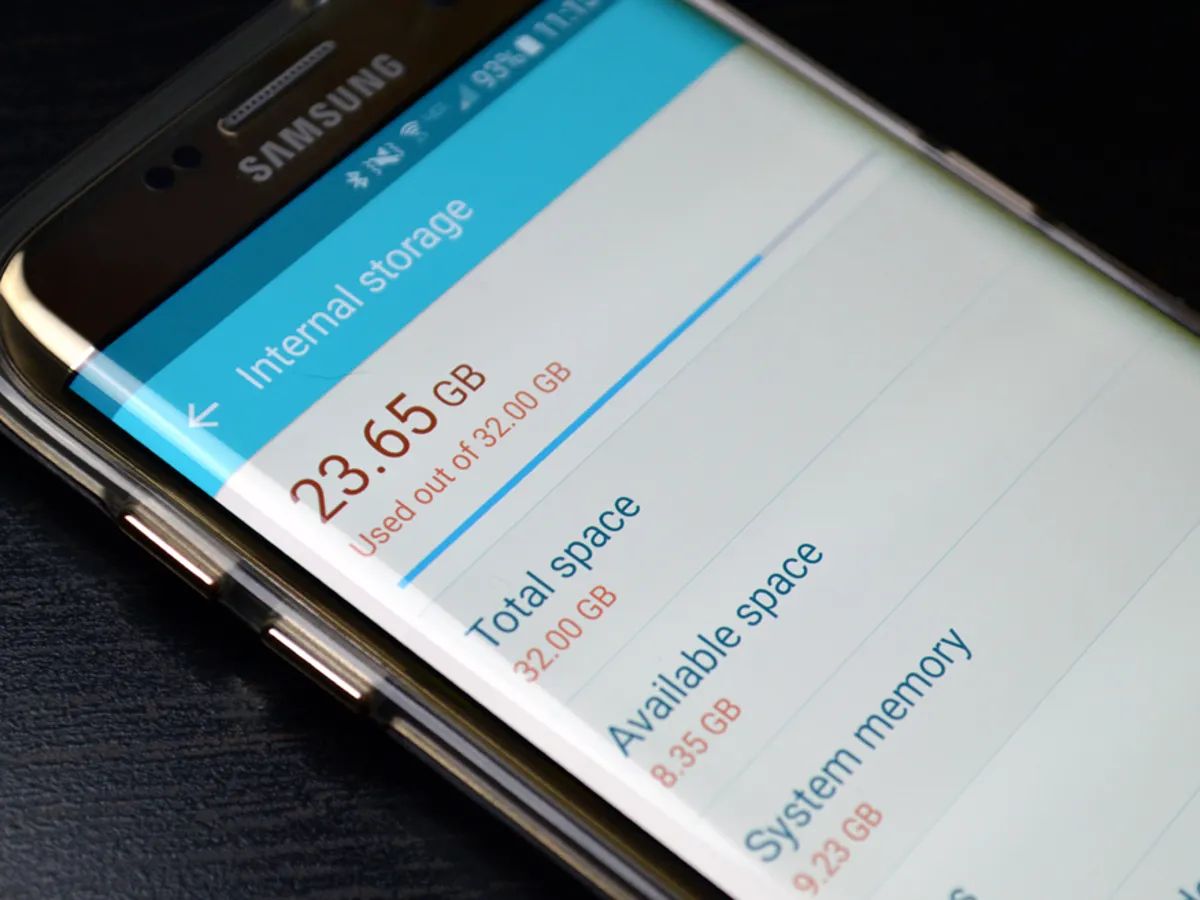
With its impressive camera capabilities, the Galaxy S5 enables you to capture high-quality photos and videos. However, these files can take up a significant amount of storage space over time. By transferring your photos to an SD card, you can free up space on your phone without having to delete any cherished memories.
In this guide, we will walk you through the process of transferring photos to an SD card on your Galaxy S5. Whether you are a photography enthusiast or simply looking to clear up storage space, this tutorial will help you effortlessly move your photos to external storage.
Before we begin, it is important to note that the steps may slightly vary depending on the software version and user interface of your Galaxy S5. However, the general process remains the same, ensuring that you can transfer your photos successfully.
Step 1: Inserting the SD Card
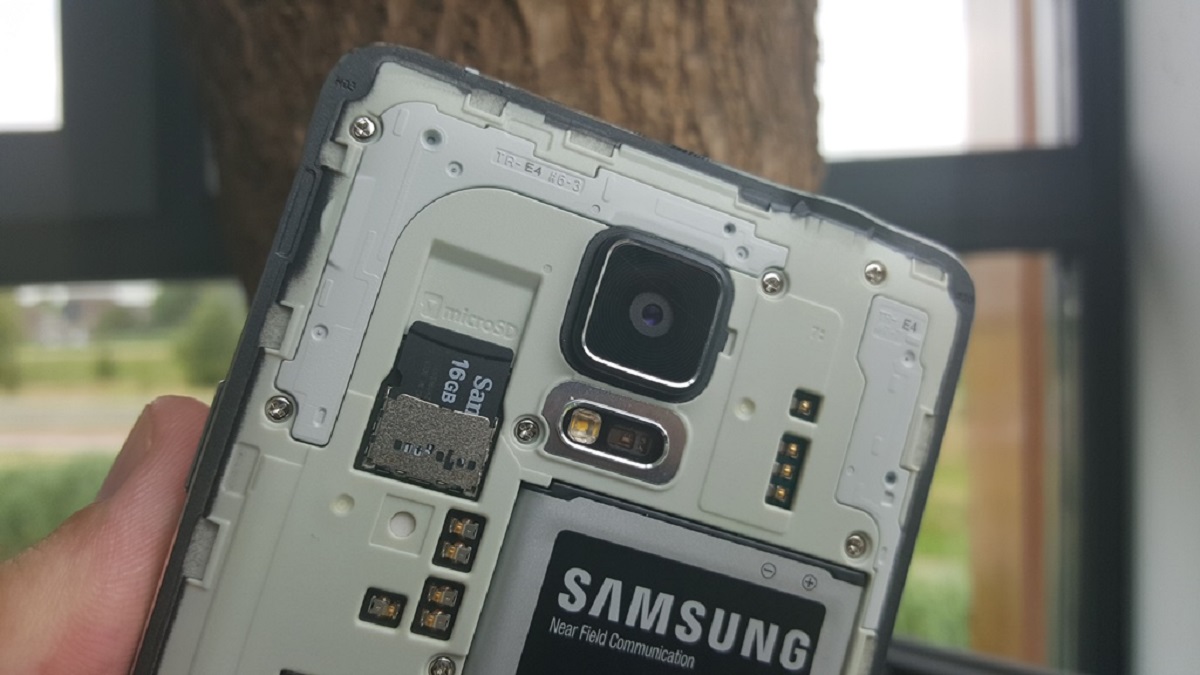
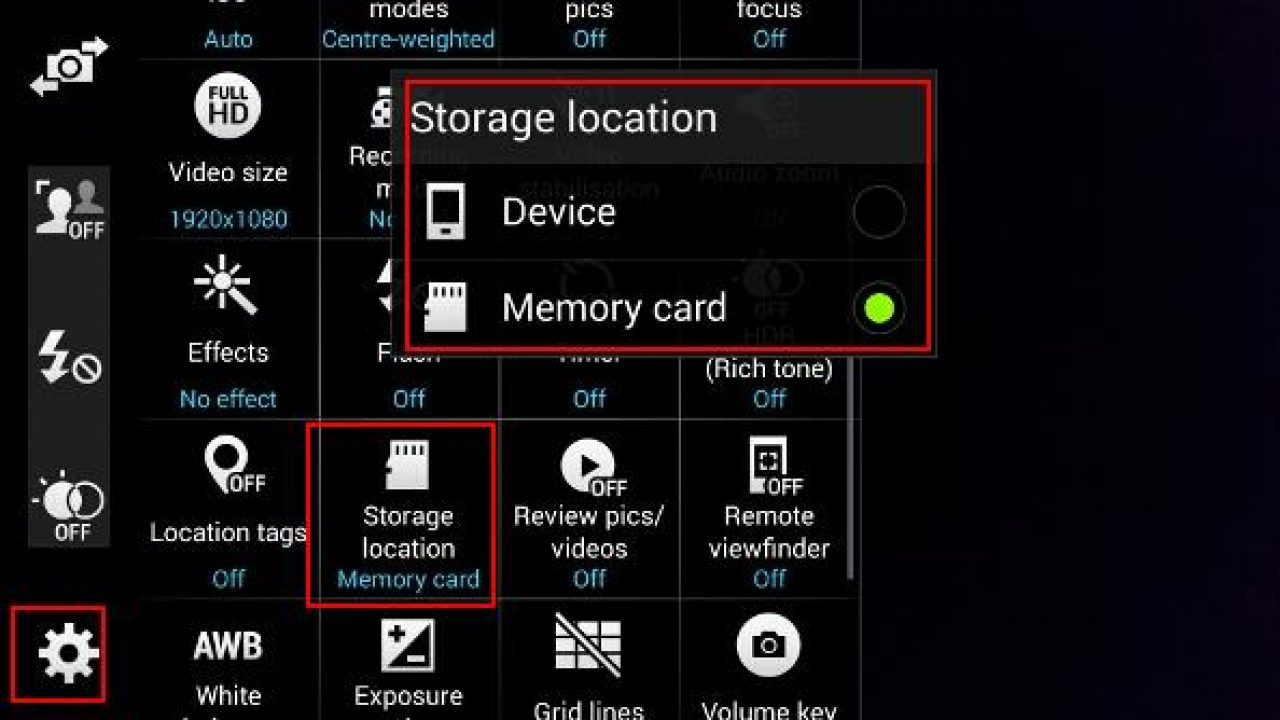
The first step in transferring your photos to an SD card on your Galaxy S5 is to insert the SD card into your device. The Galaxy S5 supports microSD cards with a capacity of up to 128GB, providing you with ample storage space for your photos.
To insert the SD card, follow these simple steps:
- Locate the SD card slot on your Galaxy S5. It is located behind the back cover, near the battery.
- Power off your phone before removing the back cover. This ensures that you don’t cause any damage to the device.
- Once the back cover is removed, you will see the SD card slot on the right-hand side.
- Gently slide the SD card into the slot, with the gold contacts facing downwards.
- Make sure the SD card is securely inserted and flush with the device.
- Replace the back cover and press it down until it clicks into place.
- Power on your Galaxy S5.
Once the SD card is properly inserted, your Galaxy S5 will detect it automatically. You are now ready to begin the process of transferring your photos to the SD card.
Step 2: Accessing the Gallery App
Now that you have inserted the SD card into your Galaxy S5, it’s time to access the Gallery app where your photos are stored.
Follow the steps below to access the Gallery app:
- Locate the “Apps” icon on your home screen or in the app drawer. It usually appears as a grid of dots or squares.
- Tap on the “Apps” icon to open the app drawer.
- Scroll through the list of apps until you find the “Gallery” app icon. It is usually represented by a colorful flower or a camera icon.
- Tap on the “Gallery” app icon to open the app.
Once the Gallery app is open, you will be able to see all the photos and videos stored on your Galaxy S5. This is where you will select the photos you want to transfer to the SD card.
The Gallery app provides various viewing options, such as organizing photos by albums, events, or location. You can swipe left or right to navigate through different folders or tap on specific albums to view their contents. Take some time to familiarize yourself with the app’s layout and organization to make it easier to select the desired photos.
Now that you have successfully accessed the Gallery app, let’s move on to the next step and select the photos you want to transfer to the SD card.
Step 3: Selecting the Photos to Transfer
Once you have opened the Gallery app on your Galaxy S5, it’s time to select the photos you wish to transfer to the SD card. You can transfer individual photos or select multiple photos at once.
Follow these steps to select the photos:
- Open the album or folder where the photos you want to transfer are located.
- Tap on the first photo you want to select. A checkmark will appear on the selected photo.
- If you want to select multiple photos, swipe left or right to view the next photo and tap on it to add a checkmark. Repeat this process for each additional photo you want to select.
- To select all photos in an album or folder, tap the “Select all” option, usually represented by a checkbox in the app’s menu.
- Review your selection to ensure that all the desired photos are selected. You can remove the checkmark from any photo by tapping on it again.
If you have a large number of photos and finding the specific ones you want to transfer becomes a challenge, you can use the Gallery app’s search function or sorting options to locate them more easily.
By following these steps, you can now confidently move on to the next stage and initiate the transfer process of the selected photos to the SD card.
Step 4: Initiating the Transfer Process
Now that you have selected the photos you want to transfer to the SD card on your Galaxy S5, it’s time to initiate the transfer process. The Gallery app provides a simple and straightforward method for moving your selected photos to the external storage.
Follow these steps to initiate the transfer:
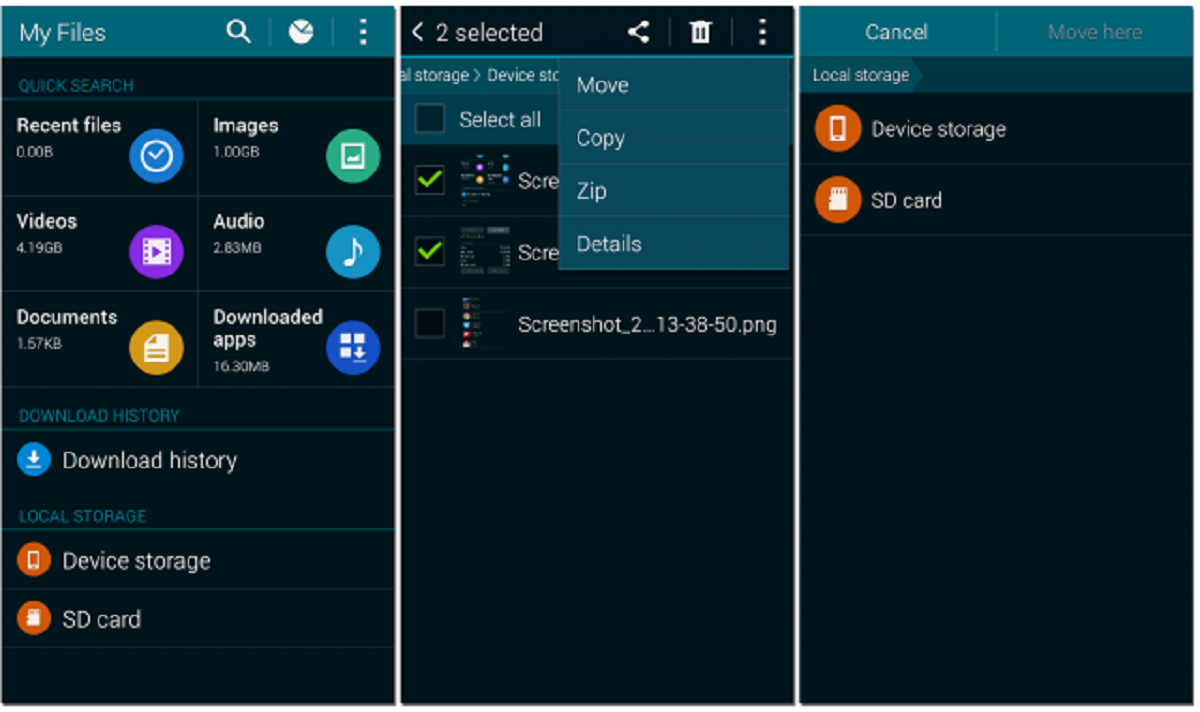
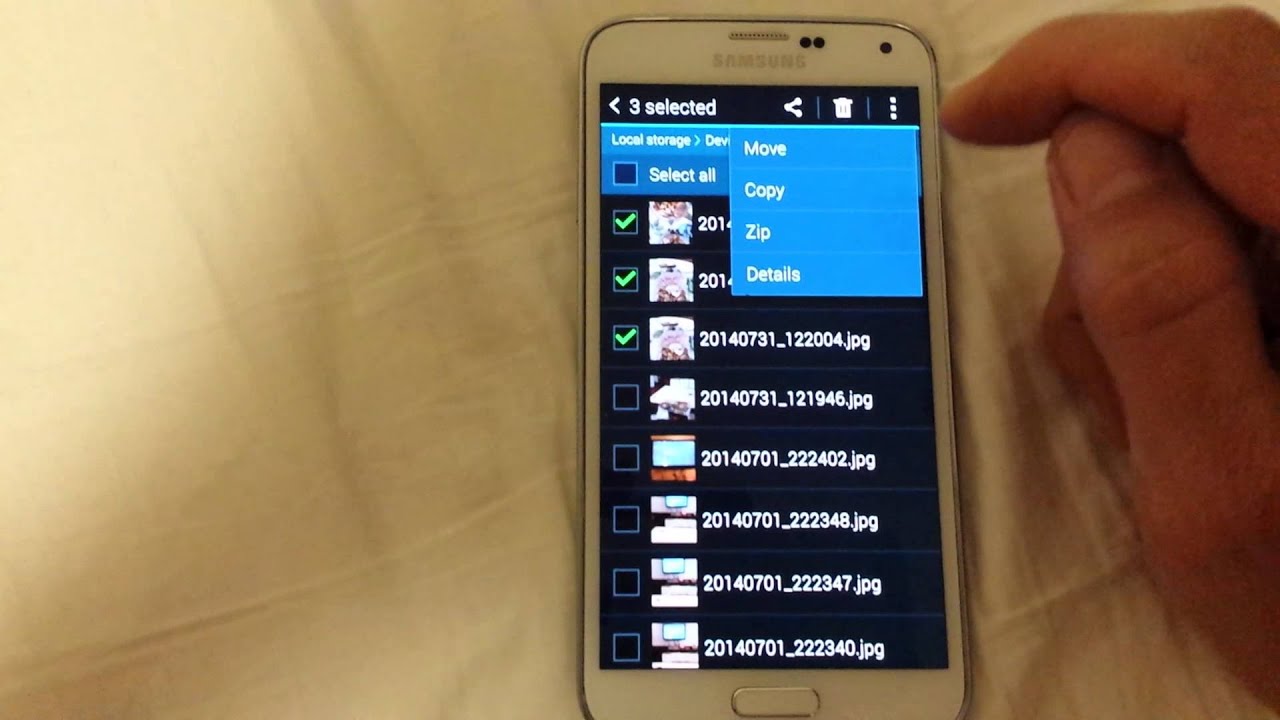
- With the selected photos still highlighted, tap on the options menu represented by three vertical dots or lines, usually located in the top-right corner of the app.
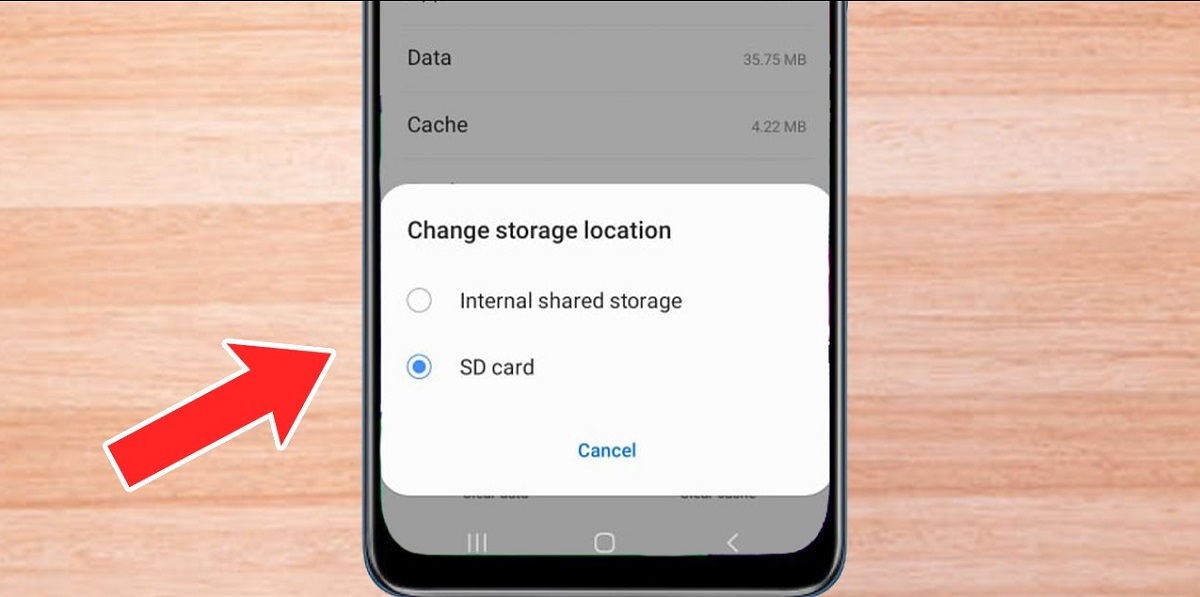
- From the options menu, select the “Move” or “Transfer to SD Card” option. The specific wording may vary depending on your device’s software version.
- A confirmation dialog box will appear, asking for your permission to move the selected photos to the SD card. Read the message and tap “OK” or “Move” to continue.
- The transfer process will start, and the selected photos will be copied from the internal storage to the SD card. The time taken for the transfer depends on the number and size of the photos.
- Once the transfer is complete, a notification will appear, indicating that the photos have been successfully moved to the SD card.
It’s important to note that during the transfer process, it is advisable to keep your device connected to a stable power source to ensure uninterrupted data transfer. Additionally, avoid interrupting the process by not unplugging the device or navigating away from the Gallery app.
Now that you have successfully initiated the transfer process, let’s move on to the next step and verify that your photos have been successfully transferred to the SD card.
Step 5: Verifying the Transfer
After initiating the transfer process of your selected photos to the SD card on your Galaxy S5, it’s important to verify that the transfer was successful. This step ensures that your precious memories are securely stored on the external storage.
Follow these steps to verify the transfer:
- Open the Gallery app on your Galaxy S5.
- Navigate to the album or folder where the photos were originally located.
- Check if the transferred photos are no longer present in the original location. They should now be stored on the SD card.
- To confirm that the photos are indeed on the SD card, tap on the “My Files” app, which is typically located in the app drawer or on the home screen.
- Navigate to the “SD card” or “External storage” section. This is where you will find the transferred photos.
- Open the folder where the photos were transferred, and you should see the selected photos in their respective folders or subfolders.
- Tap on individual photos to ensure they open correctly and are viewable.
Verifying the transfer is an essential step as it guarantees that your photos have been successfully moved to the SD card and are accessible for viewing and sharing. If any issues arise during verification, such as missing or corrupted photos, you may need to repeat the transfer process for those particular files.
Finally, it is recommended to periodically back up your SD card to a computer, cloud storage, or another external storage device to ensure the safety of your photos in case of any unforeseen circumstances or device malfunctions.
Congratulations! You have successfully transferred your photos to an SD card on your Galaxy S5, freeing up space on your device and ensuring the security of your precious memories.
Conclusion
Transferring photos to an SD card on your Galaxy S5 is a simple and effective way to free up space on your device and ensure that your precious memories are securely stored. With just a few easy steps, you can move your photos to external storage, providing you with more room for new captures and peace of mind.
In this guide, we walked through the step-by-step process of transferring photos to an SD card on your Galaxy S5. From inserting the SD card to verifying the transfer, each stage was covered in detail to ensure a seamless experience.
Remember, while the specific steps may vary slightly depending on the software version and user interface of your device, the general process remains the same. By following the instructions provided, you can confidently transfer your photos to the SD card on your Galaxy S5.
Keep in mind that it is advisable to periodically back up your SD card to ensure the safety of your photos. This can be done by storing copies on a computer, cloud storage, or another external storage device.
Now that you have successfully transferred your photos, you can continue capturing new memories without worrying about storage limitations. Enjoy the ample space and flexibility that the SD card provides on your Galaxy S5.
Thank you for following this guide. We hope it has been helpful in assisting you with transferring your photos to an SD card on your Galaxy S5. If you have any further questions or need additional assistance, feel free to refer back to this guide or consult the user manual of your device.