Introduction
Welcome to this helpful guide on how to move your photos to your SD card. If you find yourself struggling with limited storage space on your device, using an SD card can be a great solution to free up memory and store your precious photos. Whether you’re an avid photographer capturing beautiful moments or simply someone who enjoys taking snapshots, this step-by-step tutorial will walk you through the process of transferring your photos to an SD card.
With the ever-increasing quality of smartphone cameras, capturing high-resolution images has become a common practice. However, these beautiful photos can quickly eat up the storage space on your device, leaving you with limited room for new memories. By transferring your photos to an SD card, you can not only free up space but also ensure that your cherished moments are safely stored and easily accessible.
In the sections below, we will guide you through the process of moving your photos to an SD card, ensuring that you have all the necessary information to complete the task successfully. From inserting the SD card to verifying the transfer, each step will be explained in detail to make the process as smooth as possible for you.
So, if you’re ready to declutter your device and create more space to capture new memories, let’s get started with the first step: inserting your SD card.
Step 1: Insert your SD card
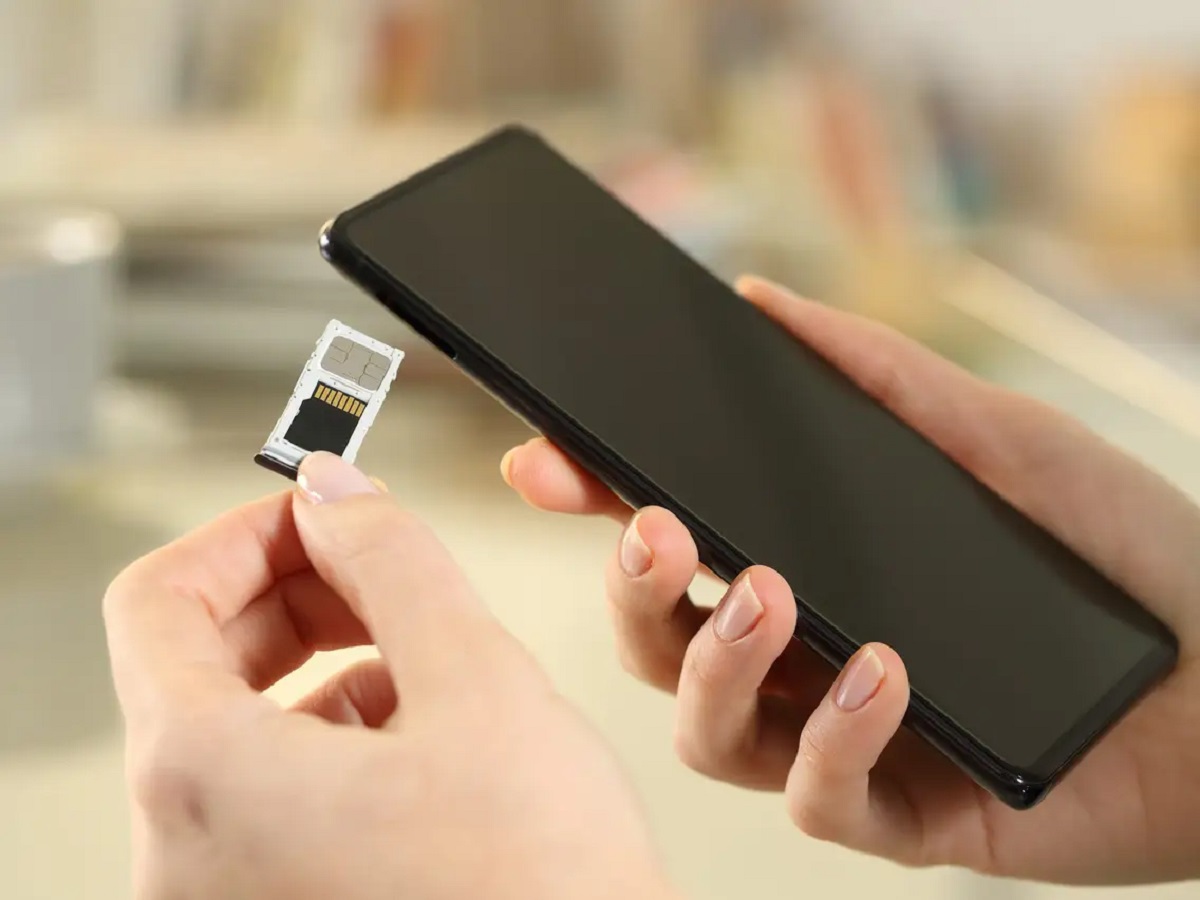
The first step in moving your photos to an SD card is to insert the card into your device. Most smartphones and cameras have a dedicated slot for SD cards, usually located on the side or back of the device. To insert your SD card:
- Turn off your device to avoid any potential data loss or damage.
- Locate the slot for the SD card.
- Remove the back cover of your device, if applicable, to access the SD card slot. Some devices may have a small tray that pops out by inserting a SIM card ejector tool or a paperclip into the pinhole next to the slot.
- Gently insert the SD card into the slot, ensuring that the gold contacts on the card are facing downwards. Push the card in until it clicks in place or is securely inserted.
- If you removed the back cover, carefully put it back on, making sure it snaps into place.
- Power on your device once again.
Now that you have successfully inserted your SD card, you’re ready to move on to the next step: locating your photos. Make sure to handle your SD card with care and avoid touching the gold contacts to prevent any damage or data corruption.
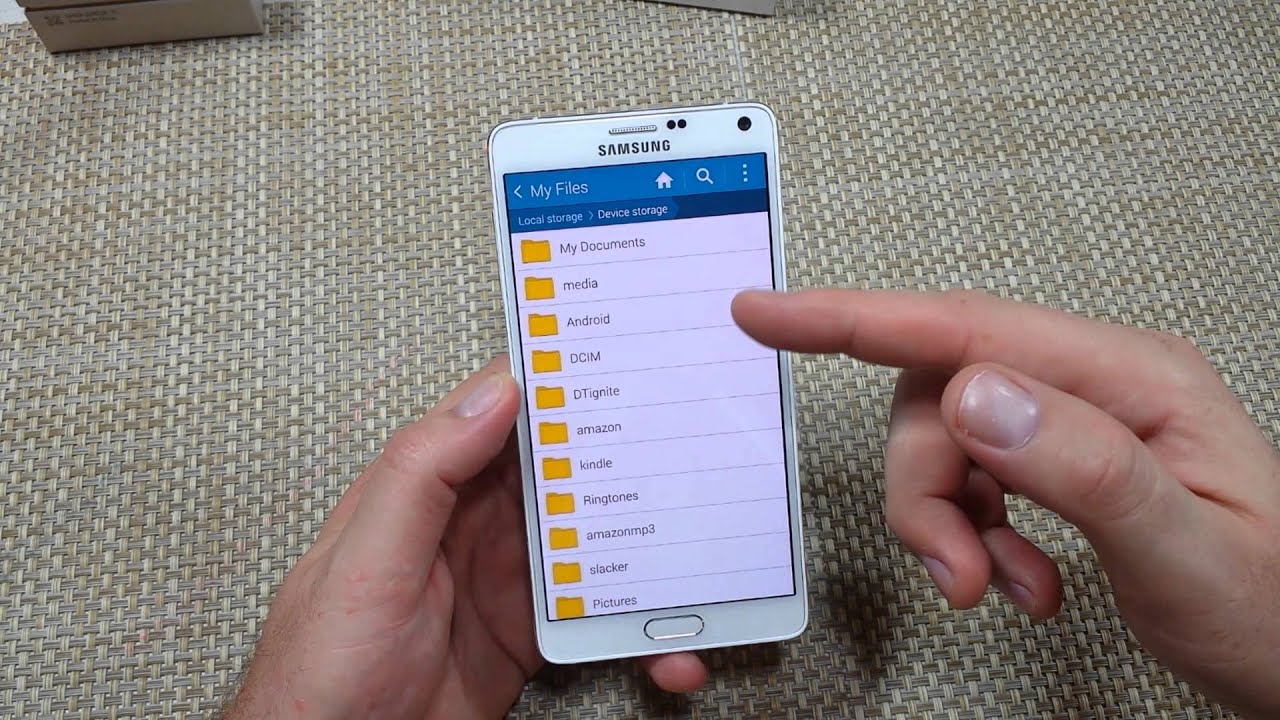
Step 2: Locate your photos
Once your SD card is correctly inserted, it’s time to locate the photos you want to move. Depending on your device and the default settings, your photos may be stored in different locations. Here are a few common places to check:
- Gallery or Photos App: Open your device’s gallery or photos app, which is typically pre-installed and easily accessible from your home screen. Look for folders labeled “Camera” or “Pictures” to find your photos.
- File Manager: Some devices have a pre-installed file manager app that allows you to explore your device’s storage. Open the file manager and navigate to the “DCIM” folder, where your photos are often stored.
- Camera App: If you’re using a dedicated camera, the photos may be saved directly onto the device’s internal memory. Consult your camera’s user manual or settings menu to locate the photos.
Once you’ve found the folder containing your photos, take a moment to browse through them and ensure that you’ve identified the correct ones for transferring. If you have multiple folders or albums, make a note of which ones you want to move. This step is crucial to avoid mistakenly transferring photos that you want to keep on your device.
Now that you know where your photos are stored, it’s time to move on to the next step: selecting the photos you want to transfer. Don’t worry if you have a large collection, as the following steps will show you how to easily select and move multiple photos at once.
Step 3: Select the photos you want to move
With the location of your photos identified, it’s time to select the specific photos that you want to move to your SD card. Whether you want to transfer a few individual photos or an entire album, most devices offer convenient ways to select multiple photos at once:
- Individual Selection: In your gallery or photos app, tap on a photo to select it. To select multiple photos, swipe left or right to browse through your collection and tap on each photo you want to include in the selection. Selected photos are typically indicated by a checkmark or highlighting.
- Select All: If you want to transfer all the photos in a specific folder or album, look for an option to “Select All” or a checkbox at the top of the screen. This will automatically select all the photos in that location.
- Batch Selection: Some devices offer a batch selection mode that allows you to mark multiple photos with a single tap. Look for options such as “Select” or “Mark” to activate this mode, and then tap on the photos you want to include in the selection.
Once you have made your selection, take a moment to double-check that all the desired photos are properly selected. This will ensure that you don’t accidentally leave out any important photos.
Now that you know how to select your photos, it’s time to proceed to the next step: copying the selected photos. This step will guide you through the process of preparing your photos for the transfer to the SD card.
Step 4: Copy the selected photos
Now that you’ve selected the photos you want to move to your SD card, it’s time to copy them from their current location on your device. Follow these steps to copy the selected photos:
- Access the options menu or toolbar in your gallery or photos app. This is usually represented by three vertical dots or a gear icon located in the upper-right or lower-right corner of the screen.
- Look for a menu option that says “Copy” or “Move.” Selecting “Copy” will create a duplicate of the selected photos, keeping the original photos in their current location. Choosing “Move” will transfer the selected photos to the SD card, removing them from their original location.
- If prompted, choose the destination location for the copied or moved photos. This is where you will select your SD card as the target location.
- Navigate to the SD card folder or directory where you want to store the photos. If you haven’t created a specific folder for your photos, you can simply choose the root directory of your SD card.
- Select the “Paste” or “Copy Here” option to initiate the copying process. This will transfer the selected photos to your SD card.
- Wait for the process to complete. The time will vary depending on the number and size of the photos being copied.
Once the copying process is done, you should see the selected photos in the designated location on your SD card. This confirms that the photos have been successfully copied to the SD card.
Now that you have copied the photos onto your SD card, it’s time to proceed to the next step: verifying the transfer. This step will help ensure that the photos are indeed on your SD card and ready for access.
Step 5: Paste the photos onto your SD card
With the selected photos copied to your device’s clipboard, it’s time to paste them onto your SD card. Follow these steps to complete the transfer:
- Navigate to the location on your device where you want to paste the copied photos. This can be a specific folder or the root directory of your SD card.
- Access the options menu or toolbar in your file manager app or gallery app.
- Select the “Paste” or “Paste Here” option. This will initiate the transfer process and paste the copied photos onto your SD card.
- Wait for the transfer to complete. The time required will depend on the number and size of the photos being transferred.
Once the transfer is complete, you should see the pasted photos in the designated location on your SD card. This confirms that the photos have been successfully transferred from your device’s internal memory to the SD card.
It is important to note that during the transfer process, it’s best to avoid interrupting the operation and keeping your device connected to a stable power source to prevent any potential data loss or corruption. Additionally, ensure that your SD card has sufficient free space to accommodate the transferred photos.
Now that you have successfully pasted the photos onto your SD card, you can proceed to the next step: verifying the transfer. This step will help ensure that the photos are accessible and viewable on your SD card.
Step 6: Verify the transfer
After pasting the photos onto your SD card, it’s important to verify that the transfer was successful. Here are a few steps to help you confirm the presence of your photos on the SD card:
- Safely remove your device’s SD card from its slot if necessary. Refer to your device’s user manual or settings to safely eject the SD card.
- Insert the SD card into a compatible device, such as a computer, camera, or another smartphone, that can read SD cards.
- Navigate to the location on the SD card where the photos were transferred. This will typically be the folder or directory you selected in the previous steps.
- Browse through the photos and ensure that the ones you transferred are present and accessible.
- Open a few selected photos to confirm that they display correctly and show no signs of corruption.
If you can view the transferred photos without any issues, congratulations! The transfer was successful, and your photos are now safely stored on your SD card. You can now enjoy the additional storage space on your device for new photos and files.
In the event that you encounter any problems or cannot find the transferred photos on your SD card, double-check the steps you followed in the previous sections. It’s possible that you may have accidentally selected a different location or encountered a technical issue during the transfer process.
If you are still experiencing difficulties, you may need to repeat the transfer process from the beginning, ensuring that you carefully select the correct photos and paste them onto the SD card.
Now that you have verified the transfer, it’s important to proceed to the final step: safely removing your SD card from the device and ensuring its longevity and usability.
Step 7: Safely remove your SD card
Before safely removing your SD card from your device, make sure you follow these steps to avoid any data loss or potential damage:
- Ensure that all apps or processes using the SD card are closed. This includes any file transfers, photo editing, or other tasks that may be accessing the SD card.
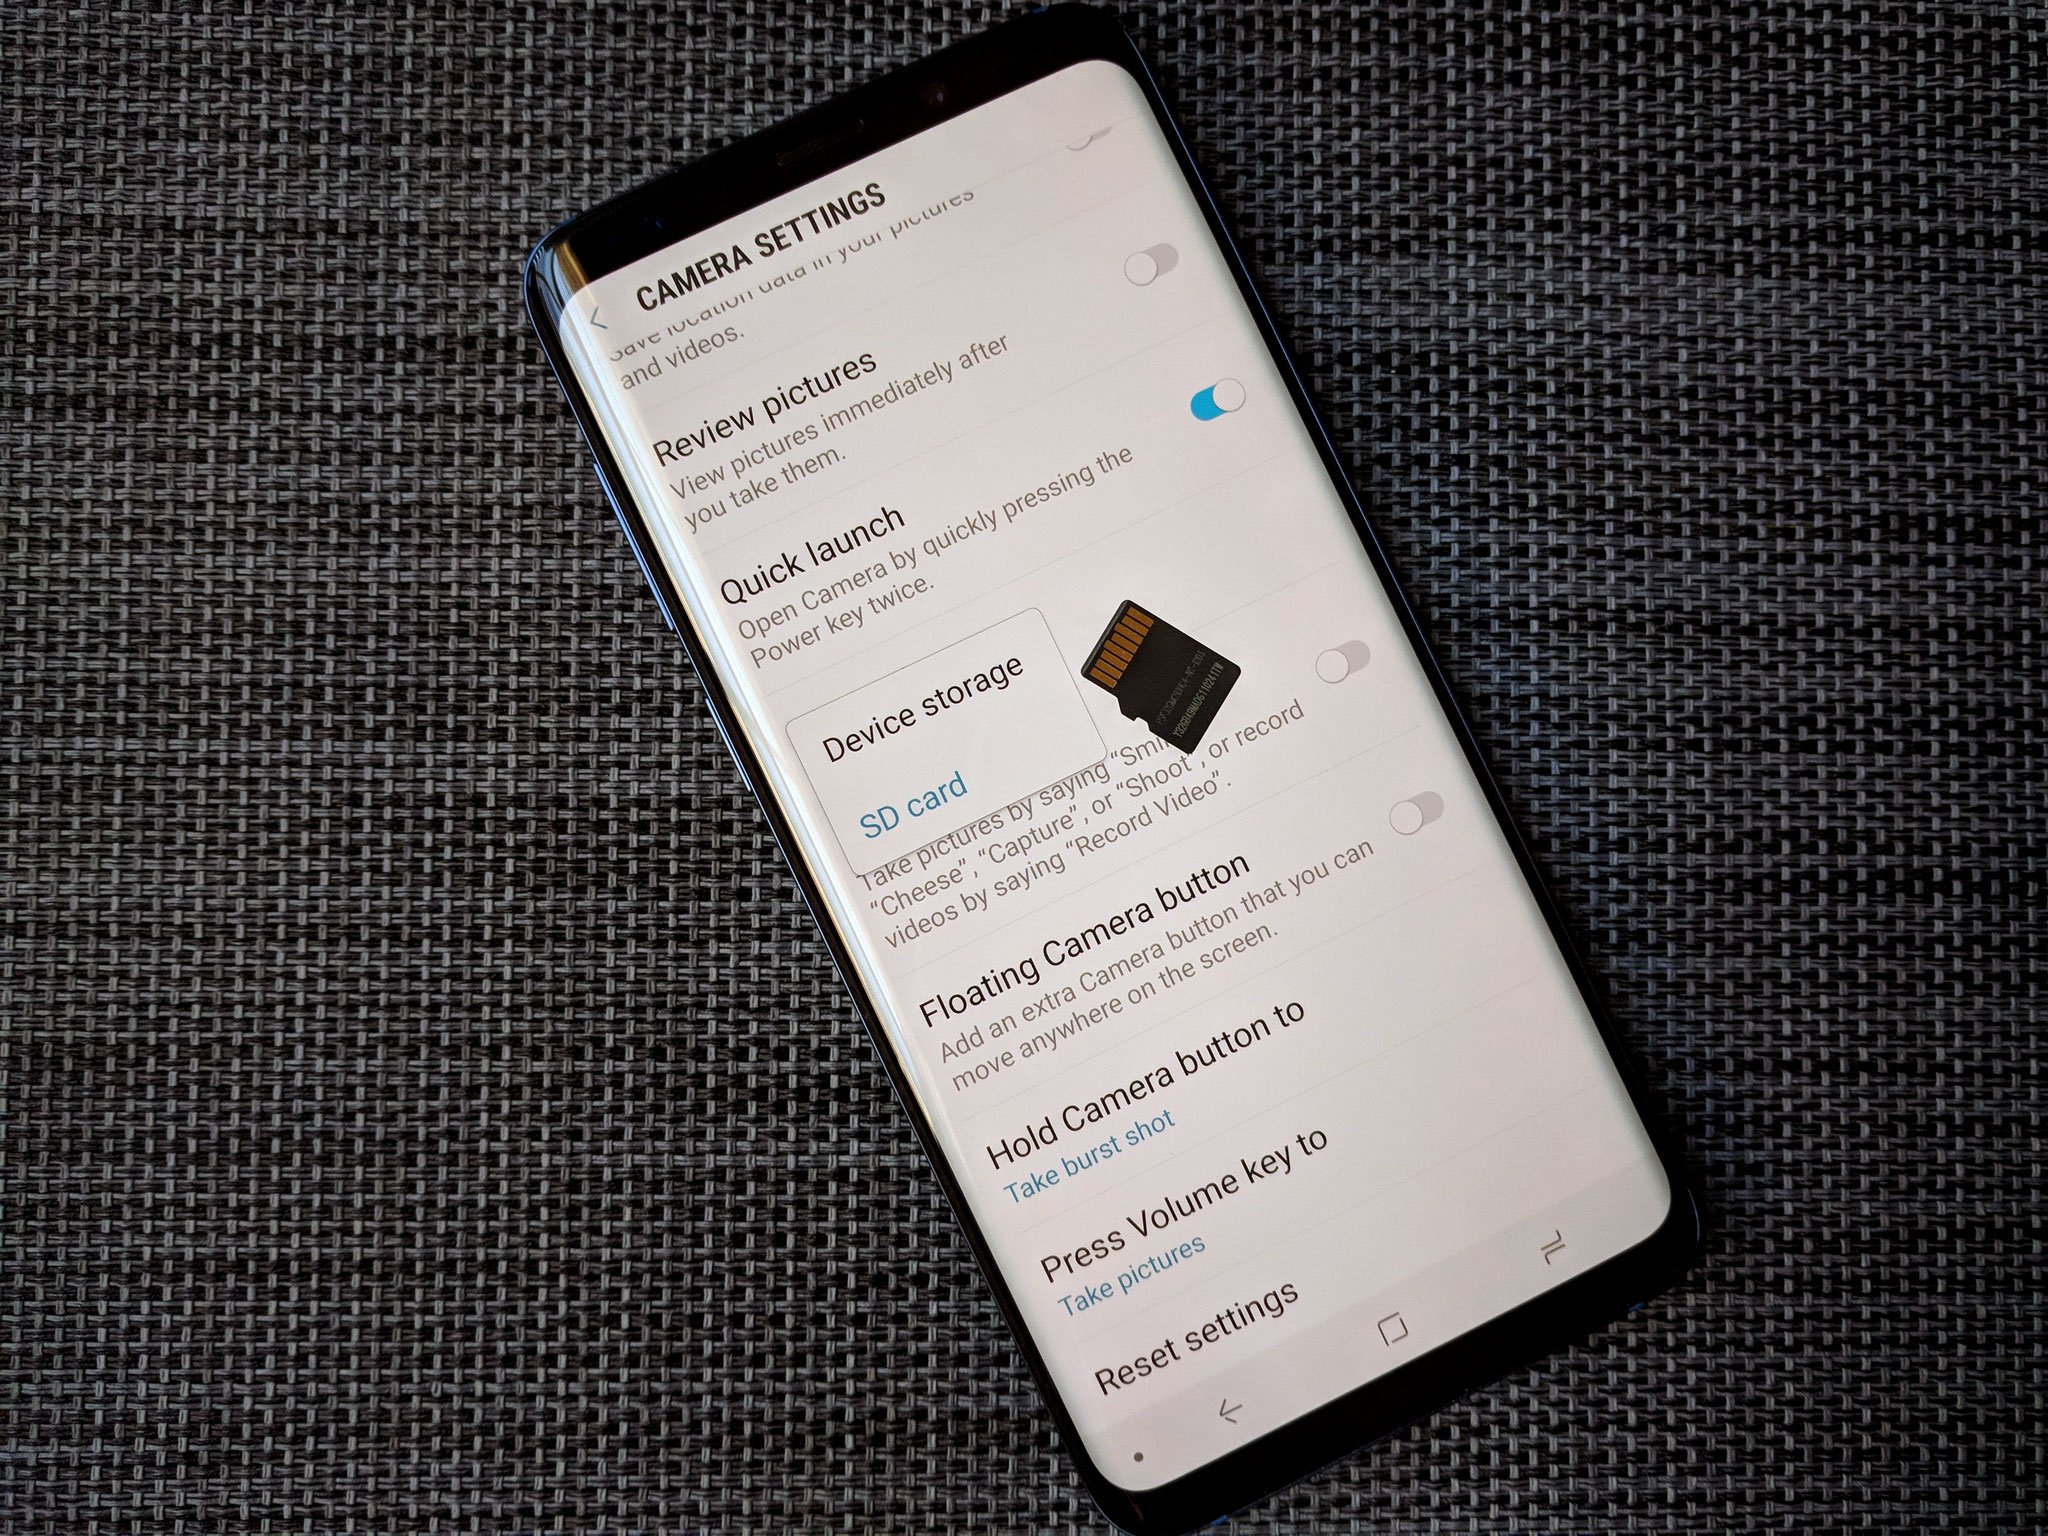
- Go to your device’s settings and find the option to safely eject or unmount the SD card. This option is typically located in the Storage or Memory settings.
- Tap on the eject or unmount option and wait for the confirmation message that it is safe to remove the SD card.
- Gently remove the SD card from its slot. If you’re using a smartphone or tablet, you may need to use a SIM card ejector tool or a paperclip to release the card from the tray.
- Keep your SD card in a safe place, preferably in a protective case or storage container, to prevent any physical damage or loss.
Safely removing your SD card ensures that all data is properly saved and avoids any potential data corruption or loss. It also protects the integrity of the SD card itself, ensuring its longevity and future usability.
If you will be using your SD card on a different device or for a different purpose, make sure to format it before using it again. Formatting will erase all the existing data on the SD card, preparing it for a fresh start.
By following these steps to safely remove your SD card, you can confidently switch devices or continue using your device without worrying about any complications or data loss.
With the completion of this final step, you have successfully moved your photos to your SD card and taken the necessary precautions to ensure a smooth and secure process. Enjoy the extra space on your device and the convenience of having your photos safely stored on your SD card!
Conclusion
Congratulations! You have successfully learned how to move your photos to your SD card. By following the steps outlined in this guide, you can now free up valuable storage space on your device while keeping your cherished memories safe and accessible.
We started by inserting the SD card into your device, ensuring that it was correctly positioned in the designated slot. Then, we located the photos in your device’s storage, whether it was in the gallery app, file manager, or camera app. After selecting the photos you wanted to transfer, we copied them to the clipboard and pasted them onto the SD card, making sure they were safely transferred to the designated location.
Once the transfer was complete, we verified the success by removing the SD card from the device and accessing it on another compatible device or computer. This step ensured that the photos were present, intact, and accessible on the SD card.
Finally, we concluded by emphasizing the importance of safely removing the SD card from your device and keeping it protected to ensure its longevity and usability.
With your photos now stored on the SD card, you can enjoy more space on your device for new photos, videos, and apps. Plus, you can easily share or transfer your photos by simply removing the SD card and inserting it into another device.
Remember, if you ever need to add more photos to your SD card or transfer them back to your device, you can follow these steps in reverse. Always handle your SD card with care and avoid touching the gold contacts to prevent any damage.
We hope this guide has helped you successfully move your photos to your SD card. Enjoy the extra storage space and the peace of mind that your precious memories are securely stored. Happy snapping!