Introduction
Welcome to the world of mobile devices, where the need for storage space is ever-growing. In this article, we will explore the process of saving files to an SD card on the Motorola Razr M, a popular and versatile device known for its sleek design and powerful features.
As mobile technology continues to advance, the demand for storage capacity has become a crucial consideration for users. The Motorola Razr M, with its impressive capabilities, provides the option to expand storage through the use of an SD card. This feature allows users to store a wide range of files, including photos, videos, music, and documents, without worrying about running out of space on the device itself.
By understanding how to effectively utilize the SD card on the Motorola Razr M, users can optimize their device's storage capacity and ensure that important files are safely stored and easily accessible. Whether you're a photography enthusiast looking to capture countless memories, a music lover with an extensive library, or a professional needing to keep essential documents at hand, the ability to save files to an SD card offers a convenient solution to the perennial challenge of limited storage space on mobile devices.
In the following sections, we will delve into the step-by-step process of inserting an SD card into the Motorola Razr M, setting the default storage location, and saving various types of files to the SD card. By the end of this guide, you will have the knowledge and confidence to make the most of your device's storage capabilities, ensuring that you can continue to capture, create, and store without limitations. Let's embark on this journey to unlock the full potential of your Motorola Razr M and expand its storage horizons.
Step 1: Inserting the SD Card
The process of inserting an SD card into your Motorola Razr M is a straightforward yet essential step in expanding the device's storage capacity. The SD card serves as a convenient and portable solution for storing various types of files, ensuring that you can seamlessly capture and access content without worrying about limited space. Here's a detailed guide on how to insert an SD card into your Motorola Razr M:
-
Locate the SD Card Slot: Begin by locating the SD card slot on your Motorola Razr M. Typically, the SD card slot is situated on the side of the device, often near the SIM card slot. It is essential to handle the SD card with care to avoid any damage to the card or the device.
-
Power Off the Device: Before inserting the SD card, it is advisable to power off your Motorola Razr M. This precaution ensures that the device is safely powered down, reducing the risk of any potential issues during the insertion process.
-
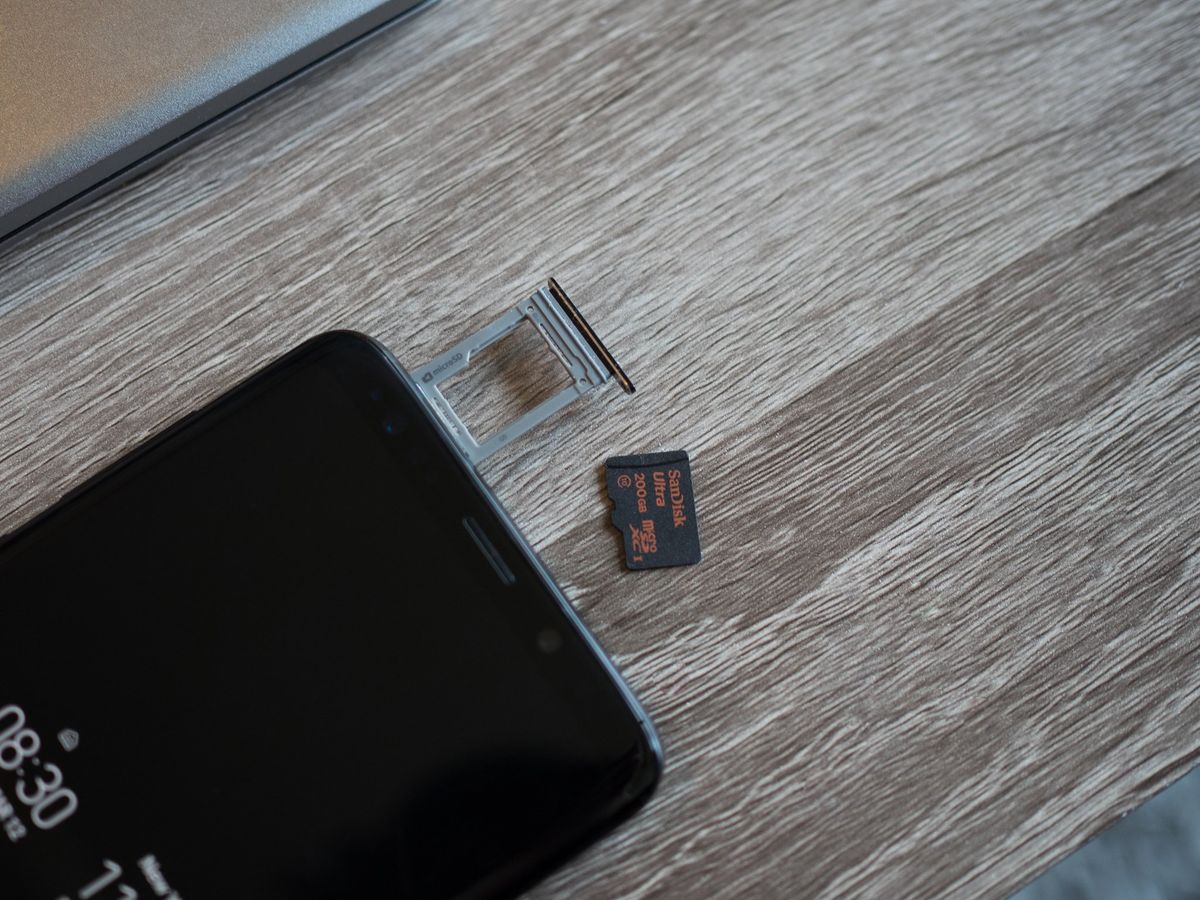
Remove the SD Card Tray: Using the provided tool or a small pin, gently insert it into the pinhole located next to the SD card slot. Apply slight pressure to release the SD card tray from the device. Once the tray is partially ejected, carefully pull it out to reveal the slot for the SD card.
-
Insert the SD Card: Take the SD card and carefully align it with the slot on the SD card tray. Ensure that the metal contacts on the SD card are facing downward and match the orientation of the slot. Gently slide the SD card into the slot until it is securely in place.
-
Reinsert the SD Card Tray: Once the SD card is inserted, carefully reinsert the SD card tray back into the device. Ensure that it is securely positioned and flush with the device's exterior.
-
Power On the Device: With the SD card successfully inserted, power on your Motorola Razr M to initiate the recognition and configuration of the newly inserted SD card. Once the device is powered on, it will detect the SD card and make it available for use.
By following these steps, you can seamlessly insert an SD card into your Motorola Razr M, expanding its storage capacity and unlocking the potential to store a diverse range of files. With the SD card in place, you are now ready to proceed to the next step of setting the default storage location on your device.
Step 2: Setting the Default Storage Location
Once the SD card is successfully inserted into your Motorola Razr M, the next crucial step is to set the default storage location for various types of files. By configuring the default storage to the SD card, you can ensure that new photos, videos, music, and other files are automatically saved to the expanded storage space provided by the SD card. This optimization allows you to maximize the usage of the SD card and alleviate the burden on the device's internal storage. Here's a detailed guide on how to set the default storage location on your Motorola Razr M:
-
Accessing the Settings: Begin by unlocking your device and navigating to the home screen. From the home screen, locate and tap on the "Settings" icon, which is represented by a gear or cogwheel symbol. The Settings menu provides access to a wide range of device customization options, including storage settings.
-
Navigating to Storage Settings: Within the Settings menu, scroll or swipe to find the "Storage" or "Storage Settings" option. This section allows you to manage and configure the storage settings for your device, including the default storage location for various types of files.
-
Selecting Default Storage: Upon accessing the Storage Settings, look for the option to set the default storage location. Depending on the device's software version and user interface, this option may be labeled as "Default Storage" or "Storage Location." Tap on this option to proceed to the next step.
-
Choosing the SD Card: Within the Default Storage or Storage Location menu, you will be presented with the available storage options, including the device's internal storage and the inserted SD card. Select the SD card as the default storage location for new files by tapping on the corresponding option.
-
Confirming the Selection: After choosing the SD card as the default storage location, the device may prompt you to confirm the selection. Verify the selection and proceed to save the changes. Once confirmed, the default storage location for new files will be set to the SD card.
By following these steps, you can effectively set the default storage location to the SD card on your Motorola Razr M, ensuring that new files are automatically saved to the expanded storage space provided by the SD card. This optimization allows you to seamlessly capture and store a wide range of content without worrying about exhausting the device's internal storage. With the default storage location configured, you are now ready to proceed to the next step of saving various types of files to the SD card.
Step 3: Saving Files to the SD Card
With the SD card successfully inserted into your Motorola Razr M and the default storage location configured, you are now equipped to save various types of files directly to the SD card. This seamless process allows you to capture, create, and store content without worrying about limited space on the device's internal storage. Whether it's photos capturing precious moments, videos documenting memorable events, music for your listening pleasure, or essential documents for work or personal use, the SD card provides a versatile and expansive storage solution. Here's a detailed guide on how to save different types of files to the SD card on your Motorola Razr M:
Saving Photos and Videos:
- Capture Memories: Use the device's camera to capture photos and videos as you normally would.
- Review and Select: After capturing content, navigate to the Gallery or Photos app to review and select the photos and videos you wish to save to the SD card.
- Tap and Hold: Tap and hold on the selected photo or video to initiate the file management options.
- Move to SD Card: From the available options, choose "Move to SD Card" or "Save to SD Card" to transfer the selected content from the device's internal storage to the SD card.
Saving Music and Audio Files:
- Access Music Library: Open your preferred music or audio player app to access your music library.
- Select Songs or Audio Files: Choose the songs or audio files you want to save to the SD card by tapping and holding on the respective items.
- Transfer to SD Card: Look for the option to "Transfer to SD Card" or "Save to SD Card" within the file management options and select it to move the chosen music or audio files to the SD card for storage.
Saving Documents and Files:
- File Manager: Use the built-in File Manager app or a third-party file management app to navigate to the location of the documents or files you want to save to the SD card.
- Select and Move: Tap and hold on the desired documents or files to select them, then choose the "Move" or "Copy" option from the available file management tools.
- Choose SD Card: When prompted to select the destination for the files, navigate to the SD card directory and choose the appropriate folder or create a new one to save the documents and files to the SD card.
By following these steps, you can effortlessly save photos, videos, music, and documents to the SD card on your Motorola Razr M, ensuring that your content is securely stored and readily accessible. This optimization allows you to make the most of the expanded storage capacity provided by the SD card, freeing up space on the device's internal storage for a seamless and efficient user experience.
Conclusion
In conclusion, the ability to save files to an SD card on the Motorola Razr M presents a valuable opportunity for users to expand their device's storage capacity and seamlessly store a diverse range of content. By following the step-by-step process of inserting an SD card, setting the default storage location, and saving various types of files, users can optimize their device's storage capabilities and ensure that important content is securely stored and easily accessible.
The process of inserting an SD card into the Motorola Razr M is a fundamental yet essential step in expanding the device's storage capacity. By carefully following the outlined steps, users can ensure that the SD card is securely inserted and ready to be utilized for storing photos, videos, music, and documents. Once the SD card is in place, the next crucial step involves setting the default storage location to ensure that new files are automatically saved to the expanded storage space provided by the SD card. This optimization alleviates the burden on the device's internal storage and allows users to capture and create content without limitations.
With the default storage location configured, users can seamlessly save various types of files directly to the SD card. Whether it's capturing precious memories through photos and videos, enjoying a vast music library, or storing essential documents, the SD card provides a versatile and expansive storage solution. By following the detailed guide on saving different types of files to the SD card, users can ensure that their content is securely stored and readily accessible, enhancing the overall user experience.
In essence, the process of saving files to an SD card on the Motorola Razr M empowers users to make the most of their device's storage capabilities, ensuring that they can continue to capture, create, and store without limitations. The convenience and flexibility offered by the SD card feature not only enhance the user experience but also provide a practical solution to the perennial challenge of limited storage space on mobile devices. By mastering the process of utilizing the SD card, users can unlock the full potential of their Motorola Razr M and enjoy a seamless and efficient storage experience.
In conclusion, the SD card feature on the Motorola Razr M serves as a valuable tool for expanding storage capacity, optimizing content management, and ensuring that users can make the most of their device's capabilities. With the knowledge and confidence gained from this guide, users can embark on their storage journey with the assurance that their content is securely stored and easily accessible, enhancing their overall mobile experience.