Introduction
Having a reliable network connection is crucial in today’s digital world, as it allows us to stay connected, make calls, send messages, and access the internet. However, encountering the dreaded “Emergency Calls Only” message on your Android device can be a frustrating experience. This issue typically occurs when your phone is unable to establish a valid network connection, restricting you to emergency calls only.
The “Emergency Calls Only” problem can stem from various factors, including network signal issues, SIM card malfunctions, incorrect settings, or even software glitches. The good news is that there are several steps you can take to fix this issue and regain normal functionality on your Android device. In this article, we will explore some of the most effective troubleshooting methods to help you resolve the “Emergency Calls Only” issue on your Android smartphone.
It is important to note that the following solutions are applicable to a wide range of Android devices, including Samsung, Google Pixel, LG, HTC, Motorola, and more. So, without further ado, let us dive into the troubleshooting methods and get your device back to full functionality.
Check Network Connection
The first step in resolving the “Emergency Calls Only” issue on your Android device is to check your network connection. Ensure that you are in an area with good network coverage and that your device is receiving a strong signal. If you are in a weak signal area, try moving to a different location to see if that improves the connection.
To check your network connection, follow these steps:
- Restart your device: Sometimes, a simple restart can fix temporary network issues. Turn off your Android device, wait a few seconds, and then turn it back on again.
- Airplane mode: Swipe down from the top of your screen to access the notification panel and tap on the airplane mode icon to enable it. After a couple of minutes, disable airplane mode and see if your network connection improves.
- Check SIM card: Ensure that your SIM card is properly inserted in your device. Remove the SIM card and reinsert it carefully, making sure it is securely in place.
- Check for network restrictions: Some Android devices have a feature called “Data Roaming” that restricts network access to emergency calls only when you are in a different country. Make sure this feature is disabled if you are using your device in your home country.
If the above steps do not resolve the issue, you may want to try using a different SIM card in your device to determine if the problem lies with your current SIM card. If the new SIM card works fine, it may be time to replace your old SIM card with a new one, as it could be faulty or damaged.
Checking your network connection is an essential first step in troubleshooting the “Emergency Calls Only” issue. By following these simple steps, you can rule out any network-related problems and move on to the next troubleshooting methods if needed.
Remove and Reinsert SIM Card
If you are still facing the “Emergency Calls Only” problem on your Android device, the next step is to remove and reinsert the SIM card. Sometimes, a loose or improperly inserted SIM card can cause network connection issues. By removing and reinserting the SIM card, you can ensure that it is properly seated in the SIM tray and establish a stronger connection.
To remove and reinsert the SIM card, follow these steps:
- Power off your Android device before proceeding to avoid any potential damage to the SIM card or the device itself.
- Locate the SIM card slot on your device. Most Android devices have it either on the side or the top of the device.
- Use a SIM ejector tool or a paperclip to push the SIM card tray ejector. This will pop out the SIM card tray.
- Gently remove the SIM card from the tray and inspect it for any signs of damage or dirt.
- Clean the SIM card and the SIM card tray with a soft, lint-free cloth.
- Place the SIM card back into the tray, making sure it is properly aligned with the SIM card slot.
- Push the SIM card tray back into the device until it is securely in place.
- Power on your Android device and check if the “Emergency Calls Only” issue is resolved.
By removing and reinserting the SIM card, you can eliminate any potential connection issues caused by a loose or misaligned SIM card. This simple troubleshooting step has helped many users restore network connectivity and resolve the “Emergency Calls Only” problem on their Android devices.
Check SIM Card Settings
In some cases, incorrect SIM card settings can lead to the “Emergency Calls Only” issue on your Android device. By checking and adjusting the SIM card settings, you can ensure that your device is configured properly to establish a network connection.
To check the SIM card settings, follow these steps:
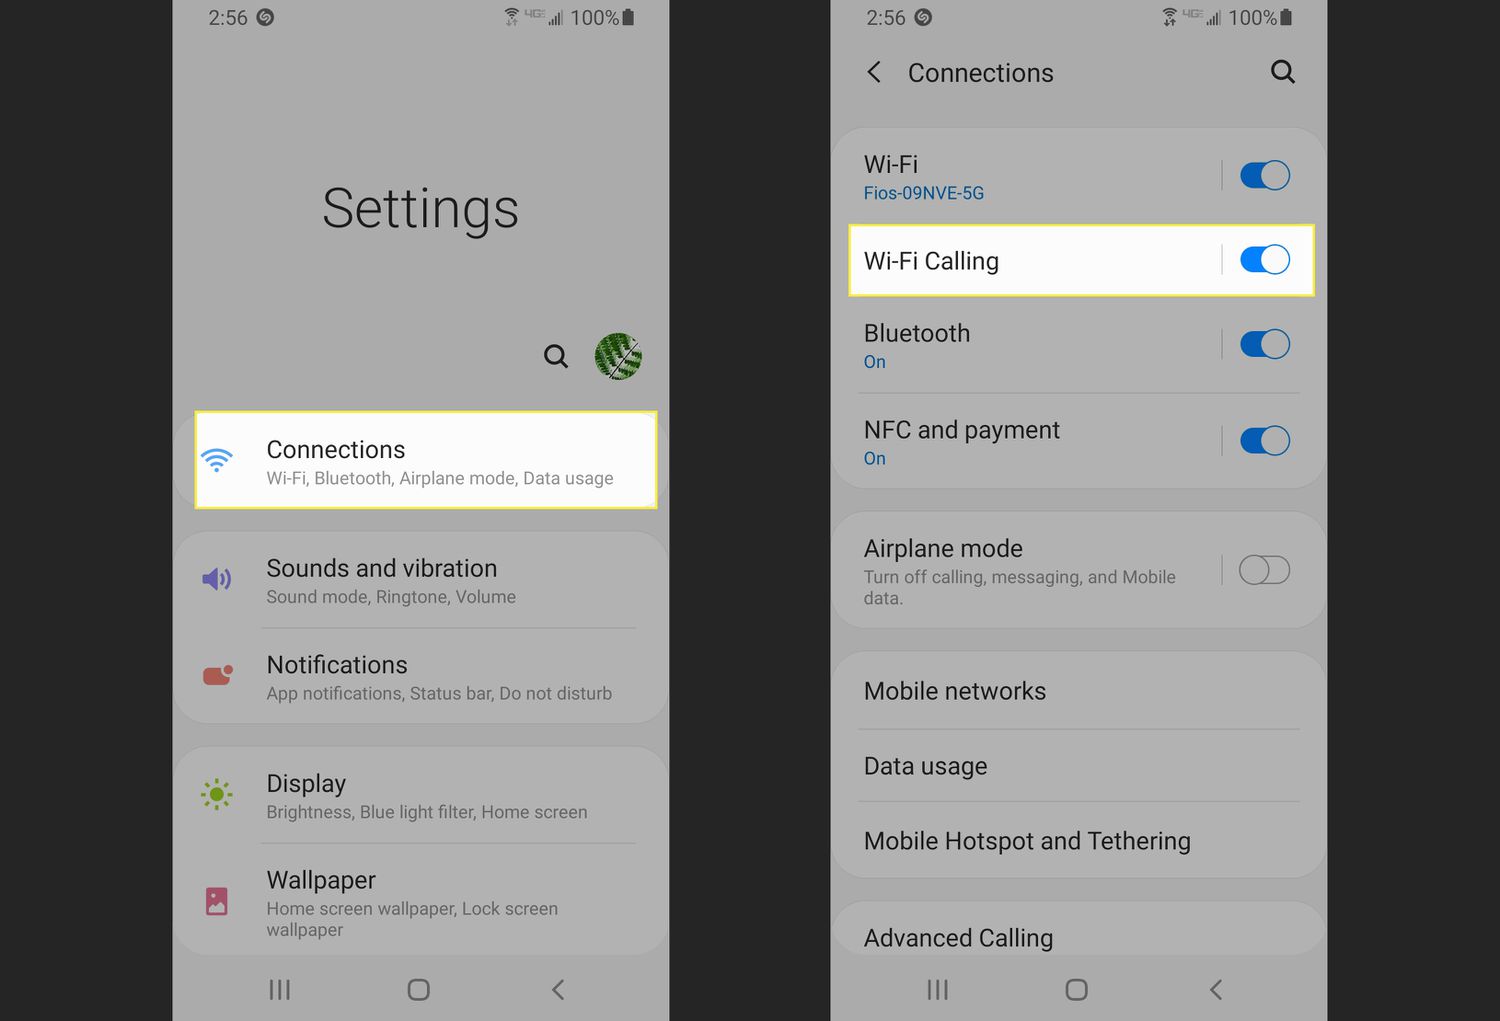
- Open the Settings app on your Android device. You can usually find it on the home screen or in the app drawer.
- Scroll down and tap on “Mobile Network” or “Network & Internet” (depending on your device model).
- Tap on “SIM card” or “SIM management”. This will open the SIM card settings menu.
- Ensure that the “SIM card status” is “Connected” or “Active”. If it shows any other status, such as “No service” or “Disabled”, tap on it and follow the instructions to activate the SIM card.
- Check the “Preferred network type” or “Network mode” setting. It should be set to “LTE/4G” or “Automatic”. If it is set to a different option, tap on it and select “LTE/4G” or “Automatic”.
- Verify the APN (Access Point Name) settings. Tap on “Access Point Names” or “APN” and ensure that the correct APN settings for your mobile network provider are configured. You may need to contact your service provider or refer to their website for the correct APN settings.
By verifying and adjusting the SIM card settings, you can ensure that your Android device is properly configured to establish a network connection. This step can help resolve the “Emergency Calls Only” issue and restore normal functionality to your device.
Set Network Mode to Automatic
Setting your network mode to automatic can help resolve the “Emergency Calls Only” issue on your Android device. Sometimes, manually selecting a specific network mode can cause compatibility issues and result in a limited network connection. By setting your device to automatic mode, it will automatically search and connect to the strongest available network in your area.
To set the network mode to automatic, follow these steps:
- Open the Settings app on your Android device.
- Scroll down and tap on “Mobile Network” or “Network & Internet” (depending on your device model).
- Tap on “Preferred network type” or “Network mode”.
- Select “Automatic” from the list of available network mode options.
By setting the network mode to automatic, your Android device will search for and connect to the best available network in your area. This can help you resolve the “Emergency Calls Only” problem and regain full network connectivity on your device.
Manually Select Network Operator
If setting the network mode to automatic did not resolve the “Emergency Calls Only” issue on your Android device, you can try manually selecting the network operator. Manually selecting a specific network can help establish a more stable connection, especially if you are in an area with multiple available networks.
To manually select a network operator, follow these steps:
- Open the Settings app on your Android device.
- Scroll down and tap on “Mobile Network” or “Network & Internet” (depending on your device model).
- Tap on “Network Operators” or “Carrier”.
- Select “Search Networks” to allow your device to search for available networks.
- Once the search is complete, a list of available networks will appear. Select the desired network from the list.
- Your device will attempt to connect to the selected network. Once connected, check if the “Emergency Calls Only” issue is resolved.
By manually selecting a network operator, you can specify the network you want to connect to. This can help in situations where your device is unable to automatically connect to the optimal network. However, it is important to note that not all devices and network providers support manual network selection, so this option may not be available on all devices.
Enable and Disable Airplane Mode
Another troubleshooting method to fix the “Emergency Calls Only” issue on your Android device is to enable and disable the Airplane mode. This feature temporarily disables all wireless connections on your device, including cellular data, Wi-Fi, and Bluetooth. Enabling and disabling Airplane mode can help reset the network settings and establish a fresh connection.
To enable and disable Airplane mode, follow these steps:
- Swipe down from the top of your screen to access the notification panel.
- Tap on the Airplane mode icon to enable it. You can also go to the Settings app and toggle the Airplane mode switch.
- Wait for a few seconds and then disable Airplane mode by tapping on the icon again or using the Settings app.
- After disabling Airplane mode, your device will reconnect to the network. Check if the “Emergency Calls Only” error is resolved.
Enabling and disabling Airplane mode can help refresh your device’s network connection and potentially fix any temporary connectivity issues. It is a simple yet effective troubleshooting step that has worked for many Android users facing the “Emergency Calls Only” problem.
Update Android Version
Updating your Android device to the latest version of the operating system can help resolve various issues, including the “Emergency Calls Only” problem. Software updates often contain bug fixes, performance improvements, and security enhancements that can address network connectivity issues.
To update your Android version, follow these steps:
- Open the Settings app on your Android device.
- Scroll down and tap on “System” or “About phone” (depending on your device model).
- Tap on “Software update” or “System updates”.
- Your device will check for available updates. If an update is available, follow the on-screen instructions to download and install it. Make sure you are connected to a stable Wi-Fi network and have sufficient battery power.
- After the update is complete, restart your device and check if the “Emergency Calls Only” issue is resolved.
Updating your Android version can provide you with the latest features and improvements, including potential fixes for network-related issues. It is always recommended to keep your device up to date to ensure optimal performance and stability.
Reset Network Settings
If you are still experiencing the “Emergency Calls Only” problem on your Android device, you can try resetting the network settings. This will restore the network settings to their original defaults, which can help fix any misconfigured settings that may be causing the issue.
To reset the network settings on your Android device, follow these steps:
- Open the Settings app on your Android device.
- Scroll down and tap on “System” or “System & updates” (depending on your device model).
- Tap on “Reset options” or “Reset” (the name may vary).
- Select “Reset Wi-Fi, mobile & Bluetooth” or similar.
- Read the warning message and tap on “Reset settings” to confirm.
- Your device will reset the network settings and restart.
- After the restart, reconfigure your Wi-Fi network, Bluetooth connections, and any other network-related settings on your device.
- Check if the “Emergency Calls Only” issue is resolved.
Resetting the network settings can help fix any underlying configuration issues that may be preventing your Android device from establishing a proper network connection. However, it is important to note that this process will remove any saved Wi-Fi networks and Bluetooth pairings, so you will need to set them up again.
Contact Service Provider
If none of the previous methods have resolved the “Emergency Calls Only” issue on your Android device, it might be time to reach out to your service provider for assistance. Your service provider has the expertise to troubleshoot network-related problems and can provide specific guidance tailored to your device and network provider.
Here are some steps you can take when contacting your service provider:
- Locate the customer support number for your service provider. This can usually be found on their website, bill statement, or on the back of your SIM card packaging.
- Call the customer support number and explain the “Emergency Calls Only” issue you are experiencing. Provide details such as your device model, Android version, and the steps you have already taken to troubleshoot the problem.
- Follow the instructions provided by the customer support representative. They may ask you to perform certain troubleshooting steps or provide you with specific settings to configure on your device.
- If necessary, they may escalate the issue to their technical team or arrange for a service technician to investigate the problem further.
- Be prepared to provide additional information or follow up with your service provider if required.
Remember that your service provider has the most up-to-date information and resources to help you resolve any network connectivity issues. They can identify if there are any known network problems in your area or if there are specific device settings that need to be configured.
It is important to have patience and work closely with your service provider to find a solution to the “Emergency Calls Only” problem. They are there to assist you and will do their best to resolve the issue and ensure that you have a reliable network connection on your Android device.