Introduction
Welcome to this tutorial on how to enable Face ID on your iPhone! Face ID is a facial recognition technology that allows you to securely unlock your device, authenticate your identity, and authorize app purchases with just a glance. It offers a convenient and efficient way to keep your iPhone secure while adding a touch of futuristic functionality.
Gone are the days of using a passcode or fingerprint to unlock your iPhone. With Face ID, all you need to do is look at your device, and it will recognize you and grant access. This advanced feature utilizes the TrueDepth camera system, which captures precise depth information and analyzes facial features with incredible accuracy.
In this step-by-step guide, we will walk you through the process of setting up and enabling Face ID on your iPhone. Whether you have just purchased a new iPhone or want to start utilizing this cutting-edge technology, this tutorial is designed to help you master Face ID and take full advantage of its benefits.
Before we dive into the steps, it’s important to note that Face ID is available on the iPhone models with the TrueDepth camera system. This includes the iPhone X, iPhone XS, iPhone XS Max, iPhone XR, iPhone 11, iPhone 11 Pro, and iPhone 11 Pro Max. If you have an older iPhone model, you won’t be able to enable Face ID as it requires the specific hardware.
Now that we have the basics covered, let’s get started with enabling Face ID on your iPhone.
Step 1: Go to Settings
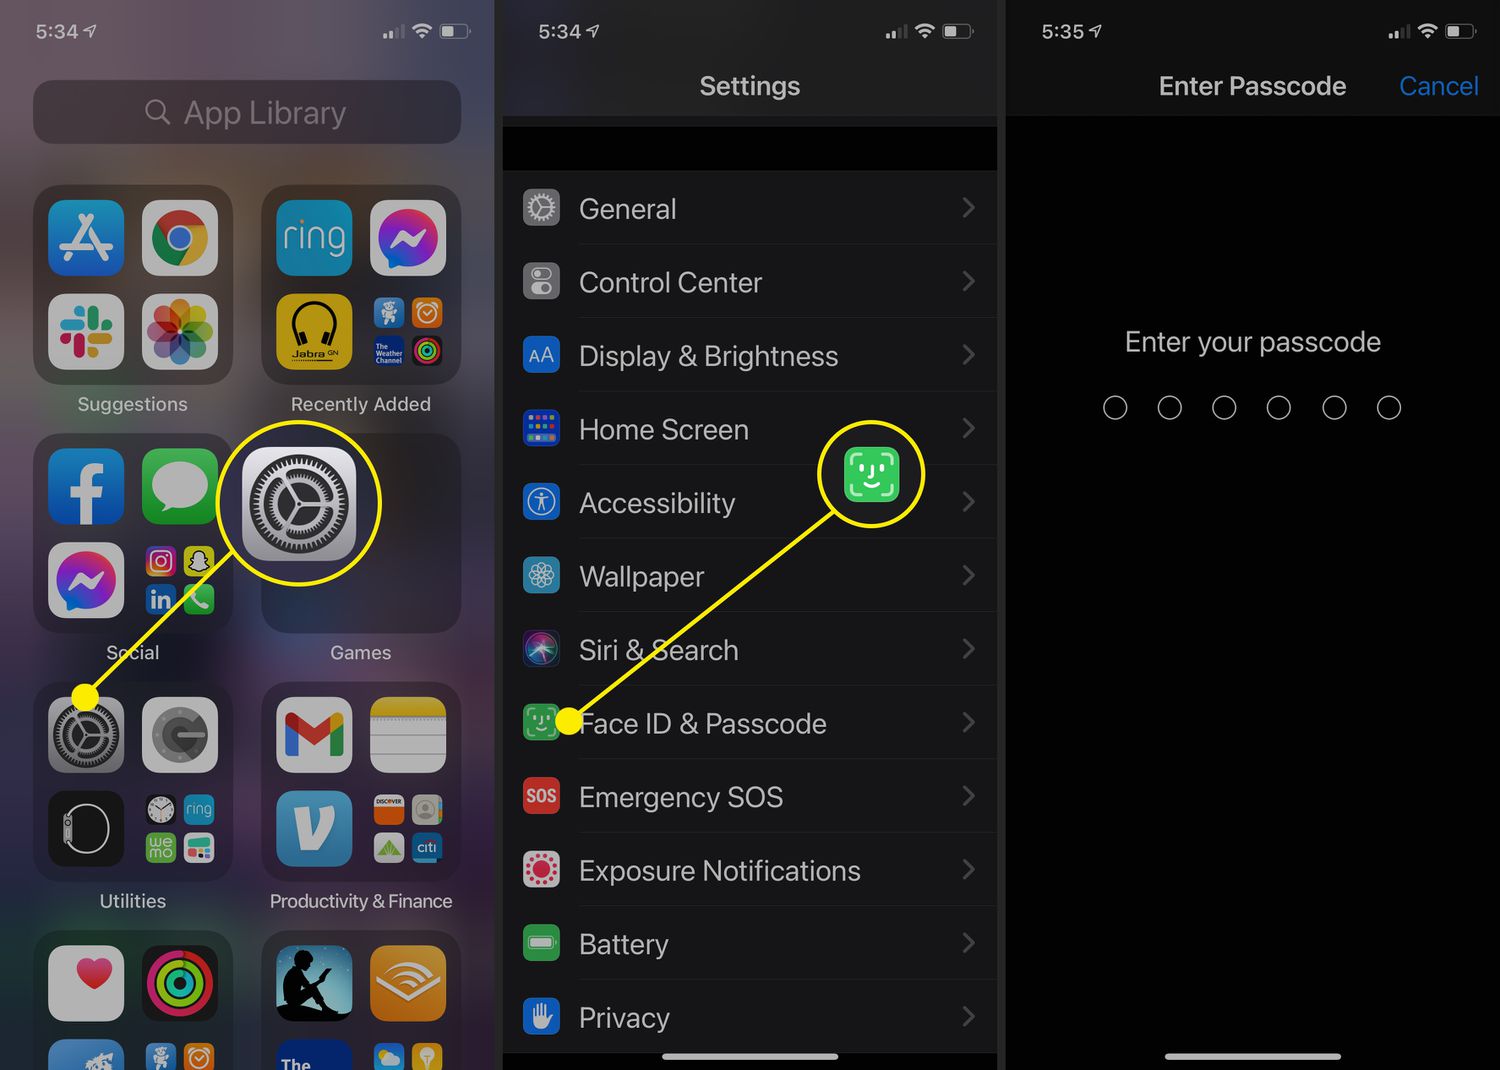
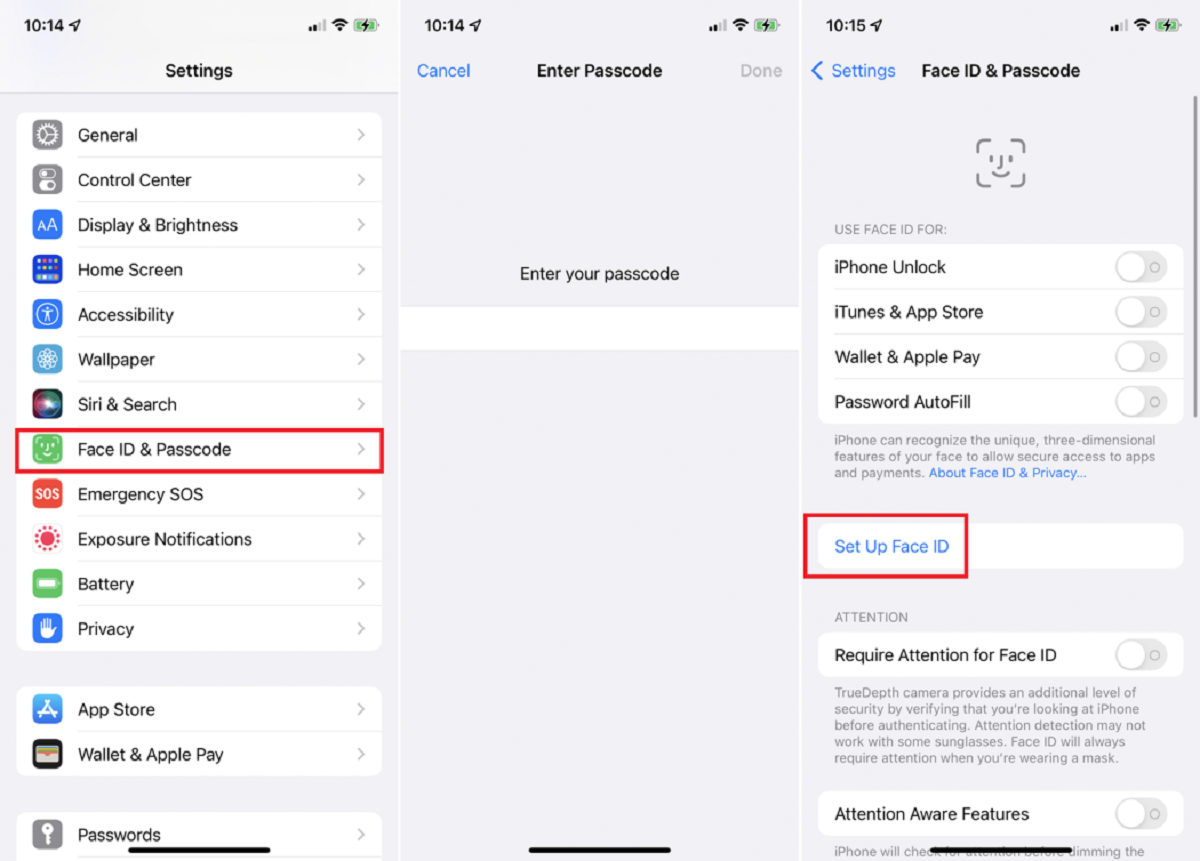
The first step to enabling Face ID on your iPhone is to access the Settings menu. The Settings app is where you can customize various options and preferences for your device. Here’s how to get there:
- Unlock your iPhone by entering your passcode or using Touch ID, if applicable.
- Locate and tap on the Settings app on your home screen. The app icon resembles a gear, and it’s typically found in the first few rows of your apps.
- Once you open the Settings app, you’ll be greeted with various sections and options. Scroll down until you see the “Face ID & Passcode” option. Tap on it to proceed to the next step.
By following these simple instructions, you’ll find yourself in the settings menu of your iPhone, ready to delve deeper into enabling the Face ID feature.
Step 2: Tap on Face ID & Passcode
Once you’re in the Settings menu, the next step is to navigate to the “Face ID & Passcode” section. This is where you’ll be able to set up and configure Face ID on your iPhone. Here’s what you need to do:
- Look for the “Face ID & Passcode” option in the list of settings. It is usually located towards the top of the Settings menu.
- Tap on “Face ID & Passcode” to access the Face ID settings.
Tapping on “Face ID & Passcode” will bring you to a screen where you can manage the Face ID feature and adjust other authentication settings. This is where you’ll be able to begin the setup process for Face ID.
Now that you have successfully located and tapped on the “Face ID & Passcode” option, you’re one step closer to enabling Face ID on your iPhone.
Step 3: Set Up Face ID
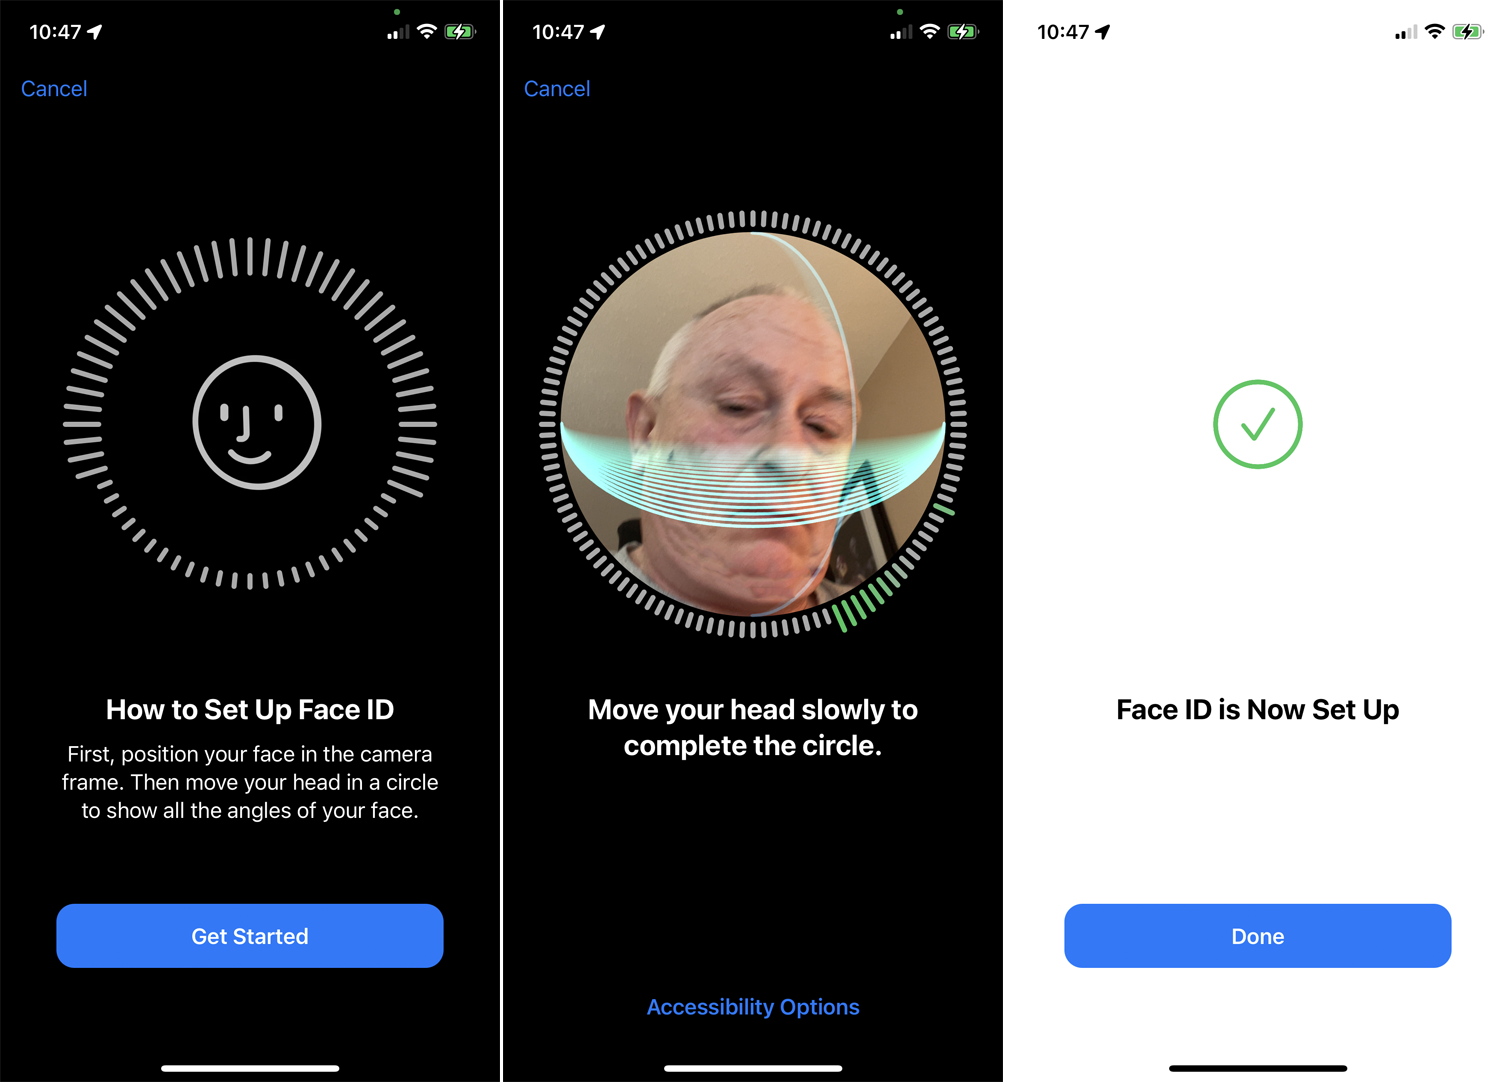
Now that you’ve accessed the Face ID settings, it’s time to set up Face ID on your iPhone. This process involves registering your face to allow your device to recognize and authenticate you. Follow these steps to get started:
- On the “Face ID & Passcode” screen, you will see two options: “Enroll Face” and “Reset Face ID.” Tap on the “Enroll Face” option to begin setting up Face ID.
- You will be prompted to position your face within the frame on the screen. Make sure your face is centered and visible.
- Hold your iPhone at a comfortable distance and position, ensuring that your face is well-lit for optimal recognition.
- The iPhone will now guide you through the process of positioning your face in different angles. Follow the instructions on the screen and rotate your face accordingly.
- Keep adjusting your face until the iPhone notifies you that it has successfully captured the necessary information to set up Face ID.
It’s worth noting that during the setup process, make sure you look directly at the front-facing camera of your device. This will ensure accurate face recognition and improve the overall Face ID performance.
With these steps, you have successfully set up Face ID on your iPhone. The next step will involve registering your face to complete the Face ID setup.
Step 4: Register Your Face
After initiating the Face ID setup, the next step is to register your face with your iPhone. This process involves capturing multiple facial scans to ensure accurate recognition. Follow these instructions to register your face:
- Position your face within the designated frame on the screen. Make sure your entire face is visible and well-centered.
- Slowly move your head in a circular motion to capture different angles of your face. This helps the iPhone create a comprehensive and accurate facial map.
- Continue following the on-screen prompts, which may include instructions to tilt your head or turn it slightly.
- Ensure that you maintain a relaxed and natural expression throughout the registration process.
- Once the iPhone has successfully captured enough facial scans, it will prompt you with a completion message.
It’s important to note that while registering your face, try to be in a well-lit environment with even lighting. Avoid extreme shadows or direct sunlight, as this can affect the accuracy of Face ID recognition.
By diligently following these steps, you have successfully registered your face with Face ID. Now it’s time to finalize the Face ID setup on your iPhone.
Step 5: Complete the Face ID Setup
Now that you have registered your face, it’s time to complete the Face ID setup on your iPhone. This involves configuring additional settings and options to maximize the functionality of Face ID. Follow these steps to complete the setup:
- Once the iPhone notifies you that the face registration is complete, you will be prompted to set a passcode.
- Choose a strong and secure passcode that you can easily remember but is difficult for others to guess.
- Next, you will be presented with options to “Require Attention for Face ID” and “Attention Aware Features.” These options enhance the security and usability of Face ID by ensuring that your eyes are open and looking at the device when unlocking or using facial authentication.
- Enable or disable these options based on your preferences. It is recommended to leave these features enabled for enhanced security.
- You may also see options for “Auto-Lock” and “Allow Access When Locked.” Adjust these settings according to your needs and preferences.
- Once you have configured the desired settings, tap on the “Done” or “Finish” button to complete the Face ID setup.
Completing the Face ID setup ensures that your iPhone is fully equipped to recognize and authenticate your face accurately. It also allows you to customize various options to tailor the Face ID experience to your liking.
Now that you have completed the Face ID setup, it’s time to enable Face ID for authentication and start enjoying the benefits of this advanced feature.
Step 6: Enable Face ID for Authentication
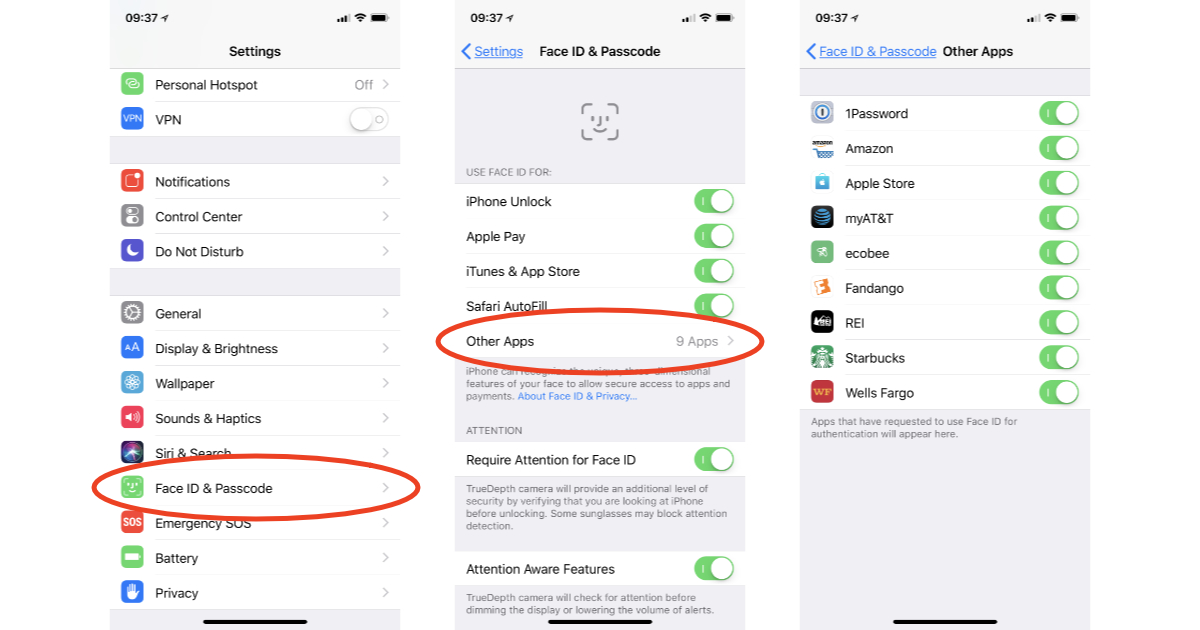
With the Face ID setup complete, the next step is to enable Face ID for authentication on your iPhone. Enabling Face ID allows you to unlock your device and authorize transactions with just a quick glance. Follow these steps to enable Face ID:
- Go back to the main Settings menu on your iPhone.
- Scroll down and tap on “Face ID & Passcode” again.
- Enter your passcode to proceed to the Face ID settings.
- Toggle the switch next to “iPhone Unlock” to enable Face ID for unlocking your device.
- If you wish to use Face ID for purchasing apps and media from the App Store, toggle the switch next to “iTunes & App Store” as well.
- You can also enable Face ID for specific app authentication by scrolling down and selecting the desired app from the list under “Use Face ID For.”
Enabling Face ID for authentication ensures that your iPhone recognizes your unique facial features and grants access to the device and authorized apps securely. It simplifies the unlocking process and adds an extra layer of convenience to your daily interactions with your iPhone.
Now that you have enabled Face ID for authentication, it’s time to test and ensure that it works seamlessly on your device.
Step 7: Test Face ID
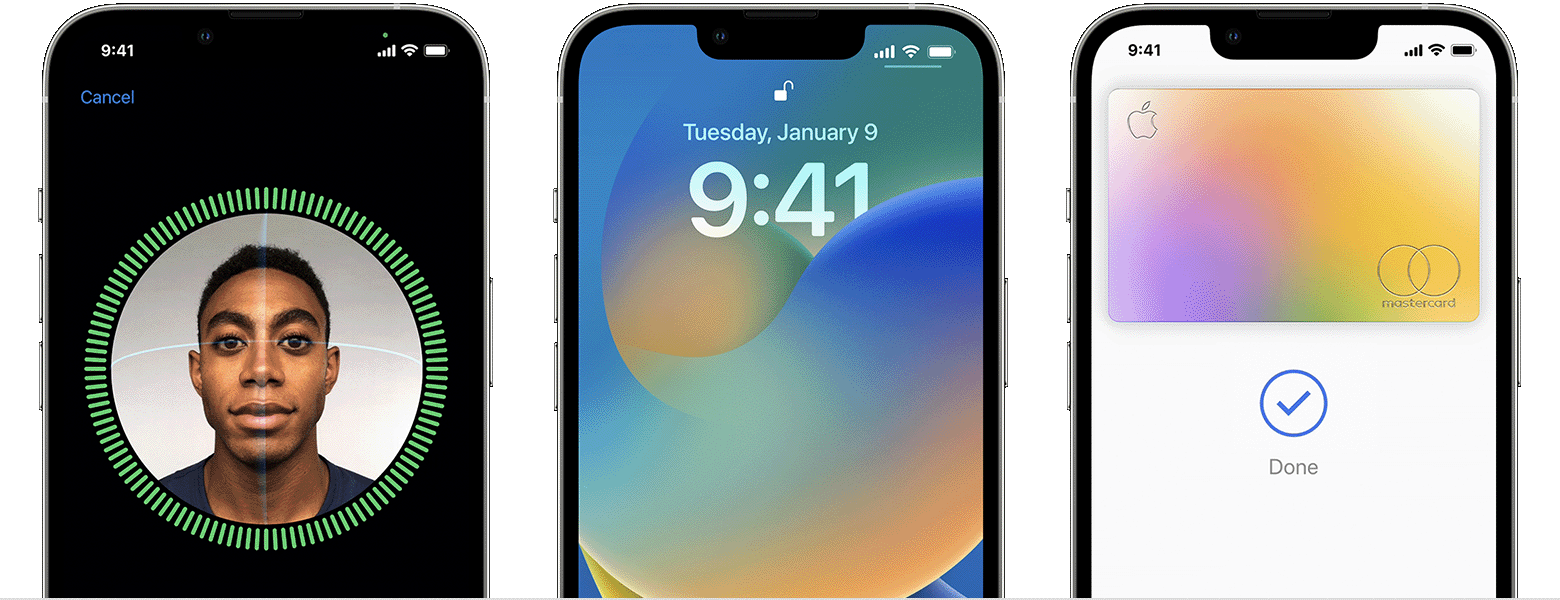
After setting up and enabling Face ID on your iPhone, it’s crucial to test the feature to ensure that it’s working correctly. Testing Face ID allows you to verify its accuracy and responsiveness. Follow these steps to test Face ID:
- Lock your iPhone by pressing the power button or allowing it to enter the auto-lock mode.
- Wake up your iPhone by pressing the power button or lifting it. Alternatively, you can simply tap the screen.
- Look directly at the front-facing camera and position your face within the screen.
- If Face ID recognizes and verifies your face, the lock icon on the screen will animate, and the device will unlock.
- For further testing, try different facial angles and lighting conditions to assess how well Face ID adapts and recognizes you.
- You can also test Face ID authentication in apps that support the feature by accessing the respective app and triggering facial authentication.
By performing these tests, you can ensure that Face ID is working efficiently and accurately on your iPhone. If you encounter any issues or inconsistencies, you can revisit the Face ID settings and reconfigure the feature if necessary.
Congratulations! You have successfully completed the process of enabling and testing Face ID on your iPhone. Enjoy the convenience and enhanced security that comes with this advanced facial recognition technology.
Conclusion
Congratulations! You’ve reached the end of this tutorial on how to enable Face ID on your iPhone. By following the step-by-step instructions provided in this guide, you have successfully set up and configured Face ID, allowing you to unlock your device and authenticate with just a glance.
Face ID offers a secure and efficient way to access your iPhone, adding an extra layer of convenience to your daily interactions with the device. With the TrueDepth camera system accurately capturing and analyzing your facial features, you can be confident in the reliability of Face ID.
During the setup process, you learned how to navigate the Settings menu, access the Face ID & Passcode settings, register your face, and complete the Face ID configuration. By enabling Face ID for authentication, you have streamlined your iPhone experience, making it easier and faster to unlock your device and authorize app purchases.
Remember to test Face ID to ensure its accuracy and responsiveness under various lighting conditions and facial angles. This will help you become familiar with the feature and address any potential issues that may arise.
With Face ID, you can enjoy the convenience of securely unlocking your iPhone and authorizing transactions without the need for passcodes or fingerprints. It’s a cutting-edge technology that exemplifies the innovation and elegance of Apple devices.
We hope this tutorial has been helpful in guiding you through the process of enabling Face ID on your iPhone. Embrace the future of facial recognition and enjoy the seamless and secure access that Face ID provides.