Introduction
Welcome to the world of hidden photos on your iPhone! With the advancement of technology, our smartphones have become not just a means of communication, but also a storage hub for our precious memories. Sometimes, we may have photos that we want to keep private and away from prying eyes. That’s where the hidden photos feature comes in handy.
In this article, we will explore how to add an extra layer of security to your hidden photos by using Face ID. Face ID is a facial recognition system that allows you to unlock your device and authenticate various apps and features using just your face. By enabling Face ID on your hidden photos, you can ensure that only you have access to your private moments.
Whether you want to hide personal photos, sensitive documents, or memorable snapshots, Face ID on hidden photos provides a convenient and secure way to protect your privacy. The best part? It’s incredibly easy to set up and use. So, let’s dive in and discover how you can take advantage of this feature on your iPhone.
What is Face ID?
Face ID is a cutting-edge facial recognition technology developed by Apple. It was introduced with the iPhone X and has since become a standard feature on newer iPhone models. Face ID uses a combination of hardware and software to accurately map and identify your unique facial features. This enables you to unlock your device, authenticate purchases, and access various applications and features with just a glance.
Unlike traditional fingerprint-based authentication systems, Face ID offers a seamless and intuitive user experience. It uses the TrueDepth camera system, which includes an infrared camera, a flood illuminator, and a dot projector, to create a detailed facial map by projecting and analyzing over 30,000 invisible dots onto your face. This information is then converted into mathematical data and securely stored in the device’s Secure Enclave.
Face ID continuously adapts to changes in your appearance, making it highly reliable even if you grow a beard, wear glasses, or put on makeup. It also has built-in protections to prevent spoofing attempts, such as photos or masks, by using advanced algorithms to detect and validate the presence of a live person.
In addition to device unlocking, Face ID can be used to authenticate various applications and features on your iPhone, including Apple Pay, App Store purchases, and even hidden photos. By leveraging the power of facial recognition technology, Face ID provides a secure and convenient way to safeguard your device and personal information.
Now that we understand the fundamentals of Face ID, let’s explore the benefit of using it specifically for hidden photos on your iPhone.
The Benefit of Using Face ID on Hidden Photos
Adding Face ID to your hidden photos provides a range of benefits, primarily centered around enhancing the security and convenience of accessing your private photos. Here are some key advantages of using Face ID on your hidden photos:
1. Enhanced Privacy: Face ID adds an additional layer of protection to your hidden photos, ensuring that only you can access them. Even if someone manages to access your device, they would still need to authenticate with your face to unlock the hidden photos album.
2. Seamless Authentication: With Face ID, there’s no need to remember passwords or codes to unlock your hidden photos. Simply look at your device, and Face ID will instantly authenticate and grant you access to your private collection. It’s quick, effortless, and hassle-free.
3. Accessibility: Face ID makes it easier for you to access your hidden photos, especially in situations where your hands may be occupied or if you have limited finger dexterity. By utilizing facial recognition, you can quickly view and share your private photos with minimal effort.
4. Deter Unauthorized Access: Face ID acts as a powerful deterrent against unauthorized access to your hidden photos. The advanced facial recognition technology makes it exceedingly difficult for someone to bypass your security measures and view your private content without your consent.
5. Continual Adaptation: Face ID continuously adapts to changes in your appearance, ensuring that you can still access your hidden photos even if you change hairstyles, wear glasses, or age. Its ability to recognize and authenticate your face under various conditions adds to the reliability and convenience of securing your private photos.
6. Peace of Mind: By using Face ID on your hidden photos, you can have peace of mind knowing that your personal and sensitive content remains safeguarded. Whether it’s cherished memories, confidential documents, or any other private material, Face ID provides an extra level of confidence in the security of your hidden photos.
Now that we understand the benefits of using Face ID on hidden photos, let’s explore how to enable hidden albums on your iPhone.
How to Enable Hidden Albums on iPhone
Enabling hidden albums on your iPhone allows you to organize and protect your private photos in a discreet and secure manner. To enable hidden albums, follow these simple steps:
1. Open the Photos app: Launch the Photos app on your iPhone by tapping on the icon on your home screen. This will open your photo library.
2. Select the photo(s) you want to hide: Navigate to the photo(s) that you wish to hide from your main photo library. You can select multiple photos by tapping on them one by one.
3. Tap the share button: Once you have selected the photos, tap on the share button. It is located at the bottom left corner of the screen and looks like a square with an upward arrow.
4. Choose the “Hide” option: In the share menu that appears, scroll down until you find the “Hide” option. Tap on it to hide the selected photos from your main photo library.
5. Confirm the action: A pop-up will appear asking you to confirm the action. The pop-up will provide two options: “Hide Photo” and “Cancel”. Tap on “Hide Photo” to proceed and hide the selected photos.
6. Access the hidden photos album: Once the photos are hidden, you can access them in the hidden photos album. To do this, go back to your photo library and navigate to the “Albums” tab at the bottom of the screen. Scroll down until you find the “Hidden” album.
7. View and manage hidden photos: Open the “Hidden” album to view and manage your hidden photos. Here, you can add additional photos to the hidden album or remove photos from it as needed.
8. Hide the hidden album: If you want to further secure your hidden photos, you can also hide the hidden album itself. To do this, go to the “Settings” app, select “Photos”, scroll down to the “Hidden Album” section, and toggle off the switch next to “Hidden Album”. This will hide the hidden album from the Albums tab in the Photos app.
By following these steps, you can easily enable hidden albums on your iPhone and begin organizing and protecting your private photos. Next, let’s explore how to use Face ID to lock and unlock hidden photos.
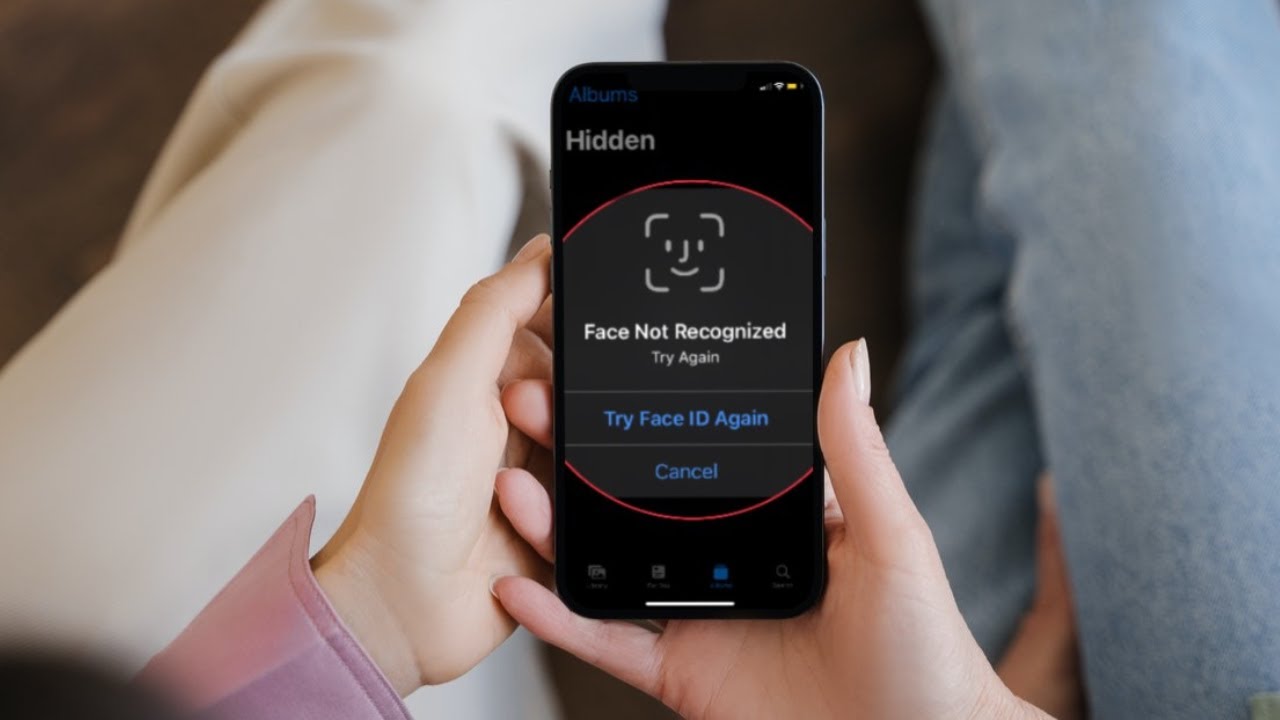
Using Face ID to Lock and Unlock Hidden Photos
With Face ID, you can conveniently lock and unlock your hidden photos using facial recognition. This adds an extra layer of security and ensures that only you can access your private collection. Here’s how you can use Face ID to lock and unlock hidden photos:
1. Open the Photos app: Launch the Photos app on your iPhone and navigate to the “Hidden” album. This is where your hidden photos are stored.
2. Tap on the “Select” button: To lock or unlock multiple photos, tap on the “Select” button at the top right corner of the screen. Alternatively, you can tap on a single photo to lock or unlock it individually.
3. Tap on the share button: Once you have selected the photos you want to lock or unlock, tap on the share button at the bottom left corner of the screen. It looks like a square with an upward arrow.
4. Choose the “Lock” or “Unlock” option: In the share menu that appears, scroll down until you find the “Lock” or “Unlock” option, depending on the current status of the selected photos. Tap on the appropriate option to apply the lock or unlock action.
5. Authenticate with Face ID: If Face ID is enabled on your device, you will be prompted to authenticate with Face ID to complete the lock or unlock action. Simply look at your device, and Face ID will recognize your face and process the request.
6. Verify the lock or unlock status: After authenticating with Face ID, the selected photos will either be locked or unlocked, depending on your action. Locked photos will no longer be visible in the main photos library or any other album besides the “Hidden” album.
7. Repeat the process as needed: You can easily lock or unlock additional photos by repeating the above steps. Tap on the “Select” button, choose the photos you want to lock or unlock, and follow the prompt to authenticate with Face ID.
By utilizing Face ID to lock and unlock your hidden photos, you can ensure that only you have access to your private collection. The convenience of using facial recognition technology adds an extra level of security without the need for passwords or codes. Now, let’s explore how to add Face ID to the hidden photos album.
How to Add Face ID to the Hidden Photos Album
To add Face ID to the hidden photos album, you’ll need to enable the “Require Face ID” option. This ensures that each time you want to access the hidden photos, Face ID authentication will be required. Here’s how you can add Face ID to the hidden photos album:
1. Open the Settings app: Locate the Settings app on your iPhone’s home screen and tap on it to open it.
2. Scroll down and select “Face ID & Passcode”: In the Settings app, scroll down until you find “Face ID & Passcode” option. Tap on it to access the Face ID settings.
3. Authenticate with Face ID: If requested, enter your passcode to authenticate and access the Face ID settings.
4. Enable “Require Face ID” for hidden photos: In the Face ID settings, scroll down until you find the “Hidden Photos” option. Toggle the switch next to it to enable the “Require Face ID” feature.
5. Test Face ID authentication: To ensure the feature is working properly, try accessing your hidden photos by opening the Photos app and navigating to the “Hidden” album. Face ID will prompt you to authenticate and grant you access if successfully recognized.
6. Customize additional Face ID settings (optional): In the Face ID & Passcode settings, you can customize additional options such as “Attention Aware Features” or “Alternate Appearance” to fine-tune the Face ID experience according to your preferences.
7. Enjoy secure access to your hidden photos: With Face ID now enabled for the hidden photos album, you can securely access your private collection by using facial recognition. Face ID will ensure that only you can view and manage your hidden photos with just a glance.
By following these steps, you can easily add Face ID to the hidden photos album on your iPhone. This provides an additional layer of security and convenience, allowing you to protect your private photos from unauthorized access. Now, let’s address some common troubleshooting issues with Face ID for hidden photos.
Troubleshooting Face ID for Hidden Photos
While Face ID is a reliable and advanced technology, there may be times when you encounter issues related to using Face ID with the hidden photos feature. Here are some common troubleshooting steps you can take to address any problems:
1. Ensure Face ID is set up and working: Before troubleshooting hidden photos, make sure that Face ID is properly set up and functioning correctly. Check the Face ID settings in your device’s settings app to ensure it is enabled and recognizes your face accurately.
2. Update your iPhone: Outdated software can sometimes cause compatibility issues. Check if there are any available software updates for your iPhone and install them. Updating your device’s software can often resolve hidden photos-related problems.
3. Reset Face ID settings: If you’re experiencing issues specific to using Face ID with hidden photos, you can try resetting the Face ID settings. Go to the Face ID settings in the settings app and choose “Reset Face ID.” Then set up Face ID again and try using it with hidden photos.
4. Make sure the hidden photos album is accessible: Double-check that the hidden photos album is accessible in the Photos app. If you can’t find the hidden album, review the steps mentioned earlier in this article on how to enable hidden albums on your iPhone.
5. Re-add photos to the hidden album: If you’re having trouble accessing specific photos in the hidden album, try re-adding them. Remove the photos from the album, and then add them back again. This can address any potential issues with individual photos in the hidden album.
6. Reset all settings: If none of the above steps resolve the issue, you can try resetting all settings on your iPhone. This will reset all customized settings, including Face ID. Go to the Settings app, choose “General,” then “Reset,” and select “Reset All Settings.” Keep in mind that this will erase all personalized settings on your device, so make sure to back up your data beforehand.
7. Contact Apple Support: If you’ve tried the above troubleshooting steps and are still encountering issues with Face ID for hidden photos, it’s recommended to reach out to Apple Support for further assistance. They have a dedicated team of experts who can help diagnose and resolve any technical issues or concerns you may have.
By following these troubleshooting steps, you can address common problems related to using Face ID with hidden photos on your iPhone. It’s important to remember that Face ID is a secure and reliable feature, but in rare cases, technical issues may arise. Now that we’ve covered troubleshooting, let’s wrap up this article.
Conclusion
Protecting your private photos is crucial in today’s digital age, and by using Face ID to lock and unlock hidden photos on your iPhone, you can ensure that your personal moments remain secure. With Face ID, you can enhance the privacy and convenience of accessing your hidden photos using facial recognition technology.
In this article, we learned about the benefits of using Face ID on hidden photos, including enhanced privacy, seamless authentication, and accessibility. We also explored how to enable hidden albums on your iPhone and add Face ID to the hidden photos album, providing an extra layer of security.
If you encounter any issues with Face ID for hidden photos, there are troubleshooting steps you can take, such as ensuring Face ID is set up correctly, updating your iPhone’s software, or resetting Face ID settings. Remember to reach out to Apple Support for further assistance if needed.
By following the steps outlined in this article, you can safeguard your privacy and enjoy the peace of mind of knowing that your hidden photos are protected. Whether it’s personal memories, sensitive documents, or any other private content, Face ID offers a convenient and secure way to keep them safe on your iPhone.
So, go ahead and take advantage of the power of Face ID to lock and unlock your hidden photos. Ensure that only you have access to your cherished moments and valuable information. Keep your photos where they belong – hidden from prying eyes and protected by the advanced technology of Face ID.