Introduction
Welcome to the era of the iPhone 14, the latest innovation from Apple that boasts an array of exciting features. One of the standout features is Face ID, a revolutionary facial recognition technology that allows you to unlock your iPhone and authenticate transactions with just a glance.
Gone are the days of using passcodes or fingerprint scanners – with Face ID, you can enjoy a seamless and secure experience in the palm of your hand. In this article, we will guide you through the step-by-step process of setting up Face ID on your brand-new iPhone 14, ensuring that you can take full advantage of this cutting-edge feature.
Whether you are a tech enthusiast or a first-time iPhone user, fear not – the setup process is simple and user-friendly. By following our instructions, you’ll be able to set up Face ID and maximize the functionality of your new iPhone in no time.
Before diving into the setup, it’s important to note that Face ID utilizes advanced technologies such as machine learning and depth-sensing cameras to create a secure and accurate facial map. This ensures that only you can unlock your iPhone and access sensitive information.
Now, let’s get started on the journey to setting up Face ID on your iPhone 14. Get ready to experience a whole new level of convenience and security.
Step 1: Open the Settings app
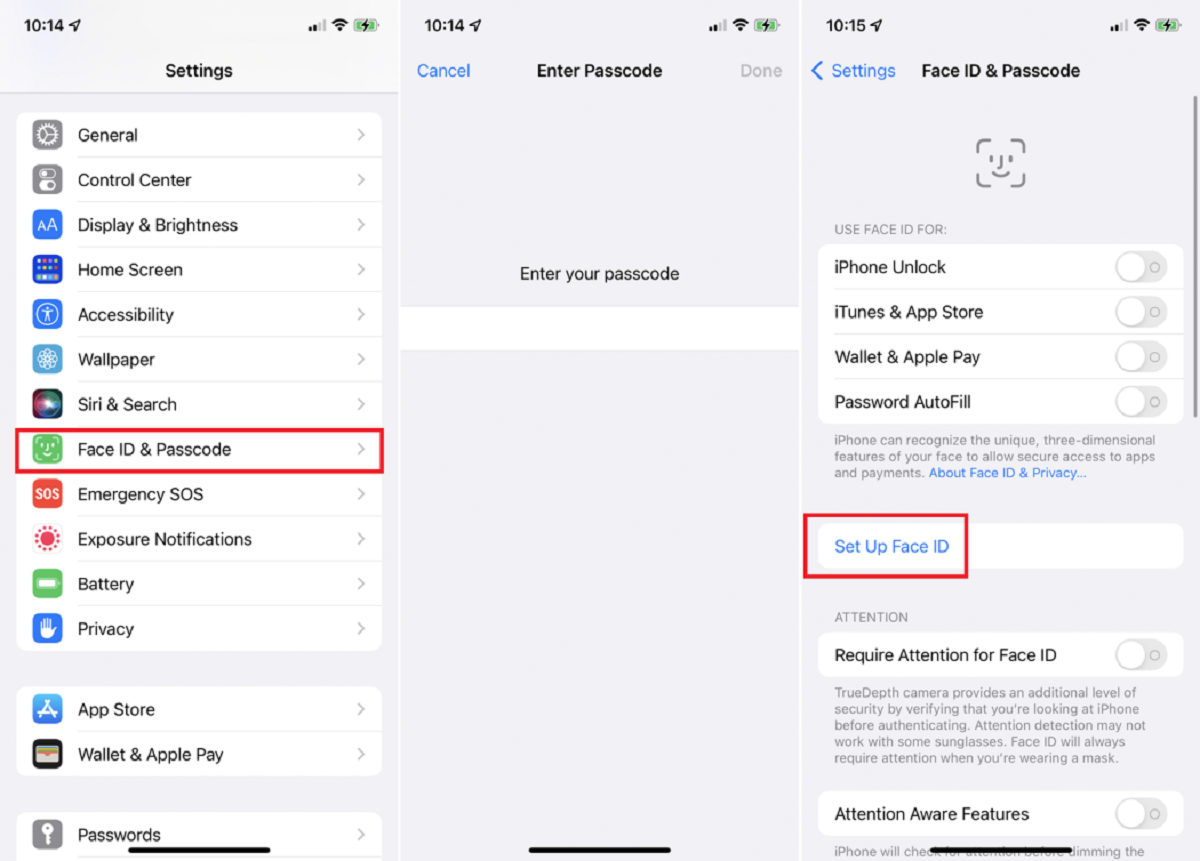
The first step to setting up Face ID on your iPhone 14 is to open the Settings app. Locate the app icon on your home screen, which resembles a grey gear, and tap on it to launch the Settings menu.
The Settings app is your gateway to various customization options on your iPhone, allowing you to personalize your device to suit your preferences. From adjusting display settings to managing app permissions, the Settings app is a powerful tool that puts you in control.
Once you’ve opened the Settings app, you’ll be greeted with a list of different categories such as General, Display & Brightness, and Privacy. We need to navigate to the specific category that deals with Face ID settings.
To do this, you can either scroll down the list to find the Face ID & Passcode option or use the search bar at the top of the screen. Simply type “Face ID” into the search bar, and the relevant category will appear below. Tap on it to proceed to the Face ID settings page.
Alternatively, if you prefer the manual approach, you can scroll down through the Settings categories until you find the Face ID & Passcode option. This category houses all the settings related to Face ID, including the setup process and additional customization options.
Once you’ve reached the Face ID & Passcode settings page, you’re one step closer to unlocking the power of Face ID on your iPhone 14. But before we proceed with the setup, you’ll need to enter your existing passcode to access and modify these settings. It’s an added layer of security to ensure that only authorized users can manage the Face ID functionality.
In the next step, we’ll guide you through the process of entering your passcode and accessing the Face ID settings. Get ready to embark on a journey to a faster, more convenient way of unlocking your iPhone and securing your personal data.
Step 2: Navigate to Face ID & Passcode
Now that you’ve successfully opened the Settings app on your iPhone 14, it’s time to navigate to the Face ID & Passcode settings. This is where you’ll find all the options and controls related to setting up and managing Face ID.
On the Settings page, scroll down until you find the category labeled “Face ID & Passcode.” Tap on it to access the Face ID settings.
Upon entering the Face ID & Passcode settings, you’ll be presented with a range of options to customize your Face ID experience. This is where you can enable or disable Face ID, set up alternative appearance options, and even manage app-specific Face ID preferences.
If you’re new to Face ID and this is your first time setting it up, don’t worry – we’ll guide you through the process step by step. The Face ID setup process allows your iPhone 14 to create a detailed mathematical representation of your face for accurate recognition.
By navigating to the Face ID & Passcode settings, you’re taking the first step towards enhancing the security and convenience of your iPhone. Once set up, Face ID will not only allow you to unlock your device with ease but also enable secure authentication for various apps and services.
Before we proceed with the setup, make sure you have your passcode handy. Face ID requires a passcode as a backup authentication method in case the facial recognition feature is unable to verify your identity. This ensures that you can always access your device even in situations where Face ID may not be available.
In the next step, we’ll show you how to enter your passcode and proceed to set up Face ID on your iPhone 14. Get ready to unlock a world of convenience and security!
Step 3: Enter your passcode to access Face ID settings
Now that you’ve reached the Face ID & Passcode settings on your iPhone 14, it’s time to enter your passcode to access and modify these settings. This additional security measure ensures that only authorized users can manage Face ID on your device.
Upon entering the Face ID & Passcode settings, you’ll notice a prompt asking you to enter your current passcode. Your passcode is a six-digit numerical code that you set when you initially set up your iPhone. If you haven’t set a passcode yet, now is the time to do so by tapping on “Set Passcode” and following the instructions.
Once you’ve entered the correct passcode, you’ll gain access to all the Face ID settings and customization options. This is where you’ll be able to set up Face ID, manage alternative appearance options, and control Face ID preferences for specific apps and services.
Entering your passcode not only provides an added layer of security but also acts as a backup method in case Face ID fails to recognize your face. It’s important to choose a passcode that is secure and memorable to safeguard your device and personal data.
If you’re experiencing difficulty entering your passcode or have forgotten it, there are a couple of options available. You can attempt to use Face ID by positioning your face correctly in front of the camera, as it may still recognize you and allow access. Alternatively, you can connect your iPhone to a trusted computer and use iTunes to restore your device to its factory settings, but keep in mind that this will erase all data on your device.
Once you’ve successfully entered your passcode, you’re ready to proceed with the Face ID setup process. With Face ID enabled, you’ll be able to unlock your iPhone, authenticate transactions, and enjoy a seamless user experience with just a glance.
In the next step, we’ll guide you through the process of setting up Face ID on your iPhone 14. Get ready to experience the cutting-edge technology of facial recognition!
Step 4: Set up your Face ID by following the on-screen instructions
Now that you’ve accessed the Face ID settings on your iPhone 14 by entering your passcode, it’s time to set up Face ID. The setup process is simple and intuitive, guided by on-screen instructions that will allow your device to create a precise facial map for accurate recognition.
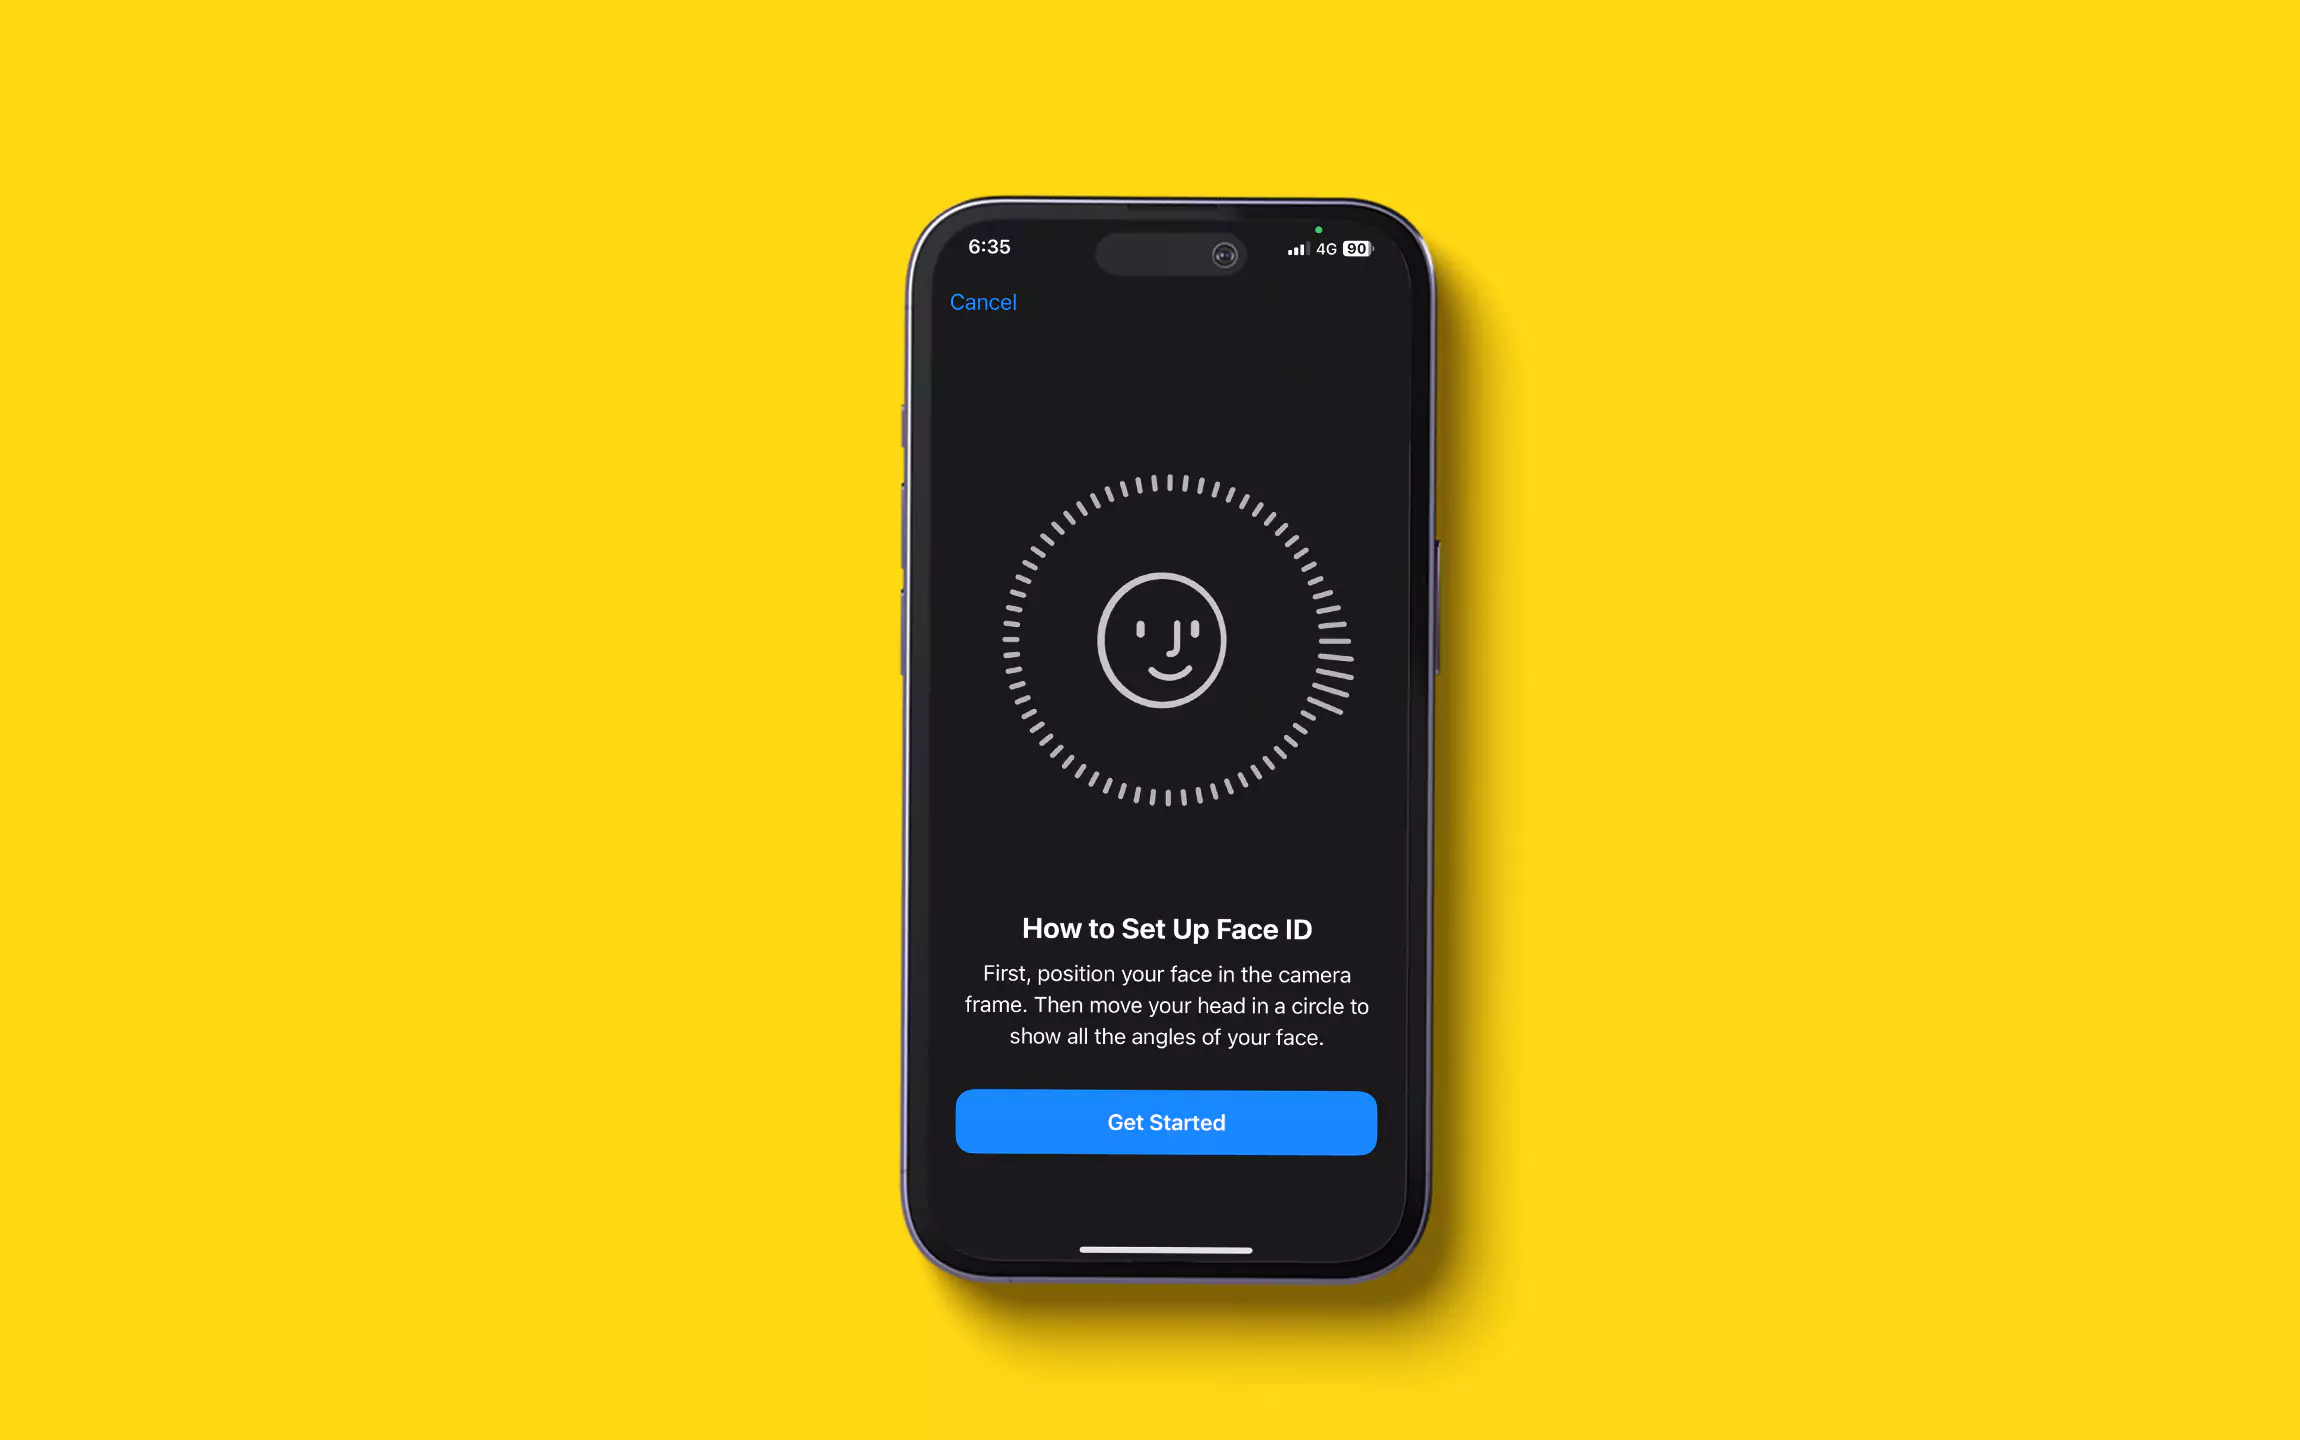
To begin the setup, tap on the option labeled “Set Up Face ID”. Your iPhone will now guide you through a series of steps to capture your facial data and optimize the performance of Face ID.
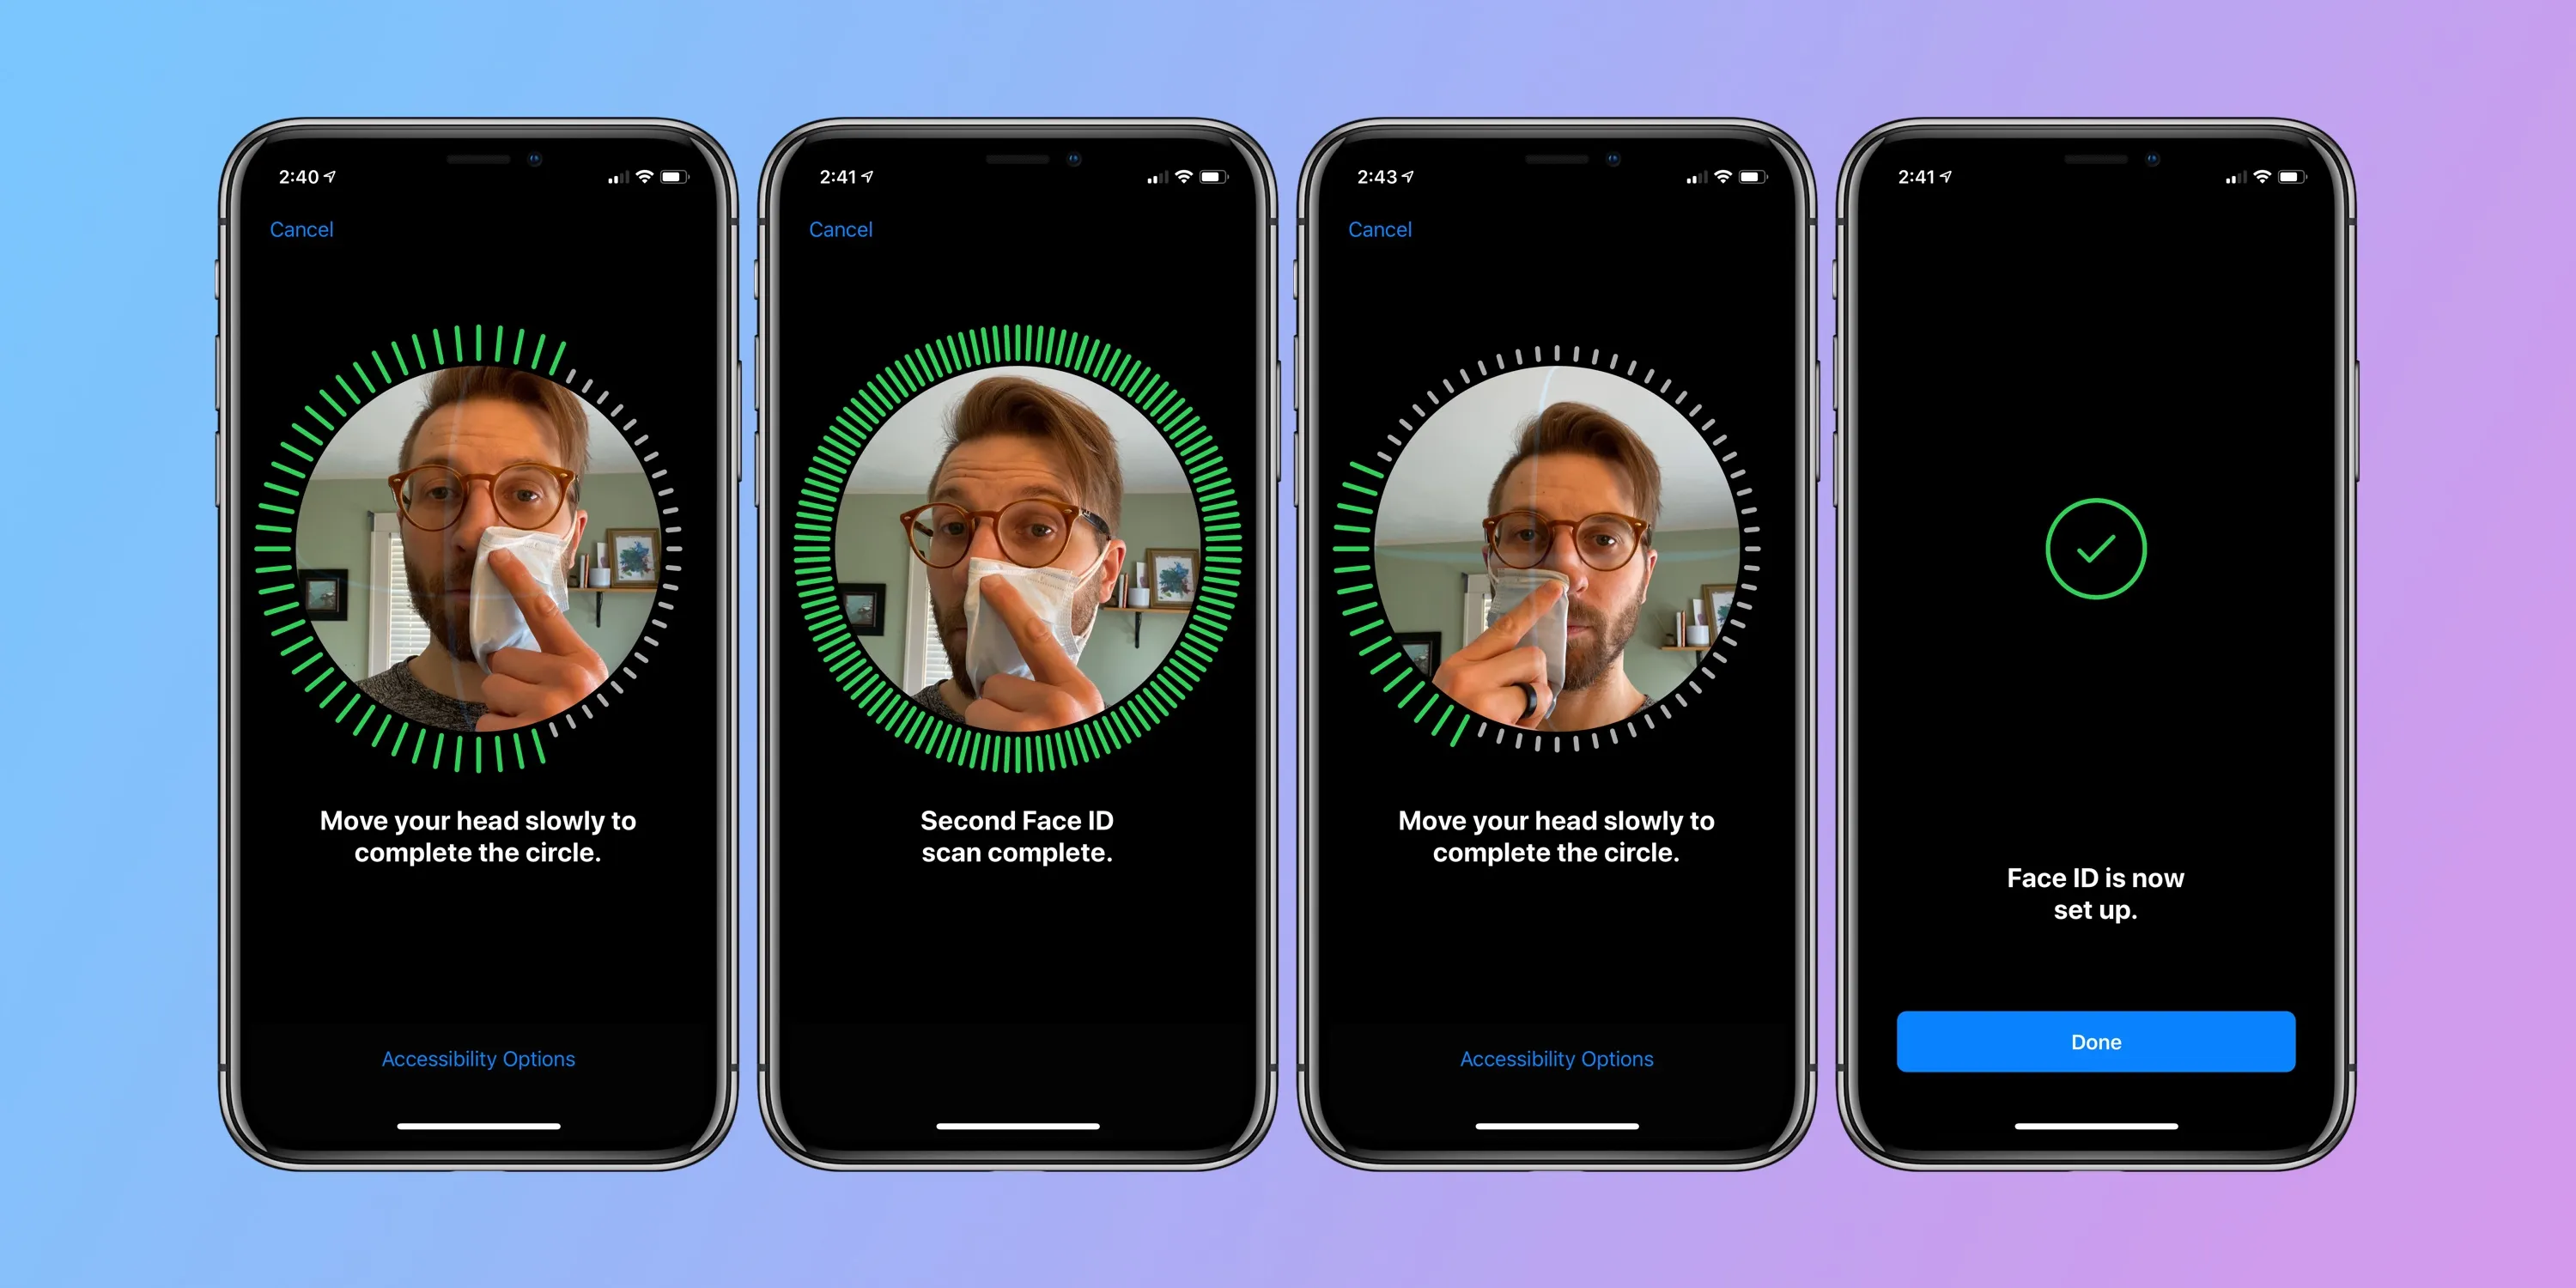
During the setup process, make sure you hold your iPhone in a comfortable position and align your face within the frame displayed on the screen. You’ll be instructed to position your face directly in front of the camera and move your head in a smooth circular motion.
As you move your head, your iPhone’s TrueDepth camera system will capture detailed depth data and analyze your facial features using advanced algorithms. This information is used to create a mathematical representation of your face that is unique to you.
Throughout the setup process, it’s important to follow the on-screen instructions carefully. This will ensure that your iPhone captures the necessary data for accurate and reliable facial recognition.
In addition to capturing a single set of facial data, your iPhone 14 allows you to set up an alternative appearance. This is useful if you frequently wear glasses, hats, or other accessories that may slightly alter your facial features. By setting up an alternative appearance, Face ID can adapt to different appearances of your face and still recognize you.
Once you’ve completed the initial setup process, you’ll be prompted to repeat it a second time to ensure accuracy and enhance Face ID’s performance. This double capture process improves the reliability of facial recognition and reduces the chances of false positives or negatives.
After successfully setting up Face ID, your iPhone will be ready to unlock with just a glance, providing you with enhanced security and convenience. You can now enjoy the seamless experience of authenticating transactions and accessing your device without the need for passcodes or touch-based methods.
In the next step, we’ll explore how to customize Face ID settings further and enable or disable this feature for specific app and service preferences. Stay tuned!
Step 5: Position your face within the frame and move your head in a circle
Now that you’ve initiated the Face ID setup process on your iPhone 14, it’s time to position your face within the frame and move your head in a circle. This step is crucial to ensure that your device captures accurate facial data for reliable identification.
Follow the on-screen instructions and hold your iPhone in a comfortable position. With your face in clear view, align it within the frame displayed on the screen. Make sure your face is centered and fully visible within the frame for optimal results.
Next, move your head in a circular motion as instructed. The on-screen guide will provide you with a visual representation of how to perform this motion. The purpose of moving your head in a circle is to allow the TrueDepth camera system to capture depth data from various angles, enhancing the accuracy of the facial recognition process.
During this step, it’s important to maintain a consistent and smooth motion. Avoid moving your head too quickly or abruptly, as this may affect the quality of the captured data. By following the on-screen instructions and moving your head as guided, you enable your iPhone 14 to create a detailed and precise facial map that forms the basis of Face ID.
It’s worth noting that the TrueDepth camera system on your iPhone utilizes advanced technologies such as infrared sensors and depth mapping to create a highly accurate representation of your face. These sensors can detect even minor changes in your facial features, ensuring that Face ID remains reliable and secure in various lighting conditions and environments.
After completing the circular head motion, your iPhone will process the captured data and analyze it using sophisticated algorithms. This analysis allows your device to create a mathematical model unique to you, which is then used for future facial recognition purposes.
Remember, in order to ensure the utmost security, the facial data captured during the setup process is stored only on your iPhone and is not accessible to Apple or any external parties. Your privacy and protection are important considerations in the design and implementation of Face ID.
In the next step, we’ll discuss the importance of repeating this process a second time and explore its impact on the overall performance and reliability of Face ID. Let’s continue to enhance the security and convenience of your iPhone 14!
Step 6: Repeat the process twice to complete the setup
Completing the Face ID setup process on your iPhone 14 requires you to repeat the steps you followed in the previous section. This repetition is crucial to ensure the accuracy and reliability of facial recognition and enhance the overall performance of Face ID.
Following the completion of the initial setup, your iPhone will prompt you to repeat the process a second time. This repetition is necessary to capture additional data points and further refine the mathematical model of your face that Face ID relies upon.
Just like in the initial setup, position your face within the frame displayed on the screen. Make sure your face is fully visible and centered within the frame for optimal results. This ensures that the TrueDepth camera system captures accurate depth data and facial features from various angles.
As with the first setup, you’ll be instructed to move your head in a circular motion. Perform this motion smoothly and consistently, following the on-screen guide. The circular head motion allows the camera to capture additional depth data, further enhancing the accuracy and reliability of Face ID.
By repeating the setup process a second time, your iPhone can create a comprehensive and detailed representation of your face, taking into account various angles, lighting conditions, and minor changes in your appearance. This redundancy significantly reduces the chances of false positives or negatives during facial recognition.
Once you’ve completed the repetition of the setup process, your iPhone will analyze the additional data captured and refine the mathematical model of your face. This refinement enhances the performance of Face ID, making it more accurate and reliable in recognizing your unique facial features.
It’s important to emphasize that each repetition of the setup process is quick and straightforward, taking only a few moments of your time. However, the impact it has on the overall performance of Face ID is significant, ensuring a seamless and efficient user experience going forward.
With the completion of this step, you’ve successfully set up Face ID on your iPhone 14. Your device is now equipped with a powerful and secure facial recognition feature that offers convenience, privacy, and peace of mind.
In the next step, we’ll explore how you can enable or disable Face ID for specific app and service preferences, allowing you to have even more control over your iPhone’s security features. Let’s dive in!
Step 7: Enable or disable Face ID for specific app and service preferences
Now that you’ve successfully set up Face ID on your iPhone 14, you have the option to enable or disable Face ID for specific app and service preferences. This feature allows you to customize the usage of Face ID based on your personal preferences and security needs.
To access the app-specific Face ID preferences, navigate back to the Face ID & Passcode settings on your iPhone. Scroll down to the section labeled “Use Face ID For” or “Allow Face ID Access.” This is where you can manage the permissions for various apps and services that support Face ID authentication.
Within this section, you’ll see a list of apps and service preferences that are compatible with Face ID. These may include banking apps, password managers, payment platforms, and more. By default, Face ID is enabled for these apps, allowing you to conveniently and securely access your accounts and perform transactions.
If, for any reason, you prefer not to use Face ID for a particular app or service, simply toggle the switch to disable Face ID for that specific option. This gives you complete control over which apps and services can utilize the facial recognition feature.
Disabling Face ID for specific apps or services can be helpful in certain scenarios. For example, you may decide to disable Face ID for banking apps to ensure an extra layer of security, requiring manual authentication even if your iPhone is unlocked via Face ID.
On the other hand, enabling Face ID for apps and services can streamline your user experience and eliminate the need for entering passwords or PINs. It makes accessing your favorite apps and services quick and effortless.
Keep in mind that enabling or disabling Face ID for specific apps and services does not affect the overall functionality of Face ID on your device. It only impacts the usage of Face ID within the selected apps or services.
Your iPhone 14’s Face ID feature provides a flexible and customizable experience, allowing you to strike a balance between convenience and security. Take advantage of these app-specific Face ID preferences to tailor your device’s functionality to your specific needs.
With the completion of this step, you have successfully set up Face ID on your iPhone 14 and explored additional customization options. Enjoy the convenience and security of facial recognition, seamlessly unlocking your iPhone, and accessing your favorite apps with just a glance.
That concludes our guide on setting up Face ID on your iPhone 14 and customizing its usage. We hope this article has been informative and helpful. If you have any further questions or need assistance, feel free to consult the Apple support resources or reach out to their customer service.
Conclusion
Congratulations! You’ve successfully set up Face ID on your iPhone 14, unlocking a world of convenience and security at your fingertips. With this revolutionary facial recognition technology, you can now enjoy a seamless and effortless user experience, replacing the need for passcodes or fingerprint scanners.
The setup process was simple and user-friendly, guided by on-screen instructions that allowed your iPhone 14 to create a detailed mathematical representation of your face. By positioning your face within the frame and moving your head in a circle, you ensured the accurate capture of depth data and facial features.
Remember, Face ID utilizes advanced technologies such as machine learning and depth-sensing cameras to create a secure and accurate facial map. This means that only you can unlock your iPhone and access sensitive information, providing you with peace of mind and protection.
In addition to the initial setup, you learned how to navigate to the Face ID & Passcode settings, enter your passcode for access, and enable or disable Face ID for specific app and service preferences. These customization options give you control over your iPhone’s security features, allowing you to optimize the usage of Face ID based on your preferences and needs.
With Face ID enabled, you can unlock your iPhone, authenticate transactions, and access your favorite apps and services with just a glance. This innovative technology not only improves convenience but also enhances the overall security of your device. Your face becomes the key to your iPhone, ensuring that only you can unlock and access your personal data.
We hope this guide has been helpful in setting up and customizing Face ID on your iPhone 14. As you continue to explore the features and capabilities of your device, may you enjoy a seamless and secure user experience. Should you have any further questions or need assistance, Apple’s support resources and customer service are always there to help.
Embrace the power of Face ID and immerse yourself in the world of advanced facial recognition technology. Unlock your iPhone with just a glance and experience the convenience and security that Face ID brings to your everyday life.