Introduction
Gaming has become an increasingly popular form of entertainment, with thousands of games available for download online. However, with the ever-increasing file sizes of modern games, it’s not uncommon for computer hard drives to quickly fill up. This can result in slower performance and limited storage space for new games. Thankfully, there is a solution – downloading games onto an external hard drive.
By utilizing an external hard drive, you can expand your storage capacity and ensure your gaming experience remains smooth and enjoyable. In this article, we will explore the benefits of downloading games onto an external hard drive, as well as provide step-by-step instructions on how to properly set up and manage your game library on the external drive.
With an external hard drive, you can say goodbye to the hassle of constantly juggling games and worrying about disk space limitations. Whether you’re a casual gamer or an avid enthusiast, learning how to download games onto an external hard drive is a valuable skill that will greatly enhance your gaming experience.
In the following sections, we will discuss the advantages of using an external hard drive for game downloads, the necessary preparations before downloading games, how to find reputable websites for game downloads, the process of downloading and installing games onto your external hard drive, transferring existing games, organizing your game library, and running games directly from your external hard drive. We will also provide some tips for maintaining and optimizing your game library to ensure smooth gameplay.
So, if you’re ready to unlock the full potential of your gaming experience and overcome storage limitations, let’s dive into the world of downloading games onto an external hard drive.
Benefits of Downloading Games onto an External Hard Drive
Downloading games onto an external hard drive offers several advantages that can greatly enhance your gaming experience. Let’s explore some of the key benefits:
1. Increased Storage Capacity: One of the primary benefits of using an external hard drive for game downloads is the ability to expand your storage capacity. Modern games can take up a significant amount of space, often surpassing hundreds of gigabytes. By utilizing an external hard drive with ample storage, you can download and store a vast library of games without worrying about running out of space on your computer’s primary drive.
2. Improved Performance: When game files are stored on an external hard drive, it helps to reduce the load on your computer’s internal drive. This results in improved performance, as your computer can focus on running the game smoothly without the added burden of managing other files and applications. By separating your games from your operating system and other data, you can enjoy faster load times, reduced lag, and an overall smoother gaming experience.
3. Portability and Flexibility: With games downloaded onto an external hard drive, you can easily take your gaming library with you wherever you go. This is especially beneficial for those who frequently travel or attend gaming events. Instead of carrying multiple physical discs or relying on unstable internet connections to re-download games, you can simply connect your external hard drive to any compatible device and enjoy your favorite games without hassle.
4. Easy Game Transfers: Transferring games between computers or upgrading to a new system becomes a breeze when using an external hard drive. Instead of having to redownload games from scratch, you can transfer your entire game library by simply connecting the external hard drive to the new system. This saves time and eliminates the need to reconfigure game settings and preferences.
5. Enhanced Data Security: An external hard drive provides an extra layer of data protection for your precious game files. With the ability to store backups of your games, you can rest assured knowing that even if your computer experiences a hardware failure or data loss, your games can be easily restored from the external hard drive. It also allows you to keep your games separate from your system files, reducing the risk of accidental deletion or corruption.
By taking advantage of these benefits, downloading games onto an external hard drive offers a convenient and efficient solution for managing your gaming library. Not only does it provide increased storage capacity and improved performance, but it also offers portability, flexibility, easy game transfers, and enhanced data security.
Preparing Your External Hard Drive for Game Downloads
Before you can start downloading games onto your external hard drive, it is essential to properly prepare the drive to ensure optimal performance and compatibility. Here are some steps to follow:
1. Format the External Hard Drive: If your external hard drive is brand new or has been previously used for another purpose, you need to format it before using it for game downloads. Formatting is the process of preparing the storage device for use with your specific operating system. Connect the external hard drive to your computer and follow the instructions to format it. Make sure to choose a compatible file system format, such as NTFS for Windows or APFS for Mac.
2. Allocate Space: Determine how much space you want to allocate on the external hard drive for game downloads. It is crucial to consider the size of the games you plan to download and the available storage capacity on the drive. It is recommended to leave some space free for future game updates and expansions.
3. Create Game-specific Folders: To keep your game library organized, create specific folders on your external hard drive to store the game files. Create a main folder for your games and then create subfolders for each game or game series. This will make it easier to locate and manage your games in the future.
4. Ensure Adequate Power Supply: External hard drives require power to function correctly. Ensure that the external hard drive is connected to a stable power source, either through a power adapter or a USB port that provides ample power. Insufficient power supply may cause performance issues or even data corruption.
5. Protect Your External Hard Drive: Since your external hard drive will house your valuable game library, it’s crucial to protect it from physical damage and potential data loss. Invest in a durable carrying case or sleeve to provide added protection when transporting it. Additionally, always safely eject the drive from your computer to prevent data corruption or file system errors.
6. Update External Hard Drive Firmware: Check if there are any firmware updates available for your external hard drive and install them if necessary. Firmware updates often provide performance improvements and bug fixes, ensuring that your external hard drive operates smoothly and efficiently.
By following these steps, you can properly prepare your external hard drive for game downloads. Formatting the drive, allocating space, creating organized folders, ensuring adequate power supply, protecting the drive, and updating the firmware will help ensure a seamless gaming experience without any hiccups or issues.
Checking System Requirements for Downloaded Games
Before downloading any game onto your external hard drive, it is essential to check the system requirements to ensure that your computer meets the necessary specifications to run the game smoothly. Here’s how you can check the system requirements:
1. Minimum and Recommended Specifications: Most game developers provide both minimum and recommended system requirements for their games. The minimum requirements indicate the absolute minimum specifications needed to run the game, while the recommended requirements suggest the ideal specifications for an optimal gaming experience. Check these requirements on the game’s official website or the platform from which you’re downloading the game.
2. Operating System Compatibility: Ensure that the game is compatible with your computer’s operating system. Some games may only work on specific operating systems, such as Windows, macOS, or Linux. Verify if your operating system is supported by the game before proceeding with the download.
3. Processor (CPU): Verify that your computer’s processor meets or exceeds the minimum requirements specified by the game. The processor is one of the most critical components for running games smoothly, as it handles most of the game’s computations. Make sure your computer’s CPU is powerful enough to handle the game’s demands.
4. Graphics Card (GPU): Check if your computer’s graphics card meets the minimum requirements for the game. The graphics card is responsible for rendering the game’s visuals and effects. Ensure that your GPU can handle the game’s graphical demands to avoid lag or poor visual quality.
5. Memory (RAM): Verify if your computer has enough RAM to run the game. Insufficient memory can lead to sluggish performance and slow loading times. Make sure your computer meets the minimum RAM requirements specified by the game.
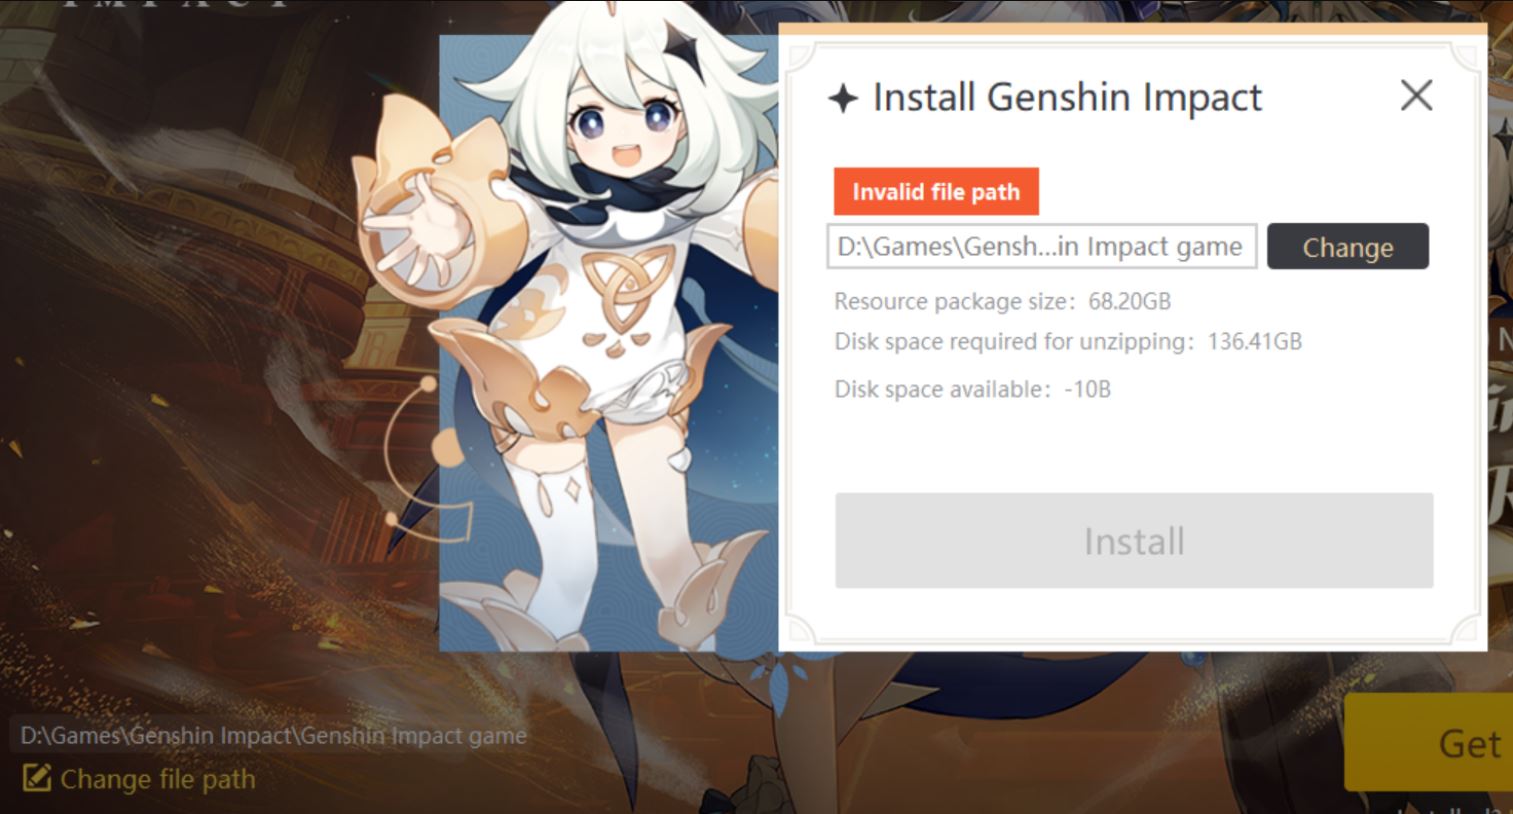
6. Storage Space: Check the game’s storage space requirements and ensure that you have enough space available on your external hard drive. Game sizes vary significantly, with some modern titles occupying dozens of gigabytes or more. Allocate sufficient storage space to accommodate the game and any future updates or expansions.
7. Additional Requirements: Some games may have additional requirements, such as specific DirectX versions, internet connectivity, or peripherals like controllers or VR headsets. Ensure that you have any additional hardware or software needed to run the game as intended.
By checking the system requirements before downloading games onto your external hard drive, you can avoid compatibility issues and ensure a seamless gaming experience. Verifying the minimum and recommended specifications, checking operating system compatibility, reviewing CPU and GPU requirements, assessing memory and storage space needs, and considering any additional requirements will help you determine if your computer is capable of running the game smoothly.
Finding Reputable Websites for Game Downloads
When it comes to downloading games onto your external hard drive, it is crucial to find reputable websites that offer safe and legal game downloads. Here are some tips on how to find trustworthy sources:
1. Official Game Platforms: Start by checking the official websites of game developers and publishers. Many of them have their own platforms, such as Steam, Epic Games Store, GOG, or Origin, where you can purchase and download games directly. These platforms are reputable and provide a wide range of games from various publishers.
2. Digital Distribution Platforms: In addition to official game platforms, there are reputable digital distribution platforms that offer a vast selection of games. Examples include Humble Bundle, Green Man Gaming, and Itch.io. These platforms often have curated collections, user reviews, and stringent quality control measures to ensure the safety and legitimacy of the games they offer.
3. Community Recommendations: Seek recommendations from fellow gamers or online gaming communities. Forums, subreddits, and social media groups dedicated to gaming can be excellent sources for finding trustworthy websites for game downloads. Be sure to assess the credibility of the sources and consider multiple opinions before making a decision.
4. Established Retailers: Well-known retailers like Amazon, Best Buy, and GameStop also offer digital game downloads. These sites often have a reputation to uphold and take measures to ensure the authenticity and safety of the games they sell. However, keep in mind that their selection of games may be more limited compared to official platforms or dedicated game distribution platforms.
5. Review Websites: Look for reputable game review websites and publications. These sites often include links to recommended sources for game downloads. They typically provide insights, reviews, and ratings for various games and platforms, giving you a reliable starting point for finding reputable sources.
6. Avoid Torrent and Piracy Sites: While it may be tempting to explore torrent or piracy websites for free game downloads, it is strongly advised against. These sites not only violate copyright laws but also pose significant cybersecurity risks. Downloading from such sites can result in malware infections, compromised personal information, and legal consequences.
7. Verify Website Legitimacy: Before downloading any games, ensure that the website you choose is legitimate and secure. Look for signs of trustworthiness, such as verified SSL certificates, secure payment options, customer support, and positive user reviews. Avoid websites that raise red flags, such as excessive pop-up ads, suspicious download links, or requests for personal information.
By following these tips, you can find reputable websites for game downloads and minimize the risks associated with downloading games from untrusted sources. Stick to official game platforms, digital distribution platforms, trusted retailers, community recommendations, review websites, and always prioritize your online safety and security.
Downloading and Installing Games onto Your External Hard Drive
Once you have found a reputable website or platform for game downloads, it’s time to download and install your desired games onto your external hard drive. Here’s a step-by-step guide on how to do it:
1. Choose and Purchase the Game: Select the game you want to download and purchase it from the chosen website or platform. Follow the prompts to complete the transaction and obtain the necessary license or activation key.
2. Connect the External Hard Drive: Connect your external hard drive to your computer using the appropriate cables or ports. Ensure that the drive is recognized and accessible by your computer.
3. Select the Install Location: During the installation process, you may be prompted to choose the installation location. Select the external hard drive as the destination for the installation. If this option is not available during the installation, you can usually change the installation location through the game’s settings or preferences after installation.
4. Follow the Installation Wizard: Proceed with the installation by following the prompts in the installation wizard. The wizard will guide you through the necessary steps to install the game onto your external hard drive. Depending on the game’s size, this process may take some time.
5. Activate the Game: If required, enter the provided license key or activation code to activate the game. This step may vary depending on the game and the platform you are using for downloading.
6. Repeat for Additional Games: If you wish to download more games onto your external hard drive, repeat the process for each game. Remember to allocate sufficient storage space on the external hard drive to accommodate all the games you will be downloading.
7. Launch and Play: Once the installation is complete, launch the game from your external hard drive. Depending on the platform, you may need to open the platform’s launcher or use a desktop shortcut created during the installation process. Enjoy your game directly from the external hard drive without taking up valuable space on your computer’s internal drive.
8. Keep Game Files Organized: To maintain a well-organized game library on your external hard drive, consider storing each game in its designated folder. This will make it easier to locate, manage, and uninstall games in the future.
By following these steps, you can successfully download and install games onto your external hard drive. Remember to choose the external hard drive as the installation location, activate the game if necessary, and keep your game library organized for seamless gaming experiences.
Transferring Existing Games to Your External Hard Drive
If you already have games installed on your computer’s internal hard drive and want to free up space or transfer them to your external hard drive, you can do so by following these steps:
1. Locate the Game Files: Find the folder where the game is installed on your computer’s internal hard drive. The default installation directory is often in the “Program Files” or “Program Files (x86)” folder for Windows users. Mac users can look for the game in the “Applications” folder.
2. Copy the Game Files: Once you’ve located the game folder, copy it to your external hard drive by right-clicking the folder and selecting “Copy” (or using the keyboard shortcut Ctrl+C). Alternatively, you can drag and drop the folder onto the external hard drive’s destination folder (e.g., the previously created game-specific folder).
3. Paste the Game Files: Navigate to the target folder on your external hard drive where you want the game to be stored. Right-click on an empty space in the folder and select “Paste” (or use the keyboard shortcut Ctrl+V) to transfer the game files from your computer’s internal hard drive to the external hard drive. The time to complete the transfer depends on the game’s size and the speed of your external hard drive.
4. Update Game Directory: To ensure that the game runs properly from the external hard drive, you may need to update the game’s directory or installation path. This step is necessary to redirect any file references or shortcuts to the new location. This can typically be done from within the game’s settings or preferences menu. Refer to the game’s documentation or the developer’s instructions for specific guidance.
5. Verify Game Installation: After transferring the game files, it is essential to verify its installation on the external hard drive. Launch the game from the external hard drive to confirm that it runs smoothly without any issues. If any problems arise, double-check the game’s updated directory and verify that all necessary files have been properly transferred.
6. Clear Space on Internal Hard Drive: Once you have confirmed that the transferred game is functioning correctly from the external hard drive, you can safely remove it from your computer’s internal hard drive to free up space. Uninstall the game using the appropriate uninstallation method, which may vary depending on the operating system and the specific game.
7. Repeat for Other Games: If you have additional games that you want to transfer to the external hard drive, repeat the process for each game individually. Ensure you have enough space on the external hard drive to accommodate the transferred games.
By following these steps, you can successfully transfer existing games from your computer’s internal hard drive to your external hard drive. This process will help to free up space on your computer and enable you to enjoy your games directly from the external hard drive, without compromising on performance or storage capacity.
Organizing Your Game Library on the External Hard Drive
As your game library grows on your external hard drive, it’s essential to keep it organized for easier navigation and management. Here are some tips to help you organize your game library effectively:
1. Create Categories or Genres: Consider categorizing your games based on their genres or categories. For example, you can create folders for RPGs, shooters, strategy games, or indie titles. This arrangement makes it easier to locate specific types of games and maintain a cohesive structure.
2. Use Subfolders for Game Series: If you have multiple games from the same series, create subfolders within the genre folder dedicated to that series. This way, you can keep games from the same franchise together, further enhancing organization and making it easier to find related titles.
3. Alphabetical Order: Sort your games alphabetically within each category or genre folder. This arrangement simplifies finding games quickly, especially when your library continues to expand. Additionally, consider using numerical prefixes (e.g., 01 Game A, 02 Game B) to ensure consistent sorting.
4. Add Metadata or Cover Images: To enhance the visual appeal and make your game library more engaging, consider adding metadata or cover images to your game folders. This can be done manually or with the help of software designed for organizing digital media libraries. Metadata can include details like game titles, release dates, and brief descriptions.
5. Remove Duplicates or Unwanted Games: Regularly review your game library and remove any duplicate copies or games that you no longer play or intend to play. This decluttering process helps to maintain a streamlined library and frees up valuable storage space on your external hard drive.
6. Backup Library Structure: To avoid losing your organized library in case of external hard drive failure or corruption, create backups of your game library structure. This can be done by simply copying the entire folder structure to another storage device or cloud storage service.
7. Separate Installer or Setup Files: If you have installer or setup files for your games, keep them separate from the actual game files. This allows you to reinstall games easily if needed without having to redownload the entire game again. Consider creating a separate folder for these setup files for quick access.
8. Regular Maintenance: Continuing to maintain your game library is crucial for effective organization. Regularly review and update your library, especially when adding new games or removing old ones. This ensures that your library remains tidy and easy to navigate.
By implementing these organizational tips, you can create a well-structured and easily accessible game library on your external hard drive. Whether you’re searching for a specific game, browsing through genres, or showcasing your collection to friends, an organized library will enhance your overall gaming experience.
Running Games from Your External Hard Drive
Once you have downloaded and organized games onto your external hard drive, you can easily run them directly from the external drive. Here are the steps to run games from your external hard drive:
1. Connect the External Hard Drive: Ensure that your external hard drive is properly connected to your computer via the appropriate cable or port. Additionally, ensure that the drive is recognized and accessible by your computer.
2. Launch the Game: Open the platform or launcher associated with the game you want to play. This can be the official game platform, such as Steam or Epic Games, or a dedicated game launcher for a specific game. If the game is DRM-free, you may be able to launch it directly from its installation folder on the external hard drive.
3. Locate the Game: In the platform or launcher, navigate to the game you want to play. If you have organized your game library on the external hard drive as suggested earlier, this should be relatively straightforward. Look for the game’s title within the appropriate category or genre folder.
4. Click Play: Once you have located the game, click on the “Play” or “Launch” button within the platform or launcher. This will initiate the game and start the loading process. The game will run directly from the files stored on the external hard drive.
5. Enjoy Your Game: Once the game has loaded, you can now enjoy playing it. Whether it’s an immersive single-player adventure or an intense multiplayer session, the game will run smoothly from your external hard drive, providing an enjoyable gaming experience.
6. Keep the Hard Drive Connected: It is important to keep the external hard drive connected to your computer while running the game. Removing the drive during gameplay can cause the game to crash or lose progress. Ensure a stable connection to avoid any interruption during your gaming session.
7. Close the Game: Once you have finished playing the game, exit the game properly using the in-game menu or by closing the game application. This will ensure that any progress is saved, and the game is closed correctly.
By following these steps, you can successfully run games directly from your external hard drive. Enjoy the convenience of playing your favorite games without taking up valuable space on your computer’s internal hard drive. Remember to keep the hard drive connected while playing, close the game properly when finished, and explore your diverse game library easily from the external hard drive.
Tips for Maintaining and Optimizing Your Game Library on the External Hard Drive
As your game library grows on your external hard drive, it’s essential to maintain and optimize it for better performance and organization. Here are some helpful tips to consider:
1. Regularly Update Games: Keep your games up to date by installing patches, updates, and bug fixes released by the game developers. Regular updates often include performance improvements, new features, and enhanced stability, ensuring a smoother gaming experience.
2. Optimize Storage Space: Games can occupy a significant amount of storage space, so it’s important to manage the available space on your external hard drive. Uninstall games that you no longer play or need to free up storage. Consider using utilities or software that can help you identify and remove unnecessary files or duplicate copies.
3. Back Up Your Game Saves: Game saves are valuable and often represent hours of progress. Regularly back up your game saves to another storage device or cloud storage service to prevent data loss or corruption. Many games have built-in backup options, but you can also manually copy the save files onto another location.
4. Perform Regular Disk Maintenance: Keep your external hard drive in optimal condition by performing regular disk maintenance tasks. This can include disk defragmentation, which reorganizes data for faster access, and disk error checking to identify and fix any potential issues with the drive’s file system. This maintenance can help improve game load times and overall performance.
5. Archive Infrequently Played Games: If you have games that you rarely play or are not actively playing, consider archiving them to save space on your external hard drive. You can back up the game files to another storage device or cloud storage and remove them from the external hard drive. When you want to play the game again, simply copy the files back and reinstall the game.
6. Protect Your External Hard Drive: Safeguard your external hard drive from physical damage and data loss by using a protective case or sleeve when transporting it. Avoid dropping or mishandling the drive, and always eject it safely from your computer before unplugging it to prevent data corruption or file system errors.
7. Scan for Malware Regularly: Protect your game library and computer by regularly scanning your external hard drive for malware or viruses. Use reputable antivirus software to ensure that your games and files remain free from any malicious software that could compromise your system’s security.
8. Keep Documentation and Game Keys Organized: If you have physical game boxes or digital documentation and license keys, keep them organized and accessible. This will make it easier to reinstall games or verify ownership if needed. Consider scanning physical documentation and saving digital receipts or keys securely.
By implementing these tips, you can effectively maintain and optimize your game library on your external hard drive. Regularly updating games, optimizing storage space, backing up game saves, performing disk maintenance, archiving infrequently played games, protecting your external hard drive, scanning for malware, and organizing documentation and game keys will ensure a smooth and enjoyable gaming experience.
Conclusion
Downloading and storing games onto an external hard drive offers numerous benefits, including expanded storage capacity, improved performance, portability, and easy game transfers. By following the steps outlined in this article, you can successfully download games onto your external hard drive, transfer existing games, and organize your game library for a seamless gaming experience.
Remember to always check the system requirements for downloaded games to ensure compatibility with your computer, and to verify the legitimacy and reputation of websites before downloading games. Running games directly from your external hard drive eliminates the need for limited internal storage and allows you to enjoy your gaming collection without sacrificing performance or space.
Maintaining and optimizing your game library on the external hard drive is crucial for efficient storage management. Remove unnecessary games, regularly update games and drivers, back up your game saves, and perform disk maintenance to keep your game library running smoothly and to prevent data loss.
With a well-organized and optimized game library on your external hard drive, you can easily access and enjoy your favorite games at any time. Take advantage of the portability of the external hard drive to play games on different computers or locations effortlessly.
By following the tips and steps provided in this article, you can enhance your gaming experience, increase storage capacity, and maintain a well-organized game library. Embrace the benefits of downloading games onto an external hard drive and elevate your gaming journey to new heights.