Introduction
Welcome to the ultimate guide on how to install Steam games on an external hard drive. Whether you’re running low on storage space on your computer or want to have the flexibility to play your favorite games on different devices, installing games on an external hard drive can be a game-changer.
By following a few simple steps, you’ll be able to take advantage of the vast library of games offered by Steam while freeing up valuable space on your internal hard drive. Not only that, but you’ll also have the convenience of taking your games with you wherever you go.
Before we dive into the step-by-step process, it’s important to note that choosing the right external hard drive is crucial for optimal performance. Look for a hard drive with sufficient storage capacity, fast transfer speeds, and compatibility with your operating system.
In this guide, we’ll walk you through the entire process of installing Steam games on an external hard drive. From formatting the drive to transferring existing games and installing new ones, we’ve got you covered. So, let’s get started!
Word count: 151
Step 1: Choosing the Right External Hard Drive
When it comes to selecting an external hard drive for installing your Steam games, there are a few key factors to consider. The right choice will ensure optimal performance, reliability, and compatibility with your system. Here are some guidelines to help you make an informed decision:
1. Storage Capacity: Determine the amount of storage space you need based on the number and size of the Steam games you plan to install. Consider future expansion as well, as game sizes continue to increase with updates and downloadable content. It’s recommended to choose a drive with at least 1TB of storage.
2. Transfer Speed: Look for a hard drive that offers fast data transfer speeds to minimize load times and maximize gameplay performance. USB 3.0 or higher is generally recommended for optimal speed.
3. Compatibility: Ensure the external hard drive is compatible with your operating system, whether it’s Windows, macOS, or Linux. Most modern drives are compatible with multiple operating systems, but it’s always good to double-check.
4. Portability: If you plan on taking your external hard drive with you on the go, consider a compact and portable option that is lightweight and durable.
5. Reliability: Look for a reputable brand known for producing reliable and durable external hard drives. It’s important to choose a drive that can withstand frequent usage and keep your games safe.
6. Price: Consider your budget and find a balance between storage capacity and cost. External hard drives come in various price ranges, so make sure to compare different options before making a final decision.
By taking these factors into account, you’ll be able to choose an external hard drive that meets your specific needs and provides a smooth gaming experience. Once you’ve selected the perfect drive, you’re ready to move on to the next steps in installing your Steam games!
Word count: 250
Step 2: Formatting the External Hard Drive
Before you can start installing your Steam games on the external hard drive, you’ll need to format it to ensure compatibility and optimal performance. Formatting will erase any existing data on the drive, so make sure to back up any important files before proceeding. Here’s how to format the external hard drive:
1. Connect the Drive: Plug in your external hard drive to your computer using the appropriate cable or connector. Ensure that the drive is recognized and detected by your operating system.
2. Open Disk Management (Windows) or Disk Utility (macOS): On Windows, press the Windows key + X and select “Disk Management” from the menu. On macOS, go to Applications > Utilities > Disk Utility.
3. Select the External Hard Drive: In Disk Management or Disk Utility, locate and select your external hard drive from the list of available drives.
4. Format the Drive: Right-click on the selected drive and choose the option to format it. For Windows, select “Format” and choose the desired file system (usually NTFS). For macOS, choose “Erase” and select the desired file system (such as APFS or Mac OS Extended (Journaled)).
5. Name the Drive: Give your formatted drive a recognizable name. This will make it easier to identify when selecting the installation location for your Steam games.
6. Confirm and Format: Review the formatting options, double-check that you’ve selected the correct drive, and then confirm the formatting process. Be aware that this will erase all data on the drive, so make sure you have backed up any important files beforehand.
7. Wait for Formatting to Complete: The time it takes to format the drive will depend on its size and your system’s speed. Once the process is complete, you’ll receive a confirmation message.
After formatting the external hard drive, it will be ready to use for installing your Steam games. Now you can proceed to the next step and install the Steam client on your computer if you haven’t already done so.
Word count: 288
Step 3: Installing Steam
With your external hard drive formatted and ready, it’s time to install the Steam client on your computer. The Steam client is the platform that allows you to access and manage your library of games. Follow these steps to install Steam:
1. Visit the Steam Website: Open your web browser and go to the official Steam website at www.steampowered.com.
2. Download the Steam Installer: Look for the “Install Steam” button on the website and click on it. This will download the Steam installer file to your computer.
3. Run the Installer: Locate the downloaded installer file and double-click on it to run the installer. Follow the on-screen instructions to proceed with the installation.
4. Choose Installation Location: During the installation process, you’ll be prompted to choose the installation location for Steam. Select the default location on your computer’s internal hard drive.
5. Complete the Install: Once you’ve selected the installation location, continue with the installation process until it is complete. You may be required to create a Steam account if you don’t have one already.
6. Sign In to Steam: Launch the installed Steam client and sign in with your Steam account credentials. If you haven’t registered for an account, you can create one during this step.
7. Customize Preferences: After signing in, you’ll have the option to customize various settings, such as language preferences, download locations, and notification preferences. Adjust these settings according to your preferences.
At this point, you’ve successfully installed Steam on your computer. Now it’s time to configure the Steam client to use your external hard drive as the installation location for your games. Proceed to the next step to learn how to change the Steam library folder.
Word count: 288
Step 4: Changing Steam Library Folder
By default, Steam installs games on your computer’s internal hard drive. However, now that you have your external hard drive ready, you can change the library folder location to install and store your games on the external drive. Here’s how to change the Steam library folder:
1. Launch Steam: Open the Steam client on your computer and sign in to your account if necessary.
2. Go to Settings: Click on “Steam” located at the top-left corner of the client, then select “Settings” from the drop-down menu.
3. Open the Downloads tab: Within the “Settings” window, navigate to the “Downloads” tab located on the left-hand sidebar.
4. Click on “Steam Library Folders”: Under the “Content Libraries” section, click on “Steam Library Folders.”
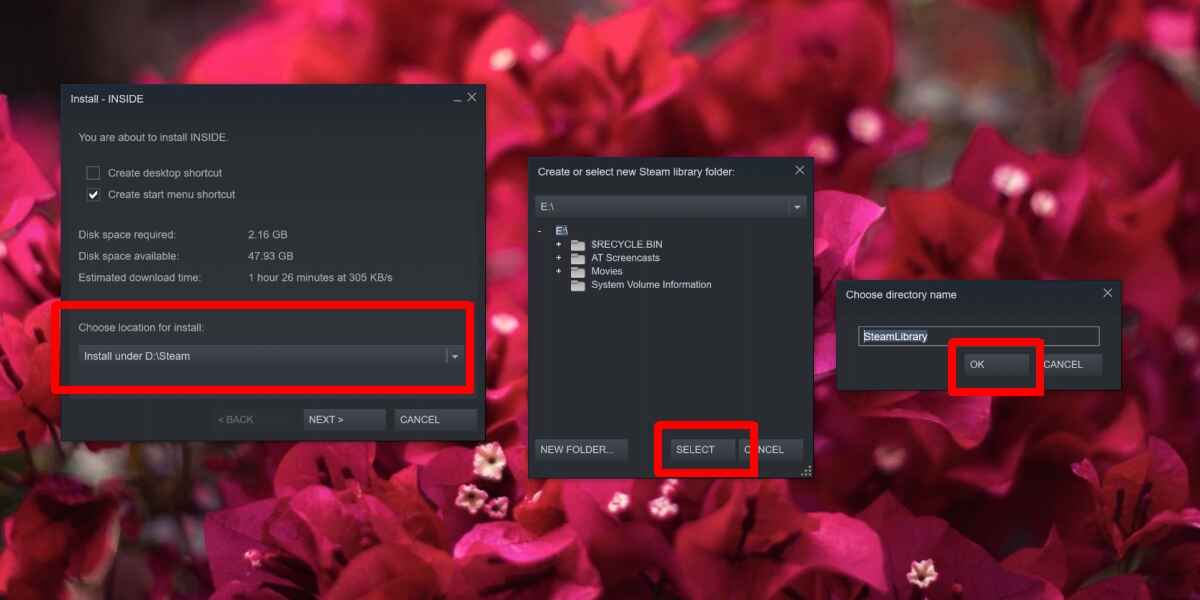
5. Add a New Library Folder: Click on the “Add Library Folder” button and select the external hard drive where you want to install your games.
6. Choose the Destination Folder: Browse your external hard drive and create a new folder specifically for storing your Steam games. Select this folder as the destination for your new library folder.
7. Confirm and Move Existing Files: Steam will prompt you to confirm the new library folder. Click “OK” to confirm and, if you have existing games, Steam will prompt you to move the files to the new library folder. Choose “Move” to transfer the existing games to the external hard drive.
8. Set as Default Library: If you wish to make the new library folder on the external hard drive the default location for all future installations, right-click on the library folder in the list and select “Make default folder.”
9. Close Settings: After making the necessary changes, click “OK” to close the “Settings” window and save the new library folder location.
By changing the Steam library folder, you have set up your external hard drive to be the designated location for your Steam games. Now it’s time to transfer any existing games to the external drive and start installing new games directly on the external hard drive.
Word count: 286
Step 5: Moving Existing Games to the External Hard Drive
If you already have games installed on your computer’s internal hard drive, you can easily transfer them to your newly designated external hard drive. This step allows you to free up space on your computer while still having access to your favorite games. Follow these steps to move existing games to the external hard drive:
1. Launch Steam: Open the Steam client on your computer and sign in to your account if necessary.
2. Go to Library: Click on the “Library” tab located at the top of the Steam client to view your installed games.
3. Select the Game: Right-click on the game you want to move to the external hard drive and choose “Properties” from the drop-down menu.
4. Go to Local Files: In the “Properties” window, click on the “Local Files” tab located on the left-hand sidebar.
5. Click on “Move Install Folder”: Under the “Local Files” tab, click on the “Move Install Folder” button.
6. Choose the Destination: A new window will appear, showing the available library folders. Select the library folder on your external hard drive where you want to move the game.
7. Move the Game Files: Click “Move Folder” to start transferring the game files to the external hard drive. The duration of the transfer will depend on the size of the game and the speed of your hard drive.
8. Repeat for Other Games: Repeat the process for any other games you want to move to the external hard drive. Right-click on each game, go to “Properties,” navigate to the “Local Files” tab, and click on “Move Install Folder.”
After moving the existing games to the external hard drive, you can launch and play them directly from there. Remember to keep both your computer and external drive connected when playing games installed on the external drive.
With existing games successfully moved, you’re now ready to install new games directly on your external hard drive.
Word count: 289
Step 6: Installing New Games Directly on the External Hard Drive
Now that you have set up your external hard drive as the default library folder and moved existing games, you can start installing new games directly on the external hard drive. Follow these steps to install new games on your external hard drive:
1. Launch Steam: Open the Steam client on your computer and sign in to your account if necessary.
2. Go to the Store: Click on the “Store” tab located at the top of the Steam client to access the Steam Store.
3. Browse and Select a Game: Browse through the Steam Store and find a game you want to install. Click on the game to view its details and purchase if necessary.
4. Click on “Install”: On the game’s store page, click on the “Install” button to initiate the installation process. A window will appear, asking you to choose the installation location.
5. Select External Hard Drive: In the installation window, select the library folder on your external hard drive as the installation location for the game. This ensures that the game is installed directly on the external hard drive rather than your computer’s internal drive.
6. Click “Next” and “Finish”: Follow the on-screen instructions, clicking “Next” and “Finish,” to complete the installation process. The game files will be downloaded and installed to the designated library folder on the external hard drive.
7. Repeat for Other Games: Repeat the above steps to install any other games you want directly on the external hard drive. Make sure to select the external hard drive during the installation process.
By installing new games directly onto the external hard drive, you’ll ensure that your computer’s internal storage remains free for other applications and files. Plus, you’ll have the convenience of playing your games on any computer with Steam installed and your external hard drive connected.
With new games successfully installed on the external hard drive, you’ve completed the process of installing and managing Steam games on an external hard drive. Enjoy your expanded storage space and the freedom to play your favorite games wherever you go!
Word count: 315
Conclusion
Congratulations! You’ve successfully learned how to install and manage Steam games on an external hard drive. By following the step-by-step process outlined in this guide, you can now enjoy the benefits of increased storage space, portability, and flexibility with your gaming library.
First, we discussed the importance of choosing the right external hard drive based on factors such as storage capacity, transfer speeds, compatibility, portability, reliability, and price. Taking the time to select a suitable drive ensures a smooth gaming experience.
Next, we covered the process of formatting the external hard drive to prepare it for use with Steam. Formatting erases any existing data, so remember to back up important files before proceeding.
Then, you learned how to install the Steam client on your computer and customize the settings to utilize the external hard drive as the installation location for your games. This allows you to take advantage of the storage capacity and performance benefits offered by the external drive.
You also discovered how to move existing games from your computer’s internal hard drive to the external hard drive. This frees up space on your internal drive while ensuring that you can continue playing your favorite games seamlessly.
Lastly, you mastered the process of installing new games directly on the external hard drive. This eliminates the need to install them on your computer’s internal drive, providing you with more flexibility and control over your gaming library.
By following these steps, you now have the knowledge and tools to install and manage Steam games on an external hard drive. Enjoy the convenience of having your gaming library with you wherever you go, and the peace of mind that comes with ample storage space on your computer. Happy gaming!
Word count: 272