Introduction
Welcome to the world of gaming! Whether you’re a casual gamer or a hardcore enthusiast, chances are you have a growing collection of Steam games on your computer. However, as your library expands, you may find yourself running out of storage space on your internal hard drive. Fear not! In this guide, we’ll show you how to download Steam games to an external hard drive, freeing up valuable space on your computer without sacrificing your gaming experience.
By following a few simple steps, you can easily transfer your games to an external hard drive and continue playing them without any hassle. Not only will this give you more storage space on your computer, but it will also ensure that your games are safely backed up and easily accessible wherever you go.
Before we dive into the nitty-gritty details, there are a few things you’ll need to keep in mind. Firstly, make sure you have a compatible external hard drive with enough storage capacity to accommodate your game library. Secondly, ensure that your external hard drive is properly formatted and ready to use. If you’re unsure about how to format your hard drive, don’t worry – we’ll cover that in the next section.
So, if you’re ready to reclaim storage space on your computer and take your games on the go, let’s get started with formatting your external hard drive.
Step 1: Formatting the External Hard Drive
The first step in downloading Steam games to an external hard drive is to ensure that the drive is properly formatted. Formatting the drive prepares it for use with your computer and ensures compatibility. Here’s how you can format your external hard drive:
- Connect your external hard drive to your computer using the appropriate cable.
- Open the “File Explorer” on your Windows computer or the “Finder” on your Mac.
- Locate the external hard drive in the list of available drives.
- Right-click on the drive and select “Format” or “Erase” (Mac).
- Choose the desired file system for your external hard drive. For Windows, NTFS is the recommended file system, while for Mac, you can select either Mac OS Extended (Journaled) or APFS.
- Give your drive a name and click “Format” or “Erase” to begin the formatting process. Note that formatting will erase all data on the drive, so make sure to back up any important files before proceeding.
- Wait for the formatting process to complete. This may take a few minutes.
- Once the formatting is finished, your external hard drive is ready to use.
By formatting your external hard drive, you have prepared it for use with your computer. Now you can move on to the next step, which is installing Steam on the external hard drive.
Step 2: Installing Steam on the External Hard Drive
Now that your external hard drive is formatted and ready to go, it’s time to install Steam on the drive itself. By doing this, you’ll ensure that all your games and associated files are stored directly on the external hard drive, freeing up space on your computer’s internal storage. Follow these steps to install Steam on your external hard drive:
- Open your web browser and visit the official Steam website (https://store.steampowered.com).
- Click on the “Install Steam” button located at the top right corner of the page.
- Once the Steam installer is downloaded, launch it.
- During the installation process, you’ll be prompted to choose the installation location for Steam. Select your external hard drive as the destination.
- Follow the on-screen instructions to complete the installation. It may take a few minutes for the installation to finish.
- Once the installation is complete, launch Steam from the external hard drive.
- Sign in to your Steam account or create a new one if you don’t have an account yet.
- After signing in, Steam will create the necessary folders and files on your external hard drive.
By installing Steam on your external hard drive, you’re ensuring that any games you download or install will be stored directly on the drive instead of your computer’s internal storage. This allows you to keep your game library separate from your computer’s limited storage space, giving you more freedom to download and play your favorite games.
With Steam successfully installed on your external hard drive, you can now move on to the next step, which is changing the Steam library folders.
Step 3: Changing Steam Library Folders
Now that you have Steam installed on your external hard drive, it’s time to configure it to recognize the new location as the default library for your games. This will ensure that any games you download or install will be saved directly to the external hard drive rather than your computer’s internal storage. Here’s how you can change the Steam library folders:
- Launch Steam from your external hard drive.
- Click on the “Steam” menu at the top left corner of the Steam client and select “Settings” from the dropdown menu.
- In the Settings window, click on the “Downloads” category located in the left sidebar.
- Under the “Content Libraries” section, click on “Steam Library Folders”.
- Click on the “Add Library Folder” button.
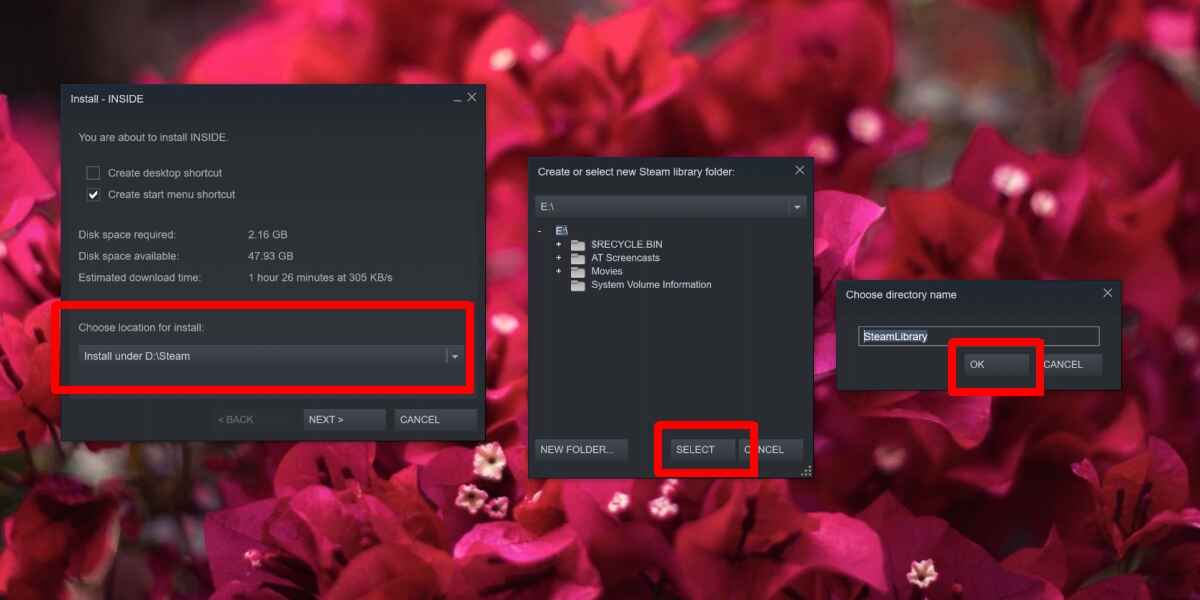
- Choose the location of your external hard drive from the list of available drives and click “New Folder” to create a new folder on the external hard drive specifically for your Steam games.
- Give the new folder a name and click “OK”.
- After the folder is created, click “Select” to choose the new folder as your default library folder for Steam.
- Finally, click “OK” to save the changes.
By changing the Steam library folders, you’re redirecting the default location for your game installations to the external hard drive instead of your computer’s internal storage. This ensures that any new games you download or install will be saved directly to the external hard drive, saving space on your computer and keeping your game library organized.
Now that you’ve successfully changed the Steam library folders, you’re ready to move on to the next step, which is changing the download locations for Steam games.
Step 4: Changing Download Locations for Steam Games
Now that your Steam library is set up on the external hard drive, it’s time to configure the download locations for your games. By changing the download locations, you can ensure that any new games you download will be saved directly to the external hard drive, minimizing the use of your computer’s internal storage. Here’s how you can change the download locations for Steam games:
- Launch Steam from your external hard drive.
- Click on the “Steam” menu at the top left corner of the Steam client and select “Settings” from the dropdown menu.
- In the Settings window, click on the “Downloads” category located in the left sidebar.
- Under the “Content Libraries” section, click on “Steam Library Folders”.
- Ensure that the external hard drive is selected as the default library folder.
- Under the “Download Region” section, click on the drop-down menu and select your preferred download location.
- Next, under the “Steam Library Folders” section, click on the “Steam Library Folders” button.
- Ensure that the new folder on your external hard drive is selected as the default download location.
- Click “OK” to save the changes.
By changing the download locations for Steam games, you’re instructing the Steam client to download any new games or updates directly to the external hard drive instead of your computer’s internal storage. This prevents your computer from quickly running out of space and ensures that your games are safely stored on the external hard drive.
With the download locations for Steam games successfully changed, you’re now ready to move on to the next step, which involves moving existing Steam games to the external hard drive.
Step 5: Moving Existing Steam Games to the External Hard Drive
If you have already downloaded and installed games on your computer’s internal storage, you can easily move them to the external hard drive to free up space. Here’s a step-by-step guide on how to move existing Steam games to the external hard drive:
- Launch Steam from your external hard drive.
- Click on the “Library” tab at the top of the Steam client to view your game library.
- Right-click on the game you want to move and select “Properties”.
- In the properties window, click on the “Local Files” tab.
- Click on the “Move Install Folder” button.
- Select the new folder on your external hard drive where you want to move the game.
- Click “Move Folder” to start the process of moving the game files to the external hard drive. This may take some time depending on the size of the game.
- Once the move is complete, Steam will update the game’s location in your library.
- Repeat the process for each game you want to move to the external hard drive.
By moving existing Steam games to the external hard drive, you are transferring the game files from your computer’s internal storage to the external hard drive. This not only frees up space on your computer but also ensures that your games remain accessible and playable from the external hard drive.
Now that you’ve successfully moved your existing Steam games to the external hard drive, you can proceed to the final step, which is downloading new Steam games directly to the external hard drive.
Step 6: Downloading New Steam Games to the External Hard Drive
With everything set up and your existing games safely stored on the external hard drive, you can now download new games directly to the drive. This ensures that your computer’s internal storage remains free, and all future games are automatically stored on the external hard drive. Follow these steps to download new Steam games to the external hard drive:
- Launch Steam from your external hard drive.
- Browse the Steam Store to find the game you want to download.
- Click on the game’s store page to view its details and click on the “Add to Cart” or “Buy” button.
- Complete the purchase process by following the on-screen instructions.
- Once the game is purchased, click on the “Library” tab at the top of the Steam client to view your game library.
- Click on the game you just purchased and click on the “Install” button.
- In the installation window, select the external hard drive as the destination for the game installation.
- Click “Next” and follow the on-screen instructions to complete the installation process.
- Once the installation is complete, the game is ready to be played directly from the external hard drive.
By downloading new games directly to the external hard drive, you’re ensuring that your computer’s internal storage remains free and uncluttered. All new games will be saved and installed on the external hard drive by default, making it convenient and simple to manage your expanding game library.
Congratulations! You have successfully learned how to download and manage Steam games on an external hard drive. With your games safely stored on the drive, you can enjoy gaming without worrying about limited storage space on your computer.
Conclusion
Managing your Steam game library can be a breeze with the help of an external hard drive. By following the steps outlined in this guide, you can successfully download, install, and store your Steam games on the external hard drive, freeing up valuable space on your computer’s internal storage.
We started by formatting the external hard drive to ensure compatibility with your computer and then proceeded to install Steam directly on the drive. With Steam installed, we changed the library folders and download locations to ensure that all new games would be saved to the external hard drive by default.
Furthermore, we learned how to move existing Steam games from the internal storage to the external hard drive, ensuring access and reducing clutter on your computer. Finally, we discussed the process of downloading new Steam games directly to the external hard drive.
By implementing these steps, you can enjoy a spacious game library without worrying about running out of storage space. Additionally, you’ll have the flexibility to take your games with you and play on other computers with the same external hard drive.
Now that you’re equipped with the knowledge and steps to download Steam games to an external hard drive, it’s time to put it into action and organize your gaming experience. So, go ahead, grab that external hard drive, follow the steps outlined in this guide, and enjoy gaming to the fullest!