Introduction
Steam is a popular digital distribution platform that offers a vast library of games for PC gamers to enjoy. With the increasing size and complexity of modern games, it’s not uncommon to run out of storage space on your primary hard drive. If you find yourself in this situation, fear not! Steam provides an easy solution to download and store games on a different hard drive.
By following a few simple steps, you can conveniently manage your game installations and optimize your storage space. Whether you want to download games directly to an external hard drive or move existing games to a different drive, this guide will walk you through the process.
In this article, we will outline a step-by-step guide on how to download Steam games to a different hard drive. We’ll cover everything from assessing available space on your different hard drive to configuring Steam settings and choosing the new installation location. By the end of this guide, you’ll have the necessary knowledge to effectively manage your game library on multiple hard drives.
Before we dive into the steps, it’s worth noting that Steam allows you to have multiple game library folders on different drives. This means you can keep some games on your primary hard drive while reserving another drive for larger installations or games you don’t play as frequently.
Without further ado, let’s get started on downloading Steam games to a different hard drive and expanding your gaming possibilities!
Step 1: Determine the Available Space on Your Different Hard Drive
Before you start downloading Steam games to a different hard drive, it’s important to assess the amount of space available on the drive. This will help you determine if it can accommodate your desired game installations.
To check the available space on your different hard drive, follow these steps:
- Open the File Explorer on your computer by pressing the Windows key and E simultaneously.
- In the File Explorer window, locate and click on your different hard drive from the left-hand sidebar. It is usually labeled with a letter such as D:, E:, or F:.
- Once you have accessed the different hard drive, look at the bottom of the File Explorer window to see the available free space. This will be displayed in gigabytes (GB) or terabytes (TB).
By knowing how much space is available on your different hard drive, you can ensure that you have enough capacity to store the games you want to download. Keep in mind that newer games and larger installations can require significant storage space, so it’s essential to check that your different hard drive has enough room for your desired games.
As a rule of thumb, it’s always a good idea to have some extra space available on your hard drive to account for future game updates, patches, or new installations. This will prevent you from running out of space and allow you to continue downloading and enjoying new games without any interruptions.
Once you have determined the available space on your different hard drive, you are ready to proceed to the next step in downloading Steam games to a different hard drive:
Step 2: Open Steam and Access the Settings Menu
After assessing the available space on your different hard drive, it’s time to open Steam and navigate to the settings menu. This is where you’ll find the options to configure your game library folders and choose the installation location for your Steam games.
Follow these steps to open Steam and access the settings menu:
- Launch the Steam application on your computer. You can find it by searching for “Steam” in the Start menu or by double-clicking the Steam shortcut on your desktop.
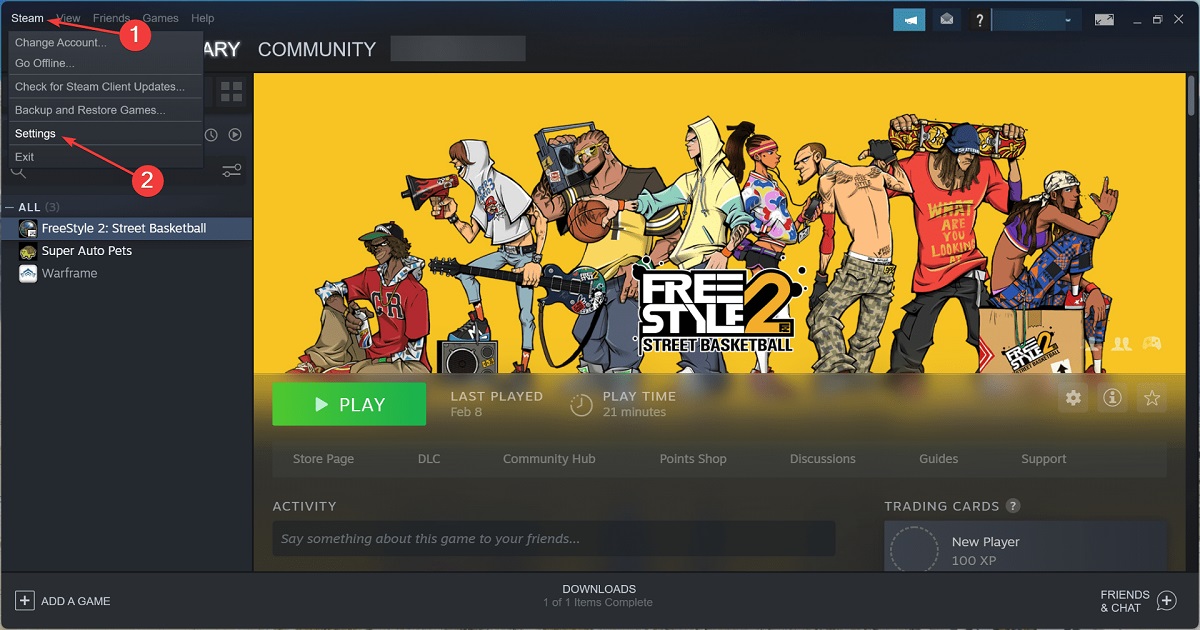
- Once Steam is open, locate the “Steam” menu at the top-left corner of the window.
- Click on the “Steam” menu to reveal a drop-down list of options.
- In the drop-down list, select “Settings.” This will open the Steam settings menu.
By accessing the settings menu, you gain access to the various configuration options provided by Steam. This is where you can customize your Steam experience, including managing your game library folders and specifying the installation location for your games.
Next, we will navigate to the appropriate tab within the settings menu to continue the process of downloading Steam games to a different hard drive. Stay tuned for the next step, where we delve into the specific settings and options within the Steam settings menu.
Step 3: Navigate to the “Downloads” Tab
Once you’ve accessed the Steam settings menu, it’s time to navigate to the “Downloads” tab. This is where you’ll find the options related to managing your game installations and library folders.
Follow these steps to locate the “Downloads” tab:
- In the Steam settings menu, you’ll see a list of tabs on the left-hand side. Click on the “Downloads” tab.
- The “Downloads” tab contains a variety of settings related to the downloading and updating of your Steam games.
Within the “Downloads” tab, you’ll find options to control factors such as download speed, automatic updates, and content libraries. It’s important to navigate to this tab to access the necessary settings for managing your game library folders and configuring the installation location of your Steam games.
By reaching the “Downloads” tab, you’re one step closer to downloading Steam games to your different hard drive. In the next step, we’ll explore the “Steam Library Folders” button, which is essential for adding a new library folder on your different hard drive.
Step 4: Click on the “Steam Library Folders” Button
Now that you’re on the “Downloads” tab within the Steam settings menu, it’s time to click on the “Steam Library Folders” button. This button allows you to manage the locations where Steam stores your game installations.
Follow these steps to access the “Steam Library Folders” button:
- In the “Downloads” tab, look for the “Steam Library Folders” button and click on it. It is located near the top of the window.
- Clicking on this button will open a new window that displays your current Steam library folders.
The “Steam Library Folders” window is where you can view and manage your existing library folders. Steam allows you to have multiple library folders on different drives, giving you the flexibility to store your games wherever you choose.
Within this window, you can add new library folders, remove existing ones, and even move games between different library folders. This functionality is essential for our goal of downloading Steam games to a different hard drive.
In the next step, we will learn how to add a new Steam library folder on your different hard drive, which will enable you to install and store games on that specific drive.
Step 5: Add a New Steam Library Folder on the Different Hard Drive
After clicking on the “Steam Library Folders” button, it’s time to add a new library folder on your different hard drive. This will allow you to designate a specific location for installing and storing your Steam games.
Follow these steps to add a new Steam library folder on your different hard drive:
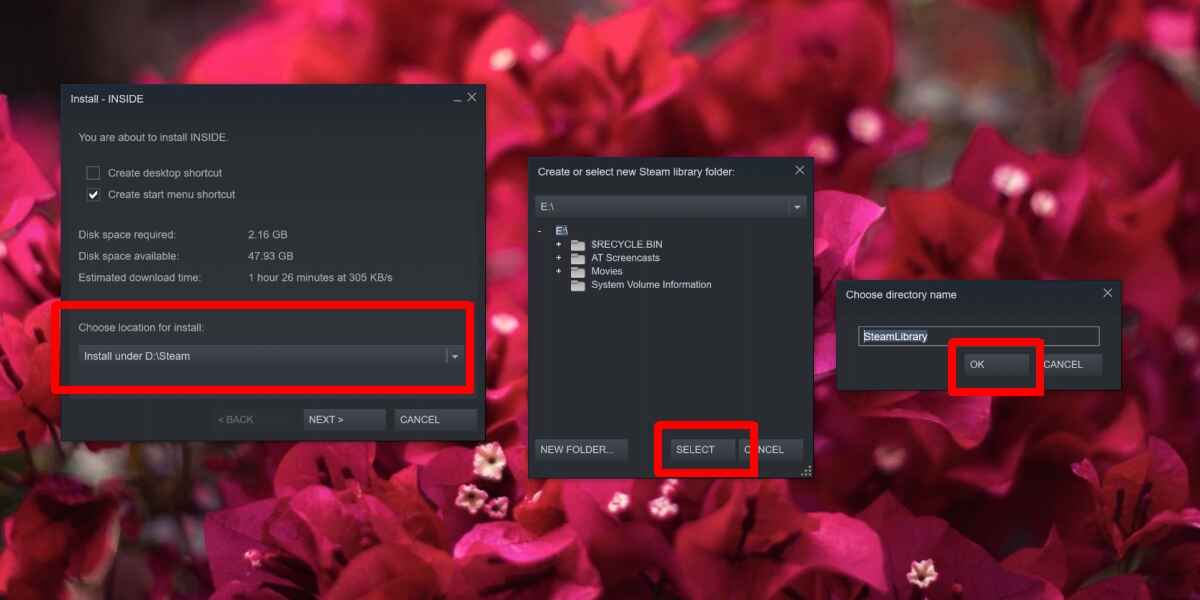
- In the “Steam Library Folders” window, click on the “Add Library Folder” button. This button is located at the bottom-left corner of the window.
- A new window will appear, prompting you to choose a location for the new library folder.
- Browse your computer to locate your different hard drive, then select it as the destination for the new library folder.
- Click on the “New Folder” button to create a new folder on your different hard drive.
- Give the new folder a descriptive name, such as “Steam Games” or “Steam Library.”
- Click “OK” to confirm the creation of the new library folder on your different hard drive.
By adding a new library folder on your different hard drive, you’ve successfully created a dedicated space for your Steam games. This allows you to separate your game installations from your primary hard drive and organize them effectively.
It’s worth noting that you can add multiple library folders on different drives if desired. This enables you to spread out your game installations across various drives, optimizing storage space and improving performance.
In the next step, we’ll configure the default installation location to ensure future game downloads are saved to the new library folder on your different hard drive.
Step 6: Choose the Different Hard Drive as the Default Installation Location
With the new Steam library folder on your different hard drive created, it’s time to configure it as the default installation location for your Steam games. This will ensure that any new game you download will be installed on the designated drive automatically.
Follow these steps to choose the different hard drive as the default installation location:
- In the “Steam Library Folders” window, locate the newly added library folder on your different hard drive.
- Right-click on the library folder and select “Make Default Folder” from the context menu.
By making the different hard drive library folder the default, any new game you download from this point forward will automatically be installed in this location. This eliminates the need to manually choose the installation location for each game and ensures consistent storage on your preferred drive.
It’s worth mentioning that you can still choose to install specific games to other library folders if desired. During the installation process of any game, Steam will give you the option to select the installation location manually. However, by setting the different hard drive library folder as the default, you streamline the process and minimize manual intervention.
Now that you’ve chosen the different hard drive as the default installation location, you’re ready to start downloading Steam games and enjoy the benefits of having a dedicated space for your gaming library.
In the next step, we’ll cover the process of downloading and installing Steam games to the different hard drive using the newly configured settings.
Step 7: Start Downloading Steam Games to the Different Hard Drive
With the default installation location set to the different hard drive, you can now begin downloading and installing your favorite Steam games directly to this designated location. Follow these steps to start downloading Steam games to the different hard drive:
- Open the Steam application on your computer and navigate to the game you want to download. You can browse through the Steam store or access your library to find the desired game.
- Click on the game title to view its store page or library entry.
- On the game’s store page or library entry, click on the blue “Install” button to initiate the download.
- A window will appear, displaying the installation location. Ensure that the different hard drive library folder is selected as the destination.
- Click “Next” to confirm the installation location and proceed with the download.
- Wait for the game to download and install. The progress will be displayed in the Steam client.
Once the download and installation are complete, the game will be stored on your different hard drive, ready to be played whenever you desire. You can access and launch the game directly from your Steam library.
Remember, with the different hard drive designated as the default installation location, any new games you download in the future will automatically be saved to this drive, ensuring efficient storage management and easy access to your favorite titles.
By following these steps, you have successfully learned how to download and install Steam games to a different hard drive. This method allows you to expand your game library without worrying about running out of space on your primary drive.
Now that you have this knowledge, you can enjoy the convenience and flexibility of managing your game installations across multiple hard drives, optimizing storage capacity, and enhancing your gaming experience.
Go ahead and start downloading your favorite Steam games to the different hard drive and immerse yourself in the world of gaming!
Conclusion
Managing your Steam game installations and storage can be a breeze with the ability to download games to a different hard drive. By following the steps outlined in this guide, you can take control of your game library and ensure that you have enough space for all your favorite titles.
The process begins by assessing the available space on your different hard drive, allowing you to determine if it can accommodate your desired game installations. You can then open Steam, access the settings menu, and navigate to the “Downloads” tab, where you can find options related to managing your game library folders.
Clicking on the “Steam Library Folders” button provides the opportunity to add a new library folder on your different hard drive. This gives you the freedom to designate a specific location for your game installations.
After adding the new library folder, you can choose the different hard drive as the default installation location. This ensures that any new games you download will be automatically installed on the designated drive.
Finally, you can start downloading Steam games to the different hard drive by opening the Steam application, locating the desired game, and initiating the download process with the correct installation location selected.
By following these steps, you can effectively manage your game library, optimize storage space, and enhance your gaming experience.
Now that you have the knowledge and understanding of how to download Steam games to a different hard drive, go ahead and enjoy the benefits of convenient storage management and easy access to your favorite games.
Expand your gaming possibilities and make the most of your available storage space. With a dedicated different hard drive for your Steam games, you’ll always have room for new adventures and exciting gameplay.
Happy gaming!