Introduction
Welcome to this article on how to delete shared photos on Google Photos. If you are an avid user of Google Photos, chances are you have shared photos with others at some point. While sharing photos can be a great way to connect and collaborate with friends, family, or colleagues, there may come a time when you need to delete those shared photos for various reasons. In this guide, we will walk you through the steps to delete shared photos from Google Photos.
Google Photos is a popular cloud-based photo storage and sharing service offered by Google. It allows users to store, organize, and share their photos and videos easily. When you share a photo with someone on Google Photos, it creates a link or an album that enables them to view the photos. However, sometimes you may want to remove these shared photos for privacy reasons, to free up storage space, or simply because you no longer need them to be accessible to others.
In the following sections, we will explore the different methods you can use to delete shared photos on Google Photos. Whether you want to remove photos from a shared album, remove them from your personal library, or delete the shared album entirely, we have you covered.
Keep in mind that the specific steps may vary slightly depending on the version of Google Photos you are using, as updates are periodically released to enhance the user experience. However, the overall process should remain fairly consistent across different versions.
So, let’s dive in and learn how to delete shared photos on Google Photos!
Understanding Shared Photos in Google Photos
Before we delve into the methods of deleting shared photos, it’s important to understand how shared photos work in Google Photos. When you share a photo with someone, Google Photos creates a link or an album that allows them to access and view those photos. This can be useful for sharing vacation pictures, collaborating on a project, or simply sharing memories with loved ones.
Shared photos in Google Photos can be organized into albums, which can be shared with multiple people. These shared albums provide a convenient way to group and organize photos for collaborative purposes. When someone is invited to a shared album, they can view, comment on, and even add photos to the album, depending on the permissions set by the album owner.
It’s important to note that when you share a photo or an album, the original photos are not actually moved or duplicated. Rather, Google Photos generates a link that allows the recipient to access the shared content without altering the source files. This means that deleting a shared photo or album does not delete the original files from your personal library if you are the owner.
While sharing photos can be a fantastic way to connect and collaborate, there may be instances where you want to revoke access to the shared content. This could be due to privacy concerns, changes in the collaboration, or simply because you no longer want the photos to be accessible to others. Whatever the reason may be, Google Photos provides multiple methods to delete shared photos and albums, which we will explore in the following sections.
Now that we have a basic understanding of shared photos in Google Photos, let’s move on to the methods you can use to delete these shared photos and albums.
Reasons to Delete Shared Photos
While sharing photos on Google Photos can be a convenient and enjoyable experience, there are several reasons why you may need to delete shared photos from your account. Here are a few common scenarios where deleting shared photos becomes necessary:
1. Privacy concerns: You may have shared photos with someone, but now wish to revoke their access due to privacy reasons. Whether it’s a personal matter, sensitive information, or simply a change in your relationship with the person, deleting shared photos ensures that your content remains private and only accessible to those you choose.
2. Collaboration completion: If you have collaborated with others on a specific project or event and no longer require their input or access to the shared photos, deleting them is a way to wrap up the collaborative process. By removing shared photos, you can ensure that the project is finalized and that further changes or additions are no longer needed.
3. Change in circumstances: There may be instances where the context or circumstances surrounding the shared photos have changed. This could include a change in your relationship with the person, the photos no longer being relevant, or simply wanting to declutter your shared albums. Deleting shared photos allows you to maintain control over the content you have shared, ensuring that it reflects your current situation.
4. Freeing up storage space: Deleting shared photos can help free up storage space in your Google Photos account. If you have a large number of shared photos or albums, they can take up valuable storage space over time. By removing them, you can make room for new photos or videos without having to worry about running out of storage.
5. Organizational purposes: As your collection of shared photos grows, you may find the need to reorganize or streamline your albums. Deleting unnecessary or outdated shared photos can help keep your albums tidy and easy to navigate. This can be particularly helpful if you frequently collaborate with different people on various projects or events.
These are just a few examples of why you may want to delete shared photos on Google Photos. The specific reasons will vary depending on your personal circumstances and preferences. By removing shared photos, you can maintain control over your content, safeguard your privacy, and ensure that your albums stay organized and relevant.
How to Delete Shared Photos on Google Photos
Now that we understand the importance of deleting shared photos, let’s explore the different methods you can use to remove shared photos from your Google Photos account. Depending on your specific needs and preferences, you can choose from the following methods:
Method 1: Deleting Shared Photos from the Shared Album:
If you have shared photos within an album, you can delete them directly from the shared album. Here’s how:
- Open the shared album in Google Photos.
- Select the photos you wish to delete.
- Click on the three-dot menu icon and choose the “Delete” option.
- Confirm the deletion when prompted.
Method 2: Removing Shared Photos from Your Library:
If you want to delete shared photos but keep them in your personal library, this method is ideal for you:
- Go to your Google Photos library.
- Locate the shared photo you want to delete.
- Click on the three-dot menu icon and select the “Remove from album” option.
- The photo will be removed from the shared album, but it will still be present in your library.
Method 3: Removing the Shared Album Completely:
If you want to remove an entire shared album from your Google Photos account, use this method:
- Go to your Google Photos library.
- Open the shared album you want to delete.
- Click on the three-dot menu icon and choose the “Delete album” option.
- Confirm the deletion when prompted.
These methods allow you to delete shared photos and albums with ease. Whether you want to delete specific photos within a shared album, remove them from your personal library, or delete the shared album entirely, these methods provide the flexibility and control you need.
Note: When you delete shared photos, they will no longer be accessible to the people you shared them with. However, it’s important to remember that the photos will still remain in their own personal Google Photos accounts if they saved or made a copy of them before deletion.
Now that you know the different methods to delete shared photos, let’s move on to some useful tips to make the process even smoother.
Method 1: Deleting Shared Photos from the Shared Album
If you have shared photos within an album on Google Photos and want to delete them directly from the shared album, this method is for you. Follow the steps below to remove specific shared photos:
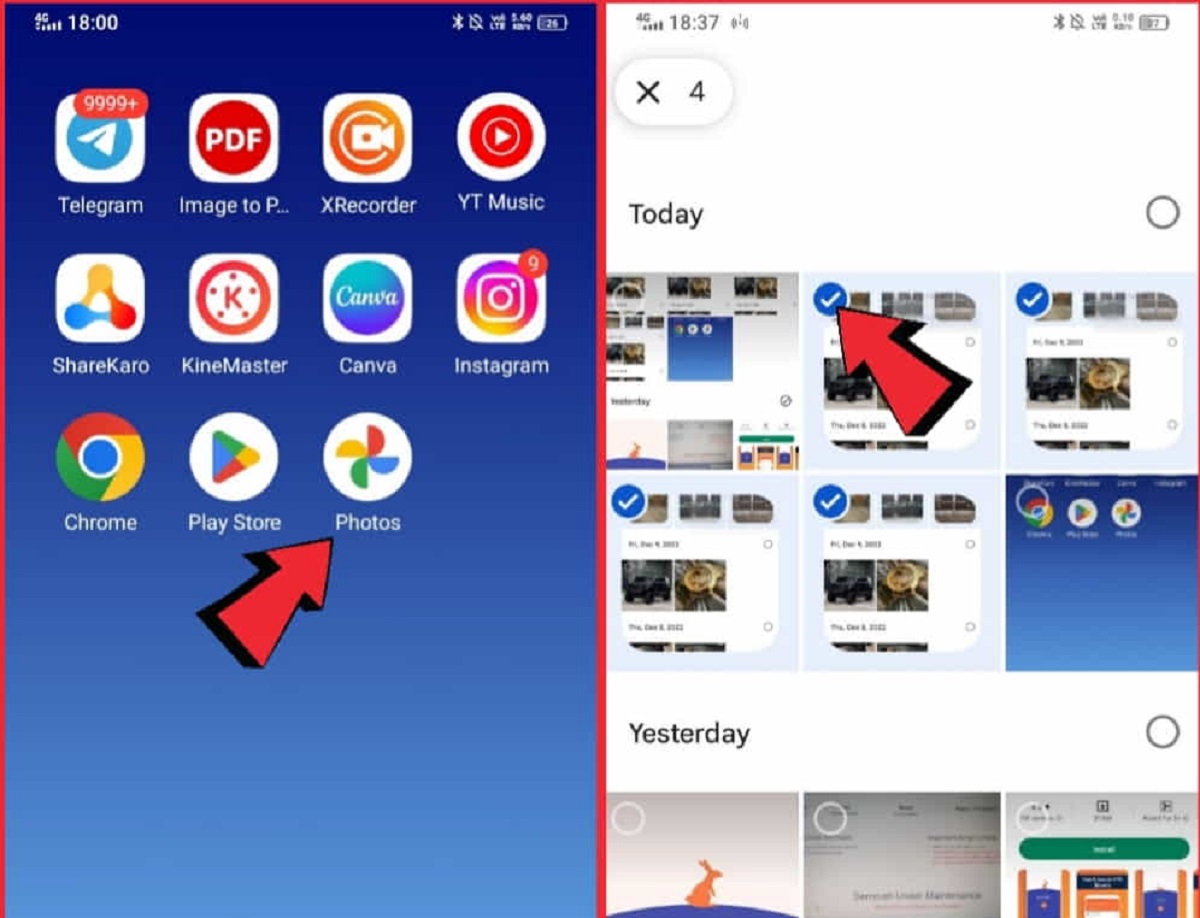
- Step 1: Open the shared album in Google Photos. You can do this by clicking on the album’s thumbnail in your library or accessing it through the shared link.
- Step 2: Once you have opened the shared album, you will see all the photos contained within it.
- Step 3: Select the photos you wish to delete. You can do this by clicking on the photos individually or by using the “Select” option to choose multiple photos at once.
- Step 4: After selecting the photos, click on the three-dot menu icon located in the top-right corner or next to the selected photos.
- Step 5: From the menu that appears, choose the “Delete” option. A confirmation prompt may appear asking if you want to remove the selected photos from the album.
- Step 6: Confirm the deletion by clicking “OK” or “Delete” in the prompt.
By following these steps, you will successfully delete the selected photos from the shared album on Google Photos. It’s important to note that deleting shared photos from the album does not delete them from your personal library. The photos will still be available in your library, and you can access them at any time.
Note: Deleting shared photos from the album will revoke access to those photos for all the users with whom the album was shared. They will no longer be able to view or access the deleted photos unless they have made a copy or saved them to their personal Google Photos accounts.
Now that you know how to delete shared photos from the shared album, let’s explore the next method, which allows you to remove shared photos from your personal library.
Method 2: Removing Shared Photos from Your Library
If you want to delete shared photos from your Google Photos library while keeping them in your personal collection, this method is the one for you. Follow the steps below to remove shared photos from your library:
- Step 1: Go to your Google Photos library. You can access your library by clicking on the “Library” tab in the Google Photos app or website.
- Step 2: Locate the shared photo you want to delete. You can locate it by scrolling through your library or by using the search bar to search for the photo by name or date.
- Step 3: Once you have found the shared photo, click on the three-dot menu icon that appears when you hover over the photo or tap on it if you are using a mobile device.
- Step 4: From the menu that appears, select the “Remove from album” option. This will remove the photo from the shared album, but it will still be present in your personal library.
By following these steps, you can easily remove shared photos from your library without permanently deleting them. This method can be helpful if you no longer want the photos to be accessible within a shared album but still want to keep them in your personal collection.
Note: Removing shared photos from your library will only remove them from the shared album and revoke access to those photos for the users with whom the album was shared. However, the photos will still remain in your personal library, and you can access them at any time.
Now that you understand how to remove shared photos from your library, let’s move on to the next method, which involves completely deleting a shared album from your Google Photos account.
Method 3: Removing the Shared Album Completely
If you want to remove an entire shared album from your Google Photos account, this method will guide you through the process. Follow the steps below to delete a shared album completely:
- Step 1: Go to your Google Photos library. You can do this by opening the Google Photos app or website and clicking on the “Library” tab.
- Step 2: Locate the shared album you want to delete. You can scroll through your library or use the search bar to find the specific album.
- Step 3: Once you have found the shared album, click on the three-dot menu icon that appears when you hover over the album or tap on it if you are using a mobile device.
- Step 4: From the menu that appears, select the “Delete album” option. A confirmation prompt may appear to confirm the deletion.
- Step 5: Confirm the deletion by clicking “OK” or “Delete” in the prompt. The shared album and all the photos contained within it will be permanently deleted from your account.
By following these steps, you can remove a shared album completely from your Google Photos account. It’s important to note that deleting the shared album also revokes access to all the photos within the album for the users with whom it was shared. They will no longer be able to view or access the photos from their accounts.
Note: Deleting a shared album does not delete the original photos from your personal library. The photos will still be accessible in your library, regardless of whether they were originally shared within the deleted album or not.
Now that you know how to remove shared albums from your account, let’s move on to some tips that will help you during the process of deleting shared photos on Google Photos.
Tips for Deleting Shared Photos
When it comes to deleting shared photos on Google Photos, here are some useful tips to enhance your experience and ensure a smooth process:
1. Double-check before deleting: Before you delete any shared photos or albums, make sure to double-check your selections. Ensure that you are deleting the correct photos and that you won’t regret the deletion later. Once the photos are deleted, they cannot be recovered.
2. Communicate with others: If you are deleting shared photos that others have contributed to, it’s a good practice to inform them beforehand. This way, they are aware of the changes and can save or download any photos they wish to keep.
3. Consider making a backup: If you have important shared photos that you want to delete, consider making a backup of them before deletion. You can download them to your local device or store them in another cloud storage service for safekeeping.
4. Review sharing settings: After deleting shared photos, take a moment to review your sharing settings. Ensure that the privacy settings for your future shared albums are appropriate and align with your preferences.
5. Clean up your library: While deleting shared photos, take the opportunity to clean up your overall library. Remove any unnecessary photos or albums to declutter and improve the organization of your Google Photos account.
6. Use search and filters: If you have a large collection of shared photos and find it difficult to locate specific ones for deletion, utilize the search and filter options in Google Photos. This can help you pinpoint the exact photos you want to delete more efficiently.
7. Regularly review shared albums: Make it a habit to review your shared albums periodically. This ensures that you stay in control of the photos you’ve shared and allows you to remove any outdated or unwanted content.
By keeping these tips in mind, you can effectively delete shared photos on Google Photos while maintaining a well-organized and personalized photo library.
With the methods and tips provided in this article, you are now equipped with the knowledge to delete shared photos and albums on Google Photos. Whether you want to remove specific photos from a shared album, take them out of your personal library, or delete an entire shared album, you have the flexibility and control to manage your shared content as you see fit.
Remember, maintaining control over your shared photos ensures privacy, declutters your library, and allows you to curate your collections in a way that best reflects your preferences and needs.
Conclusion
Deleting shared photos on Google Photos is a straightforward process that can help you maintain control over your content, protect your privacy, and keep your library organized. Whether you want to remove specific photos from a shared album, delete them from your personal library, or remove an entire shared album, Google Photos provides the necessary tools and options to accomplish these tasks.
In this article, we explored different methods to delete shared photos on Google Photos. We discussed deleting photos from shared albums directly, removing shared photos from your personal library while keeping them in your collection, and deleting shared albums completely. Each method offers flexibility depending on your specific needs and preferences.
We also provided tips to enhance your experience when deleting shared photos, such as double-checking your selections, communicating with other collaborators, and considering backups for important photos. Additionally, we suggested reviewing sharing settings, cleaning up your library, and using search and filters to streamline the process.
By following these methods and tips, you can effectively manage your shared photos on Google Photos, ensuring that your content remains under your control and aligned with your desired privacy levels.
Remember, as you delete shared photos, it’s essential to understand the implications for others who had access to those photos. Communicating with collaborators and informing them of the changes can help minimize any inconvenience or confusion.
With this newfound knowledge, feel confident in your ability to delete shared photos on Google Photos. Take the time to review your shared albums, remove outdated or unwanted content, and keep your library organized and relevant.
Now, it’s time to put these methods into action and enjoy a more curated and personalized Google Photos experience!