Introduction
Sharing photos has become a popular way to keep loved ones connected and to showcase memorable moments. One of the platforms that offers seamless photo-sharing capabilities is Google Photos. With its user-friendly interface and unlimited storage options, it’s no wonder that many people choose to use this service to store and share their cherished memories.
However, there may be instances where you want to stop sharing your photos or limit who can access them. Whether it’s due to privacy concerns or wanting to regain control over your photo library, it’s essential to know how to manage your shared content effectively.
In this article, we will explore various methods on how to stop sharing photos with Google Photos. Whether you want to disable backup and sync, delete individual photos, remove photos from albums, control shared libraries, revoke shared links and collaborations, adjust app settings, or disconnect third-party apps and services, we have got you covered.
By following these methods, you will have the tools to manage your photo sharing preferences according to your specific needs, giving you peace of mind and control over your personal memories.
Method 1: Disabling Backup and Sync
If you no longer want your photos to be automatically backed up and synced to Google Photos, you can disable this feature. Disabling backup and sync will ensure that any new photos you take or add to your device’s gallery will not be uploaded to your Google Photos account.
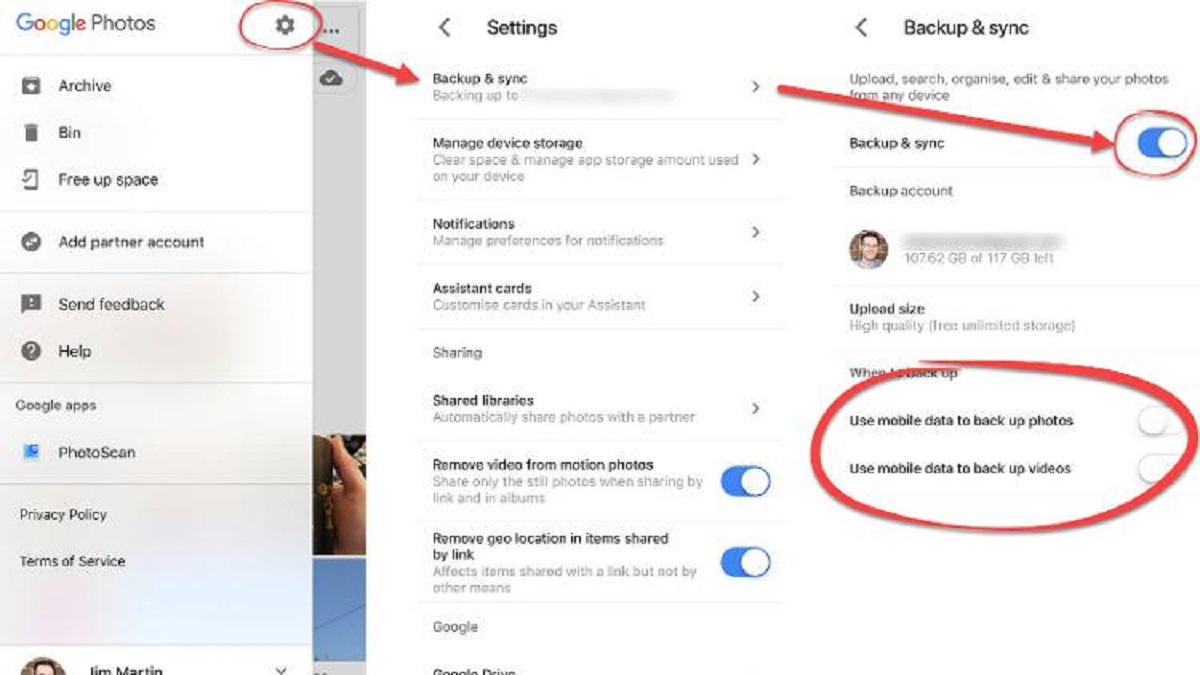
To disable backup and sync, follow these steps:
- Open the Google Photos app on your device.
- Tap on your profile picture or avatar in the top-right corner to access the side menu.
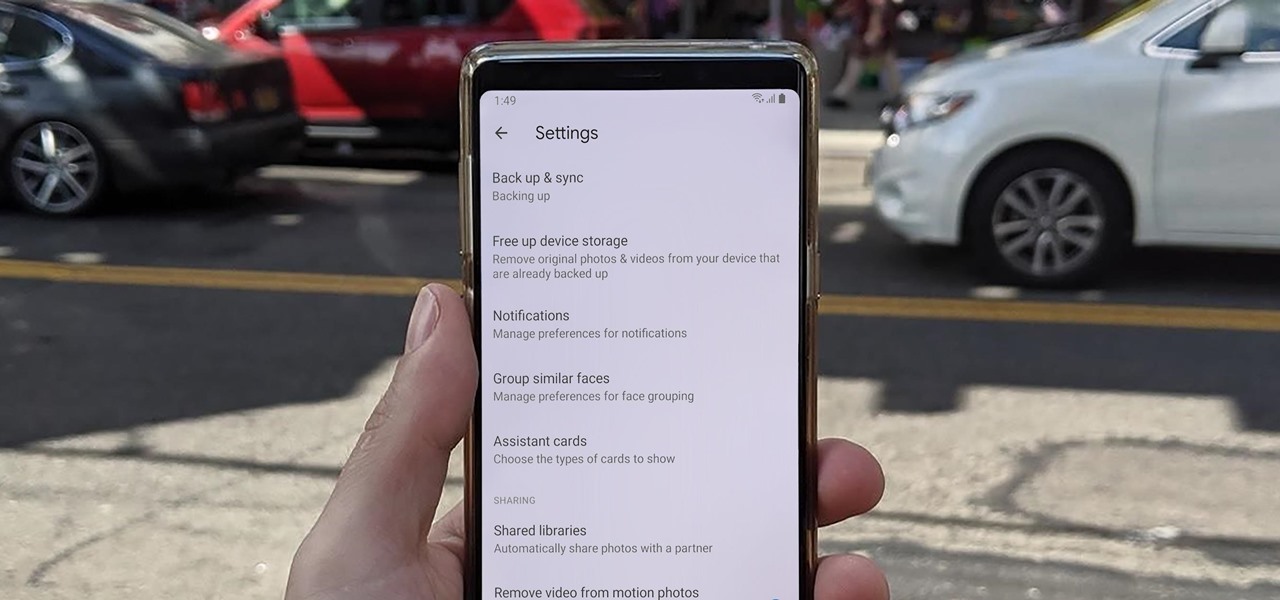
- Select “Photos settings” from the menu.
- In the “Back up & sync” section, toggle the switch to the off position.
Once you have disabled backup and sync, any new photos will only be stored locally on your device and will not be automatically backed up to your Google Photos account. However, please note that this will not affect any photos that have already been uploaded to your account. To remove those photos from your Google Photos account, you will need to follow the next method.
Disabling backup and sync is a straightforward method to stop sharing photos with Google Photos. It allows you to have control over which photos are uploaded to the platform, giving you the freedom to keep your personal photos private if desired.
Method 2: Deleting Individual Photos
If you want to stop sharing specific photos with Google Photos, you can choose to delete them individually. This method gives you the flexibility to remove photos that you no longer want to be accessible through your Google Photos account.
Follow these steps to delete individual photos:
- Open the Google Photos app or access the website on your computer.
- Navigate to the photo you wish to delete.
- Tap or click on the photo to open it in full view.
- Look for the trash bin icon, usually located in the top-right corner of the screen.
- Tap or click on the trash bin icon to delete the photo.
- Confirm the deletion when prompted.
By deleting individual photos, you can remove specific images from your Google Photos account and prevent them from being shared with others. This method allows you to have complete control over the content that remains in your library.
It’s important to note that deleting a photo from your Google Photos account will also remove it from any shared albums or other collaborations where it was included. If you only want to remove the photo from a shared album without deleting it entirely from your account, you can proceed to the next method.
Method 3: Removing Photos from Albums
If you have shared albums on Google Photos and want to stop sharing specific photos within those albums, you can remove them individually. This method allows you to maintain the overall collection while controlling which photos are visible to others.
Follow these steps to remove photos from albums:
- Open the Google Photos app or access the website on your computer.
- Navigate to the shared album from which you want to remove a specific photo.
- Find the photo you wish to remove and tap or click on it.
- Look for the three-dot menu icon, usually located in the top-right corner of the screen.
- Tap or click on the menu icon to reveal a list of options.
- Select “Remove from album” or a similar option, depending on the platform you are using.
- Confirm the removal when prompted.
By removing specific photos from shared albums, you can control the content that is visible to others without needing to delete the entire album. This method is useful if you want to maintain the album structure but only want to exclude certain photos from view.
It’s important to note that removing a photo from a shared album will not delete it from your Google Photos account. The photo will still exist in your library and can be accessed through other means. If you want to completely remove the photo from your account, refer to Method 2: Deleting Individual Photos.
Method 4: Controlling Shared Libraries
If you have shared your Google Photos library with others and want to regain control over who can access and share your photos, you can manage your shared libraries. This method allows you to customize the permissions and privileges granted to individuals or groups that have access to your shared library.
Follow these steps to control your shared libraries:
- Open the Google Photos app or access the website on your computer.
- Tap on your profile picture or avatar in the top-right corner to access the side menu.
- Select “Photos settings” from the menu.
- Go to the “Shared Libraries” section.
- Choose the shared library you want to modify.
- Review the list of people or groups who have access to your library.
- Adjust the settings according to your preferences, such as removing individuals or groups, changing the shared content, or revoking access completely.
By controlling your shared libraries, you can dictate who can view, edit, and share your photos. This method helps you maintain privacy and ensures that your personal photos are only accessible to individuals or groups you trust.
Keep in mind that this method will only apply to the shared libraries you have created. If someone has shared their library with you, you will need to contact them to change the permissions or remove access to their content.
Method 5: Revoking Shared Links and Collaborations
If you have previously shared photos or albums through Google Photos using shared links or collaborations and want to stop sharing them, you can revoke access. This method allows you to remove the sharing permissions for specific links or collaborations, ensuring that they are no longer active.
Follow these steps to revoke shared links and collaborations:
- Open the Google Photos app or access the website on your computer.
- Navigate to the photo or album you want to revoke access to.
- Look for the sharing icon, usually represented by a “Share” button or an icon with three dots connected by lines.
- Tap or click on the sharing icon to open the sharing options.
- Locate the shared link or collaboration you want to revoke.
- Tap or click on the options provided, such as “Remove link” or “Stop collaboration.”
- Confirm the action when prompted.
By revoking shared links and collaborations, you can instantly disable access to your shared photos or albums. This method allows you to have full control over who can view and interact with your shared content.
It’s important to note that revoking access to shared links or collaborations will only affect those specific links or collaborations. If you have shared the same photos or albums through other means, such as sharing them individually with certain people or groups, those will still be accessible to the recipients. If you want to remove access to those as well, consider using method 4: Controlling Shared Libraries.
Method 6: Adjusting Google Photos App Settings
To further enhance your control over sharing photos with Google Photos, you can adjust the app settings to align with your preferences. By customizing these settings, you can have more control over how Google Photos handles and shares your photos.
Follow these steps to adjust the Google Photos app settings:
- Open the Google Photos app on your device.
- Tap on your profile picture or avatar in the top-right corner to access the side menu.
- Select “Photos settings” from the menu.
- Explore the different available settings and options.
- Make changes according to your preferences, such as enabling or disabling sharing suggestions, face groupings, or suggested actions.
- Review other app settings that might affect sharing, such as backup settings or upload quality.
- Save your changes.
Adjusting the Google Photos app settings allows you to fine-tune the sharing features to suit your needs. Whether you want to limit certain suggestions, groupings, or actions, or tweak backup and upload settings, customizing these options gives you more control over the sharing process.
Note that adjusting the app settings will only affect how the Google Photos app behaves on your device. If you access Google Photos through other platforms or devices, the settings may vary. Ensure that you review and adjust the settings accordingly across all your devices to maintain consistency in your photo sharing experience.
Method 7: Disconnecting Third-party Apps and Services
If you have connected third-party apps or services to your Google Photos account and want to stop sharing photos through them, you can disconnect these integrations. This method allows you to revoke access and prevent these apps or services from accessing your Google Photos library.
Follow these steps to disconnect third-party apps and services:
- Open the Google Photos app or access the website on your computer.
- Tap on your profile picture or avatar in the top-right corner to access the side menu.
- Select “Photos settings” from the menu.
- Go to the “Account & privacy” section.
- Look for the “Third-party apps & services” option or a similar setting.
- Navigate to the list of apps and services that have access to your Google Photos account.
- Select the app or service you want to disconnect.
- Follow the provided instructions to disconnect the integration.
- Confirm the disconnection when prompted.
By disconnecting third-party apps and services, you can prevent them from accessing and sharing your photos. This method helps you maintain control over your photos and ensures that only the apps and services you trust have access to them.
Keep in mind that disconnecting an app or service will vary depending on the specific integration and platform. Some integrations may require you to visit the app’s settings directly to revoke access to Google Photos. If you are unsure about how to disconnect a particular app or service, refer to their support documentation or contact their customer support for guidance.
Conclusion
Managing the sharing of your photos with Google Photos is important to maintain privacy and control over your personal content. Whether you want to disable backup and sync, delete individual photos, remove photos from albums, control shared libraries, revoke shared links and collaborations, adjust app settings, or disconnect third-party apps and services, there are various methods available to meet your specific needs.
By following these methods, you can effectively limit who can access your photos, maintain the privacy of your content, and regain control over your Google Photos library. It’s essential to regularly review and adjust your sharing preferences to ensure that your photos are only shared with those you trust.
Remember, each method offers its own advantages and considerations. Disabling backup and sync allows you to control which photos are uploaded automatically, while deleting individual photos gives you the ability to remove specific content entirely. Removing photos from albums allows you to control visibility within shared collections, and managing shared libraries allows you to customize access for different individuals or groups. Revoking shared links and collaborations ensures that no one has access to your shared content, and adjusting app settings empowers you to have more control over sharing suggestions and actions. Disconnecting third-party apps and services limits access and ensures that only trusted integrations interact with your photos.
By combining these methods, you can create a personalized and secure sharing experience with Google Photos. Regularly reviewing and adjusting your sharing settings will allow you to maintain control over your photos and ensure that your shared content aligns with your preferences.
So, take charge of your photo sharing experience and implement the methods that best suit your needs. With the right approach, you can confidently share your photos while safeguarding your privacy.