Introduction
Welcome to the world of Google Photos, a versatile platform designed to help you manage and organize your digital images effortlessly. Whether you’re a budding photographer or simply a memory keeper, having the ability to delete unwanted photos is crucial for maintaining a clean and clutter-free gallery. In this guide, we will explore the step-by-step process of deleting photos in Google Photos, ensuring that you have the freedom to curate your collection with ease.
Google Photos offers a user-friendly interface and intuitive features that make it simple to delete individual photos, multiple photos, or even entire albums. From blurry snapshots to duplicate images, you can wave goodbye to the undesirable clutter that may be clogging up your storage space. So, let’s dive in and discover how to make the most of Google Photos’ powerful photo deletion capabilities.
Before we begin, it’s important to note that deleting a photo in Google Photos will permanently remove it from your account, including any associated albums, shared links, and edits. Therefore, it’s crucial to double-check your selection before proceeding with any deletions. Additionally, deleted photos are moved to the Trash folder, where they will remain for 60 days before being permanently deleted. So, without further ado, let’s get started on our journey to declutter and organize your Google Photos library.
Step 1: Launch Google Photos
The first step towards deleting photos in Google Photos is to open the app on your mobile device or visit the Google Photos website on your computer. If you’re using a mobile device, you can find the Google Photos app in your app drawer or on your home screen. Once you have located the app, go ahead and tap on it to launch it.
If you’re accessing Google Photos through a web browser, open your preferred browser and navigate to photos.google.com. Sign in to your Google account if prompted and you’ll be taken to the Google Photos web interface.
Upon opening Google Photos, you will be greeted with your photo library, where all your uploaded photos and albums are displayed. Take a moment to familiarize yourself with the interface, as we will be using it throughout the photo deletion process.
Keep in mind that Google Photos automatically organizes your photos by date and creates albums based on criteria such as location or subject matter. This makes it easier to navigate through your collection and locate specific photos or albums that you may want to delete.
Now that you’re all set up and ready to go, let’s move on to the next step and learn how to select the photos you want to delete.
Step 2: Select the Photos You Want to Delete
Once you have launched Google Photos and familiarized yourself with the interface, it’s time to select the photos you want to delete. Google Photos provides multiple ways to make your selections, giving you the flexibility to choose individual photos, multiple photos, or even entire albums.
To delete a single photo, simply locate the photo in your library and tap on it. This will open the photo in full screen mode, where you’ll find a trash can icon at the bottom of the screen. Tap on the trash can icon, and a confirmation message will appear, asking if you want to delete the photo. Confirm your decision, and the photo will be moved to the Trash folder.
If you have multiple photos you wish to delete, you can use Google Photos’ convenient selection mode. In the library view, tap and hold on a photo until it is selected. Then, simply slide your finger across the screen to select multiple photos at once. You’ll notice that as you select photos, a counter will appear at the top of the screen, indicating the number of selected photos. Once you have made your selections, tap on the trash can icon to delete the chosen photos.
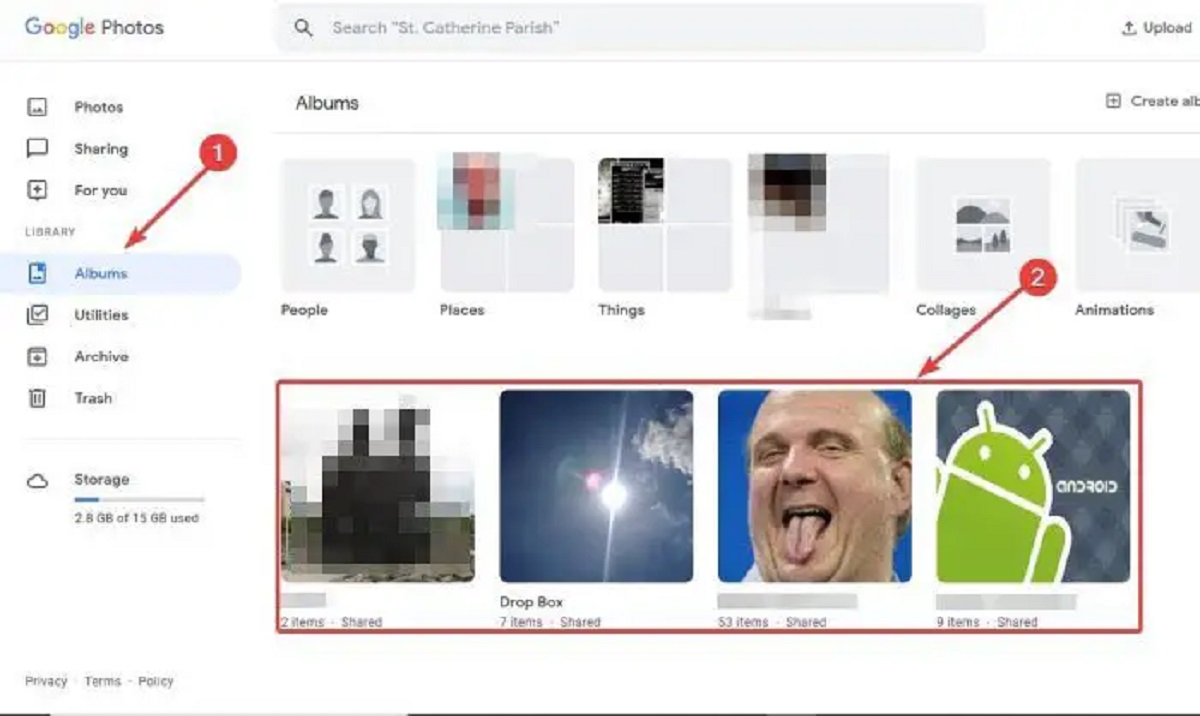
To delete an entire album, navigate to the Albums tab in your Google Photos library. Locate the album you wish to delete and tap on it to open it. Inside the album, tap on the three-dot menu icon at the top-right corner of the screen. From the menu that appears, select the “Delete album” option. Confirm your decision, and the entire album, along with its contents, will be deleted.
Now that you know how to select the photos you want to delete, let’s move on to the next step and learn how to delete individual photos in more detail.
Step 3: Delete Individual Photos
Deleting individual photos in Google Photos is a straightforward process that allows you to remove specific images from your collection. Whether it’s a blurry shot, a duplicate, or simply a photo you no longer desire, here’s how to delete individual photos:
1. Launch the Google Photos app or visit the Google Photos website.
2. Navigate to the photo you wish to delete by browsing through your library or using the search bar.
3. Once you have located the photo, tap on it to open it in full-screen mode.
4. At the bottom of the screen, you’ll find a trash can icon. Tap on the trash can icon.
5. A confirmation pop-up will appear, asking if you want to delete the photo. To confirm, tap on “Delete” or “OK” depending on your device.
6. The photo will now be moved to the Trash folder, where it will remain for 60 days before permanent deletion.
It’s important to note that deleting a photo using this method only removes it from your Google Photos library. If the photo was added to an album or shared with others, it will still be visible in those locations. To eliminate it completely from all instances, you will need to remove it from those albums and sharing options as well.
Deleting individual photos is a helpful way to streamline your collection and keep only the images you cherish. Now that you understand how to delete individual photos, let’s move on to the next step: deleting multiple photos.
Step 4: Delete Multiple Photos
Deleting multiple photos in Google Photos is an efficient way to declutter your library and remove unwanted images in bulk. Whether you have several similar shots or a group of photos no longer needed, follow these steps to delete multiple photos at once:
1. Launch the Google Photos app or access the Google Photos website through your browser.
2. Navigate to your library and locate the first photo you want to delete.
3. Tap and hold on the photo until it is selected. You will notice a blue checkmark appearing on the selected photo.
4. While continuing to hold down on the first photo, swipe your finger across the screen to select additional photos. As you swipe, the selected photos will be highlighted with a blue checkmark.
5. Once you have selected all the desired photos, you will see a counter at the top of the screen displaying the number of photos you have chosen.
6. At the bottom of the screen, you will find a trash can icon. Tap on the trash can icon to delete the selected photos.
7. A confirmation pop-up will appear, asking if you want to delete the photos. Confirm your decision by tapping on “Delete” or “OK.”
8. The selected photos will now be moved to the Trash folder, ensuring they are removed from your library and freeing up storage space.
Deleting multiple photos is a convenient way to tidy up your Google Photos collection. It saves time and effort compared to deleting each photo individually. Remember, once photos are deleted, they will remain in the Trash folder for 60 days before they are permanently removed.
Now that you know how to delete multiple photos, let’s move on to the next step: deleting all photos in an album.
Step 5: Delete All Photos in an Album
If you have an entire album in Google Photos that you no longer need or want to remove, deleting all the photos within the album is a quick and straightforward process. Here’s how you can delete all photos in an album:
1. Launch the Google Photos app or access the Google Photos website.
2. Navigate to the Albums tab to view all your albums.
3. Locate the album you want to delete and tap on it to open it.
4. Once inside the album, tap on the three-dot menu icon located at the top-right corner of the screen.
5. From the menu options that appear, select “Delete album.” A confirmation message will pop up, informing you that the album and its contents will be permanently deleted.
6. Confirm your decision by tapping on “Delete” or “OK,” depending on your device.
All the photos within the selected album will now be deleted, and the album itself will be removed from your Google Photos library. It’s important to note that this action cannot be undone, so double-check your decision before confirming the deletion.
Deleting all photos in an album provides a convenient way to declutter your library and remove entire collections in one go. It’s especially useful when you want to get rid of multiple photos that are grouped together in one album.
Now that you know how to delete all photos in an album, let’s move on to the next step: removing photos from the Trash folder.
Step 6: Remove Photos from Trash
After deleting photos in Google Photos, they are moved to the Trash folder, where they are stored for a period of 60 days before being permanently deleted. However, if you change your mind or realize that you deleted a photo by mistake, you still have the opportunity to recover it from the Trash folder. Here’s how to remove photos from the Trash:
1. Launch the Google Photos app or visit the Google Photos website.
2. Access the side menu by tapping on the three-line icon at the top-left corner of the screen.
3. From the side menu, select “Trash.” This will take you to the Trash folder, where your deleted photos are stored.
4. In the Trash folder, you will find all the photos you have deleted. Tap on the photo you want to remove from the Trash folder.
5. Once the photo is open, tap on the three-dot menu icon located at the top-right corner of the screen.
6. From the menu options that appear, select “Delete from trash.” A confirmation message will appear, asking if you want to permanently delete the photo. Confirm your decision by tapping on “Delete” or “OK.”
By removing the photo from the Trash folder, you are permanently deleting it from your Google Photos library.
It’s important to note that once the 60-day period has passed, photos in the Trash folder will be automatically deleted and cannot be recovered. Therefore, it’s advisable to regularly check your Trash folder and ensure that you restore any mistakenly deleted photos before they are permanently lost.
Now that you know how to remove photos from the Trash, you have successfully completed all the steps to delete photos in Google Photos. Congratulations!
Conclusion
Managing and organizing your digital photos is made easier with the powerful deletion capabilities of Google Photos. Whether you want to remove individual photos, delete multiple photos at once, or get rid of entire albums, the step-by-step process outlined in this guide provides you with the tools to accomplish your goals.
By launching Google Photos and selecting the photos you want to delete, you can effortlessly streamline your photo library. The ability to delete individual photos allows you to get rid of unwanted or duplicate images with a simple tap. Deleting multiple photos in bulk saves time and effort, while deleting all photos in an album gives you a clean slate. And if you ever need to recover photos, you can remove them from the Trash folder before they are permanently deleted.
Remember, it’s important to exercise caution and double-check your selections before deleting photos. Once a photo is deleted, it cannot be recovered after the 60-day period in the Trash folder has passed.
Now that you have a clear understanding of how to delete photos in Google Photos, you can take control of your photo collection, keeping it organized and clutter-free. Whether you’re clearing out outdated images, removing duplicates, or simply curating your memories, Google Photos offers an intuitive and user-friendly platform to achieve your goals.
So go ahead and start deleting those unwanted photos in Google Photos today. Enjoy the freedom to curate, organize, and showcase your most cherished images without the burden of clutter. Happy deleting!