Introduction
Gaming on a PC is a popular pastime for many, but as time goes on, you may find yourself with a collection of games that you no longer play or need. Deleting these games not only frees up valuable storage space but also helps optimize your PC’s performance. However, figuring out the proper way to delete games on a PC can sometimes be a daunting task, especially if you’re not familiar with the process.
In this article, we will guide you through the steps to uninstall and delete games from your PC. Whether you want to remove games to make room for new ones or declutter your system, our step-by-step instructions will help you do it easily and efficiently.
Before we dive into the process, it’s important to note that uninstalling a game doesn’t necessarily mean all its associated files and data will be completely removed from your system. Therefore, we’ll also cover additional steps for manually deleting game files and clearing any remaining remnants from the Registry.
Regardless of whether you’re a casual gamer or a hardcore enthusiast, understanding how to properly delete games on your PC can save you valuable time and resources. So let’s get started with our comprehensive guide to help you reclaim your storage space and optimize your gaming experience.
Why Delete Games?
As gamers, we tend to accumulate a large number of games over time. However, not all games continue to hold our interest or provide the same level of enjoyment as they once did. There are several reasons why you might consider deleting games from your PC:
- Storage Space: Games can take up a significant amount of storage space, especially with large updates and downloadable content. By deleting games you no longer play or need, you can free up valuable storage space for new games or other files and applications.
- System Performance: Having too many games installed on your PC can slow down its performance. Each game may have background processes and services running, consuming system resources. Removing unnecessary games can help optimize your PC’s performance and allow it to run more smoothly.
- Organizational Benefits: Deleting games can help you declutter your gaming library and make it easier to navigate and find the games you actually want to play. It allows you to create a curated collection of games that you enjoy, making it more convenient to access and manage your gaming library.
- Game Updates and Patches: Game developers frequently release updates, patches, and bug fixes to enhance gameplay and address issues. If you no longer play a game, updating it might feel like a waste of time and bandwidth. Deleting these games eliminates the need for these updates, saving you time and bandwidth for games you actively play.
- Personal Preferences: Our gaming preferences evolve over time, and what we enjoyed playing in the past may not align with our current interests. By deleting games that no longer resonate with us, we create space and time to explore new games that align with our updated preferences.
Now that we’ve explored the reasons why you might want to delete games from your PC, let’s move on to the step-by-step process of uninstalling and removing games from your system.
Step 1: Uninstalling Games from the Control Panel
Uninstalling games from the control panel is the most common and straightforward method to remove games from your PC. Follow these steps to uninstall games from the Control Panel:
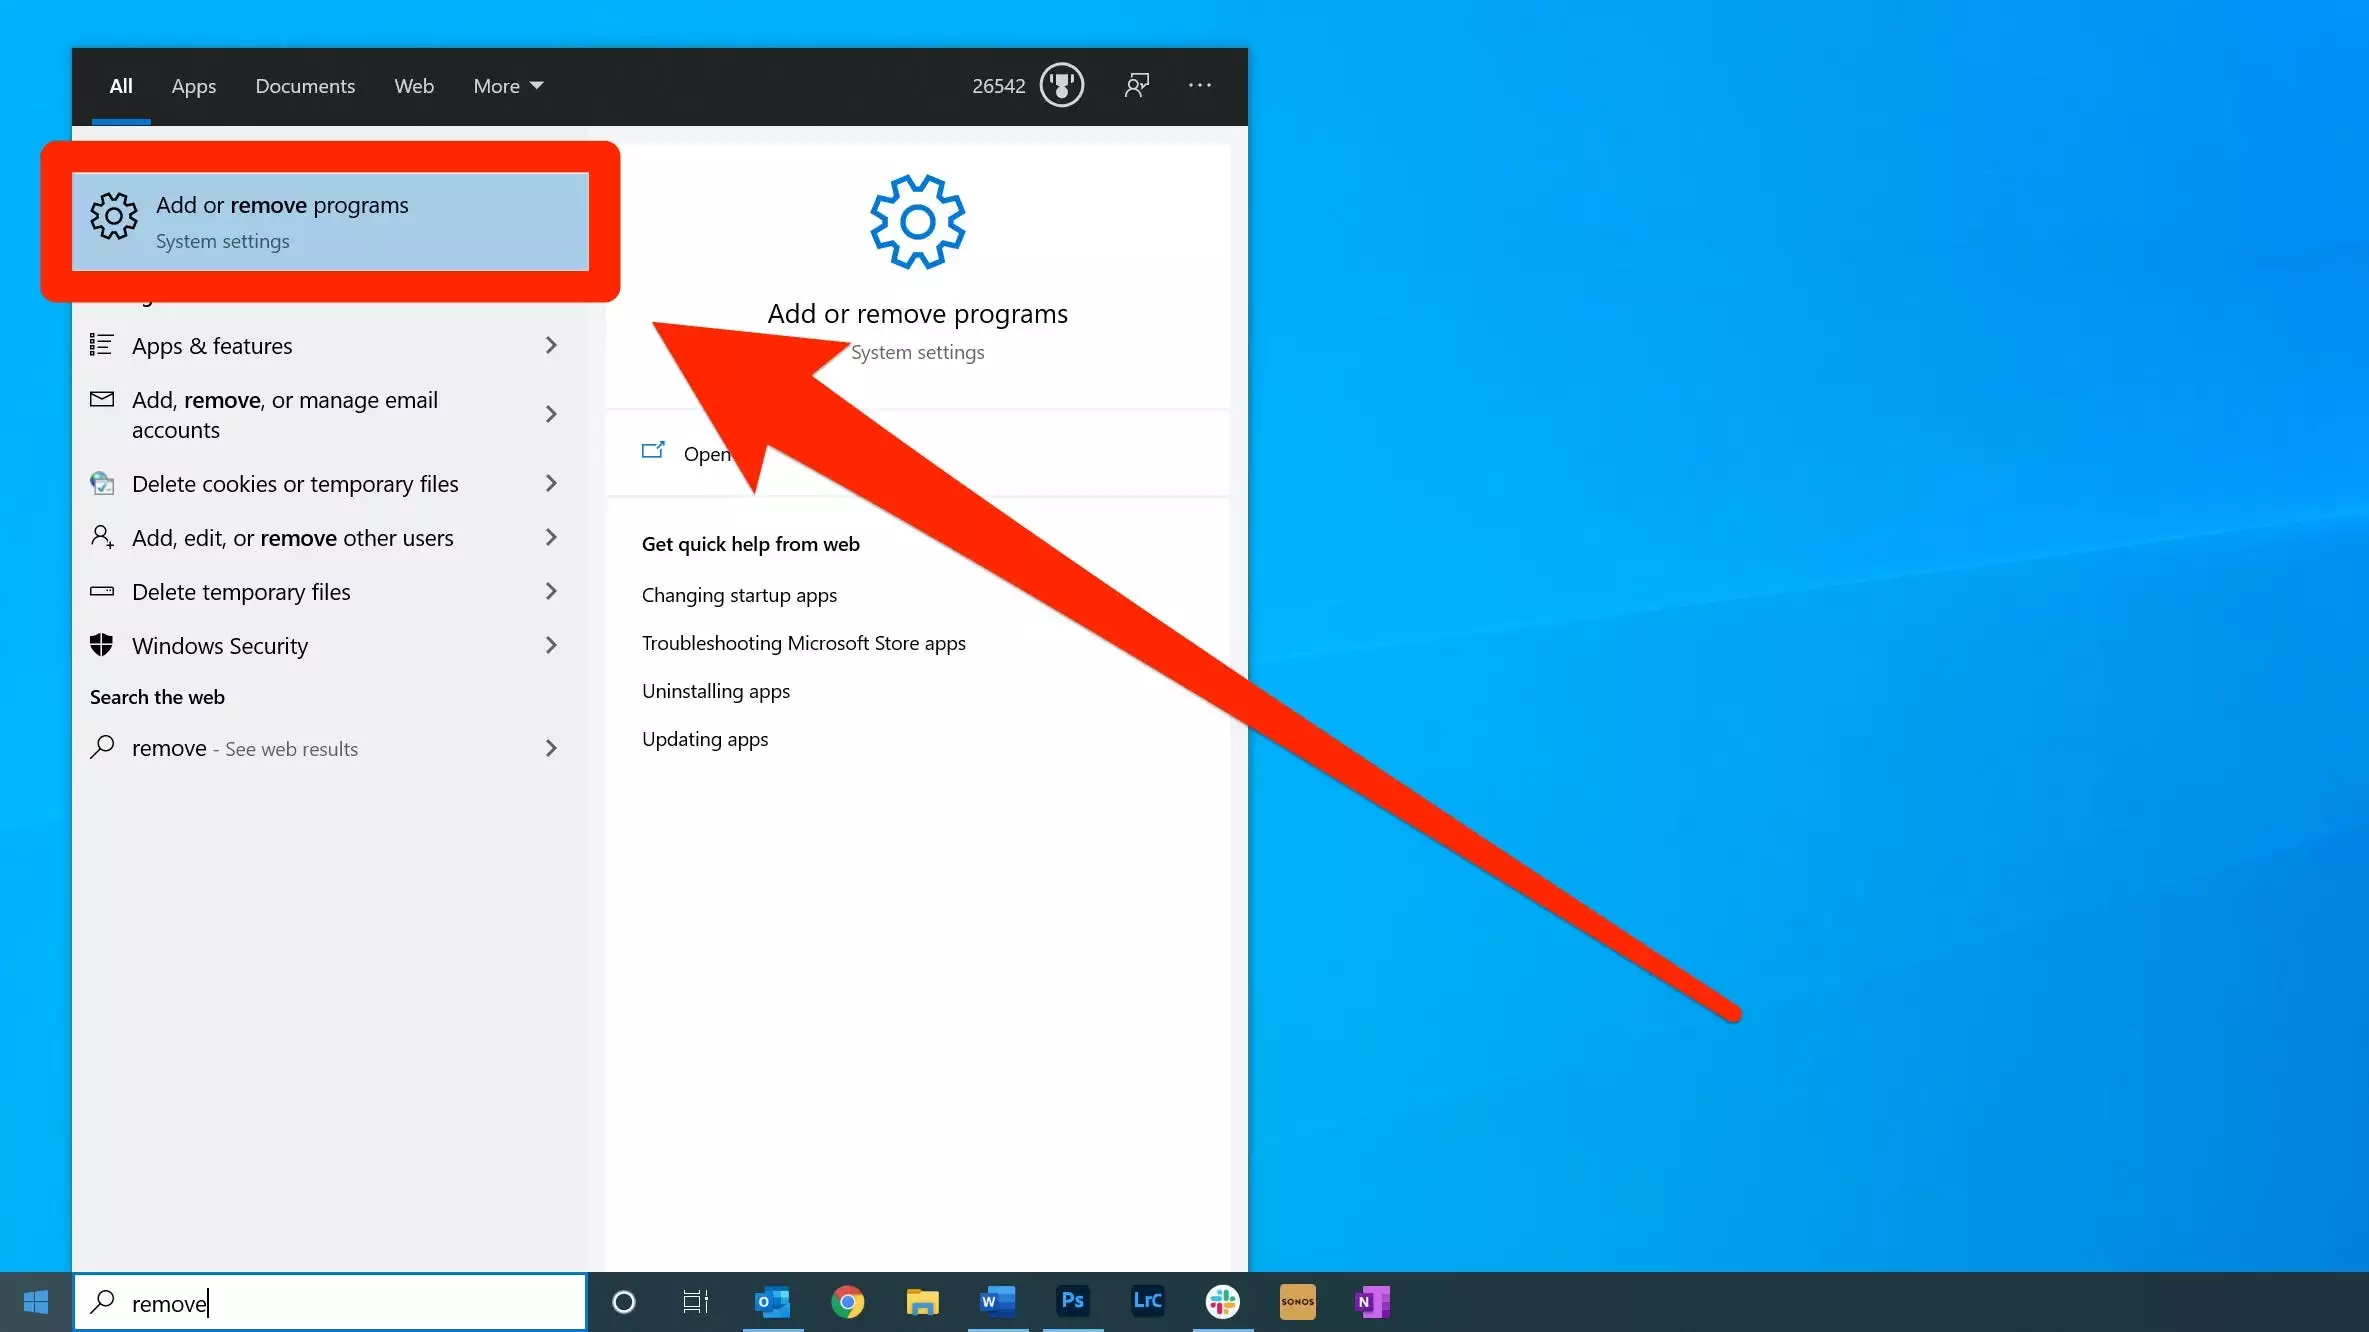
- Open the Control Panel on your PC. You can access it by clicking on the Windows Start button and searching for “Control Panel”.
- In the Control Panel, navigate to the “Programs” or “Programs and Features” option.
- A list of installed programs will appear. Look for the game you want to uninstall.
- Select the game and click on the “Uninstall” or “Remove” button.
- Follow the on-screen prompts to complete the uninstallation process. Some games may have a separate uninstall wizard that you need to follow.
- Once the game is successfully uninstalled, restart your computer to ensure any remaining files or settings are removed.
It’s important to note that the Control Panel may not show all the installed games on your PC, especially if they were installed through platforms such as Steam, Origin, or Epic Games. In that case, you’ll need to use the respective platform’s built-in uninstallation method, which we’ll cover in the next steps.
This method removes the game from your system and frees up storage space. However, it might not delete all the associated files and settings. To ensure a complete removal and optimize your PC, continue to the next steps to delete any remaining game files manually.
Step 2: Using the Game’s Uninstaller (if available)
Many games come with their own uninstaller, which is specifically designed to remove the game and all its associated files from your PC. If the game you want to uninstall has its own uninstaller, follow these steps:
- Locate the game’s shortcut icon on your desktop, Start menu, or wherever you usually access the game.
- Right-click on the game’s shortcut icon and select “Open file location” or “Properties”.
- A new window will open, showing the game’s installation folder. Look for an uninstaller file or an executable file that is specifically for uninstalling the game. It may be labeled as “Uninstall.exe” or have a similar name.
- Double-click on the uninstaller file to launch the game’s uninstallation program.
- Follow the on-screen prompts provided by the uninstaller to remove the game from your system. Take note of any additional options or settings that may be available during the uninstallation process.
- Once the uninstallation is complete, restart your computer to ensure any residual files or settings are removed.
Using the game’s uninstaller ensures a more thorough removal of the game and its associated files, as it is specifically designed for that purpose. It may also provide options to choose what components or settings to remove, giving you more control over the uninstallation process.
If the game you want to uninstall doesn’t have its own uninstaller or you encounter any issues during the uninstallation process, don’t worry. In the next step, we’ll guide you through manually deleting any remaining game files from your PC.
Step 3: Deleting Game Files Manually
If the previous steps didn’t completely remove the game from your system or you want to ensure a thorough deletion, you can manually delete the game files. Follow these steps to delete game files manually:
- Open the file explorer on your PC by pressing the Windows key + E or by clicking on the folder icon in the taskbar.
- Navigate to the installation folder of the game you want to delete. This is usually located in the “Program Files” or “Program Files (x86)” directory.
- Select the game’s folder by clicking on it once.
- Right-click on the selected folder and choose “Delete” from the context menu. Alternatively, you can press the Delete or Backspace key on your keyboard.
- A confirmation prompt will appear asking if you want to permanently delete the folder. Click “Yes” to proceed.
- Repeat these steps for any other game folders or files you want to remove.
By manually deleting game files, you ensure that any leftover game data, settings, or saved game files are removed from your system. This can help free up additional storage space and eliminate any potential conflicts or issues caused by residual files.
Keep in mind that manually deleting game files can be a bit more complex and should be done with caution. Be sure to only delete the game’s folder and not any system files or other important data.
Once you’ve finished deleting the game files, you can move on to the next step to clear any remaining remnants from the Windows Registry.
Step 4: Clearing Game Remnants from the Registry (Optional)
This step is optional, but it can help ensure a more thorough removal of game remnants from your PC. The Windows Registry contains information and settings for various applications, including games. Clearing any residual entries related to the game you uninstalled can help optimize your system further. However, it’s important to note that editing the registry can be risky, so proceed with caution and follow these steps:
- Press the Windows key + R to open the Run dialog box.
- Type “regedit” without the quotes and press Enter. This will open the Windows Registry Editor.
- In the Registry Editor, backup the registry by clicking on “File” in the top menu and choosing “Export.” Save the backup file to a location on your computer.
- In the Registry Editor, navigate to the following path: HKEY_CURRENT_USER\Software or HKEY_LOCAL_MACHINE\Software.
- Look for a folder or entry related to the game you uninstalled. Right-click on it and choose “Delete.” Confirm the deletion when prompted.
- Repeat this step for any other game-related entries you find in the registry.
Clearing game remnants from the Windows Registry can help eliminate any leftover settings, preferences, or references that might interfere with other applications or cause system instability. However, exercise caution when making changes to the registry, as a mistake can have adverse effects on your computer’s performance.
After completing the registry cleanup, the last step involves emptying your Recycle Bin to permanently remove any remnants of the uninstalled game.
Step 5: Emptying the Recycle Bin
After uninstalling and deleting game files, there might still be remnants of the game lingering in your Recycle Bin. To ensure a complete removal, it’s important to empty the Recycle Bin. Follow these steps:
- Locate the Recycle Bin icon on your desktop.
- Double-click on the Recycle Bin icon to open it. This will display all the files and folders that have been deleted but not permanently removed from your system.
- To permanently delete all the files and folders in the Recycle Bin, click on the “Empty Recycle Bin” option located on the top menu of the Recycle Bin window.
- A confirmation prompt will appear, asking if you’re sure you want to permanently delete all the items. Click “Yes” or “OK” to confirm.
By emptying the Recycle Bin, you permanently remove all the deleted files, including any remaining game files. This helps free up additional storage space on your PC and ensures a clean and thorough removal of the uninstalled game.
With the Recycle Bin emptied, you have successfully completed the process of deleting games from your PC. You can now enjoy the benefits of extra storage space, improved system performance, and an organized gaming library.
Remember to regularly follow these steps to uninstall and delete games you no longer play or need, as it helps maintain an optimized gaming environment on your PC.
Conclusion
Deleting games from your PC is an essential task to optimize storage space and improve system performance. Uninstalling games through the Control Panel, using the game’s uninstaller (if available), and manually deleting game files are the primary steps to remove games from your PC. Additionally, clearing game remnants from the Windows Registry and emptying the Recycle Bin can ensure a thorough deletion.
By removing games you no longer play or need, you free up valuable storage space and declutter your gaming library. This allows you to have a curated collection of games that align with your gaming preferences, making it easier to navigate and find the games you want to play.
Remember to exercise caution when making changes to your PC’s settings or the Windows Registry. Always back up your registry before making any modifications to ensure you can restore it if needed.
Regularly deleting games you no longer play can help maintain a well-organized gaming environment, optimize system performance, and ensure that your PC is running smoothly. By following the step-by-step instructions provided in this guide, you can effectively uninstall and remove games from your PC, reclaiming storage space and enhancing your overall gaming experience.
So, take the time to evaluate your gaming collection, remove the games you no longer need, and enjoy a streamlined gaming experience on your PC.


