Choosing the Right Monitor
When it comes to connecting a second monitor to your laptop, one of the first things you need to consider is the type of monitor that suits your needs. There are various factors to take into account in order to make the right choice. Let’s explore these factors to help you make an informed decision:
- Display Size: Determine the ideal size for your second monitor. Consider how you plan to use it – if it’s for multitasking or programming, a larger display may be more suitable. On the other hand, if your primary use is gaming or watching movies, a smaller monitor might suffice.
- Resolution: Look for a monitor with a high-resolution display. Higher resolutions offer sharper images and more real estate for your content. Common options include Full HD (1920×1080 pixels), Quad HD (2560×1440 pixels), and 4K Ultra HD (3840×2160 pixels).
- Refresh Rate: Consider the refresh rate of the monitor, especially if you’re a gamer. A higher refresh rate, such as 144Hz or 240Hz, provides smoother motion and reduces the chance of screen tearing.
- Connection Options: Check the available connectivity options on both your laptop and the potential monitor. Common connections include HDMI, DisplayPort, and VGA. Ensure that the monitor has compatible ports to connect to your laptop.
- Ergonomics: Look for a monitor with adjustable height, tilt, and swivel options, as these features can greatly enhance your comfort and productivity. Consider whether a VESA mount is necessary if you plan to attach it to a monitor arm or wall mount.
- Budget: Set a budget for your second monitor and compare the prices of different models. Consider the features that are most important to you and find a monitor that offers the best value for your money.
By carefully considering these factors, you can choose a second monitor that perfectly complements your laptop and meets your specific requirements. Keep in mind that it’s important to strike a balance between budget and performance to ensure a satisfying experience with your dual monitor setup.
Checking Your Laptop’s Display Ports
Before connecting a second monitor to your laptop, it’s essential to identify the available display ports on your device. Different laptops come with different port options, so it’s important to check which ones your laptop supports. Here are some common display ports you might find:
- HDMI: HDMI (High-Definition Multimedia Interface) ports are widely used and offer a high-quality digital connection. They allow you to transmit both video and audio signals to the monitor. Most modern laptops have an HDMI port, making it a convenient option.
- DisplayPort: DisplayPort is another popular digital video interface that supports higher resolutions and refresh rates. If your laptop has a DisplayPort, you can connect the monitor using a DisplayPort cable for optimal performance.
- VGA: VGA (Video Graphics Array) ports are older and less common on modern laptops. However, some older laptops still have VGA ports, so if your monitor only supports VGA, you may need to use an HDMI to VGA adapter or a VGA to VGA cable to connect them.
- USB-C/Thunderbolt 3: Newer laptops often come with a USB-C or Thunderbolt 3 port, which provides both power and data transfer capabilities. These versatile ports support connecting external displays using an appropriate adapter or cable.
To find the display ports on your laptop, look for small rectangular or square-shaped ports on the sides or back of the device. They are usually labeled with a symbol or the port name. Additionally, consult your laptop’s user manual or do a quick online search to determine the exact location and specifications of the ports.
Once you have identified the available display ports on your laptop, you can proceed to the next step of selecting the appropriate cables or adapters to connect your second monitor.
Getting the Right Cables
After identifying the display ports on your laptop, the next step is to ensure you have the right cables or adapters to connect your second monitor. The type of cable you need will depend on the available ports on both your laptop and the monitor. Here are some common cable options:
- HDMI Cable: If both your laptop and second monitor have HDMI ports, an HDMI cable is the simplest and most common choice. These cables transmit high-quality video and audio signals, providing a seamless dual monitor experience. Make sure to check the HDMI version (e.g., HDMI 1.4, HDMI 2.0) to ensure compatibility with your devices.
- DisplayPort Cable: If your laptop and monitor both have DisplayPort ports, a DisplayPort cable can deliver excellent video quality and high resolutions. It’s recommended for gaming or professional use that requires fast refresh rates and high image clarity.
- VGA Cable: If your laptop has a VGA port and your monitor supports VGA input, a VGA cable can be used. However, keep in mind that VGA is an analog signal and may result in lower quality compared to HDMI or DisplayPort. You may need an HDMI to VGA or DisplayPort to VGA adapter if your laptop doesn’t have a VGA port.
- USB-C or Thunderbolt 3 Cable: For laptops with USB-C or Thunderbolt 3 ports, you can use a USB-C to HDMI or DisplayPort cable to connect your second monitor. These cables are designed to transmit both video and audio signals and provide power delivery to the monitor.
Before purchasing a cable or adapter, ensure that you verify the compatibility of the ports on both your laptop and the monitor. Consider the length of the cable you need, as longer cables may result in signal degradation. Additionally, ensure that the cable or adapter supports the resolution and refresh rate you want to achieve on your second monitor.
If you’re unsure about the exact cable or adapter you need, consult the user manual of your laptop and monitor or seek assistance from a knowledgeable salesperson or technical support team.
Connecting the Second Monitor
Once you have chosen the right monitor and obtained the necessary cables or adapters, you’re ready to connect your second monitor to your laptop. Follow these steps for a successful connection:
- Turn off both the laptop and the second monitor: Before making any connections, it’s important to turn off both devices to avoid any potential damage or electrical issues.
- Identify the correct ports: Locate the appropriate ports on both your laptop and the second monitor. Ensure that they match the type of cable or adapter you have (e.g., HDMI to HDMI, DisplayPort to DisplayPort).
- Connect the cable: Insert one end of the cable into the corresponding port on your laptop. Then, connect the other end of the cable to the specific port on the second monitor.
- Power on the devices: Once the cable is securely connected, power on both your laptop and the second monitor.
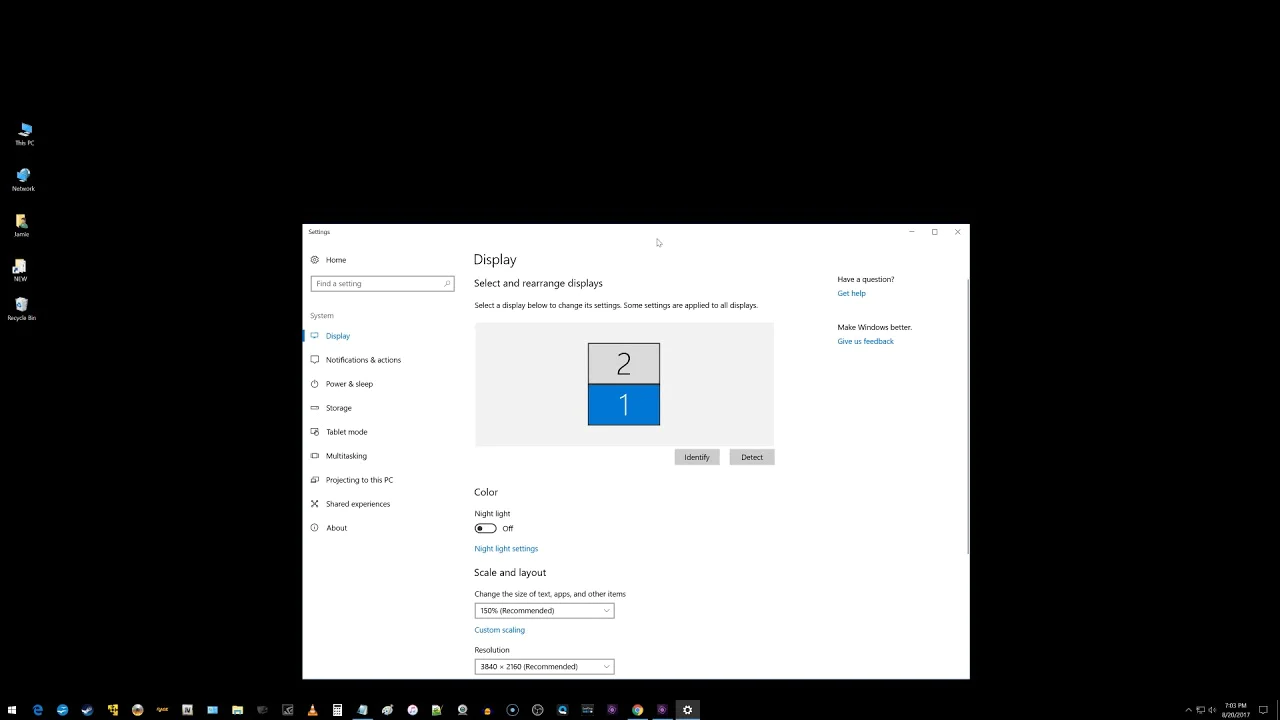
- Adjust display settings: Your laptop should detect the second monitor automatically. However, if it doesn’t, you may need to adjust the display settings. On Windows, go to “Display Settings” by right-clicking on the desktop and selecting “Display Settings.” On macOS, go to “System Preferences” and click on “Displays.”
- Select display mode: Choose whether you want to extend or duplicate the display. In extended mode, you can use the second monitor as an additional workspace. In duplicate mode, both monitors will display the same content.
- Configure resolution and orientation: Adjust the resolution and screen orientation if needed. Ensure that the settings are optimized for both monitors to achieve the desired visual experience.
Once you have completed these steps, your second monitor should be successfully connected to your laptop. You can now enjoy the benefits of a dual monitor setup and take advantage of increased productivity and expanded screen real estate.
Adjusting the Display Settings
After successfully connecting your second monitor to your laptop, you may need to make some adjustments to ensure optimal display settings. Here are some key settings to consider:
- Resolution: The resolution determines the clarity and sharpness of the image on your monitor. Adjust the resolution settings to match the capabilities of your second monitor. For Windows users, navigate to “Display Settings” and choose the desired resolution from the drop-down menu. On macOS, go to “System Preferences” and click on “Displays” to adjust the resolution.
- Orientation: You can choose whether you want your second monitor positioned to the right or left of your primary monitor. This can be adjusted in the display settings as well. Experiment with different orientations to find what works best for your workflow.
- Scaling: Scaling allows you to adjust the size of content on your second monitor. It is especially useful if you have different-sized monitors. Windows users can go to “Display Settings” and select the monitor they want to scale. On macOS, go to “System Preferences,” click on “Displays,” and adjust the scaling settings. Find the right balance to ensure readability and a consistent user experience across both monitors.
- Color Calibration: Color calibration ensures accurate and consistent colors between your laptop and second monitor. You can use built-in calibration tools or third-party software to adjust brightness, contrast, gamma, and color temperature. This is particularly important for graphic designers, photographers, or anyone working with color-sensitive content.
- Display Arrangement: In extended mode, you can arrange the position of your monitors to match their physical placement on your desk. Drag and drop the monitor icons in the display settings to reflect their actual position. This ensures a seamless transition when moving the mouse between monitors.
Take the time to explore and experiment with these display settings to find the configuration that suits your needs and preferences. Keep in mind that adjusting the settings may require some trial and error to achieve the desired results. Regularly review and fine-tune the settings as needed to ensure an optimal dual monitor setup.
Extending or Duplicating the Display
Once you have connected your second monitor to your laptop, you have the option to either extend or duplicate the display. These display modes offer different functionalities and suit various user preferences. Let’s explore the differences between these two modes:
- Extended Display: In extended display mode, your second monitor becomes an extension of your primary monitor. This means you can drag windows and applications from one monitor to another, effectively increasing your available workspace. It is ideal for multitasking, as you can have different applications open on each monitor simultaneously. For example, you can have your email client open on one screen while working on a document on the other.
- Duplicate Display: Duplicate display mode, as the name suggests, mirrors the content on your primary monitor to the second monitor. Both monitors will display the same content simultaneously. This mode is commonly used during presentations or when you want to share your screen with others. It ensures that everyone can view the same content without having to look at a single screen.
To configure the display mode, follow these steps:
- Access Display Settings: Right-click on the desktop and select “Display Settings” for Windows users. On macOS, go to “System Preferences” and click on “Displays.”
- Select Display Mode: In the display settings, look for the “Multiple displays” section. Choose the desired mode from the available options, such as “Extend these displays” or “Duplicate these displays.”
- Adjust Settings: Once you have selected the desired mode, you can further customize the settings. For extended display mode, you can arrange the position of the monitors, adjust the resolution, and select the primary display. In duplicate display mode, you can choose which monitor is the primary one.
- Apply and Save: After making the necessary adjustments, click on “Apply” or “Save” to save the changes. Your monitors will reconfigure according to the selected display mode.
Whether you choose to extend or duplicate the display depends on your specific needs and tasks. Consider the nature of your work and how you plan to utilize the additional screen space to determine the most suitable mode for your dual monitor setup.
Arranging the Position of the Monitors
Once you have connected your second monitor to your laptop and adjusted the display settings, you may want to arrange the physical position of the monitors to match their virtual placement on your desktop. This ensures a smooth and intuitive experience when moving your cursor or windows across screens. Here are some steps to help you arrange the position of your monitors:
- Access Display Settings: Right-click on the desktop and select “Display Settings” for Windows users. On macOS, go to “System Preferences” and click on “Displays.”
- Identify the Monitors: In the display settings, you will see icons representing your connected monitors. Each icon is labeled with its assigned number or name to distinguish between them.
- Drag and Drop: Click and drag the monitor icons within the display settings to rearrange their positions according to the actual physical layout on your desk. For example, if your primary monitor is on the left and the second monitor is on the right, drag the icon representing the second monitor to the right of the primary monitor icon.
- Align Monitor Edges: If your monitors have different resolutions or sizes, you can adjust their positioning to align the top, bottom, left, or right edges. This ensures a seamless transition when moving the cursor or dragging windows between monitors.
- Save Changes: Once you have arranged the position of the monitors to your satisfaction, click on “Apply” or “Save” to save the changes. Your monitors will now reflect the correct virtual positioning.
By aligning the position of your monitors, you create a more intuitive workspace, where the cursor moves smoothly between screens and windows snap to the desired location. This setup enhances productivity and makes it easier to manage tasks across multiple monitors.
Remember that you can always readjust the position of the monitors in the display settings if your physical setup changes or if you prefer a different configuration. Experiment with different arrangements to find the positioning that works best for you.
Troubleshooting Common Issues
While connecting and setting up a second monitor to your laptop can be a straightforward process, you may encounter some common issues along the way. Here are a few troubleshooting tips to help you address these issues:
- No Display on the Second Monitor: If your second monitor is not displaying anything, double-check the connections to ensure that the cables are securely plugged in. Also, confirm that the monitor is powered on and set to the correct input source. Try restarting your laptop and monitor to establish a fresh connection.
- Incorrect Screen Resolution: If the resolution on your second monitor is not at the desired level, go to the display settings and adjust the resolution manually. Ensure that the selected resolution is supported by your monitor and compatible with your laptop’s graphics capabilities.
- No Sound on the Second Monitor: If you’re not getting any audio output from the second monitor, check if your monitor has built-in speakers or an audio output. Ensure that the sound is not muted or turned down on both your laptop and the monitor. If necessary, go to the sound settings and select the correct audio output device.
- Inconsistent Display Colors: If the colors on your second monitor appear different or distorted compared to your laptop’s display, try adjusting the color settings on the monitor itself. You can also perform a color calibration, as mentioned earlier, to ensure accurate color representation.
- Performance Issues: If you experience performance issues such as lag or sluggishness, check your laptop’s graphics drivers for updates. Outdated or incompatible drivers can affect the performance of your dual monitor setup. Visit the manufacturer’s website or use a driver update tool to ensure you have the latest drivers installed.
- Unexpected Monitor Disconnect: If your second monitor randomly disconnects or loses the signal, ensure that the cables are securely connected. Check if the cables are damaged or if the ports are loose. If the issue persists, try using a different cable or port to isolate the problem.
If you encounter persistent issues that you are unable to resolve, consult the user manual for your laptop and monitor or contact the manufacturer’s technical support for further assistance. They can provide specific troubleshooting steps or identify if there is a hardware issue involved.
Remember, patience and persistence are key when troubleshooting. By following these tips and seeking appropriate support when needed, you can overcome common issues and enjoy a smooth and hassle-free dual monitor experience.
Conclusion
Connecting a second monitor to your laptop can greatly enhance your productivity and provide a more immersive computing experience. By following the steps outlined in this guide, you can successfully connect and set up a dual monitor system. Here’s a quick recap of the main points covered:
- Choose the right monitor for your needs based on factors such as size, resolution, refresh rate, and connectivity options.
- Check your laptop’s display ports to ensure compatibility with the monitor.
- Obtain the correct cables or adapters required to connect your laptop to the second monitor.
- Properly connect the second monitor to your laptop and adjust the display settings as needed.
- Select the desired display mode – extended or duplicate – depending on your workflow and tasks.
- Arrange the position of the monitors in the display settings to match their physical layout on your desk.
- Troubleshoot common issues that may arise during the setup process.
Remember to experiment and fine-tune the settings based on your specific preferences and needs. A well-configured dual monitor setup can significantly boost your productivity, whether you’re a student, professional, or an avid gamer.
Lastly, don’t hesitate to seek assistance from manufacturer support or online forums if you encounter any challenging issues or require further guidance. Enjoy the benefits of a dual monitor setup and make the most of your computing experience!