Introduction
Are you tired of working on a small computer screen? Do you find yourself constantly switching between different windows or applications because your screen is too cluttered? If so, it may be time to extend your screen on Windows. By connecting a second monitor to your computer, you can significantly increase your workspace and improve your productivity.
Expanding your screen on Windows is a simple and straightforward process. In this guide, we will walk you through the steps to extend your screen and make the most out of your dual monitor setup.
Before we dive into the steps, it’s important to note that not all computers have the necessary ports to connect a second monitor. So, in the first step, we will help you check if your computer supports dual monitors. If it does, we’ll proceed with the rest of the process. If not, don’t worry – there are alternative solutions that we will explore.
So, let’s get started and turn your single monitor setup into a double delight! Follow the steps below to extend your screen on Windows and enjoy the benefits of a larger workspace.
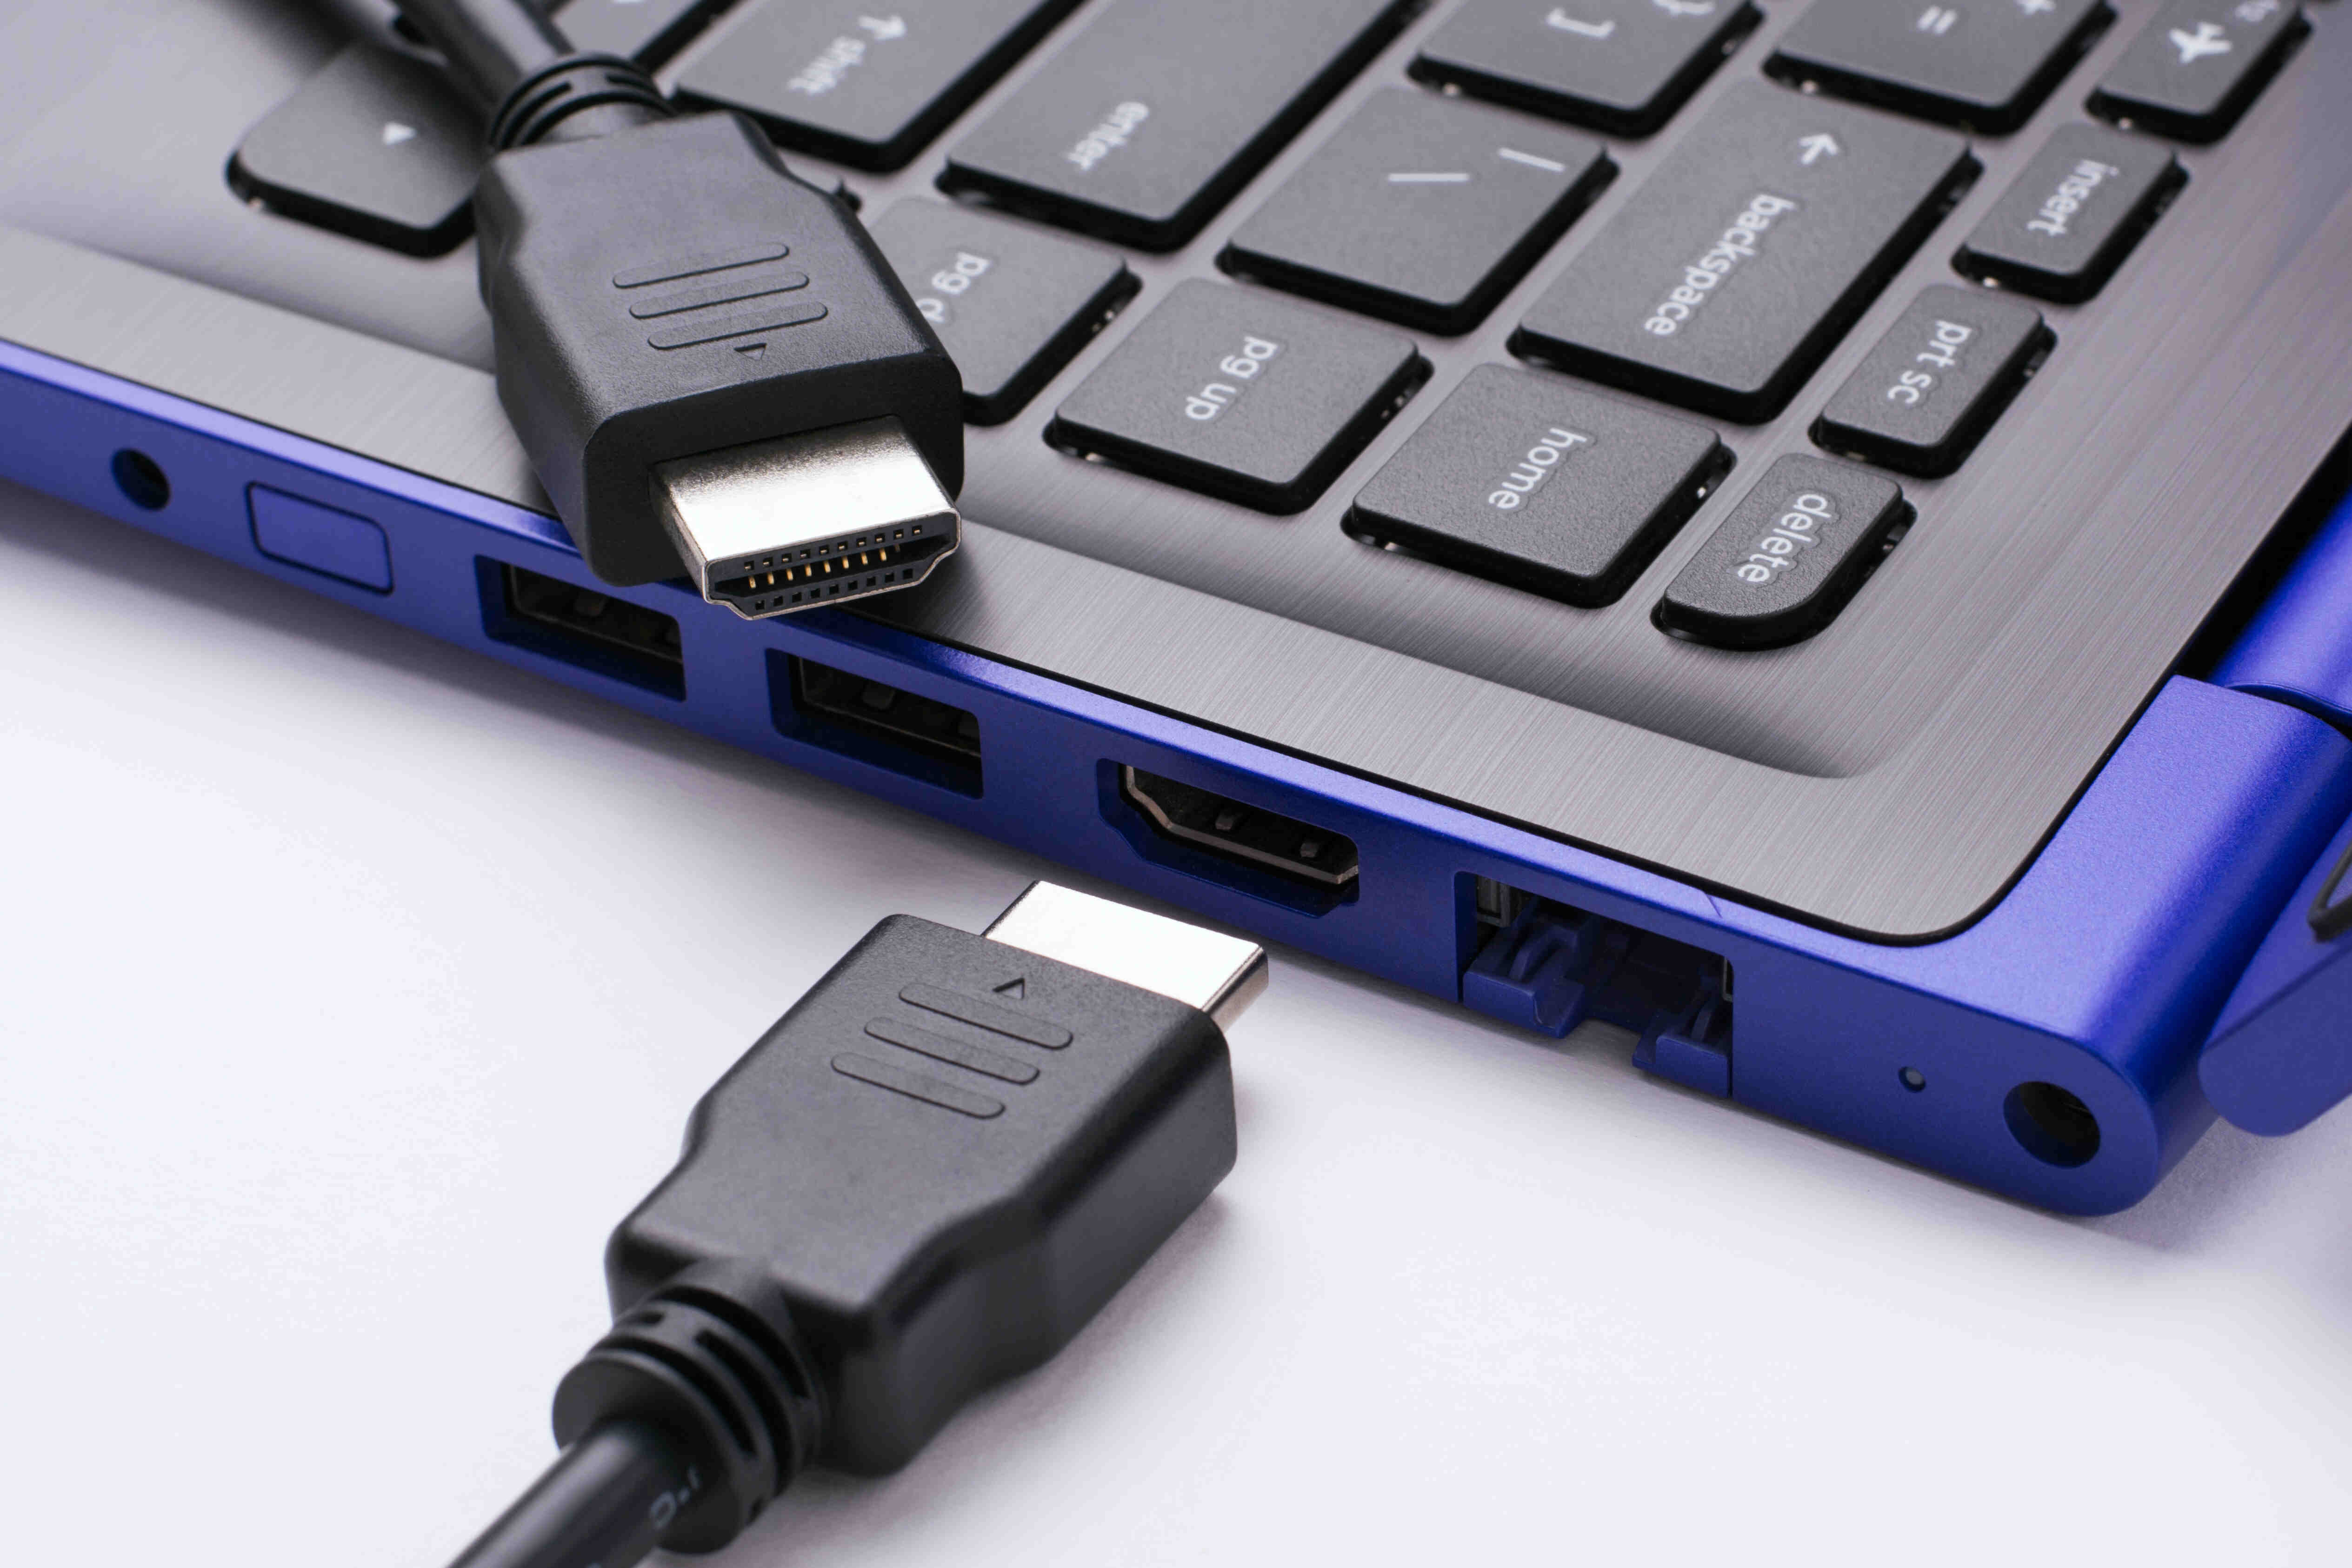
Step 1: Check your computer’s ports
Before you can connect a second monitor to your computer, it’s important to ensure that your computer has the necessary ports. The type of port you need depends on the monitor you have and the available ports on your computer. Here are the most common types of ports:
- HDMI: High-Definition Multimedia Interface is the most common port found on modern monitors and computers. It provides high-quality audio and video transmission.
- VGA: Video Graphics Array is an older analog port that is still widely used. It provides decent video quality but doesn’t carry audio signals.
- DVI: Digital Visual Interface is a digital port that provides better video quality than VGA. Like VGA, it doesn’t support audio signals.
- DisplayPort: DisplayPort is a versatile digital port that supports high-resolution displays and audio transmission.
- USB-C: USB-C ports are becoming increasingly popular and can also be used for connecting monitors. These ports support video and audio signals, as well as data transfer and charging.
To check the ports available on your computer, simply look at the back or side of your computer tower or the sides of your laptop. You should be able to identify the ports by their respective labels or symbols.
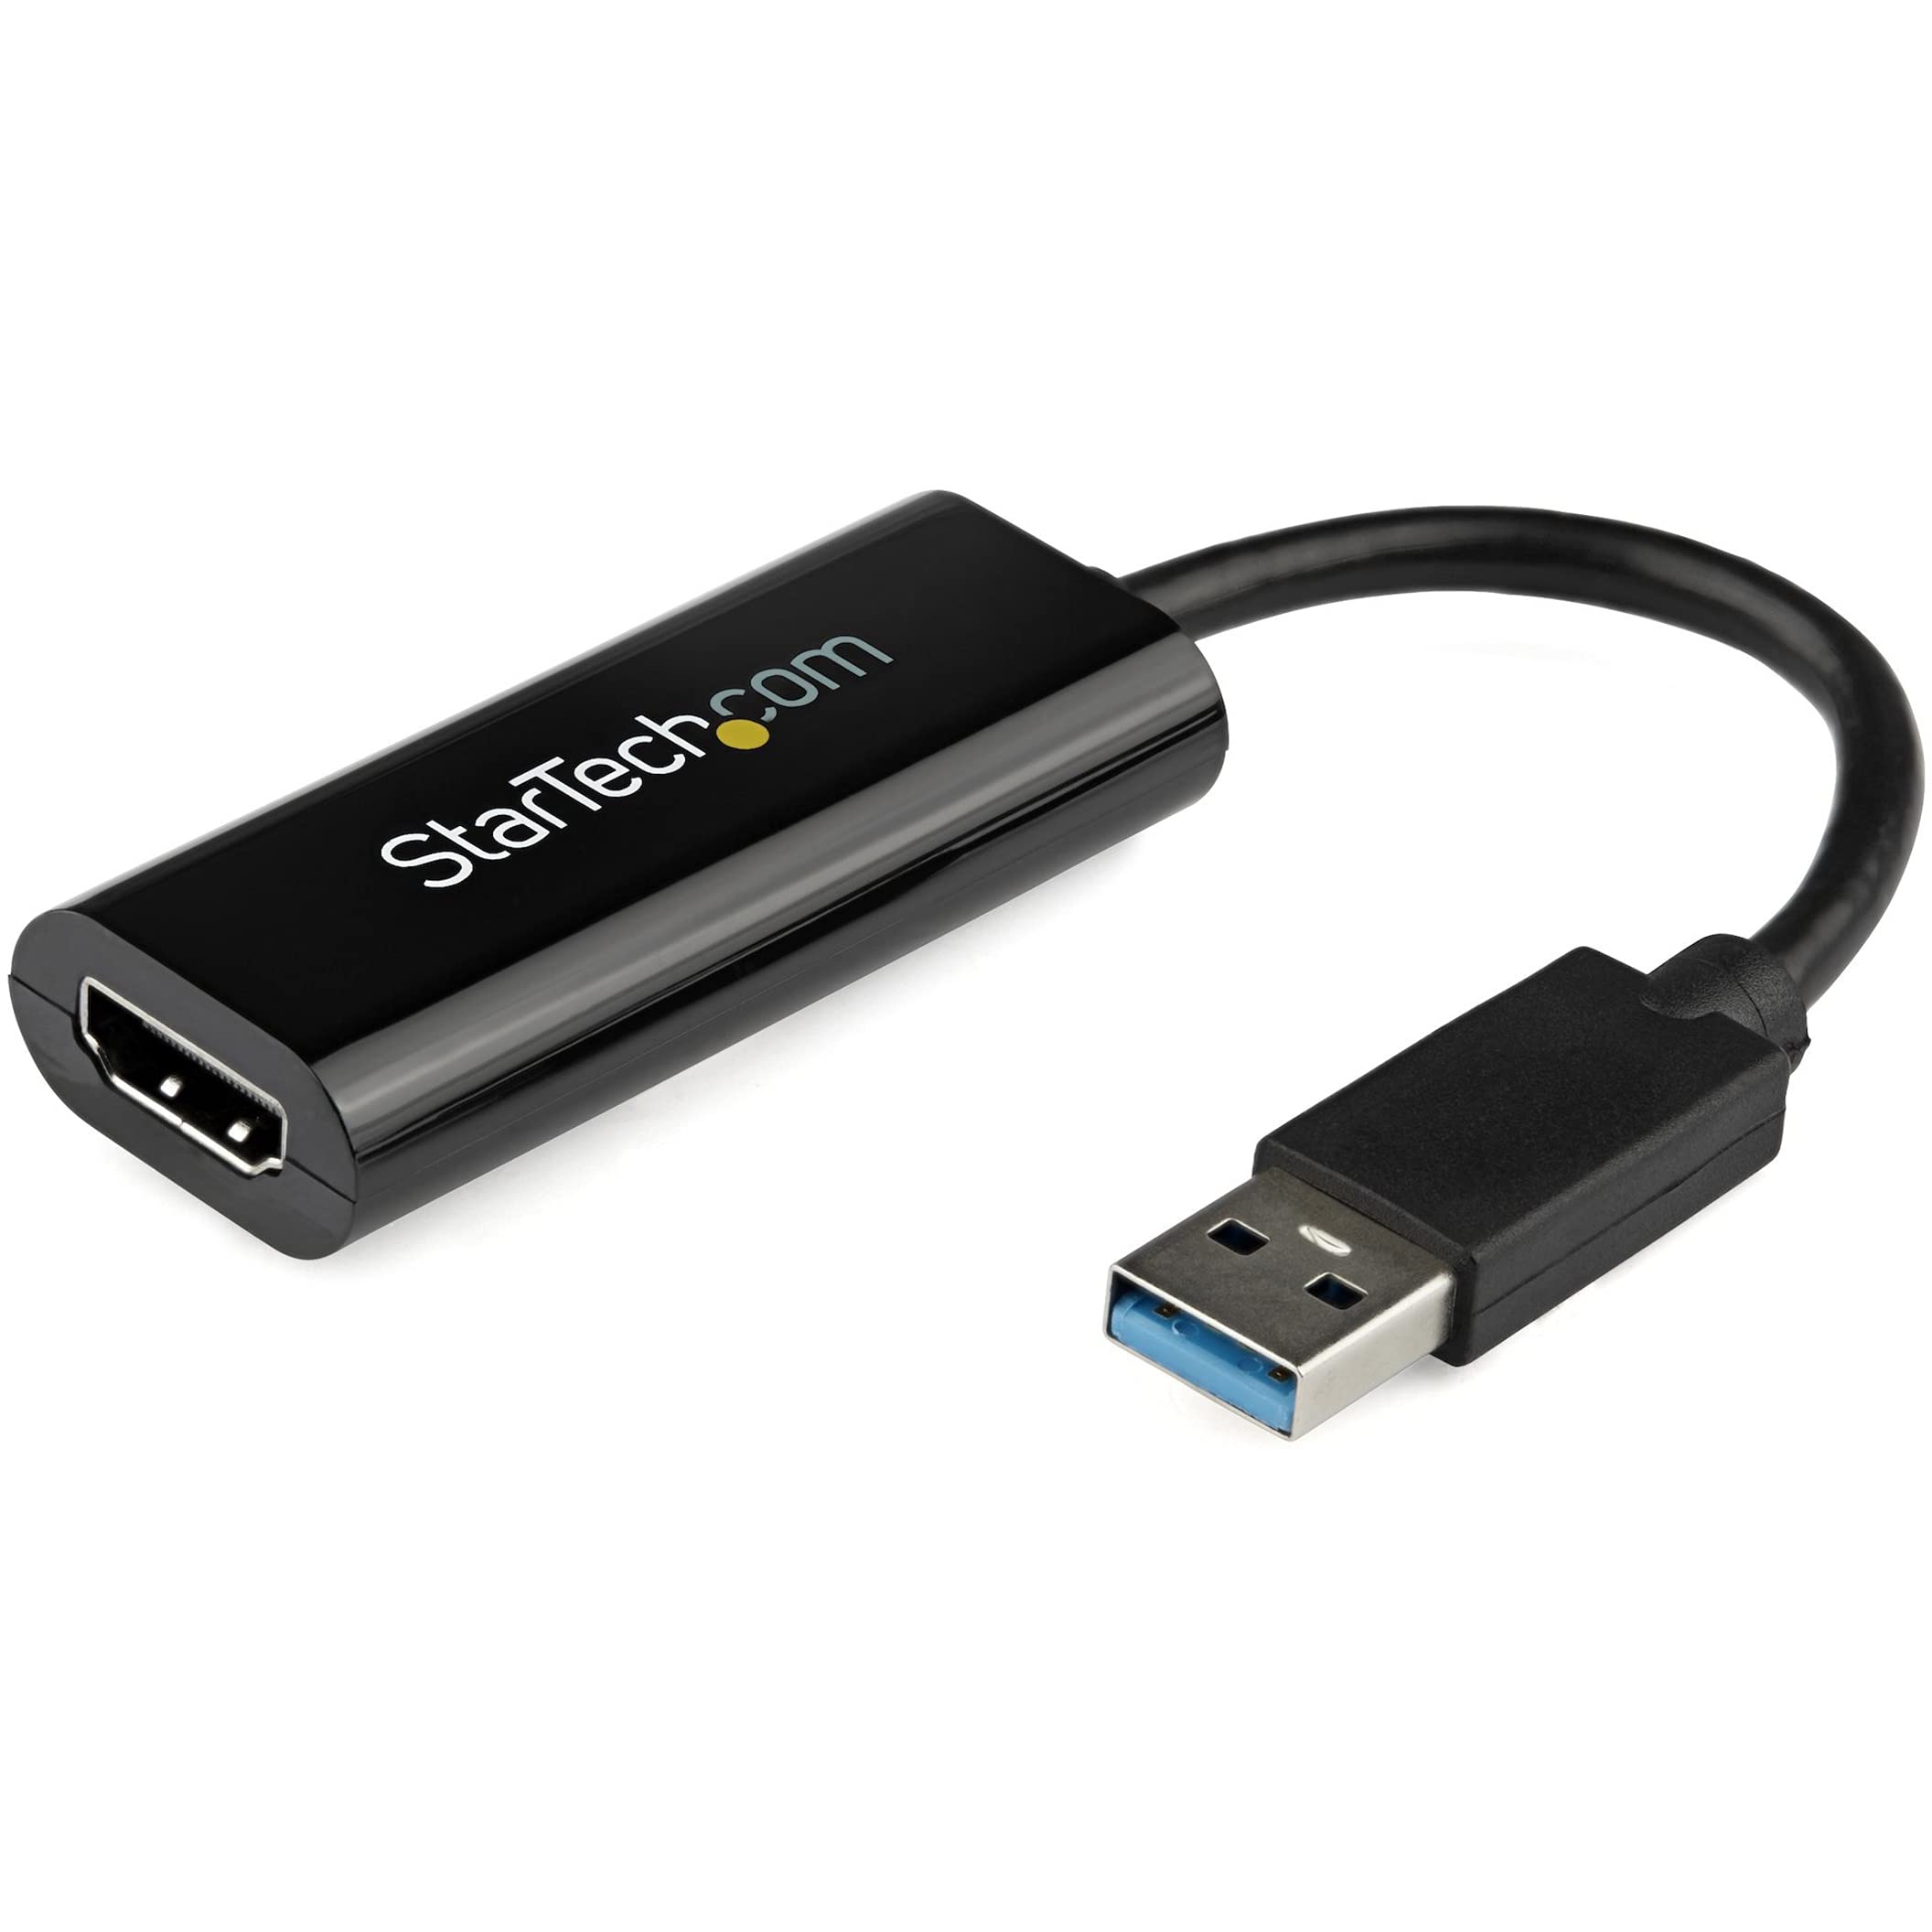
If your computer doesn’t have the necessary ports to connect a second monitor, don’t worry! There are alternative solutions available. You can use a docking station or an external graphics card to add additional ports to your computer. These solutions may require additional setup and hardware, so make sure to research and choose the best option for your needs.
Once you’ve confirmed that your computer has the required ports, you’re ready to move on to the next step: connecting the second monitor.
Step 2: Connect the second monitor
Now that you have verified that your computer has the necessary ports, it’s time to connect the second monitor. Follow these simple steps to get started:
- Power off your computer and the second monitor. This is an important step to ensure a smooth connection.
- Locate the appropriate cable for connecting your computer to the second monitor. Depending on the ports available, you may need an HDMI, VGA, DVI, DisplayPort, or USB-C cable.
- Connect one end of the cable to the respective port on the second monitor.
- Connect the other end of the cable to the corresponding port on your computer.
- Double-check the connections to ensure they are secure.
- Power on your computer and the second monitor.
Once the connections are established and both your computer and the second monitor are powered on, your computer should automatically detect the second monitor. If it doesn’t, you may need to adjust the display settings which we will cover in the next step.
If you are using a laptop, you can also connect the second monitor by using a docking station or a USB graphics adapter. These options provide flexibility and convenience in connecting multiple monitors to your laptop.
Congratulations! You have successfully connected the second monitor to your computer. Now, let’s move on to the next step and adjust the display settings to extend your screen.
Step 3: Adjust display settings
After connecting the second monitor to your computer, it’s time to adjust the display settings to ensure that both monitors work seamlessly together. Follow these steps to adjust the display settings:
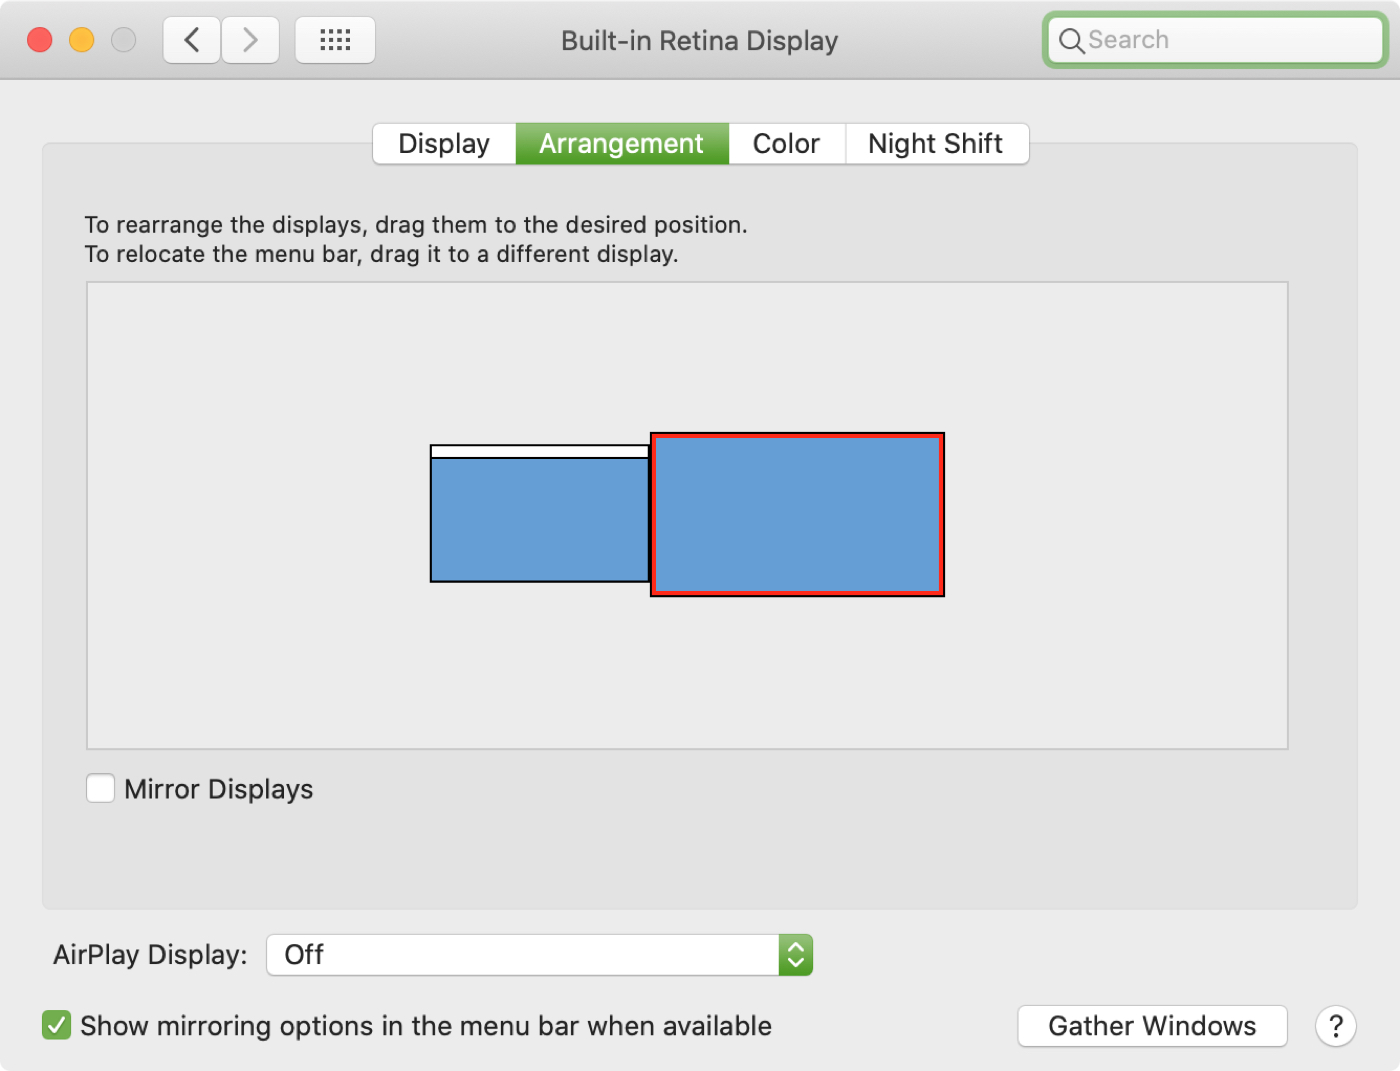
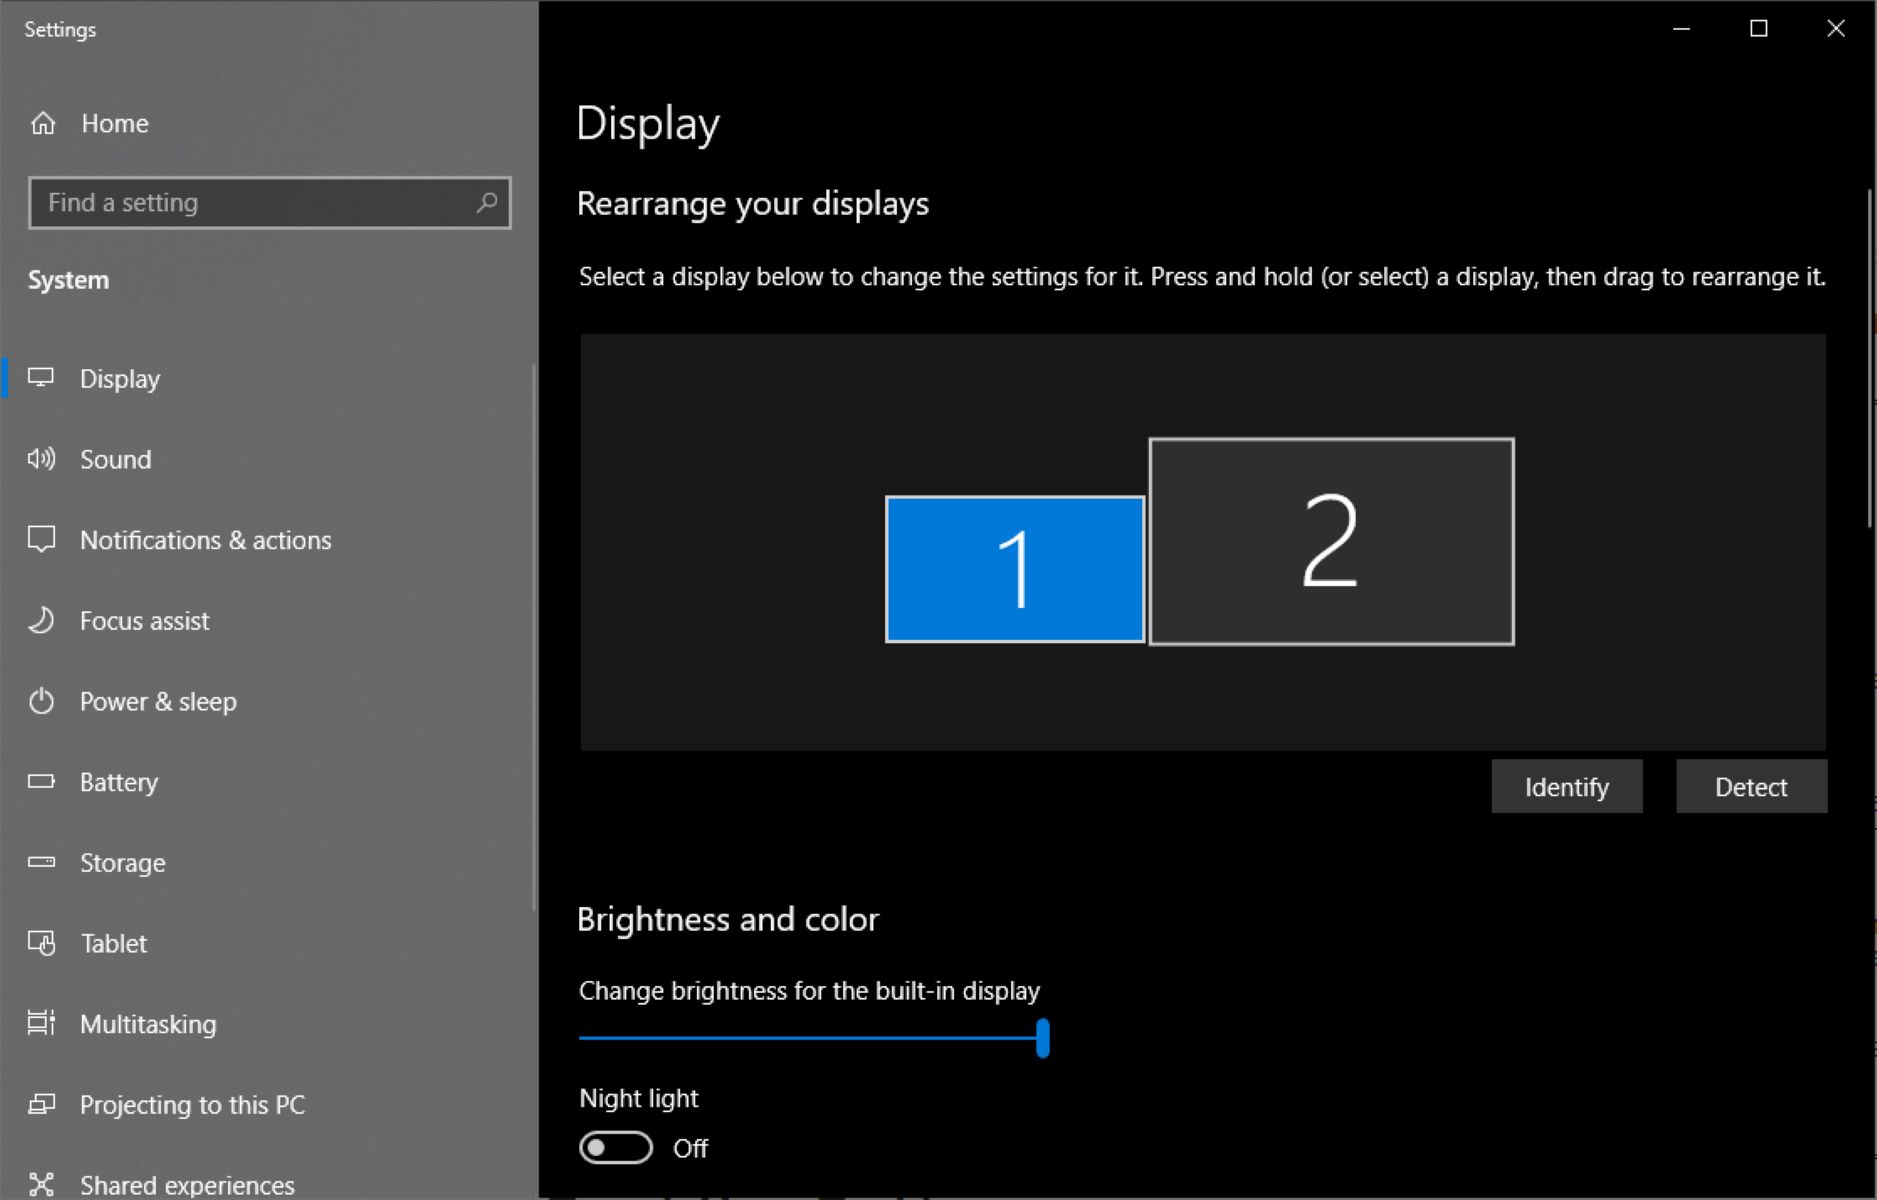
- Right-click on the desktop and select “Display settings” from the context menu.
- In the Display settings window, you will see a representation of your monitors.
- Under the “Multiple displays” section, you should see an option to “Extend these displays”. Select this option.
- Drag and drop the representation of the second monitor to the desired position relative to your first monitor. This will determine how the screens are arranged spatially.
- Click on the “Apply” button to save the changes.
With the display settings adjusted, your computer will treat the two monitors as one extended display. This means that you can move windows and applications between the two screens, effectively expanding your workspace.
Additionally, you may also notice some additional settings in the Display settings window. These settings allow you to customize the resolution, orientation, and scaling of the monitors to suit your preferences. Feel free to explore these options and tweak them to optimize your dual monitor experience.
It’s worth mentioning that while extending your screen, you can also choose to “Duplicate” the display, which will mirror the content on both monitors. This can be useful for presentations or situations where you want to share the same content on both screens.
With the display settings adjusted, you’re now ready to enjoy the benefits of an extended screen. However, there are some additional customization options that you can explore, which we will cover in the next step.
Step 4: Extend your screen
Now that you have adjusted the display settings and arranged your monitors, it’s time to actually extend your screen and make use of the additional workspace. Follow these steps:
- Open any application or window on your computer.
- Click and drag the window to the edge of your primary monitor until it moves onto the second monitor.
- Release the mouse button to drop the window onto the extended screen.
By dragging windows from your primary monitor to the secondary monitor, you are effectively extending your screen and utilizing the extra space. You can continue to open and move multiple windows and applications between the two screens to maximize your productivity.
It’s important to note that some applications may not automatically adjust to the extended screen. In such cases, you may need to manually resize the application window to fit the desired screen.
In addition to dragging windows, you can also use keyboard shortcuts to move windows between monitors. For example, pressing the Windows key + Shift + Arrow key (left or right) will move the active window to the adjacent monitor.
Remember that the extended screen is just like an expansion of your primary monitor, so you can treat it as a separate workspace. This means you can have different windows, applications, and tasks running simultaneously on each monitor, improving multitasking and overall efficiency.
Congratulations! You have successfully extended your screen on Windows and can now enjoy the benefits of a larger, more productive workspace.
In the next step, we will explore some additional customization options to further enhance your dual monitor setup.
Step 5: Arrange your screens
Now that your screens are extended and you’ve familiarized yourself with the basic functionality, it’s time to fine-tune the arrangement of your screens to suit your preferences. Follow these steps to arrange your screens:
- Open the Display settings by right-clicking on the desktop and selecting “Display settings”.
- Under the “Multiple displays” section, you will see the representation of your monitors.
- Click and drag the representation of the monitors to rearrange their physical positions, effectively changing the spatial arrangement of your screens.
- Once you are satisfied with the new arrangement, click on the “Apply” button to save the changes.
By rearranging your screens, you can ensure that the physical layout matches the virtual layout on your desktop. For example, if you have one monitor positioned to the right of the other, you can reflect this arrangement in the display settings to ensure a more intuitive experience when moving windows between monitors.
Furthermore, you can also adjust the scaling and orientation of individual monitors to optimize their display. This can be particularly useful if you have monitors of different sizes or resolutions. Experiment with these settings to find the configuration that works best for you.
It’s worth noting that you may also have additional customization options available through your graphics card’s control panel. These settings can provide further control over aspects like color balance, refresh rate, and advanced display features. Explore the control panel specific to your graphics card for more options.
With your screens arranged to perfection, you’re now ready to enjoy a personalized and efficient dual monitor setup. Having a customized arrangement can significantly enhance your workflow and make multitasking a breeze.
In the next step, we will delve into some additional display settings and advanced customization options to further optimize your dual monitor experience.
Step 6: Customize display settings
After arranging your screens, you may want to customize the display settings further to enhance your dual monitor setup. Follow these steps to explore and customize the display settings:
- Open the Display settings by right-clicking on the desktop and selecting “Display settings”.
- Scroll down and click on the “Advanced display settings” link.
- In the Advanced display settings window, you will find additional options to tweak and customize your monitors.
- Resolution: Adjust the resolution of each monitor to match its native resolution for optimal clarity and image quality.
- Orientation: Change the orientation of individual monitors to landscape, portrait, or flipped modes to best suit your needs.
- Color calibration: Fine-tune the color balance, contrast, and brightness of each monitor to ensure accurate and consistent color reproduction.
- Refresh rate: Set the refresh rate of your monitors to reduce screen flickering and improve visual smoothness.
- Multiple displays: Here, you can choose the primary display if you prefer one monitor to be the main screen.
Take your time to experiment with these settings and find the configuration that suits your preferences and enhances your viewing experience. Every monitor and user has unique requirements, so don’t be afraid to customize accordingly.
Additionally, if you are using a graphics card from a specific manufacturer, such as Nvidia or AMD, you may have access to their respective graphics control panel. These control panels offer advanced display settings and features specific to the graphics card, allowing you to further fine-tune the dual monitor experience. Explore the control panel software for more customization options.
Remember, the goal of customizing the display settings is to create a comfortable and personalized dual monitor setup. Finding the right balance of resolution, color, and orientation can greatly improve your productivity and enjoyment when working across multiple screens.
In the next and final step, we will address some common troubleshooting issues you may encounter and provide solutions to overcome them.
Step 7: Troubleshooting common issues
While setting up and configuring a dual monitor setup is typically a smooth process, you may encounter some common issues along the way. Here are a few troubleshooting tips to help you overcome these issues:
- No display on the second monitor: If your second monitor is not displaying anything, make sure all cable connections are secure. Try restarting your computer and double-checking the display settings to ensure the second monitor is properly recognized.
- Resolution mismatch: If the resolution on your second monitor doesn’t match its native resolution, go to the display settings and adjust the resolution accordingly. Choosing the incorrect resolution can result in a distorted or blurry image.
- Screen flickering: If one or both of your monitors are experiencing flickering, try adjusting the refresh rate in the display settings. Lowering the refresh rate can often resolve this issue.
- Uneven screen brightness: If you notice a difference in brightness between your monitors, adjust the brightness settings on each monitor individually. Some monitors may also have built-in settings to equalize brightness levels.
- Application window not moving: If you are unable to move an application window between monitors, make sure it is not maximized or in full-screen mode. You may need to resize the window to a smaller size before moving it.
- Black borders or underscan: If you are experiencing black borders or underscan on your second monitor, it could be due to overscan settings. Go to your graphics card control panel and adjust the overscan or scaling settings to fit the screen properly.
- Driver issues: If you encounter persistent issues, it is advisable to ensure your graphics card drivers are up to date. Visit the manufacturer’s website and download the latest drivers for your specific graphics card model.
Remember that troubleshooting may vary depending on your specific hardware, graphics card, and operating system. Consult the documentation or support resources for your specific devices if you encounter any persistent issues.
By following these troubleshooting steps, you can overcome common issues and ensure a smooth dual monitor experience. Don’t get discouraged if you encounter difficulties – with a little patience and persistence, you’ll be enjoying the benefits of your extended screen setup in no time.
Conclusion
By following the steps outlined in this guide, you have successfully learned how to extend your screen on Windows and create a dual monitor setup. Connecting a second monitor to your computer can significantly improve your productivity by providing a larger workspace and reducing the need to constantly switch between windows and applications.
In this guide, we started by checking the ports on your computer to ensure compatibility with a second monitor. We then walked through the process of connecting the second monitor and adjusting the display settings to extend your screen. Additionally, we discussed how to arrange and customize your screens to optimize your dual monitor experience.
Throughout the process, we provided troubleshooting tips for common issues you may encounter. Remember, every setup is unique, and patience and persistence are key in troubleshooting any potential problems.
Now that you have successfully set up your extended screen, embrace the expanded workspace and enjoy increased productivity. Take advantage of the ability to quickly move windows between monitors and customize your display settings to suit your preferences.
As you continue to use your dual monitor setup, don’t hesitate to explore additional features and settings provided by your graphics card control panel or monitor manufacturer. These can further enhance your experience and allow for customization based on your specific needs.
Whether you’re a professional seeking a more efficient workflow, a gamer looking for an immersive gaming experience, or a multitasker needing additional screen real estate, an extended screen setup can significantly improve your computing experience.
So, embrace the power of dual monitors and unlock the full potential of your computer setup. Enjoy the flexibility, increased productivity, and enhanced visual experience that comes with a larger workspace.